| |

 |
|


27 Years
on the Web!
|
|
Boot Disk
The
fastest way to correct the majority of all problems with old games is to
make a boot disk. The main function of a boot disk is to configure your
system optimally for a specific application or game. The boot
disk removes any applications or programs that might conflict with the
game and optimally configures the memory to meet the game's
requirements. Creating a boot disk will not alter the startup files on your
hard drive. To restore your system to "normal", simply remove the
boot disk and restart your computer.
Unfortunately, since
everyone's systems are not exactly the same, a degree of "tinkering" is
required from time to time.
|
BOOT DISK
MAKER
This
executable file will make a boot floppy that has been especially
optimized for best DOS game performance. It includes emm386 hi-memory
manager, a mouse driver, and configuration for Sound Blaster emulation
drivers (note, these drivers have to be downloaded below). Just
double-click the executable, insert a floppy into the drive, and the
rest is done by the program.
Sound
Blaster emulation drivers
This driver emulates sound in DOS mode for newer generation
Creative Labs Sound Blasters. These include SB Live!, SB 128, SB 64
and similar. The manual that explains how to set the default values is
included, but if you download the Boot Disk Maker, all the values have
already been set. All you have to do is copy them to a directory that
is specified in autoexec.bat on the floppy. |
Instructions For Making a Boot Disk Manually
If
Windows 95 is preinstalled on your system, the DOS
drivers (CD-ROM drive, video card, mouse, and sound card.) may not be
present. Please contact your computer manufacturer
for the DOS drivers for the hardware stated above and then add these new
drivers to the boot disk.
Check
out Examples Of Startup Files for information on startup files (AUTOEXEC.BAT
and
CONFIG.SYS).
Click on
the operating system that you are using to view custom boot disk
instructions:
-
WINDOWS 95
-
WINDOWS 3.X and DOS
BOOT
DISK INSTRUCTIONS FOR WINDOWS 95/98
We recommend using a new unformatted floppy disk. If you have high
density disk drives, use only high density disks.
- Exit Windows 95/98 To MS-DOS Mode.
- Click on the "START" button
- Click on "SHUT DOWN"
- Select "RESTART YOUR COMPUTER IN MS-DOS MODE"
- At your Windows prompt type: CD\ <ENTER>
- Format The Disk As A System Disk.
- Place the high density diskette in your "A" drive.
- At your C:\ prompt type: FORMAT A: /S <ENTER>
This will format the diskette in the "A" drive and copy the
system files to it.
- Copy Necessary Files To The Boot Disk.
- At your C:\ prompt type: COPY CONFIG.SYS A: <ENTER>
It should respond with "1 file(s) copied."
- Then type: COPY AUTOEXEC.BAT A: <ENTER>
It should respond with "1 file(s) copied."
- Change To Your "A" Drive And Confirm That The Files Are Present.
- At your C:\ prompt type: A: <ENTER>
Your prompt should change to A:\ then type: DIR <ENTER>
You should see a list of three files:
- COMMAND.COM
- CONFIG.SYS
- AUTOEXEC.BAT
- If you see these three files present your boot disk is now complete
and ready to be edited as necessary. If not, repeat the procedures above
or try using a different diskette.
- Edit The CONFIG.SYS And AUTOEXEC.BAT To Resemble The Ones Provided
Below.
Make sure that you leave in any lines that pertain to your CD-ROM or
soundcard. Also, if you are using a disk compression utility such as
Stacker or Doublespace, you must leave in the necessary device driver
lines.
- Edit The CONFIG.SYS File
- Change to your "A" drive by typing: A: <ENTER>
- Type EDIT CONFIG.SYS <ENTER>
- Please edit your CONFIG.SYS file on the boot disk as follows:
DEVICEHIGH=C:\WINDOWS\HIMEM.SYS
DEVICEHIGH=C:\WINDOWS\EMM386.EXE 4096 RAM D=256 I=B000-B7FF
[See note for AST Computers]*
DEVICEHIGH=C:\WINDOWS\DRVSPACE.SYS /MOVE
[See Special Note]**
DOS=HIGH,UMB
DEVICEHIGH=[Sound card driver lines]
DEVICEHIGH=[CD-ROM driver line]***
FILES=40
BUFFERS=40
STACKS=9,256
LASTDRIVE=Z
*AST Computers need to include X=C000-CFFF at the end
of the EMM386 statement. For example: DEVICEHIGH=C:\WINDOWS\EMM386.EXE
4096 RAM D=256 I=B000-B7FF X=C000-CFFF
** Special Note: Do NOT add this line if you
do not have either the DRVSPACE.SYS or DBLSPACE.SYS lines are in your
CONFIG.SYS on your hard drive. If one of the two lines is present then
it MUST be added as shown above. In the case of the presence of
DBLSPACE.SYS, simply substitute the DBLSPACE.SYS in place of the
DRVSPACE.SYS.
*** CD-ROM Drivers: The CD-ROM drive line is only required
on CD-ROM games. If you are making a boot disk for a floppy disk game
(i.e., Monkey Island 1) then you can omit the CD-ROM driver
line from the boot disk.
When you are finished editing the CONFIG.SYS file, save your
changes. To save changes:
- Hold down the ALT key and press the letter "F".
A menu box should appear in the upper left hand corner.
- Press the letter "X" to select "EXIT."
A screen prompting you to save the file should appear.
- Press the letter "Y" to answer "Yes" to save the
file.
This action should save the file and return you to an A:\ prompt.
- Edit The AUTOEXEC.BAT File
- Change to your "A" drive by typing: A: <ENTER>
- At your "A" drive, type: EDIT AUTOEXEC.BAT <ENTER>
AUTOEXEC.BAT <ENTER>
- Please edit the AUTOEXEC.BAT file on the boot disk as follows:
PATH=C:\WINDOWS;C:\WINDOWS\COMMAND
LH [Add sound card driver lines here]
SET BLASTER= [Copy this line from the C:\ drive]
LH [Add CD-ROM driver line] *
LH [Add the mouse driver here] **
C:
* The CD-ROM drive line is only required on
CD-ROM games. Here is an example of a CD-ROM driver line in the
autoexec.bat file:
C:\WINDOWS\COMMAND\MSCDEX.EXE /D:MSCD001 /M:10
If you are making a boot disk for a floppy disk game then you can omit the CD-ROM driver
line from the boot disk.
** On some joystick intensive games, we do not
recommend loading the mouse driver since it may conflict with the
joystick. Examples of joystick intensive games are X-Wing and
TIE Fighter.
- When you are finished editing the AUTOEXEC.BAT file, save your
changes. To save changes:
- Hold down the ALT key and press the letter "F".
A menu box should appear in the upper left hand corner.
- Press the letter "X" to select "EXIT."
A screen prompting you to save the file should appear.
- Press the letter "Y" to answer "Yes" to save the
file.
This action should save the file and return you to an A:\ prompt.
- Restart The Computer With The Boot Disk In The "A" Drive.
- Once the CONFIG.SYS and AUTOEXEC.BAT have been edited,
your boot disk is ready to be used. Reboot the system by either using a
warm or cold boot. The computer will boot you to: C\:>
- Warm boot: First, leave the boot disk in the "A"
drive. Hold down the CTRL and ALT keys at the same time,
while holding these keys down, press the DEL key. This will
reboot your computer. If your are having trouble with a warm boot, try a
cold boot.
- Cold boot: First, remove all disks out of disk drives. Turn
off the computer manually and wait for the machine to stop running.
Place the boot disk in the "A" drive and turn on the machine.
- Follow The Game's Instructions On How To Enter The Game From DOS.

BOOT DISK INSTRUCTIONS FOR WINDOWS 3.X AND
DOS
We recommend using a new unformatted floppy disk. If you have high
density disk drives, use only high density disks.
- Exit Windows95 To MS-DOS Mode.
- Click on "FILE" from the "PROGRAM MANAGER" in Windows.
- Select "EXIT WINDOWS"
A window will appear "THIS WILL END YOUR WINDOWS SESSION."
- Select "OK"
- Format The Disk As A System Disk.
- Place the high density diskette in your "A" drive.
- At your C:\ prompt type: FORMAT A: /S <ENTER>
This will format the diskette in the "A" drive and copy the
system files to it.
- Copy Necessary Files To The Boot Disk.
- At your C:\ prompt type: COPY CONFIG.SYS A: <ENTER>
It should respond with "1 file(s) copied."
- Then type: COPY AUTOEXEC.BAT A: <ENTER>
It should respond with "1 file(s) copied."
- Change To Your "A" Drive And Confirm That The Files Are Present.
- At your C:\ prompt type: A: <ENTER>
Your prompt should change to A:\ then type: DIR <ENTER>
You should see a list of three files:
- COMMAND.COM
- CONFIG.SYS
- AUTOEXEC.BAT
- If you see these three files present your boot disk is now complete
and ready to be edited as necessary. If not, repeat the procedures above
or try using a different diskette.
- Edit The CONFIG.SYS And AUTOEXEC.BAT To Resemble The Ones Provided
Below.
Make sure that you leave in any lines that pertain to your CD-ROM or
soundcard. Also, if you are using a disk compression utility such as
Stacker or Doublespace, you must leave in the necessary device driver
lines.
- Edit The CONFIG.SYS File
- Change to your "A" drive by typing: A: <ENTER>
- Type: EDIT CONFIG.SYS <ENTER>
- Please edit your CONFIG.SYS file on the boot disk as follows:
DEVICEHIGH=C:\WINDOWS\HIMEM.SYS
DEVICEHIGH=C:\WINDOWS\EMM386.EXE 4096 RAM D=256 I=B000-B7FF
[See note for AST Computers] *
DEVICEHIGH=C:\WINDOWS\DRVSPACE.SYS /MOVE
[See Special Note] **
DOS=HIGH,UMB
DEVICEHIGH=[Sound card driver lines]
DEVICEHIGH=[CD-ROM driver line] ***
FILES=40
BUFFERS=40
STACKS=9,256
LASTDRIVE=Z
* AST Computers need to include X=C000-CFFF at the
end of the EMM386 statement. For example: DEVICEHIGH=C:\WINDOWS\EMM386.EXE
4096 RAM D=256 I=B000-B7FF X=C000-CFFF>
** Special Note: Do NOT add this line if you do not
have either the DRVSPACE.SYS or DBLSPACE.SYS lines are in your
CONFIG.SYS on your hard drive. If one of the two lines is present then
it MUST be added as shown above. In the case of the presence of
DBLSPACE.SYS, simply substitute the DBLSPACE.SYS in place of the
DRVSPACE.SYS.
*** CD-ROM Drivers: The CD-ROM drive line is only required
on CD-ROM games. If you are making a boot disk for a floppy disk game
(i.e., Monkey Island 1) then you can omit the CD-ROM driver
line from the boot disk.
- When you are finished editing the CONFIG.SYS file, save your
changes. To save changes:
- Hold down the ALT key and press the letter "F".
A menu box should appear in the upper left hand corner.
- Press the letter "X" to select "EXIT."
A screen prompting you to save the file should appear.
- Press the letter "Y" to answer "Yes" to save the
file.
This action should save the file and return you to an A:\ prompt.
- Edit The AUTOEXEC.BAT File
- Change to your "A" drive by typing: A: <ENTER>
- At your "A" drive and type: EDIT AUTOEXEC.BAT <ENTER>
- Please edit the AUTOEXEC.BAT file on the boot disk as follows:
PATH=C:\WINDOWS;C:\WINDOWS\COMMAND
LH [Add sound card driver lines here]
SET BLASTER= [Copy this line from the C:\ drive]
LH [Add CD-ROM driver line] *
LH [Add the mouse driver here] **
C:
* The CD-ROM drive line is only required on
CD-ROM games. Here is an example of a CD-ROM driver line in the
autoexec.bat file:
C:\WINDOWS\COMMAND\MSCDEX.EXE /D:MSCD001 /M:10
If you are making a boot disk for a floppy disk game
(i.e., Monkey Island 1) then you can omit the CD-ROM driver
line from the boot disk.
** On some joystick intensive games, we do not
recommend loading the mouse driver since it may conflict with the
joystick. Examples of joystick intensive games are X-Wing and
TIE Fighter.
- When you are finished editing the AUTOEXEC.BAT file, save your
changes. To save changes:
- Hold down the ALT key and press the letter "F".
A menu box should appear in the upper left hand corner.
- Press the letter "X" to select "EXIT."
A screen prompting you to save the file should appear.
- Press the letter "Y" to answer "Yes" to save the
file.
This action should save the file and return you to an A:\ prompt.
- Restart The Computer With The Boot Disk In The "A" Drive.
Once the CONFIG.SYS and AUTOEXEC.BAT have been edited,
your boot disk is ready to be used. Reboot the system by either using a
warm or cold boot. The computer will boot you to: C\:>
- Warm boot: First, leave the boot disk in the "A"
drive. Hold down the CTRL and ALT keys at the same time,
while holding these keys down, press the DEL key. This will
reboot your computer. If your are having trouble with a warm boot, try a
cold boot.
- Cold boot: First, remove all disks out of disk drives. Turn
off the computer manually and wait for the machine to stop running.
Place the boot disk in the "A" drive and turn on the machine.
- Follow The Game's Instructions On How To Enter The Game From DOS.
Startup File Examples
These examples will give you an idea of what you can expect in your
startup files. Please keep in mind that
these are some basic examples of startup files. Your actual startup files
could vary quite a bit, due to the thousands of possible computer
configurations available on the market today.
Example #1
A system with Windows 3.x or Dos 6.x |
Example #2
Preinstalled Windows 95 |
Example #3
A system upgraded to Windows 95 |
Example #4
A system with Quarter-deck (QEMM) installed |
Example #5
Some Packard Bell systems |
Example #6
Some IBM Personal Computers |
EXAMPLE #1
CONFIG.SYS
DEVICE=C:\DOS\HIMEM.SYS
DEVICE=C:\DOS\EMM386.EXE RAM 2560
DEVICEHIGH=C:\WINDOWS\DRVSPACE.SYS /MOVE
STACKS=9,256
DEVICE=C:\scsi\aspi8dos.sys
DEVICE=C:\scsi\aspicd.sys /d:MSCD001
BUFFERS=40
FILES=40
AUTOEXEC.BAT
SET SOUND=C:\SB16\CTSND
SET MIDI=SYNTH:1 MAP:E MODE:0
SET BLASTER=A220 I5 D1 H5 P330 T6 E620
C:\MCAFEE\SCAN.EXE C:\
@IF ERRORLEVEL 1 PAUSE
CALL C:\DIAM-DOS\DMS MONITOR
PATH=C:\DOS;C:\WINDOWS
C:\DOS\MSCDEX.EXE /D:MSCD001 /M:20
EXAMPLE #2
CONFIG.SYS
DEVICE=C:\dosdrvrs\aoatapi.sys /d:idecdooo
files=40
buffers=40
lastdrive=z
AUTOEXEC.BAT
@echo off
set blaster=a220 i5 d1
EXAMPLE #3
CONFIG.SYS
DEVICE=C:\WINDOWS\HIMEM.SYS
DEVICE=C:\WINDOWS\EMM386.EXE NOEMS
BUFFERS=23,0
FILES=50
DOS=UMB
LASTDRIVE=K
FCBS=4,0
DEVICEHIGH /L:1,16976 =C:\WINDOWS\SETVER.EXE
DOS=HIGH
rem ---------- MTM ATAPI CD-ROM -----------
DEVICEHIGH /L:1,14464 =C:\MTM\MTMCDAI.SYS /D:MTMIDE01
rem ---------- MTM ATAPI CD-ROM -----------
AUTOEXEC.BAT
rem C:\PROGRA~1\MCAFEE\VIRUSS~1\SCAN.EXE C:\
rem @IF ERRORLEVEL 1 PAUSE
@IF ERRORLEVEL 1 PAUSE
REM - By Windows Setup - SET BLASTER=A220 Ixx Dx T1
rem SET BLASTER=A220 I5 D1 H5 P330 T6
REM - By Windows Setup - SET SNDSCAPE=C:\SNDSCAPE
rem ---------- MTM ATAPI CD-ROM ----------
rem - By Windows Setup - C:\WINDOWS\COMMAND\MSCDEX.EXE /S /D:MTMIDE01
/M:10
rem ---------- MTM ATAPI CD-ROM ----------
@ECHO OFF
PROMPT $p$g
PATH C:\WINDOWS;C:\WINDOWS\COMMAND;C:\DOS;C:\MACH64;D:\CPACK
PATH=%PATH%
SET MSINPUT=C:\MSINPUT
rem - By Windows Setup - C:\MSINPUT\MOUSE\MOUSE.EXE /Q
SET TEMP=C:\DOS
SET PIMS=D:\CPACK
LH C:\WINDOWS\SmartDrv
EXAMPLE #4 (QEMM)
CONFIG.SYS
DEVICE=C:\qemm\dosdata.sys
DEVICE=C:\WIN95\SETVER.EXE
DEVICE=C:\QEMM\QEMM386.SYS RAM ARAM=B080-B7FF R:1
DEVICE=C:\qemm\dos-up.sys @c:\qemm\dos-up.dat
DEVICE=C:\QEMM\LOADHI.SYS /R:1 /SIZE=11520 C:\QEMM\QDPMI.SYS SWAPFILE=DPMI.SWP
SWAPSIZE=1024 NOVM
stacks=0,0
buffers=60
DOS=HIGH, UMB
DEVICE=C:\QEMM\LOADHI.SYS /R:1 /SIZE=24096 \SAMSUNG\SSCDROM.SYS /D:SSCD000
SHELL=C:\COMMAND.COM C:\ /P /e:2048
DEVICE=C:\QEMM\LOADHI.SYS /R:1 /SIZE=4000 C:\WIN95\IFSHLP.SYS
DEVICE=C:\stacker\stachigh.sys
DEVICE=C:\stacker\dpms.exe
AUTOEXEC.BAT
rem C:\SDD53\UNIVBE.EXE -w
rem C:\SDD53\UNIPOWER.EXE
rem C:\SDD53\MKACCEL.EXE -gen
C:\qemm\loadhi /r:1 /res=29232 /sqf smartdrv.exe
SET SOUND=C:\PROGRA~1\CREATIVE\CTSND
SET MIDI=SYNTH:1 MAP:E MODE:0
SET BLASTER=A220 I5 D1 H5 P330 E640 T6
rem - By Windows Setup - C:\WIN95\COMMAND\MSCDEX.EXE /D:SSCD000
@ECHO OFF
PROMPT $p$g
SET PATH=C:\QTW\BIN;C:\BATCH;C:\QEMM;C:\WIN95\COMMAND;C:\DOS;
SET TEMP=C:\DOS
SET PGPPATH=C:\UTIL\PGP
SET TZ=EST5EDT
SET DJGPP=g:\pilot\runwayc\djgpp.env
rem C:\syntouch\syntouch
EXAMPLE #5 (Some
Packard Bell Systems)
CONFIG.SYS
DEVICE=C:\WINDOWS\HIMEM.SYS
DOS=HIGH,UMB
DEVICE=C:\WINDOWS\EMM386.EXE NOEMS I=B000-B7FF
FILESHIGH=30
BUFFERSHIGH=20
STACKSHIGH=0,0
FCBSHIGH=1
DEVICEHIGH=C:\WINDOWS\MOUSE.SYS
DEVICEHIGH=C:\PBTOOLS\NEC_IDE.SYS /D:MSCD0001
AUTOEXEC.BAT
C:\SOUND144\UTILITY\AZCAL.EXE
@ECHO OFF
PROMPT $P$G
PATH C:\WINDOWS;C:\WINDOWS\COMMAND;C:\
LH C:\WINDOWS\COMMAND\MSCDEX.EXE /D:MSCD0001 /M:20 /S
SET DIRCMD=/O
SET TEMP=C:\PBTOOLS\WINTEMP
SET WINPMT=[WINDOWS] $P$G
SET BLASTER=A220 I5 D1 T4
SET GALAXY=A220 I5 D1 K10 P530 T6
SET SOUND=C:\SOUND144
EXAMPLE #6 (Some IBM
Computers)
CONFIG.SYS
DEVICE=C:\DOS\HIMEM.SYS /TESTMEM:OFF
DEVICE=C:\WINDOWS\EMM386.EXE NOEMS I=E000-EFFF X=F000-FEFF
DOS=HIGH
BUFFERS=50
FILES=40
DOS=HIGH,UMB
DEVICEHIGH=C:\WINDOWS\COMMAND\IBMIDECD.SYS /D:IBMCD001 /P:170,15 /P:1E0,11
DEVICE=C:\MWW\MANAGER\MWD50460.SYS
REM Removing DWCFGMG.SYS may disable Mwave(games and modem) in native DOS
mode
REM DEVICE=C:\MWW\MANAGER\DWCFGMG.SYS
AUTOEXEC.BAT
@ECHO OFF
C:\IBMAV95\IBMAVSH /F00
PATH C:\MWW\DLL;C:\IBMTOOLS
LH DOSKEY
SET MWPATH=C:\MWW\DLL;C:\MWW\MWGAMES;C:\MWW\DSP
REM The following is used by DOS games to recognize Sound Blaster
hardware.
REM If hardware settings are changed, please change this line as well.
REM See the Mwave README file for instructions.
SET BLASTER=A220 I5 D1
SET LIBPATH=C:\MWW\DLL
SET MWROOT=C:\MWW
C:\IBMTOOLS\RESUME.EXE
C:\IBMTOOLS\IBMPFILE.EXE
 Help out with a small donation.
Keep Subsim
Review strong with your support! Thanks!!
All tips and contents are
©2004 SUBSIM Review
Do not copy without permission. |
|
SOUND ISSUES
The horror, the horror
 |
|
|
|
|
|
|
|
|
|
|
|
|
|
|
|
|
Tip: |
|
|
|
|
|
|
|
|
|
Want
to check the date on one of your device drivers? Right-click the
My Computer icon (or a blank space in My Computer's window),
select Properties, and then select the Device Manager tab.
Double-click the device's icon, and click on the Driver tab. The
information's in there. If the date listed is earlier than that of
a driver you've found online, it makes sense to upgrade.
|
|
|
|
|
|
|
|
|
|
|
|
|
|
|
|
|
|
What's that sound? It's...silence!
My sound card...it's gone! I must go online and download new drivers.
No...noooo! My modem...Windows 98 can't seem to detect it either. Maybe my
installation CD-ROM will have the drivers...but...the CD-ROM drive's not
listed in My Computer anymore...aaaaaahhh! My hardware...it's melting!
Analysis
It's not just Windows 98. The
Vanishing Hardware nightmare goes hand in hand with almost every OS
upgrade, just as the Appearing in Public with No Pants nightmare goes hand
in hand with eating pizza at bedtime. But because a lot people upgraded to
Windows 98--and didn't closely check the hardware compatibility list
Microsoft provides--hardware has been virtually disappearing all over the
world.
The most common reason Windows 98 can't find hardware that's actually
attached to your PC is because the hardware drivers don't work with the
new Windows. (A driver
is software that enables communication between your OS and your hardware.)
Before you install Windows 98, check that you have the most current
drivers by visiting your hardware manufacturer's Web site. Major PC makers
usually provide update packs for their most common model. But if you
created a custom system, added hardware, or bought your PC from a smaller
vendor, you may need to visit the specific hardware manufacturer's Web
site to find new drivers. You can also try searching for the hardware
maker from the download link in the left margin.
Advice
There's a trick to making hardware
reappear after Windows 98 has lost track of it--actually, several tricks.
First, find out exactly what hardware is causing the problem. (A missing
CD-ROM drive, for instance, might be traced to incompatible drivers for
the PC's drive controller card or for the drive itself--and you can't tell
which at first glance).
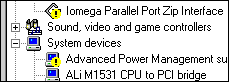
To find the problem hardware, right-click the My Computer icon, select
Properties, and then select the Device Manager tab. The offending device
will be labeled with yellow circle and exclamation mark over it, or struck
with a red X. Double-click on the icon and read the Device status window
for more information.
|
|
 |
|
Warning!
Warning! Exclamation marks in Device Manager mean something's not
working right.
|
|
If the problem hardware is Plug
and Play compatible, the first step in restoring it is to delete all
references to it in the Device Manager. Once it's officially removed,
restart Windows, and Windows 98 should redetect the hardware. If it
doesn't, the hardware probably isn't really Plug and Play, in which case
you have two options: install the hardware manually (using Add New
Hardware, a program under Start/Settings/Control Panel), or reinstall the
operating system. Trust us--you don't want to reinstall Windows 98 unless
you've exhausted all other options.
None of these fixes works, however, for DOS games that won't play
sound. The problem is that DOS programs don't recognize Windows drivers.
To fix it, go to Start/Run. Type msconfig in the box and click OK.
This is a quick way to call up the System Configuration Utility. Select
the Autoexec.bat tab, and uncheck the box next to the line that begins
BLASTER=. Click OK, then Yes, and crank up those speakers for a sonic
gaming experience.
For
SoundBlaster PCI64 and Live cards, visit the Creative Labs Knowledge Base.
|

SUBSIM® Review
© 1995-2024 SUBSIM® Review
"Subsim" is a registered trademark. All rights reserved.
Legal Notice
| Privacy
Policy
submarine, game, submarine game, wolfpack, u-boat, simulation, subsim, sim
| |