
|
|
SUBSIM: The Web's #1 resource for all submarine & naval simulations since 1997
|
SUBSIM: The Web's #1 resource for all submarine & naval simulations since 1997 |
|
|
 09-06-09, 02:35 PM
|
#1 | |
|
Nub
 Join Date: Apr 2009
Posts: 4
Downloads: 364
Uploads: 0
|
Quote:
|
|

|

|
|
09-06-09, 06:37 PM
|
#2 |
|
The Old Man
 Join Date: Aug 2009
Location: Sin City
Posts: 1,364
Downloads: 55
Uploads: 0
|
AOB pshhh. just look at your attack map and turn your boat till you think its going to hit. AOB is rearly correct when your spotted because they swerve too much like a DD always zig zags at high speeds and chances are when you fie hes gonna turn. a computer cant dertermine that in SH4. thats why its up to YOU. You know which way hell turn next. YOU can esmiate wherehes going. and look at attack map, swing your boat till you see a good target line for your toorp and Fire. usually a human's instincts trump Computer because all IT knows it what You put in there. its not gonna know itll turn but YOU do.
|
|
|
|
|
09-08-09, 05:52 AM
|
#3 | |
|
sim2reality
 Join Date: Jun 2007
Location: AM 82
Posts: 2,280
Downloads: 258
Uploads: 30
|
Quote:
or click http://www.subsim.com/radioroom/show....php?t=150069. Also do a search for "is-was" on site, should find some tutorial on the original calculator. |
|
|
|
|
|
09-19-09, 11:03 AM
|
#4 |
|
The Old Man
Join Date: Apr 2005
Location: New Orleans, LA.
Posts: 1,379
Downloads: 487
Uploads: 11
|
not sure if this was a typo or not.. but your metric speed caclulation on the side of the calculator looks abit strange.
it should be meters not yards. anyway great job. I used to use a printed version of wazoo's on stock paper. But since his didn't have a relative bearing dial (only had 2 dials), I made a 3rd dial for it by shrikning the original top dial to fit inside it. p.s. i've decided im going to make it like you did when i get some spare time. how much is a sheet of plastic? and 5mm looks abit thick from your photo, but it could just be the photo adding a few pounds to it hehe |
|
|
|
|
09-19-09, 11:07 AM
|
#5 |
|
Ocean Warrior
 Join Date: Sep 2008
Location: Notify command we have entered the Grass Sea
Posts: 2,822
Downloads: 813
Uploads: 0
|
Due to competitive bidding, I raise my bid to $27.10.
|
|
|
|
|
09-21-09, 07:21 AM
|
#6 | |
|
sim2reality
Join Date: Jun 2007
Location: AM 82
Posts: 2,280
Downloads: 258
Uploads: 30
|
Quote:
Will update and repost.  As for the thickness of the perspex 5mm gives it a very sturdy feel, but 3mm would still be quite stiff and suitable. The perspex I had to hand was actually perspex broucher holders that I had lying around. To I'm goin' down wish I could make these but In the middle of a house build and have no time to spare. Possible someone out there that could though. EDIT: New link for AoB Calculator: http://rapidshare.com/files/28301609..._Printable.rar Last edited by reaper7; 09-21-09 at 07:40 AM. |
|
|
|
|
|
09-30-09, 10:25 AM
|
#7 |
|
The Old Man
Join Date: Apr 2005
Location: New Orleans, LA.
Posts: 1,379
Downloads: 487
Uploads: 11
|
Hope you dont mind, but i used your graphics for a software version of an AoB wheel (with a built in zero gyro lead angle solver).
http://www.subsim.com/radioroom/showthread.php?t=156698 I gave credit for the imagery in the readme and in the program's about box. |
|
|
|
|
01-21-10, 10:48 PM
|
#8 |
|
Watch Officer
 Join Date: Dec 2009
Posts: 332
Downloads: 35
Uploads: 0
|
I made one of my own that is mostly the same as CapnScurvy's original, but I changed a few things to my own personal preference:
Here are a couple pictures of it. If anyone is interested, I can upload the .pdf, or even the original .ppt in case you want to customize it even further. 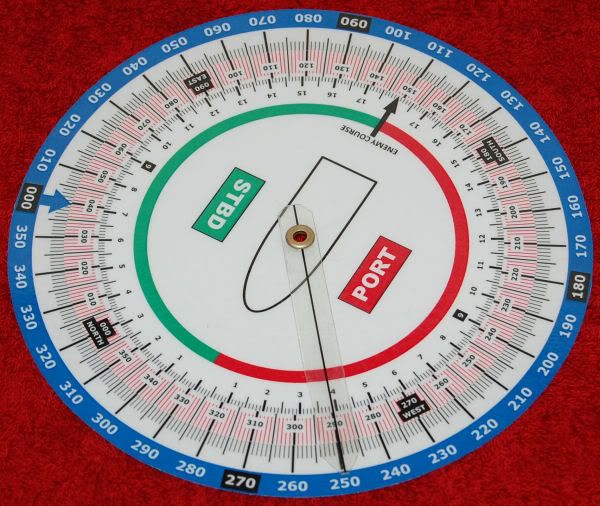 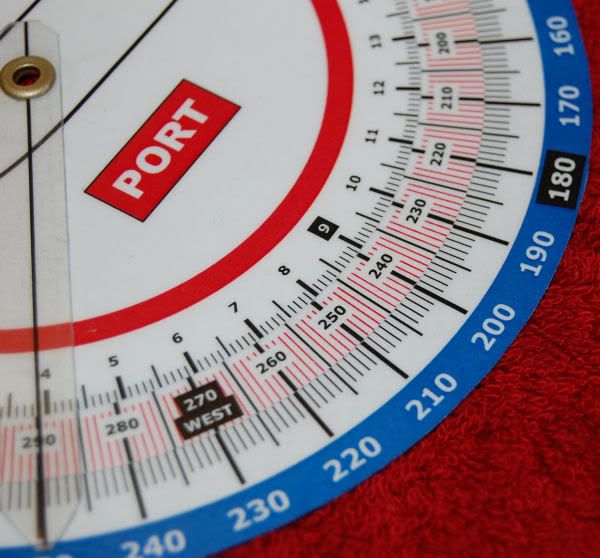 Some notes on how I constructed it:
__________________
|
|
|
|
|
02-09-10, 05:44 PM
|
#9 | |
|
Silent Hunter
  Join Date: Dec 2004
Location: AN9771
Posts: 4,904
Downloads: 304
Uploads: 0
|
Quote:
__________________
My site downloads: https://ricojansen.nl/downloads |
|
|
|
|
|
04-19-10, 02:35 PM
|
#10 | |
|
Watch Officer
Join Date: Mar 2010
Location: Yuba/Sutter, CA
Posts: 347
Downloads: 171
Uploads: 0
|
Quote:
|
|
|
|
|
|
02-09-10, 04:56 PM
|
#11 | |
|
sim2reality
Join Date: Jun 2007
Location: AM 82
Posts: 2,280
Downloads: 258
Uploads: 30
|
Quote:
Not at all Gutted Look forward to using the software version myself. |
|
|
|
|
 |
|
|


 Hybrid Mode
