The
Battle of Midway 1942 often is regarded as the turning point of the war in
the pacific. Roughly two months after that defeat, Japan faced the
beginning of the American counter-offensive, when Marines landed on the
island of Guadalcanal and several months-long bloody and very bitter
fighting for control of the island and the airstrips began. The logistic
supply lines were thin for both sides but the balance constantly shifted
against the Japanese. In an attempt to bring fresh supplies and
reinforcements to their troops on the disputed island, the Japanese
conducted several convoy raids into the waters between and around
Guadalcanal and Savo island, with an often inferior American naval
presence trying to fight these escorted convoys off before they could
unload at the beaches and prevent the heavier Japanese escorts from
bombing Marine positions on land. The result of this naval campaign was a
series of night battles between the so-called "Tokyo Express and the
rushed-in American navy reinforcements that ended in so many ships being
sunk that the waters around Savo Island became known as the "Ironbottom
Sound". It was one of the biggest naval campaigns of the war.
The late 70's and the 80's of the
last century are remembered as being the golden age of "cosims", conflict
simulations that typically are played with dozens or hundreds of thick
cardboard counters on hex-fielded maps (sometimes the size of one
square-meter or even more), following complex rules that often took dozens
of small-printed pages and that used up to one or two dozen tables to
determine random events and combat results by using a dice and a complex
system of modifiers. These games had their heydays before the market for
home computers became so strong and processing technology so powerful that
they were able to take over the complex, time-consuming manual management
of the complex game mechanisms which then were calculated in the
background and no longer were needed to be handled by the player. These
hex-field cosims are the ancestors of later computer strategy games and
often: computer simulations that offered dynamic campaigns of some kind
and that some people still hold in high honor until today. Hexfield-designed
strategy games are still published for the PC and some of them like the
Steel Panthers series or The Operational Art of War series have a strong
and dedicated community following them for years.
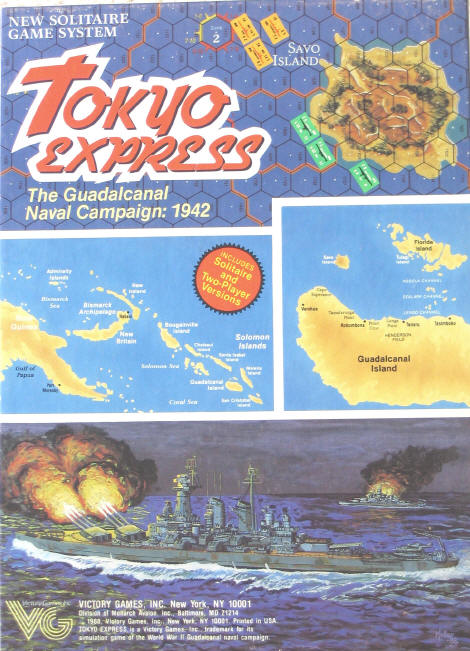
 Besides
Avalon Hill and Game Designer’s Workshop GDW, Victory Games has been one
of the giants in cosim publishing. I addition to their very popular and
well-known naval-based Fleet-series (6th Fleet, 2nd Fleet - one of my
all-time-favorites J - and 7th Fleet), they earned special recognition for
Tokyo Express. It differs from the Fleet series in that where the
Fleet games were dedicated two-player-designs that nevertheless were easy
to be handled and played by a single player as well, Tokyo Express is a
dedicated solitary player experience that additionally offers rules for
two-player-games. And Tokyo Express presents the lonely player a
challenging artificial opponent that keeps surprising him in an elegant
way that is far from the unwieldy text paragraph books and dozens of
paragraph-selection-slider-cards that were to be found for example in a
solitary game like the Ambush! series. It is a somewhat simple but
well-crafted and original game design that allows not only for quick and
easy instant play but also for quite some complex advanced rules that slow
down the game process significantly, making it very complex and paying
attention to details. The use of "hidden force" markers and rules, that
allow hiding initial force composition from the playing opponent, turns
this solitary game into a fully functional and rewarding two player-game
as well.
Besides
Avalon Hill and Game Designer’s Workshop GDW, Victory Games has been one
of the giants in cosim publishing. I addition to their very popular and
well-known naval-based Fleet-series (6th Fleet, 2nd Fleet - one of my
all-time-favorites J - and 7th Fleet), they earned special recognition for
Tokyo Express. It differs from the Fleet series in that where the
Fleet games were dedicated two-player-designs that nevertheless were easy
to be handled and played by a single player as well, Tokyo Express is a
dedicated solitary player experience that additionally offers rules for
two-player-games. And Tokyo Express presents the lonely player a
challenging artificial opponent that keeps surprising him in an elegant
way that is far from the unwieldy text paragraph books and dozens of
paragraph-selection-slider-cards that were to be found for example in a
solitary game like the Ambush! series. It is a somewhat simple but
well-crafted and original game design that allows not only for quick and
easy instant play but also for quite some complex advanced rules that slow
down the game process significantly, making it very complex and paying
attention to details. The use of "hidden force" markers and rules, that
allow hiding initial force composition from the playing opponent, turns
this solitary game into a fully functional and rewarding two player-game
as well.
 One
of the most enjoyable differences to game packages of the more
conventional kind ("family games") is that cosims very often do not only
pack empty air into huge boxes but actually do need huge boxes to store
all their hard matter-content into them. In this regard, Tokyo Express,
published in 1988, scores quite fair.
One
of the most enjoyable differences to game packages of the more
conventional kind ("family games") is that cosims very often do not only
pack empty air into huge boxes but actually do need huge boxes to store
all their hard matter-content into them. In this regard, Tokyo Express,
published in 1988, scores quite fair.
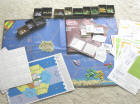
It comes with
1 letter-sized Standard Rule Booklet (64 pages,
small print)
1 Basic Rules Booklet (24 pages) Both manuals are well written and
well-structured and offer plenty of graphical illustrations, where needed.
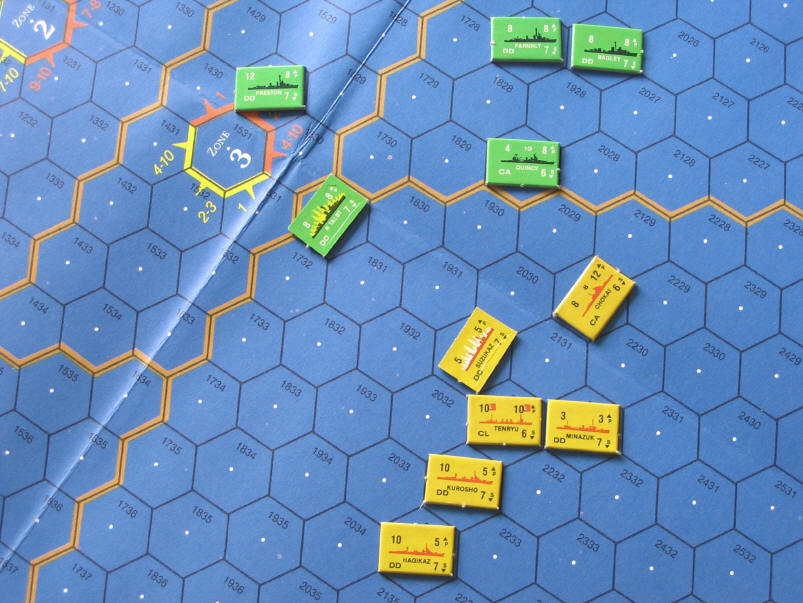
1 22”x32” mapsheet
156 ship counter 3/4x1/2 inch, printed on both sides
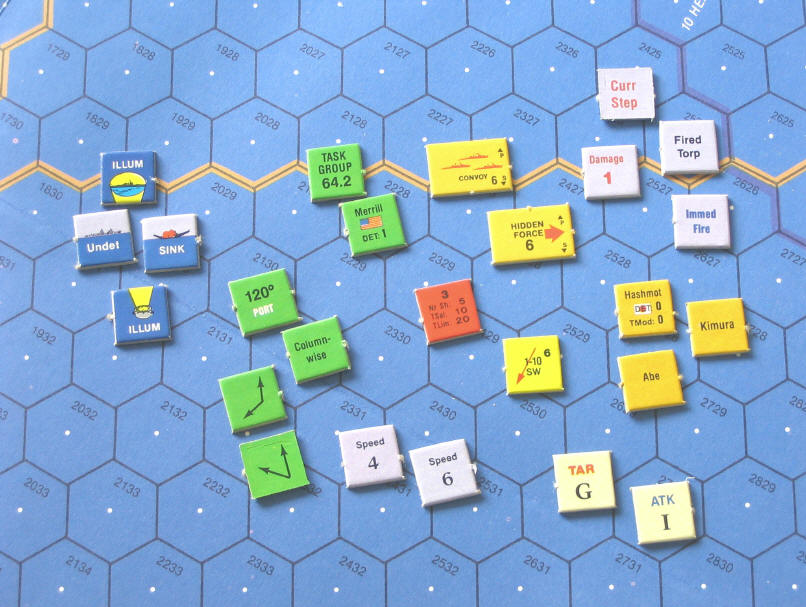
260 marker counters 1/2x1/2 inch, most are printed on both sides
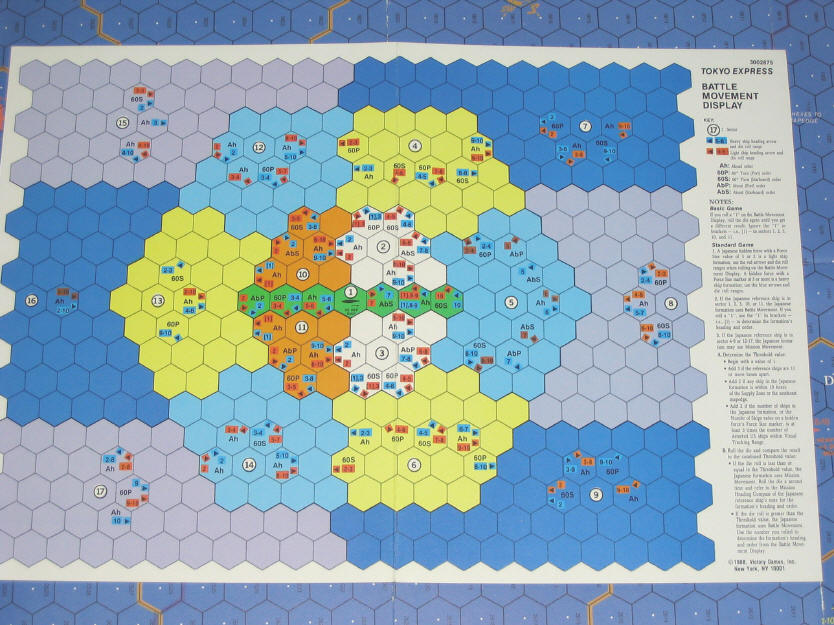
1 11”x16” battle movement display
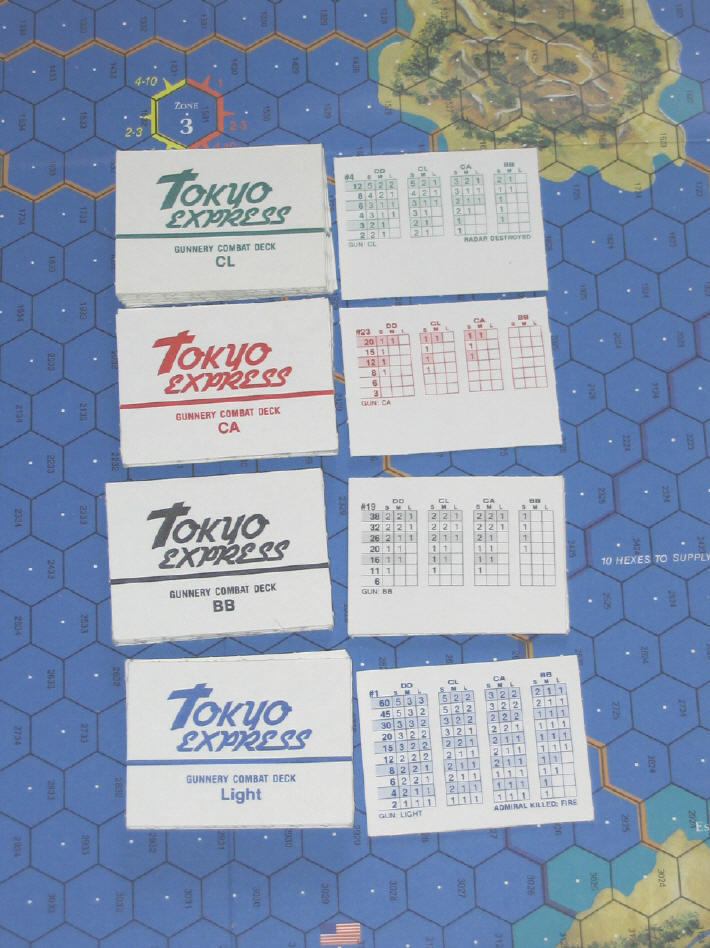
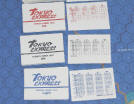
120 gunnery cards (30 per each of the four ship classes)
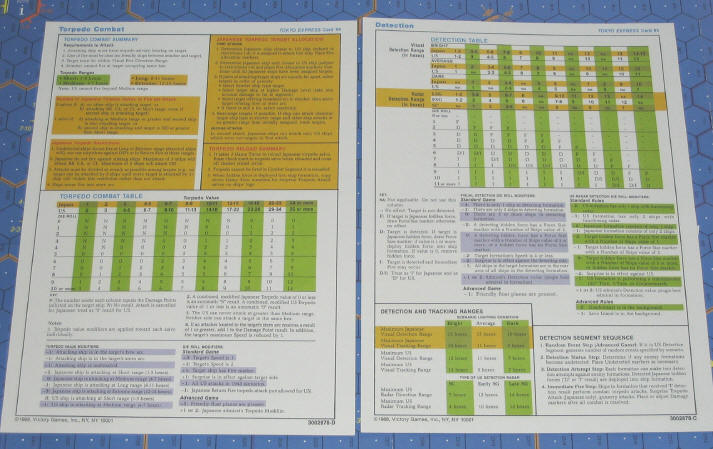
10 letter-sized, double-sided cards with charts, tables and display cards
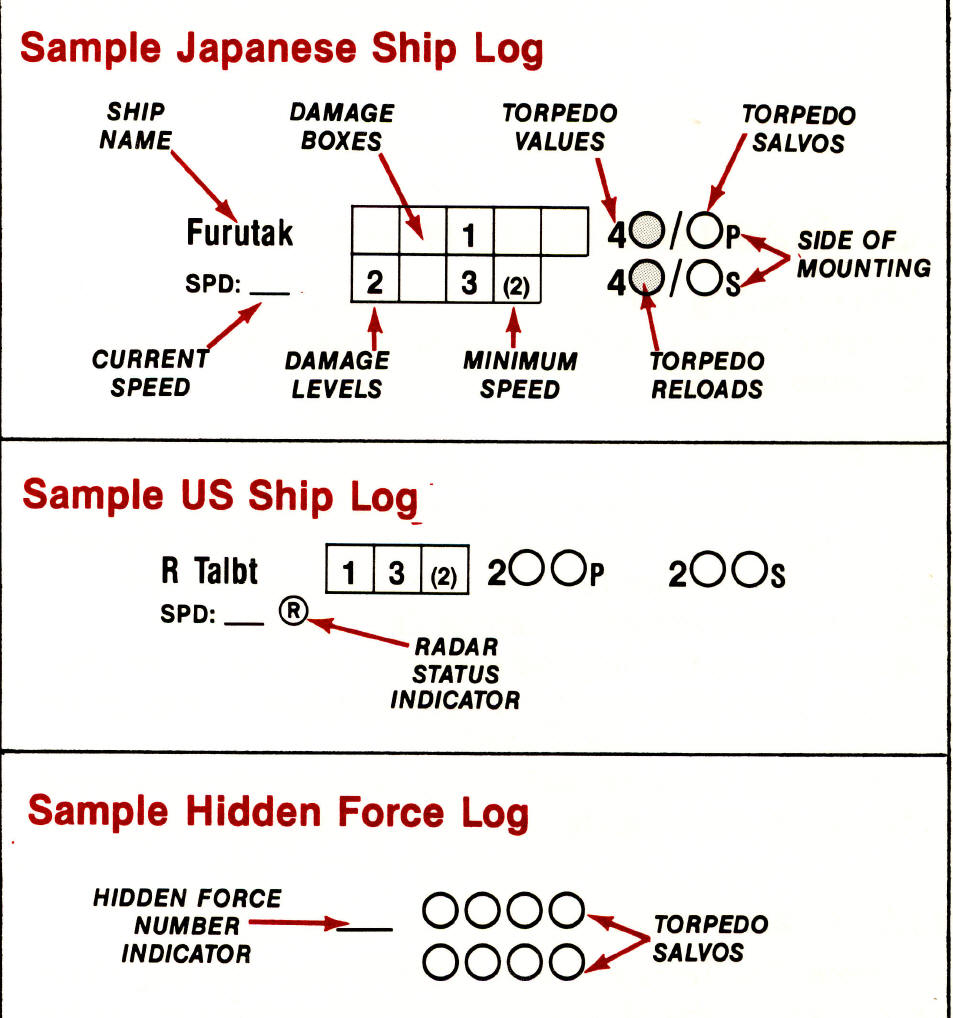
2 pads with ship log rosters
1 10-sided die
One game turn represents 10 minutes.
One hex represents a space 1500 yards in diameter. Each counter represents
one individual ship. All action takes place at night: for that reason,
precondition to keep formation is a distance between two ships not greater
than 2 hexes (3000 yards) – remember that those ships did not use any
position lights in battle.
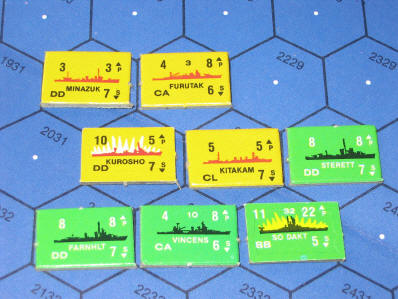
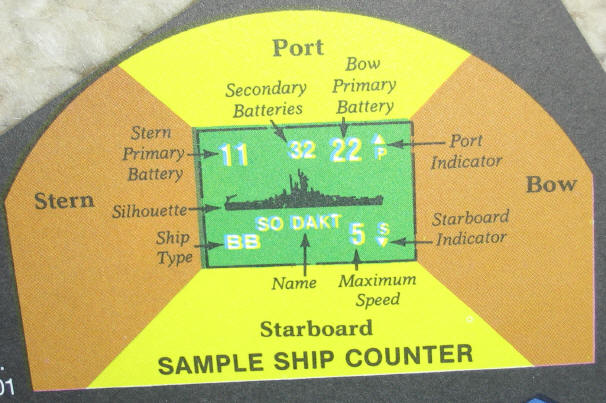
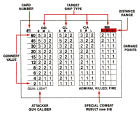
A closer look at the ship counters…
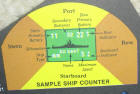
… and what the printed info on them means
The game is played in turns.
However, each turn is divided into three stages and these again divided
into several phases.
The opening “Preparation Stage” of a
turn sees the player assigning speed and maneuvering markers to his
formations, reshuffling action chits that are used blindly and at random
to determine when, during the movement phase, detection and combat occurs.
This allows the player to check what US and Japanese units fulfill the
criterion to be dealt as being “in formation”, and adjusting opposing
unit’s headings according to the Battle Movement Display (later).

The second “Activity Stage” is
divided into six movement phases. Each ship in TE can have a speed setting
between 0 and 7 hexes, and per each movement phase they move one hex at a
time, or don’t move during that phase. Ships with a speed setting below 6
obviously will skip some movement phases (a unit with a speed of 4 for
example moves one hex in the 1st, 2nd, 4th and 5th phase, but does not
move during the 3rd and 6th phase – amongst the many charts, there is one
table listing it in detail). However, moving or not, in each phase random
action chits are drawn to check if during this phase combat occurs (in the
more advanced rules, detection also is checked in this way). So the player
has no control over the precise battle timing. It could be that he plans
to fire from longer range – but the units do not engage but continue to
close in on the enemy until the 6th movement phase. It is worth mentioning
that the rules also allow degrees of freedom on formation management and
these two variables of uncertainty reflect historical reality, where
formation commanders also did not have micro-managing control over each
ship and formation. During this action stage, battle maneuvering of the
Japanese units again is checked via the Battle Movement Display.
The US player has assigned speed and
maneuvering markers in the previous stage to each of his formations and
individual units not bound in formations. These previous decisions must be
met by the player during this stage that is about moving the ships around
– even if he sees the Japanese doing something he did not expect and would
like to change his previous orders. Once committed he cannot change before
the turn is over and the next turn begins.
The third stage is called “Terminal
Stage” and is quickly done. It simply is about keeping track of damage the
units have suffered and unmark all events and actions that have taken
place during this turn.
In their most simple form, the rules
allow easy gameplay when moving units but the advanced rules add more
complexity concerning formation management, and speed and maneuvering
conditions that units must meet.
The heart and core of Tokyo Express
is of course the automatic maneuvering of the Japanese units and here the
game has a very elegant, and to my knowledge, unique solution - the Battle
Movement Display.

This chart is used to determine battle maneuvering
of the Japanese
formations by using a die and relative positions of the “reference ships”
Each single unit and each formation
the Japanese have is checked individually. The rules de-fine how two
“reference ships” are determined, the criterions are focusing on distance,
formation size, and ship classes. These two ships are put into relative
positions to each other on that display card. In the centre is the US
ship, resulting in the Japanese ship being in any of the color-coded cones
around that US ships. Each cone gives different probabilities for speed
and maneuver settings the Japanese will select, separate for light (DD,
CL) and heavy (CA, BB) units. These commands then will be followed during
the next movement phases, until the next check for the Japanese takes
place. That’s all! I must say, the system works efficiently, and leaves
enough room for uncertainty so that the player can, in most cases, expect
the Japanese ships doing reasonable maneuvers, but also leaving a slight
chance for doing something unexpected, even nasty tactical surprises. No
complex cross-referring in charts and adding and subtraction of modifiers
is needed.
Of course the rules allow details
like turns affecting speed, admiral’s competence-levels limiting or
increasing freedom of action and maneuvering, formation cohesion, and
more.
When detection has not taken place,
Japanese ships do not move by using the Battle Movement Display, but move
towards their mission objectives. Advanced rules also allow the use of
hidden-force-markers instead of the actual ship markers, so that the
player does not know size and composition of a hostile formation until he
has detected it. Some scenarios have fixed force compositions, but it is
also possible via optional rules to determine enemy forces at random,
during play. When there are several hidden-force-markers on the map the
player better prepare for every kind of surprise possible!
At some time during the action stage
combat occurs. Again, TE goes a different way than many other cosims here
that usually come back to the use of dice and cross-referring a modified
combat strength with a random value in a table. As during movement, in
combat no die is needed in TE.
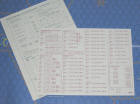
The tools of paper battle: ship log roster that
keeps track of accumulated damage per individual unit and torpedo
expenditure…and the “artillery” that delivers those damage points
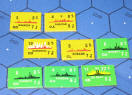
The player allocates the artillery
values of all batteries he wants to use and is allowed to use in the
attack and can concentrate all bow and stern batteries of different ships
onto one target. Or, he can use bow and stern batteries of one ship to
fire at two different targets (if they are inside their according firing
cones). The values for each ship type (gun caliber) are accumulated. Some
larger ships even have secondary batteries (that count as light CL
caliber). For each of the four caliber classes/ship types, there is a set
of thirty cards that are used to determine the resulting damage the target
receives. Taken into account are gun caliber (by the related card deck),
range, target ship class, and gunnery value. The random element is
represented by the thirty cards per deck showing very different damage
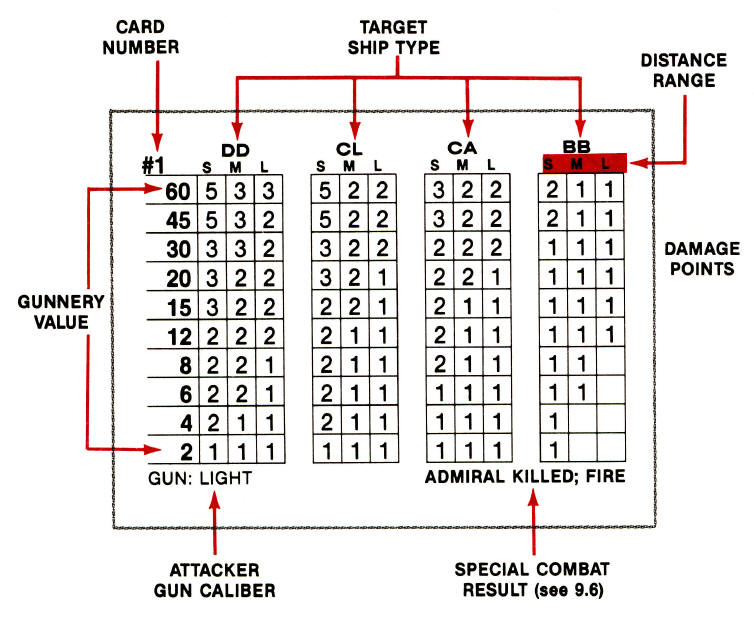
values in the cross-reference-boxes. An example for a quite successful
salvo fired is illustrated on the following example, most cards show more
empty than filled boxes.
Gunnery card
Naturally, huge guns tend to do more
damage and primary bow and stern batteries and secondary batteries have
different firing cones and are prohibited to fire into their blind angles.
Larger ships can sustain more damage. A single destroyer has only a very
slight theoretical chance to sink a battleship.
Later, the number representing the
damage is used to tick off the according number of boxes in the ship log
roster. Here, every single ship in the game is represented and has a
unique, individual profile for the damage it can sustain.
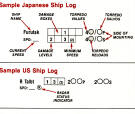
Sample ship log
When a box with a number in it is
reached, it means, the ship has reached a damage level of 1, 2 or 3, which
will increasingly handicap its speed, maneuvering and fighting
possibilities. The same log is used to keep track of torpedo expenditure
and status on reloading torpedo tubes. A worthwhile remark here: the rules
reflect the enormous problems the Americans had with their torpedoes at
that time. It is possible to fire a very promising, “probability-rich”
salvo of torpedoes at the Japanese at short distance – and not scoring a
single hit (meaning the torpedoes hit, but refused to go off). However,
the Japanese were capable of striking from greater distances and for
greater effect with their torpedoes (at least at day, which is not
represented in this game - what also is reflected by the formation and
detection rules, and the advantage the Americans had by their use of radar
also is to be found in the rules).

The usual bunch of suspects…
|

… of which there are twenty pages like this |
In principle, this is the skeleton
of rules Tokyo Express is based on. These rules are included in the 24
pages of the Basic Rule Booklet. However, there is also the Standard Rule
booklet – and that has 64 pages. Here the rules for two-player games are
laid down, which make surprisingly few changes to the existing rules. The
major difference is that the Battle Movement display is not used and that
until detection takes place, both fleets are represented by hidden force
markers on the map only, so both players have charts were they can arrange
size and composition of their fleets hidden from the eyes of their
opponent.

Two flotillas making war, not love
Then there are the descriptions of
the included scenarios. But the greatest part is reserved for explaining
and illustrating the many optional rules the player can use. That includes
for example limited duration of detection, using of searchlights, more
complex formation, maneuvering and detection rules, random events and
random setup of the Japanese, blocked line of sights, float-planes,
effects of admirals present, use of secondary batteries, collisions, and
mistaking targets.

What else there is in markers
Dating back to 1988, this game is no
longer listed as an available item at the website of Victory Games. But I
have seen it repeatedly at eBay, second hand game shops, or on offer at
pin-walls. The price usually still is around 40 dollars. I think of it as
a clever design with some innovative single player ideas, and wonder why
it never was converted to the PC on a 1:1 basis, because it’s design seems
to be predestined for that. The system is relatively simple and elegant
but optionally allows for surprising complexity, and the system for
controlling the Japanese opponent delivers good results and surprises, so
that not much effort would have been needed for converting it, compared to
other strategy games of this genre.
For collectors, it is a must, and it
still could be of interest for people who are interested in the historical
events of that timeframe and that naval campaign. Even today it still is
good enough to give you excitement and hours of good, solid gameplay. It
cannot hurt to have it in your household in case that next winter you will
suffer a blackout and cannot run your PC! Tokyo Express definitely has
been one of the better naval hex-cosims of that time.