
|
|
SUBSIM: The Web's #1 resource for all submarine & naval simulations since 1997
|
SUBSIM: The Web's #1 resource for all submarine & naval simulations since 1997 |
|
|
 05-29-14, 11:51 AM
|
#1 |
|
Growing Old Disgracefully

 Join Date: Dec 2012
Location: Hythe - Southampton
Posts: 9,609
Downloads: 1133
Uploads: 0


|
Last Updated 14th September 2015
__________________
LSH3-2015 <> TUTORIALS <> ALL YOU NEED TO KNOW <> ALL IN ONE PLACE SH4 <> TUTORIALS <> HOW TO DO IT <> INFORMATION <> DOWNLOAD LINKS SH5 <> TUTORIALS <> HOW TO DO IT <> INFORMATION <> DOWNLOAD LINKS Always Here To Help A Fellow 'Subber' | Need An Answer to A Question Just Send Me A PM Last edited by THEBERBSTER; 10-05-19 at 04:41 AM. Reason: Replaced missing pictures |

|

|
|
06-01-14, 06:02 PM
|
#2 |
|
Growing Old Disgracefully
Join Date: Dec 2012
Location: Hythe - Southampton
Posts: 9,609
Downloads: 1133
Uploads: 0
|
Last updated 21st January 2018
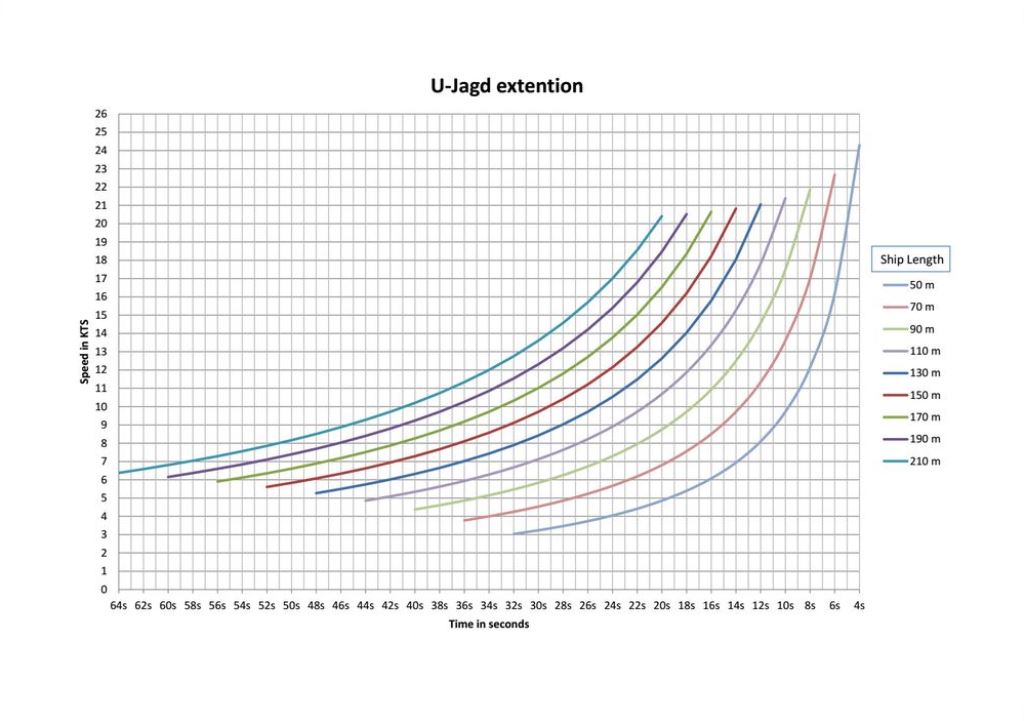
This Tutorial by Stoianm will show you how to use the U-Jagd to get a Ships Speed.  U-Jagd Clock Face Identification. Dial 1. = Time in Seconds. Dial 2 = Ship Lengths up to 100 Metres. Dial 3 = Ship Lengths up to 150 Metres. Dial 4 = Ship Lengths up to 200 Metres. Dial 5 = Ship Lengths up to 75 Metres. General Instructions On How To Use The U-Jagd. 1. Select the Stopwatch/Clock (Chronometer). 2. Right click with your mouse button on the Clock Face. 3. U-Jagd should now be showing. 4. Move the U-Jagd to a convenient place if necessary. 5. Lock the Target 6. Identify the Target 7. Open the Recognition Manual 8. Send the Mast Height to the TDC 9. Make a note of the Ships Length (Example 140.9 = 141 Metres.) 10. In this example you would use Dial 3 for Ships up to 150 Metres. 11. Position the Attack Scopes Vertical Line forward of the Ships Bow. 12. When the Bow touches the Vertical Line Start the U-Jagd 13. When the Stern passes the Vertical Line Stop the U-Jagd. 14. Read the Speed from the Dial for the Ships Length. 15. Enter in the TDC. Courtesy acknowledgment to Stoianm U-Jagd Graph Courtesy of Marco1971
__________________
LSH3-2015 <> TUTORIALS <> ALL YOU NEED TO KNOW <> ALL IN ONE PLACE SH4 <> TUTORIALS <> HOW TO DO IT <> INFORMATION <> DOWNLOAD LINKS SH5 <> TUTORIALS <> HOW TO DO IT <> INFORMATION <> DOWNLOAD LINKS Always Here To Help A Fellow 'Subber' | Need An Answer to A Question Just Send Me A PM Last edited by THEBERBSTER; 10-05-19 at 04:44 AM. Reason: Replaced missing pictures |
|
|
|
|
06-02-14, 07:20 AM
|
#3 |
|
Seaman
 Join Date: May 2014
Posts: 40
Downloads: 50
Uploads: 0
|
Thanks Peter for SH4 beginners guide.
I am thinking of installing sh4 again since my sh5 has lots of CTDs. However, I never try its manual TDC. On your guide you mention that your method is based on 90 degree AOB. Is this the same method as the one in trevally tutorial manual tdc 90 deg? |
|
|
|
|
06-02-14, 03:32 PM
|
#4 |
|
Growing Old Disgracefully
Join Date: Dec 2012
Location: Hythe - Southampton
Posts: 9,609
Downloads: 1133
Uploads: 0
|
Hi tirta
Sorry to hear that you are still having troubles. Before you give up on SH5. You say you are using Sobers snapshot. Go through each patch and see if you need to disable any unnecessary ones. You do not want any of these enabled. Dive Planes Sextants Engine Controls Stadimeter reference to Sextant Wind Speeds Advanced Experimental Would you send me your latest mod list please. Trevally's AOB 90 Tutorial is SH5 Mine is for SH4 and is all my own work. Peter
__________________
LSH3-2015 <> TUTORIALS <> ALL YOU NEED TO KNOW <> ALL IN ONE PLACE SH4 <> TUTORIALS <> HOW TO DO IT <> INFORMATION <> DOWNLOAD LINKS SH5 <> TUTORIALS <> HOW TO DO IT <> INFORMATION <> DOWNLOAD LINKS Always Here To Help A Fellow 'Subber' | Need An Answer to A Question Just Send Me A PM |
|
|
|
|
12-07-14, 01:02 PM
|
#5 | |
|
Weps
 Join Date: Dec 2012
Posts: 357
Downloads: 137
Uploads: 0
|
Quote:
Hi THEBERBSTER, Just wondering bout this mod soup and am wondering why there's no ENV mod in it. Arn't there any ENV mods around cause stock colors are... just stock.  I don't need them myself, I play TMO with a couple of other mods... just wondering. PS_ This is a great TUT on how to's, very inlightening read 
|
|
|
|
|
|
12-07-14, 01:36 PM
|
#6 |
|
Growing Old Disgracefully
Join Date: Dec 2012
Location: Hythe - Southampton
Posts: 9,609
Downloads: 1133
Uploads: 0
|
Hi HertogJan
This mod soup is to get someone who has not played or only played with Stock to be able to start with something that works and importantly reliable. GFO is a big improvement on Stock. I played a lot with it in my early SH4 days as I was learning the game so that is why I recommended it. As most of the mods are Webster's and others are mentioned in his GFO readme you know that you are in safe hands. I agree with you that the Real Environments Mod + GFO Patch could have been added but at the time I decided not to include it. If someone who is interested in this reads Websters GFO documentation then they will see that there are other alternatives available also. Peter
__________________
LSH3-2015 <> TUTORIALS <> ALL YOU NEED TO KNOW <> ALL IN ONE PLACE SH4 <> TUTORIALS <> HOW TO DO IT <> INFORMATION <> DOWNLOAD LINKS SH5 <> TUTORIALS <> HOW TO DO IT <> INFORMATION <> DOWNLOAD LINKS Always Here To Help A Fellow 'Subber' | Need An Answer to A Question Just Send Me A PM |
|
|
|
|
12-07-14, 02:00 PM
|
#7 |
|
Growing Old Disgracefully
Join Date: Dec 2012
Location: Hythe - Southampton
Posts: 9,609
Downloads: 1133
Uploads: 0
|
Last updated 21st January 2018
SH5 Tutorial > Did You Use Auto TDC Previously And Now Finding It Difficult With Manual TDC? Here is a Step by Step Tutorial to help you succeed. I guess if you are looking at this you will have previously been playing with Auto TDC and having the desire to progress to Manual TDC things are just not working out as you expected them to. This Tutorial has been designed simply so as to give you the confidence to move forward and get the reward and enjoyment as to one of the ways of using Manual TDC. First of all I am assuming that you did not have problems hitting Targets when using Auto TDC. If you did then stop here as it could be that you have a game issue that needs to be sorted first. Send me a PM explaining what is happening and we will try and sort it out together. In this Tutorial we will not be using the XO Manual TDC. We will not be using the Stadimeter. We do not need to Identify the Target although you can if you wish. All our data will be entered Manually into the TDC so you will need to be able see all of the Dials. You can use the L Key in the Periscope Station to move the XO TDC to the lower right corner and out of the way. The next point is, are you using Stock/Vanilla or a mod interface such as one of TDWs New UIs 7-4-2 or 7-5-0? I will try to cover both as we go along. The Stock player will not have the benefit of having the WEPS Officer/Gunner Icon for additional assistance. Ok, so you have spotted a Target on your Navigation Map travelling from right to left (Port). What do we need to do to get a suitable Firing solution? 1. The Targets Speed. (This is important, and we will use the 3 minutes and 15 seconds method to find it.) 2. The Range or Distance to the Target. 3. The Chronometer/Stop Watch. 4. The Bearing we will use to Fire at the Target. (This will always be 10° either side of 0/360°) 5. The AOB (This will always be 80° Port or Starboard depending on the Targets direction) How do we already know how this is? 0/360° = 90° U-Boat Heading. 0° + 10° = 80° Port. 0/360° = 90° U-Boat Heading. 0/360° - 10° = 350° = 80° Starboard. Measurements are taken from the Middle of the U-Boat. Tool Markings can be made on the Navigation Map or the TAI Map. If using the TAI Map then use the TAB Key to size the Map correctly. First we need to get the Stop Watch. (O Key Stock/Vanilla) Tip All new Tool Marks can be done with Game Paused. Adjustments can only be done with the Game UN-Paused. Keep the Game Paused if you need to. Delete Tool Map marks using the Eraser. Take the Tool and enter again on the Map. Next Pause Game. Take the Ruler Tool and draw out a Line from the Targets Stern through the Bow to a position that you will be able to take up a 90° position to with your U-Boat. This Line will be known as the Targets Course Line or (TCL) Take the Protractor Tool and on the (TCL) draw out 90° with the length coming out long enough for you to put Way Points on to it. The Protractor Arrow on the (TCL) Line always points away from the Target. Take the Ruler Tool and from beside the 90° Line on the (TCL) draw out 1,200 metres. This is the point that you need to be stopped at 0 Speed. For All Stop use the @ Key. Now place your Waypoints so the last one finishes at the 1,200 Metre mark. Use the Mouse Wheel so you can zoom out for accuracy. You will need to select a Speed that will get you there as quickly as possible but you do not want to over shoot the 1,200 metre mark ,so reduce your speed as you get closer. Our aim is to Fire Torpedoes from around 1,000 metres so the 1,200 metres gives us 200 metres to play with as we will most likely need to make some positional adjustments to get the 90° required accuracy. Start the Stop Watch. Take the Marker Pencil Tool and place an X on the Targets Bow or Middle. Un-Pause Game. When 3 minutes and 15 seconds have passed Pause Game. Take the Marker Pencil Tool again and place another X on the Targets Bow or Middle. Take the Compass Tool and measure the distance between the two Xs. We will say that this is showing 800 metres = 8 knots. So we know the Targets Speed is 8 knots. Remove the Stop Watch. It is important that the Target does not see you as you will lose the opportunity and the Target will start to take evasive action. Dive to Periscope depth when you get to the 1,200 metre position. Go to your Navigation Map and in the Top Right Hand Corner is a Triangle Tool that you can Toggle which will Open and Close the Navigation Map Bearing Overlay Visibility Compass this will then place itself on the Centre of the U-Boat. If you go to Your TAI Map do not open it fully. In the Bottom Right Hand Corner is a Triangle Tool that you can Toggle which will Open and close the Navigation Map Bearing Overlay Visibility Compass this will then place itself on the Centre of the U-Boat. Notice that each segment is 100 metres working itself outwards to maximise at 1,000 metres. You can Toggle click it On and Off at any time when you need to remove it from over the U-Boat. For the Tutorial we will call this the Attack Compass Delete any remaining Waypoints. Bring the Protractor Line to behind the U-Boat on the 180° degree line. Go to the TCL line and is it still showing 90°? Adjust as necessary with Game Un-Paused. Now look at your 0° line on the Attack Compass. This needs to be exactly placed in line with the 90° degree Protractor Line. Ok so we need to make an adjustment. Press the C Key to open the Compass or click your Mouse in the middle of the Compass Bar. At the bottom of the Compass is a small bar (sometimes not easy to see) Click on the bar and the Rudder will show. Go to Slow Ahead and click on the Rudders degrees. Red degrees to go Port (Left) Green degrees to go Starboard (Right) If you positioned your Waypoints correctly on the Protractor Line then you should only be looking at a few degrees of adjustment or less. While the adjustment is taking place also look at the Protractor Line behind the U-Boat and reposition back on to the 180° degree Line. Recheck your 90° Line on the (TCL) Use the 0 ins Key or # Key to go to Rudder Amidships. Use the @ Key to go to All Stop. If you are happy with the result and the U-Boat is no longer moving then take the Protractor Line from behind the U-Boats Stern and place in the Middle of the U-Boat. Take the Ruler and place the Line also on the Middle of the U-Boat. Press the C Key to close the Rudder. Raise the Attack Periscope a little at a time until you can see the Target on the TAI Map. During all this time of course the Target has been closing. Pause Game. Check now whether the (TCL) needs to be redrawn? The answer is probably yes. Delete the (TCL) using the Eraser Tool. Draw out a new (TCL) using the Ruler Tool. You will probably notice that the Targets Heading is still the same. The new (TCL) could be closer or further away from the U-Boat. Delete the 90° Line by using the Eraser Tool. Delete the Ruler Line by using the Eraser Tool. Take the Protractor Tool and from the Middle of the U-Boat draw along the 10° Line until you reach the new (TCL). With this Line in place it should show 80° AOB. Use the Mouse Wheel to zoom for accuracy. If it does not then Un-Pause Game. Adjust the Protractor Angle to 80° and then Pause Game again. Take the Ruler Tool and from the Middle of the U-Boat take it down along the 10° Attack Compass Line to the (TCL). We will say that the Range is now showing 1,050 metres. Looking at your Attack Map Compass we will say that your 80° AOB is showing between 10° and 11°. Go to your Attack Periscope and place the Bearing between 10° and 11° degrees. Click on the TDC Manual On/Off button. Enter the Speed 8 knots. Enter the AOB 80° Port. Enter the Range 1,050 or 1,100 metres) You will see the Periscope Bearing Dial showing between 10° and 11°. Click on the TDC Manual On/Off button again. All your Data has been entered. Now look at the 2 Gyro Angle Dials. The Left Dial is the U-Boat The Right Dial is the Target. Adjust the Periscope Bearing until both Dials are pointing upwards to show 0°. We will say that this has moved the Periscope Bearing to 12°. Set up your Torpedoes to Impact. Set the Speeds to Fast The Depth for Merchants about 5 should be ok. Now if you move your Periscope out to the right you should be able to pick up the Target. Use the Mouse Wheel to change the Periscopes Magnification larger. Use the Space Bar to Lock the Target. If you look at the Dial settings you will see that they have moved to correspond to the Periscope Bearing. If you look at the Range Dial you will see that this is still set to 1,050/1,100 metres and has not moved. Optional > If you using one of TDWs NewUIs 7-4-2 or 7-5-0 Click on the WEPS Officer/Gunner 3rd Icon from the Left. To Identify the Target Press the 1st Icon on the Left. Back to the main Icons pressing Icon 4 will Lock the centre of the Periscope on to the Target and you will see the Periscope Bearing move as the Target moves. You can use your WEPS Officer/Gunner at anytime that you can see the Target on the Map. You now also have the benefit of seeing the Hull diagram on the Torpedo Depth Gauge. You can change the depth if you wish to. You Fire your Torpedoes when the Crosshairs on your Periscope are on the 12° Bearing. This should correspond with the Target on your TAI Map passing through your Protractor Line. Stock /Vanilla Set the Periscope Bearing on 12° Check the Gyro Angles are at 0°. Lock the Target with the Space Bar as the Bow enters the Periscopes Crosshairs Fire your Torpedoes. When the Target is coming from Left to Right (Starboard) you Line up on the 350° Attack Compass Line. So what we have set up in this Tutorial is a 90° AOB fast shoot. In theory if you shoot Torpedoes between 350° and 10° with the correct Range and the U-Boat Heading is at 0° then you should be successful. With Escorted Convoys you carry out the same procedures with the exception of your Range that you will need to adjust. I would suggest this should be between 2,000 and 4,000 metres. This will give you time to slip away from the Escorts as they will be looking to search the 90° area. Please note some Keyboard actions shown in the Tutorial may differ between Stock/Vanilla and TDWs NewUI. Tip If you shade this information and then copy and paste it to your PC Notepad you can then edit it.
__________________
LSH3-2015 <> TUTORIALS <> ALL YOU NEED TO KNOW <> ALL IN ONE PLACE SH4 <> TUTORIALS <> HOW TO DO IT <> INFORMATION <> DOWNLOAD LINKS SH5 <> TUTORIALS <> HOW TO DO IT <> INFORMATION <> DOWNLOAD LINKS Always Here To Help A Fellow 'Subber' | Need An Answer to A Question Just Send Me A PM Last edited by THEBERBSTER; 01-21-18 at 04:10 PM. Reason: Repositioned text |
|
|
|
|
12-07-14, 05:15 PM
|
#8 | |
|
Weps
Join Date: Dec 2012
Posts: 357
Downloads: 137
Uploads: 0
|
Quote:
Anyhow, thx for clearing that up |
|
|
|
|
|
12-08-14, 03:14 PM
|
#9 |
|
Growing Old Disgracefully
Join Date: Dec 2012
Location: Hythe - Southampton
Posts: 9,609
Downloads: 1133
Uploads: 0
|
Last updated 16th March 2019
Fed Up Receiving The “BE MORE AGGRESSIVE” Radio Message After Sinking Ships. The Wolves of Steel Changes (TWoS). You can copy and paste your message to all of the other files. Change 1. Ubisoft\Silent Hunter 5\data\menu\menu.txt Change 2.> TWoS Real Navigation Mod. (Only if enabled) Ubisoft\Silent Hunter 5\ TWoS_Parts\TWoS Real Navigation\data\menu\menu.txt Enter your choice of message in the same format as the original message as in the example below. Go to Line Number > 4197 4197=Be more aggressive! < Original 4197=Continue with your orders! < New message example Go to Line Number > 9840 The message must be the same as in Line Number 4197. When changes have been made to each menu.txt file. Exit Save Remember when you disable mods you will need to repeat this procedure. TDW's New UI Mod 7-4-2- or 7-5-0 Changes. Change 1. > For NewUIs_7_5_0_ByTheDarkWraith or version 7_4_2 Ubisoft\Silent Hunter 5\data\menu\menu.txt Change 2. Ubisoft\Silent Hunter 5\MODS\NewUIs_7_5_0_ByTheDarkWraith\data\menu\menu .txt Change 3. > Real Navigation Mod (Only if enabled) Ubisoft\Silent Hunter 5\MODS\NewUIs_7_5_0_Real Navigation\data\menu\menu.txt Enter your choice of message in the same format as the original message as in the example below. Go to Line Number > 4197 4197=Be more aggressive! < Original 4197=Continue with your orders! < New message example Go to Line Number > 9840 The message must be the same as in Line Number 4197. When changes have been made to each menu.txt file. Exit Save Remember when you disable mods you will need to repeat this procedure. Courtesy acknowledgement to TheDarkWraith
__________________
LSH3-2015 <> TUTORIALS <> ALL YOU NEED TO KNOW <> ALL IN ONE PLACE SH4 <> TUTORIALS <> HOW TO DO IT <> INFORMATION <> DOWNLOAD LINKS SH5 <> TUTORIALS <> HOW TO DO IT <> INFORMATION <> DOWNLOAD LINKS Always Here To Help A Fellow 'Subber' | Need An Answer to A Question Just Send Me A PM Last edited by THEBERBSTER; 03-16-19 at 04:17 PM. Reason: New instructions |
|
|
|
|
12-08-14, 03:24 PM
|
#10 |
|
Growing Old Disgracefully
Join Date: Dec 2012
Location: Hythe - Southampton
Posts: 9,609
Downloads: 1133
Uploads: 0
|
Last updated 27th April 2018
In this Tutorial the Mission Orders are to Patrol Area AM5356 The Kriegsmarine main grid is made up of 2 letters and 2 numbers like AM53 The last 2 numbers can be found in a Map Tool called Light Grid. Light Grid contains 99 numbers in blocks of 9. Picture 1 > Shows the Kriegsmarine Grid AM53 Click on the short cut E key or use the Toggle Charts Visibility Icon on the right side. Select > Maps Select > Light Grid  Picture 2 > To make the Map Grid bigger use the mouse scroll wheel. Place the Light Grid over the AM53 Map Grid area. Use your mouse to expand the Light Grid to fit the AM53 Map Grid Area. You can use the edges or the corner of the Light Grid to do this. 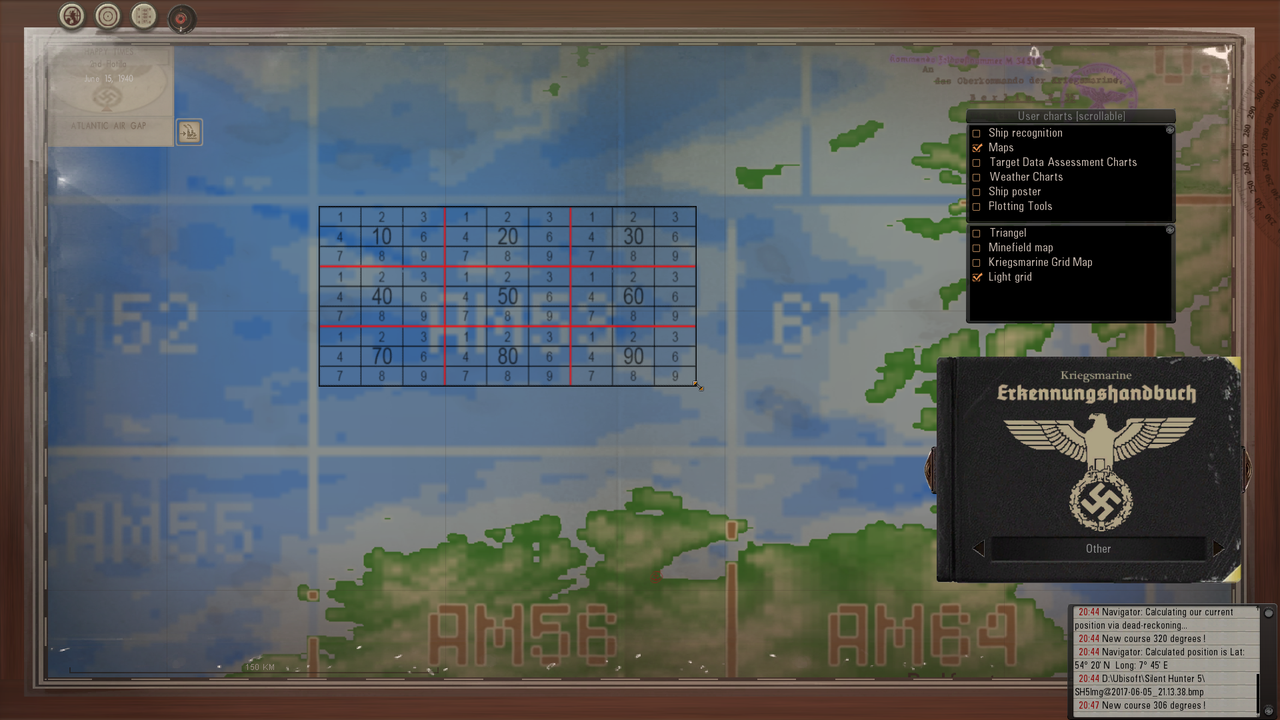 Picture 3 > With the Light Grid correctly positioned select the Marker Tool. 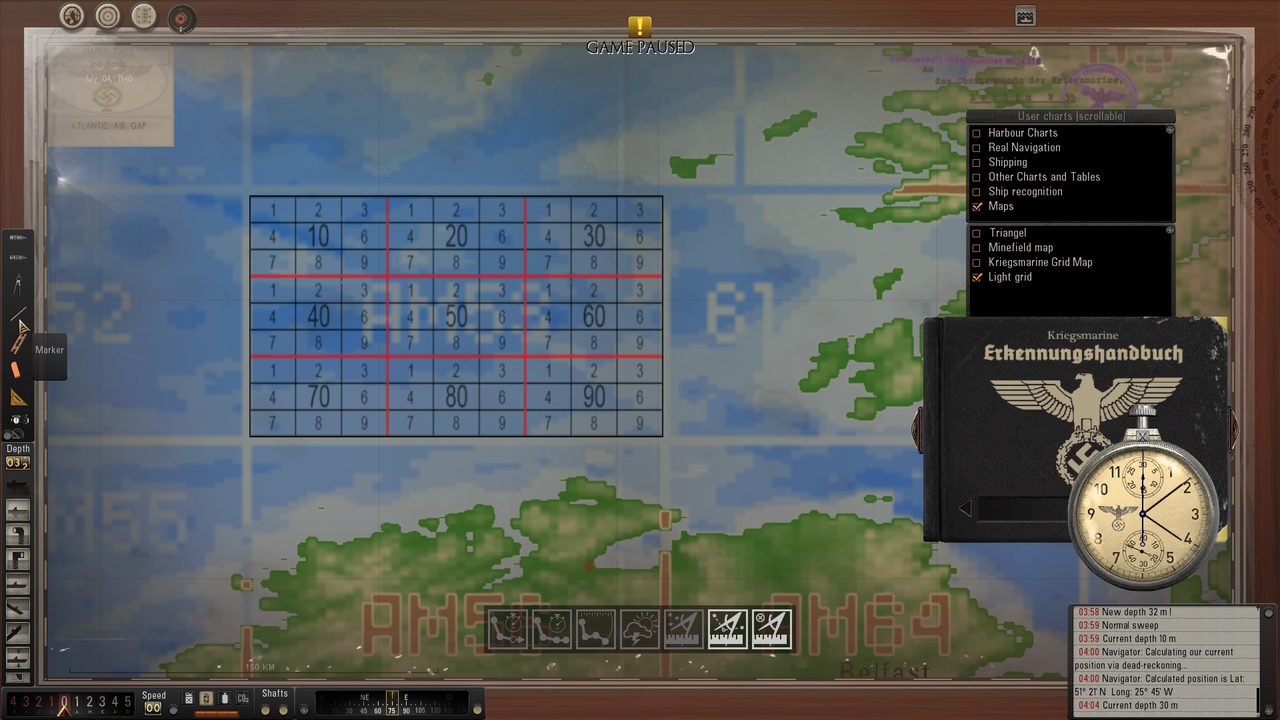 Picture 4> Place the Marker Tool in the Centre of 56 (AM53 56). You will notice the marker will change from its X shape. At this point you cannot plot the X mark onto the map.  Picture 5 > With the Marker Tool correctly positioned press the E shortcut key to remove the Light Grid. Click your mouse to plot the X Mark.  Picture 6 > Open the Map to zoom in on the X Mark. Select the Compass and draw out the Patrol km Area received in the Radio Message. You can Patrol anywhere within the circle until the objective is completed.  Note. Once you have entered the Patrol Area you must not make a manual save until your Patrol Objective is completed. If this is 48 hours then you should not leave the Patrol Area until the objective is completed otherwise you will have to go back out of the Patrol Area and come back in again to start the 48 hours again.
__________________
LSH3-2015 <> TUTORIALS <> ALL YOU NEED TO KNOW <> ALL IN ONE PLACE SH4 <> TUTORIALS <> HOW TO DO IT <> INFORMATION <> DOWNLOAD LINKS SH5 <> TUTORIALS <> HOW TO DO IT <> INFORMATION <> DOWNLOAD LINKS Always Here To Help A Fellow 'Subber' | Need An Answer to A Question Just Send Me A PM Last edited by THEBERBSTER; 12-24-19 at 04:23 AM. Reason: Replaced missing pictures |
|
|
|
|
12-08-14, 03:33 PM
|
#11 |
|
Growing Old Disgracefully
Join Date: Dec 2012
Location: Hythe - Southampton
Posts: 9,609
Downloads: 1133
Uploads: 0
|
Clearer Water Visibility Options
The easiest way to do this is by adding a Dynamic Environment optional mod to JSGME in the last position so it does not get overwritten. I have included the Dynamic Environment v2.9 text document so you can see what changes each of the 3 mods do. You can choose 1 or 2 mods to use but you cannot have both 3a and 3b enabled together. The mods included are: Mediafire download link Clearer Water Visibility Options See also this post before proceeding from Kallale: https://www.subsim.com/radioroom/sho...&postcount=491 These are the settings found in Stock and TWoS Stock Ubisoft\Silent Hunter 5\data\Filters\ColorCorrection\hdr_underwater [ColorCorrectionFilter] Gamma=0.9 Brightness=1.0 Saturation=1.0 Contrast=1.0 LevelsInputBlack=0.0 LevelsInputMidtone=0.85 LevelsInputWhite=0.87 LevelsOutputBlack=0.0 LevelsOutputWhite=1.0 ColorBalanceR=0.0 ColorBalanceG=0.0 ColorBalanceB=0.0 ColorBalanceTone=1 HueColor=FFFFFF00 HueOpacity=0.0 PhotoFilterColor=6DA9A200 PhotoFilterIntensity=1.0 The Wolves of Steel (TWoS) [ColorCorrectionFilter] Gamma=0.89 Brightness=0.45 Saturation=1.0 Contrast=0.95 LevelsInputBlack=0.0 LevelsInputMidtone=0.85 LevelsInputWhite=0.88 LevelsOutputBlack=0.0 LevelsOutputWhite=1.0 ColorBalanceR=0.0 ColorBalanceG=0.0 ColorBalanceB=0.0 ColorBalanceTone=0.5 HueColor=FFFFFF00 HueOpacity=0.0 PhotoFilterColor=6DA9A200 PhotoFilterIntensity=0.9 Courtesy acknowledgements to vdr1981 & Dynamic Environments v2.9 Team
__________________
LSH3-2015 <> TUTORIALS <> ALL YOU NEED TO KNOW <> ALL IN ONE PLACE SH4 <> TUTORIALS <> HOW TO DO IT <> INFORMATION <> DOWNLOAD LINKS SH5 <> TUTORIALS <> HOW TO DO IT <> INFORMATION <> DOWNLOAD LINKS Always Here To Help A Fellow 'Subber' | Need An Answer to A Question Just Send Me A PM Last edited by THEBERBSTER; 09-19-22 at 07:35 PM. |
|
|
|
|
04-29-22, 03:38 PM
|
#12 | |
|
Bosun
 Join Date: Jul 2013
Location: Mansfield, Notts. UK
Posts: 69
Downloads: 521
Uploads: 0
|
Quote:

|
|
|
|
|
|
05-06-19, 08:38 AM
|
#13 | |
|
Swabbie
 Join Date: Oct 2018
Location: UK
Posts: 11
Downloads: 28
Uploads: 0
|
Quote:
|
|
|
|
|
 |
|
|


 Hybrid Mode
