
|
|
SUBSIM: The Web's #1 resource for all submarine & naval simulations since 1997
|
SUBSIM: The Web's #1 resource for all submarine & naval simulations since 1997 |
|
|
 06-09-13, 10:00 AM
|
#1 |
|
Navy Seal
 
Join Date: May 2007
Location: On a mighty quest for the Stick of Truth
Posts: 5,963
Downloads: 52
Uploads: 0
|
Maybe I'm misunderstanding, or Wern is.
Frau is talking about a peninsula cabinet with countertop that extends out at a ninety degree angle from wall mounted cabinetry, are you not? If so, you would place the jack in the bottom of the cabinet, set a 2x4 cut to the right length between the jack and the underside of the counter. Slowly apply enough hydraulic pressure to raise the sag, then insert your support material in the gap. Remove jack and add it to your growing collection of tools.  You could, theoretically, do the same thing with just the 2x4 and a hammer. Wedging the board in between the cabinet floor and the countertop at the approximate center of the sag and using just the board as the support to raise the sag. It would be out of sight inside the back of the cabinet. If it's accessible. Lifting the sag should lower the end with the big gap shown in your photo. Mickey will be proud. He might even hug you if Minnie isn't around ha ha. 
__________________
 Tomorrow never comes Last edited by Wolferz; 06-09-13 at 11:32 AM. |

|

|
|
06-09-13, 12:35 PM
|
#2 | ||
|
Rear Admiral
 Join Date: Nov 2009
Location: Skyri--oh who are we kidding, I'm probably at Lowe's. Again.
Posts: 12,706
Downloads: 168
Uploads: 0

|
Quote:
Quote:
I could wedge something into the gap from inside the cabinet, provided I can get in there to do it - they're pretty big cabinets so it's probably doable. At least then if I do have to wedge things directly into the gap to raise the countertop I wouldn't be risking the same damage to the outer, visible part of the cabinet on the other side. 
|
||
|
|
|
|
06-09-13, 12:49 PM
|
#3 | |
|
Admiral
 Join Date: Jul 2009
Location: Now, alot farther from NYC.
Posts: 2,228
Downloads: 105
Uploads: 0
|
Quote:
I think you're spot-on with the 2 X 4 underneath the entire length of the countertop in order to keep it from cracking while lifting. I'd even suggest a 2 X 6, depending on the material integrity of the countertop. Then again, it's always possible that I'm on another planet, as usual. 
__________________
"The journey of a thousand miles begins with a single step." -Miyamoto Musashi ------------------------------------------------------- "What is truth?" -Pontius Pilate 
|
|
|
|
|
|
06-09-13, 01:14 PM
|
#4 | |
|
Rear Admiral
Join Date: Nov 2009
Location: Skyri--oh who are we kidding, I'm probably at Lowe's. Again.
Posts: 12,706
Downloads: 168
Uploads: 0
|
Quote:
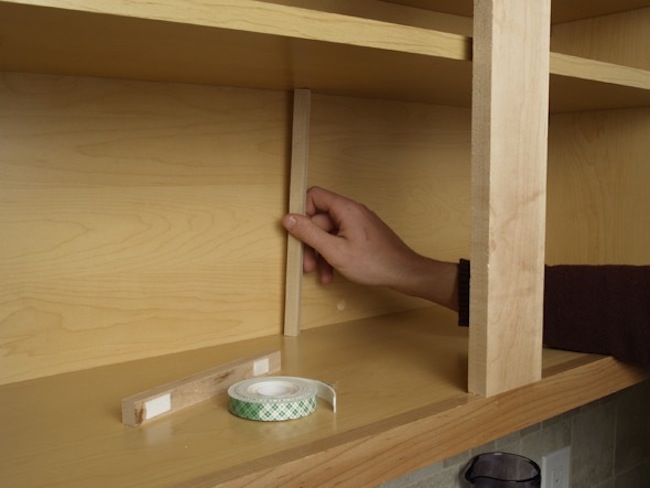
One end of the counter:  As you can see, there is a "lip" or whatever on the underside of the edge of the countertop that sits on top of the cabinet frame. This causes the rest of the underside to sit slightly higher than the top of the cabinet. Same thing on the other end:  In the middle, however, the edge of the counter is not over the cabinet because the countertop is oversized to extend outward over the back of it, to provide a counter for someone to sit at if you get barstools or whatever and sit them under there.  So there's nothing along the length of the underside of the countertop to hold it all up level with either end and it's sagging down into the gap between it and the cabinet. I want to raise it up to be level, or as level as possible, and then slide something in the gap to support it permanently. |
|
|
|
|
|
06-09-13, 01:26 PM
|
#5 | |
|
Admiral
Join Date: Jul 2009
Location: Now, alot farther from NYC.
Posts: 2,228
Downloads: 105
Uploads: 0
|
Quote:
 Well, after following Wolferz's advice on lifting it, you could use some pine shelving boards to fill in the gap. That doesn't look (in the photo) to be 2" deep, so maybe a 1" X 6" length of pine, glued and screwed into place.
__________________
"The journey of a thousand miles begins with a single step." -Miyamoto Musashi ------------------------------------------------------- "What is truth?" -Pontius Pilate
|
|
|
|
|
|
06-09-13, 01:37 PM
|
#6 | |
|
Rear Admiral
Join Date: Nov 2009
Location: Skyri--oh who are we kidding, I'm probably at Lowe's. Again.
Posts: 12,706
Downloads: 168
Uploads: 0
|
Quote:
|
|
|
|
|
|
06-09-13, 01:42 PM
|
#7 |
|
Rear Admiral
Join Date: Nov 2009
Location: Skyri--oh who are we kidding, I'm probably at Lowe's. Again.
Posts: 12,706
Downloads: 168
Uploads: 0
|
On a completely unrelated note, after perusing my patio I have to say I'm really disappointed in Ortho Roundup. Oh, it killed all the things I sprayed it on, but they were still THERE. I had to go around and pull them out by hand and that's TWICE I had to bend my aching back and/or knees for every single weed that I treated.
 I dunno, I guess I was expecting something more along the lines of the wicked witch of the west's exit in The Wizard of Oz, like they'd get doused and then just disappear back down into the ground shrieking "I'm melting!" in shrill little weedy voices.  |
|
|
|
|
06-09-13, 02:59 PM
|
#8 |
|
Old enough to know better

 Join Date: Dec 2011
Location: Prince Edward Island
Posts: 11,750
Downloads: 136
Uploads: 0


|
From the photos FK your counter top is the standard post-formed type. Particle board substrate covered with laminate. It is probably attached to your cabinet with screws through those built up parts around the edges. This type of counter top is not really strong and any heavy jacking could break it or lift it off the cabs. If I was doing this fix I would remove the top, flip it over and put the desired piece in, glued and screwed, then put it back on.
You may not want to go to that much work. I think your method should work, slowly wedging it up and getting the piece in there. I would use wooden shims. You can usually buy a small package of them at a building supply. Easy does it and it should work. The piece you put in should be the same thickness as those built down edges, probably 5/8s or 3/4s of an inch. Good luck. Enjoying reading about your new home adventures.
__________________
Two possibilities exist: either we are alone in the Universe or we are not. Both are equally terrifying. ― Arthur C. Clarke 
|
|
|
|
|
06-09-13, 02:54 PM
|
#9 | |
|
Eternal Patrol

 Join Date: Nov 2002
Location: High in the mountains of Utah
Posts: 50,369
Downloads: 745
Uploads: 249


|
Quote:

__________________
Never do anything you can't take back. Rocky Russo |
|
|
|
|
|
06-09-13, 04:14 PM
|
#10 | |
|
Rear Admiral
Join Date: Nov 2009
Location: Skyri--oh who are we kidding, I'm probably at Lowe's. Again.
Posts: 12,706
Downloads: 168
Uploads: 0
|
Quote:
|
|
|
|
|
|
06-09-13, 05:28 PM
|
#11 | |
|
Admiral
Join Date: Jul 2009
Location: Now, alot farther from NYC.
Posts: 2,228
Downloads: 105
Uploads: 0
|
Quote:
 Once you get the shims in place, get a piece of 5/8 plywood cut to a fitting length, and replace the pine shelving with the plywood, or just add additional pine shelf pieces until you have an inner wall within the cabinet wall. If you use the right glue and a few strategically placed screws, you'll never have to worry about it again. If you're talking fractions of an inch, this might be the answer.
__________________
"The journey of a thousand miles begins with a single step." -Miyamoto Musashi ------------------------------------------------------- "What is truth?" -Pontius Pilate
|
|
|
|
|
|
06-09-13, 08:10 PM
|
#12 | |
|
Rear Admiral
Join Date: Nov 2009
Location: Skyri--oh who are we kidding, I'm probably at Lowe's. Again.
Posts: 12,706
Downloads: 168
Uploads: 0
|
Quote:
|
|
|
|
|
 |
|
|


 Hybrid Mode
