
|
|
SUBSIM: The Web's #1 resource for all submarine & naval simulations since 1997
|
SUBSIM: The Web's #1 resource for all submarine & naval simulations since 1997 |
|
|
 08-06-13, 11:09 AM
|
#1 |
|
Sailor man
 Join Date: Mar 2011
Posts: 47
Downloads: 27
Uploads: 0
|
I'm posting this because the links were down, really would like a good online copy. Hopefully this helps some like me who were late to the party from searching for it. As I get time I'll try to post the rest of the sections.
.. Section I - Manual Charting While at Dead Stop The Goal: Determine the heading and speed of the target. Depending on the situation, you may find that it is best to have your U-Boat at a complete stop to make your observations and for charting plots. This is the easiest method of manual charting and is recommended for the beginner. However, MANY advanced and expert players only make their observations and charting from a Dead Stop, so don't feel that you are missing anything. Step #1: Locate and ID Your Target When a ship is sighted, center it in the scope/UZO and press L to lock the target. Bring up your Ship Registry and look for your contact. Once found, make sure to check the box so the mast height is entered on the notepad as in the picture below. Step #2: Make First Observation It is true that the more observation points you mark on the map in manual charting/TDC mode, the better. You can, in a pinch, get by with only two observation points. However, I try to make three or four to increase the accuracy. However many points you decide to make, the technique is the same for each. Get Range to Target Place the horizontal line of your scope on the waterline of the target. Next, click on Range in the Notepad. This will switch you to the Stadimeter which you then place at the top of the highest mast of the ship. Click the left mouse button when the line has been placed on the highest mast. The range to target will then appear in the Notepad.  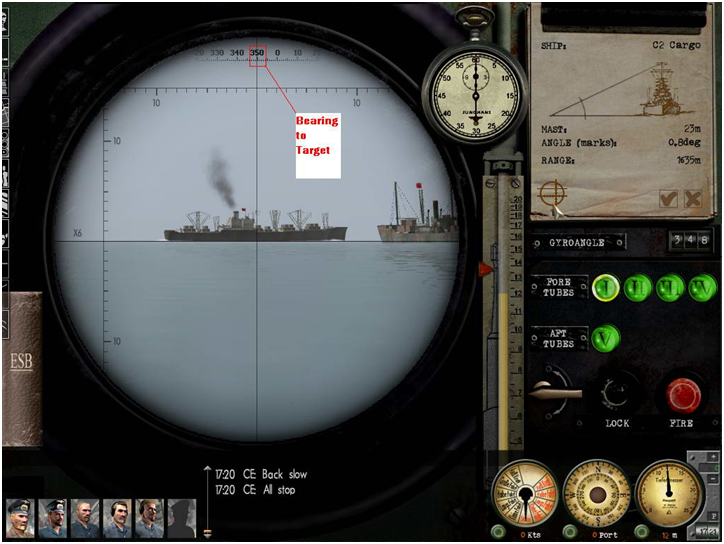 NOTE: The highest mast can be determined in the Ship Registry by looking at the target page that has only one ship on it. Get Bearing to Target Look at the number that appears in your scope right over the center of the target. This is the Bearing to Target in relation to your ship. In the above example, the Target Bearing is 350 degrees from the bow of the U-Boat and the range is 1635 meters. Start Stopwatch for First Observation Click on the stopwatch to begin what will be a three minute time period. TIP: It is good practice to lower your periscope with CTRL-Page Down once an observation is made to decrease the probability of being spotted. YOU NOW HAVE 3 MINUTES TO COMPLETE A PLOT OF THE TARGETS POSITION Step #3: Mark Observation on Navigation Chart Hit "F5" to get to the Navigation Map and zoom all the way into your U-Boat. Select the Ruler Tool and place one end of your bearing line in the dead center of the U-Boat icon by clicking the left mouse button: 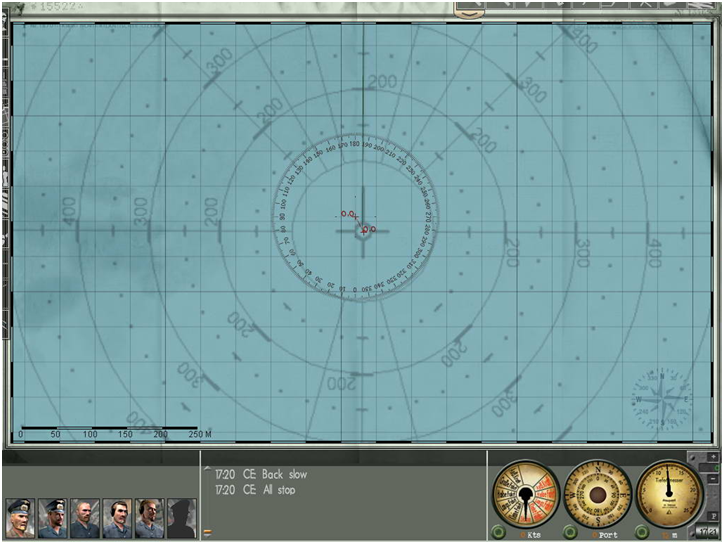 Now extend the line along the 350 degree bearing line. Why 350 degrees? Because, that is the bearing to the target you noted from your first observation: 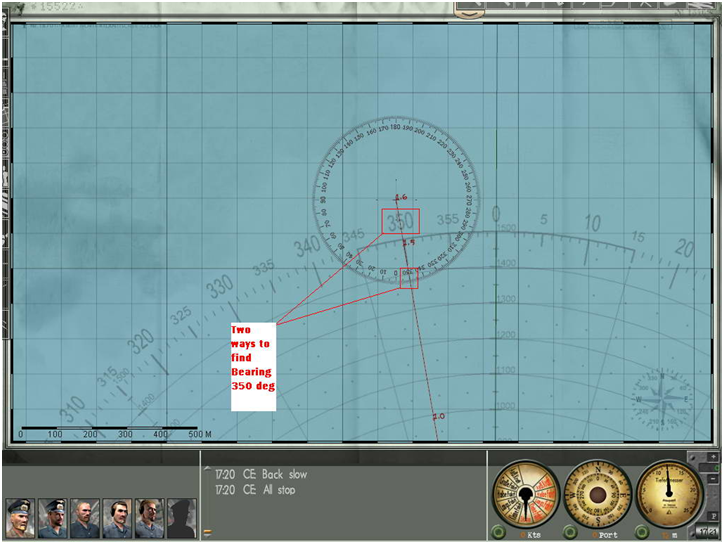 Setting the correct range requires a bit of estimating because when a number on the ruler changes, lets say from 1.6km as you extend the ruler to 1.7km, you must subtract 50 meters. Thus 1.7km is NOT 1700m when it changes from 1.6km, but is actually 1650m. An annoying little issue that I hope is fixed in a future patch. Tip: The Range Circles on the Bearing Mod appear to be the correct distances. Therefore, if your target is 1500 meters or less, you can use the Range Circles for greater accuracy. Note: You may use either the Bearing & Range Mod that draws the Bearing and Range circle centered around your U-Boat, OR, you may use the Jiim's Compass Ruler Mod that appears at the end of the Ruler line to find 350 degrees. As long as you are plotting within 2km or so of your U-Boat, the Range & Bearing Mod is usually still visible and thus quite helpful. However, when plotting long distances, you might find the Compass Mod to be quite handy. The choice is yours and the results are identical. Important: In the above example, BOTH the Bearing Mod AND the Ruler Compass show 350 degrees. This is ONLY a coincidence because the U-Boat is heading exactly due north. If the U-Boat were, say, heading 20 degrees and the target was bearing 350 degrees from the U-Boat, the Compass Ruler would NOT show 350 degrees, but instead would show the Bearing to Target from North. In this case, that would be 10 degrees on the Compass. Therefore, if you need to make a bearing line that is too far from the Bearing Mod, just match up the number on the Ruler Compass to where it "touches" the U-Boat's target bearing on the Bearing Mod. For a complete discussion of converting a Target Bearing to a Target Bearing from North, see the discussion under Charting while Moving. 
Last edited by Svonne; 08-25-13 at 01:40 AM. |

|

|
|
08-06-13, 11:19 AM
|
#2 |
|
Sailor man
Join Date: Mar 2011
Posts: 47
Downloads: 27
Uploads: 0
|
Step #4: Wait 3 Minutes and 15 Seconds Then Make Next Observation
Go back into your scope view (either periscope or UZO) and await the 3 minute 15 second point on the stop watch. With about 30 seconds left, raise your periscope (you DID lower it to maintain stealth, right??) and take another range reading. I usually do a couple as I approach the 3 minute mark to test my accuracy. 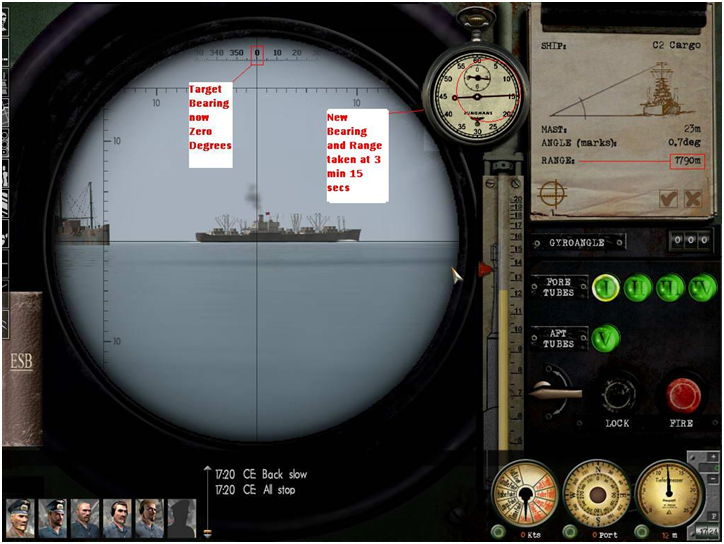 When the stopwatch hits 3 minutes 15 seconds, lower the scope and go back to the Navigation map and repeat Step #3 above. 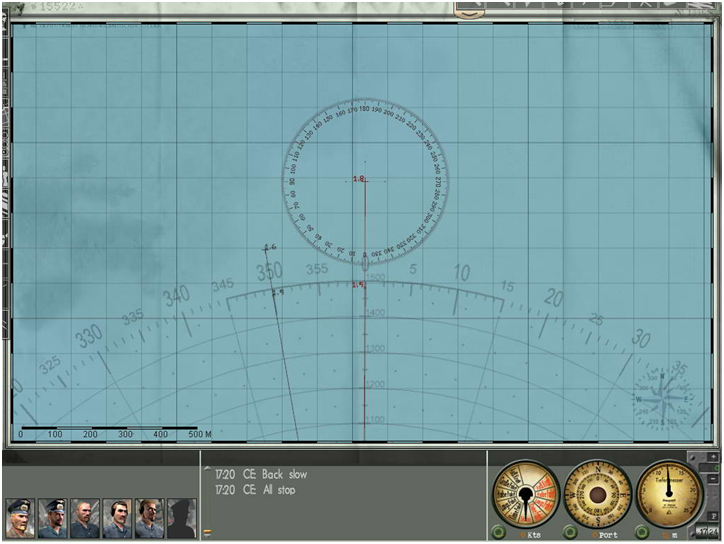 Above: Plotting of 2nd Observation Point - Bearing 000 degrees Last edited by Svonne; 08-25-13 at 01:42 AM. |
|
|
|
|
08-06-13, 11:28 AM
|
#3 |
|
Sailor man
Join Date: Mar 2011
Posts: 47
Downloads: 27
Uploads: 0
|
Step #5: Get The Target Speed From Your Observations
I have found that using Notepad stopwatch feature to determine target speed is often not accurate. Plus, it is more challenging and fun to do it from your charting like was done for real! Luckily, we have taken our observations in 3 minute 15 second increments. This has a HUGE benefit of being able to calculate the targets speed without having to make complicated calculations on the fly. Just select the ruler tool and draw a line connecting the two target points you plotted during your two observations. The distance of your line is a very close estimation of what the targets speed is in knots. For example, if the length of the measurement is .3km (or 300m), then the speed of the target is 3 knots. 500m is 5 knots, etc. 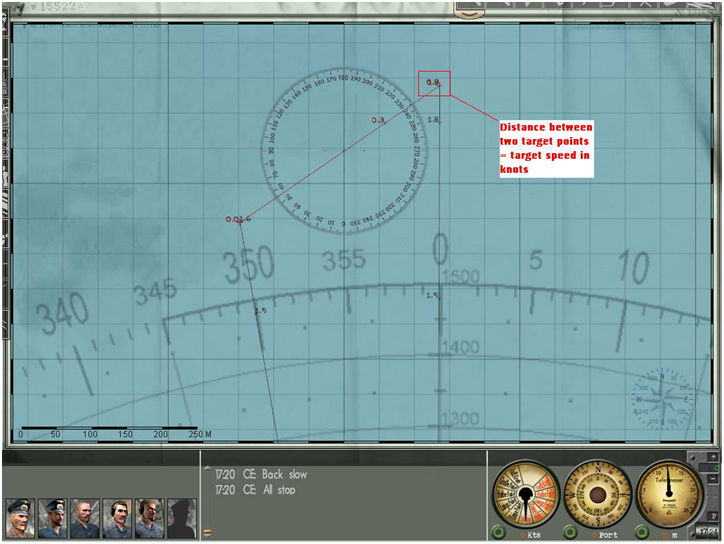 Above: Hard to see here, but the the reading still was .3km. Thus (based upon the"bug/feature" mentioned above), the speed of the target is between 3 & 3.5 knots. . NOTE: Up through Tutorial version 2.1, I was using a 3 minute timing instead of a 3 min. 15 second timing. The slightly longer timing reduces the error from about 8% to about three-tenths of 1% and is just as simple to employ! NOTE: Dont forget the ruler measuring problem (i.e. dont forget to subtract 50 meters from your measurement) discussed above. Step #6: Determine the Targets Course Now that we have a line of travel plotted from Step #5, all we need to do is measure the angle of that line to see what course the target is moving down; i.e. if you were on the targets boat, what compass heading would you be on. Once again, Jiims amazing tools come into play. Just select your ruler tool and zoom into the line you just plotted in Step #5. Now place the compass of the ruler tool so the crosshair is right on the line. The targets course will be the compass point where, due to the targets direction of travel, it would have first made contact with the compass: 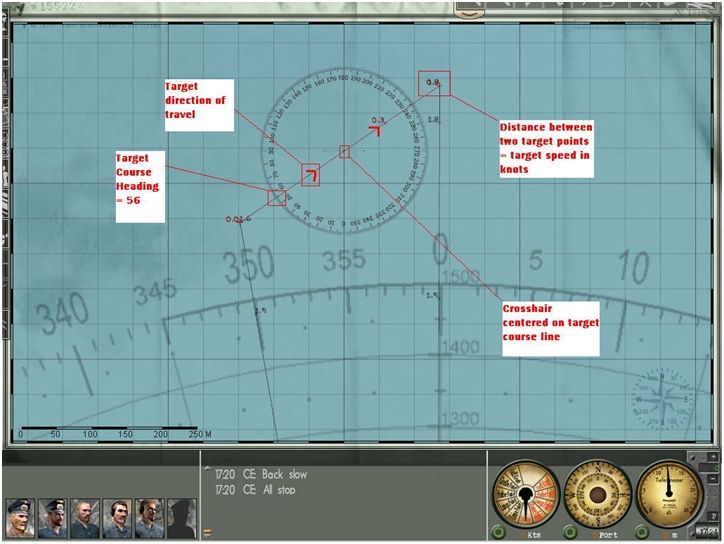 Above: Target enters compass along Course Line at 56 degrees. This is then the Target Course. Final Results Assuming that we've done our job correctly, we now have the two vital pieces of information we need to properly engage the target: Course Heading = 56 degrees Target Speed = approx. 3 - 3.5knots Last edited by Svonne; 08-25-13 at 01:43 AM. |
|
|
|
|
08-06-13, 11:32 AM
|
#4 |
|
Sailor man
Join Date: Mar 2011
Posts: 47
Downloads: 27
Uploads: 0
|
Ok there's the first part. Hopefully nothing was lost in all that copy and pasting I did.

|
|
|
|
|
08-09-13, 10:26 AM
|
#5 |
|
Sailor man
Join Date: Mar 2011
Posts: 47
Downloads: 27
Uploads: 0
|
Section II - Manual Charting While Moving
The Goal: Determine the heading and speed of the target. Depending on the situation, you might find it advantageous to make your observations and do your manual charting while your U-Boat is in motion. Often this is done to keep the range of the target ships at a reasonable distance as the farther away they get, the smaller they get, and the harder it is to get accurate range information. The downside is, as discussed below, you need to make more calculations compared to the Dead Stop method of plotting. It is, overall, a more complex way of plotting and recommended after you have mastered Dead Stop plotting. Step #1: Locating the Target and Setting a Roughly Parallel Course When a ship is sighted, center it in the scope/UZO and press L to lock the target. Make a visual observation of the contacts course relative to yours and click on the compass to set a course roughly parallel to your target. *IMPORTANT* - As highlighted in the picture below, note your new course as called out by your Chief Engineer. This will be VERY important shortly. 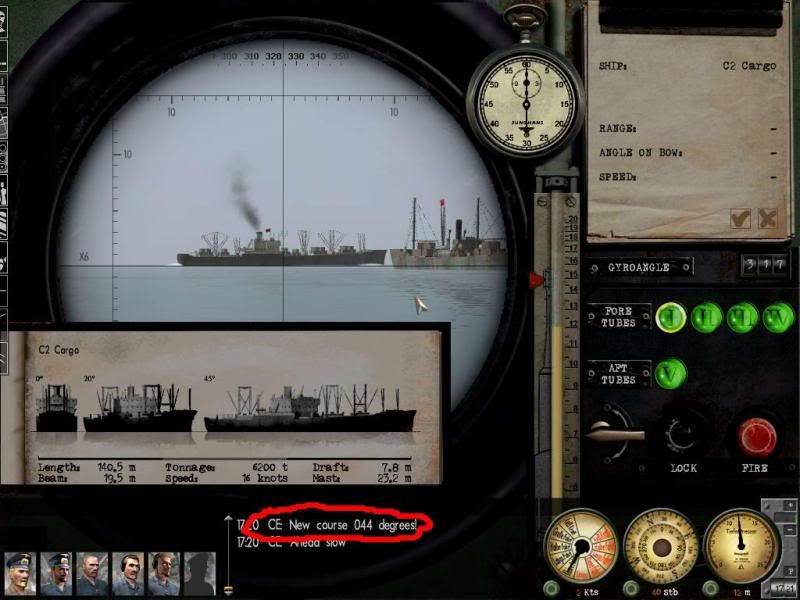 Do your best to get your bow heading in a direction that is ahead of the contact and will close distance over time. Perfection aint important here; just head in the correct general direction by not letting the contact bearing get too far behind your beam. Step #2: Get Your U-Boat Ready Zoom Map While you are turning towards your new course, go to the Navigation map and zoom all the way in to your U-boat. This will make accurate markings in real-time simpler. ID contact with recognition guide Bring up your Ship Registry and look for your contact. Once found, make sure to check the box so the mast height is entered on the notepad as in the picture below. 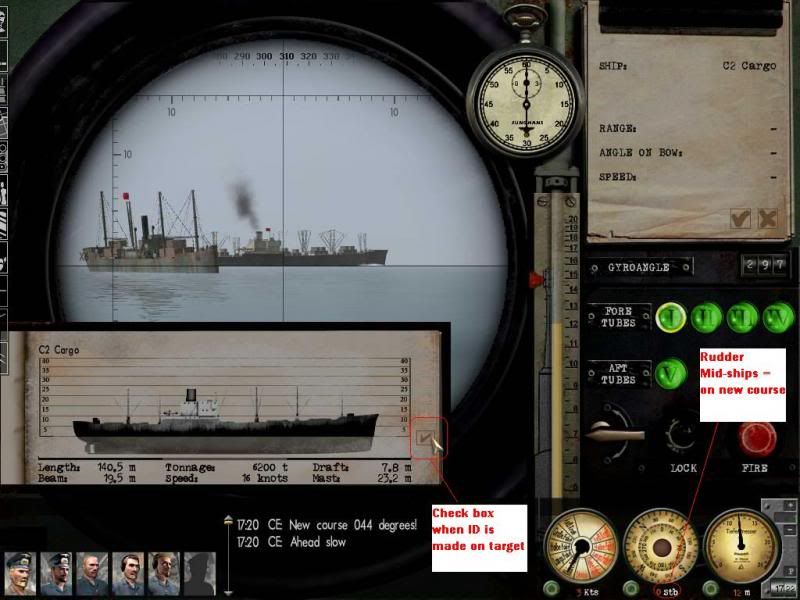 Get to New Course Confirm that you are now on your new course set in Step #1 above. Youll know when the rudder gauge shows zero turn as in picture above. DO NOT PROCEED TO STEP #3 UNTIL YOU ARE ON YOUR NEW COURSE! Set Ahead Slow By slowing down, not only do you help your stealth, you make real-time mapping a tad easier. As you get better, try upping the speed if you so desire. Step #3: Make First Observation Point It is a truism that the more observation points you mark on the map in manual charting/TDC mode, the better. For this method, you can, in a pinch, get by with only two observation points. However, I try to make three or four to increase the accuracy. However many points you decide to make, the technique is the same for each. Get Range to Target Place the horizontal line of your scope on the waterline of the target. Next, click on Range in the Notepad. This will switch you to the Stadimeter which you then place at the top of the highest mast of the ship. Click the left mouse button when the line has been placed on the highest mast. The range to target will then appear in the Notepad. 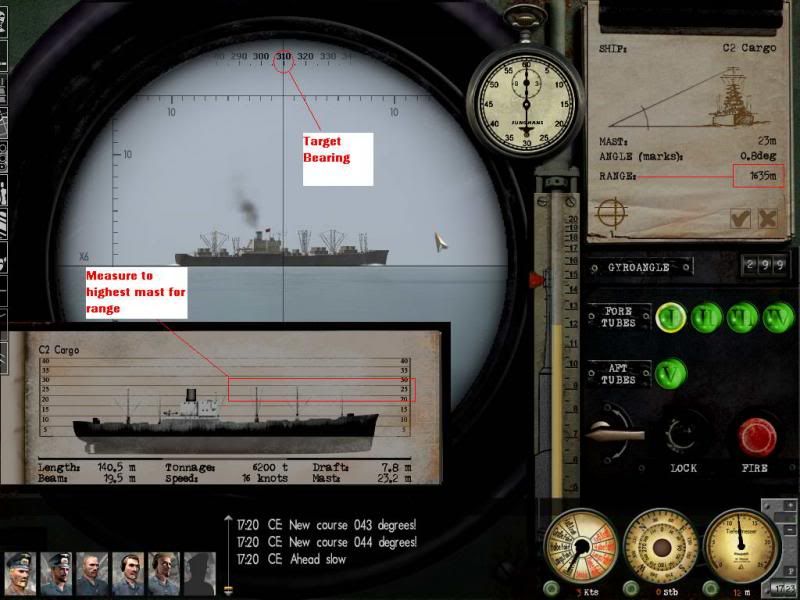 NOTE: The highest mast can be determined in the Ship Registry by looking at the target page that has only one ship on it. Get Bearing to Target Look at the number that appears in your scope right over the center of the target. This is the Bearing to Target in relation to your ship. In the above example, the Target Bearing is 310 degrees from the bow of the U-Boat and the range is 1635 meters. Start Stopwatch for First Observation Click on the stopwatch to begin what will be a three minute time period. TIP: It is good practice to lower your periscope with CTRL-PageDown once an observation is made to decrease the probability of being spotted. YOU NOW HAVE 3 MINUTES TO COMPLETE A PLOT OF THE TARGETS POSITION Last edited by Svonne; 08-25-13 at 01:45 AM. |
|
|
|
|
08-09-13, 10:33 AM
|
#6 |
|
Sailor man
Join Date: Mar 2011
Posts: 47
Downloads: 27
Uploads: 0
|
Step #4: Mark Current U-Boat position on Navigation Map
Since we are doing this without hitting the pause key, your U-boat position needs to be marked with the Marker tool to insure accurate plotting of the target. Quickly Hit F5 to get to the Navigation Map and select the Marker tool. Move the Marker tool over your U-boat and left click to enter a Mark. This is more accurate the slower you are going. 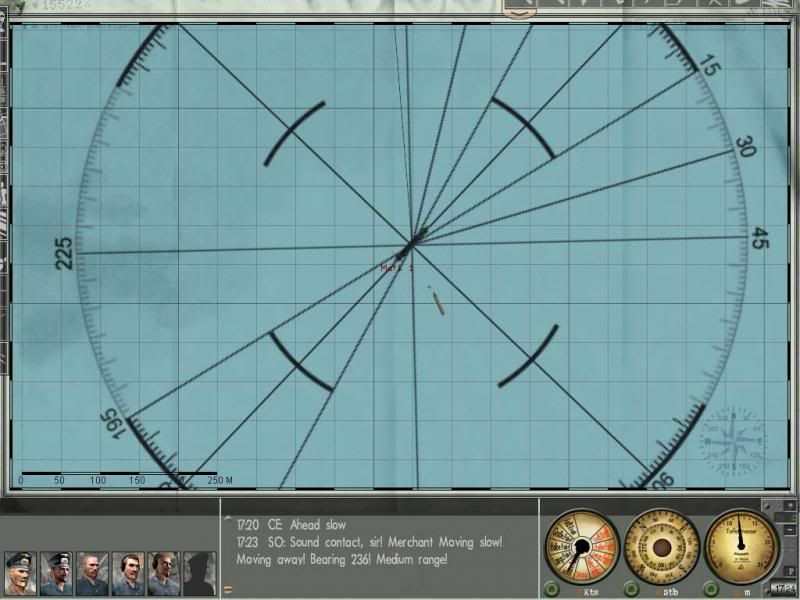 Step #5: Convert the Bearing to Target into Bearing to Target from North As your U-boat is moving away from your observation point (the one you marked in Step #4), it is not possible to use Jase's Bearing mod that displays bearings for your U-boat. This is because there is currently no mod available that keeps the orientation of the U-boat's bearings at a marked point on the map. Thus, we need a workaround to do this without pausing and then marking from the U-boats frozen position. To do this, we need to convert the Target Bearing into the Target Bearing from North. Put another way, if the U-Boat was traveling EXACTLY due North, what would the Target Bearing from the U-boat be? Luckily, this is quite simple because you have your U-boats current course heading which we took in Step #1. To convert Target Bearing from your U-Boat to Target Bearing from North, just add your course from Step #1 to the target bearing you took in Step #3. In this example, the target is bearing 310 and the U-Boats course is 44. 310 + 44 = 354 deg target bearing from North. TIP: If your answer is greater than 360, just subtract 360 from the sum to get the Target Bearing from North. Step #6: Draw a Bearing Line to the Target Select the ruler tool, and extend a line from the position you marked as your observation point in Step #4 through the bottom of the compass that appears at the tip of the ruler. The key point here is to extend the line not only the distance you recorded as the range to the target, but also at the Target Bearing to North which you calculated above. Simply have the line pass through the compass on the end of the ruler at the Target Bearing to North value. In the example below, notice how the line goes through 354 degrees on the compass outer ring. 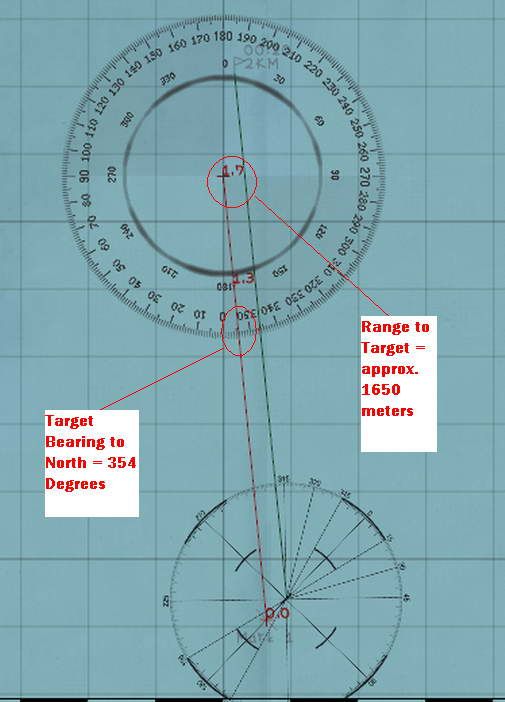 Setting the correct range requires a bit of estimating because when a number on the ruler changes, lets say from 1.6km as you extend the ruler to 1.7km, you must subtract 50 meters. Thus 1.7km is NOT 1700m when it changes from 1.6km, but is actually 1650m. An annoying little issue that I hope is fixed in a future patch. Step #7: Wait 3 Minutes and 15 Seconds Then Make Next Observation Go back into your scope view (either periscope or UZO) and await the 3 minute 15 second point on the stop watch. With about 30 seconds left, raise your periscope (you DID lower it to maintain stealth, right??) and take another range reading. I usually do a couple as I approach the 3 minute mark to test my accuracy.  When the stopwatch hits 3 minutes and 15 seconds, lower the scope and go back to the Navigation map and repeat Steps #4, #5, & #6 above. |
|
|
|
 |
|
|


 Hybrid Mode
