
|
|
SUBSIM: The Web's #1 resource for all submarine & naval simulations since 1997
|
SUBSIM: The Web's #1 resource for all submarine & naval simulations since 1997 |
|
|
 04-04-14, 05:15 AM
|
#1 |
|
Growing Old Disgracefully

 Join Date: Dec 2012
Location: Hythe - Southampton
Posts: 9,609
Downloads: 1133
Uploads: 0


|
Last updated 5th March 2017
Do Not Use These Settings For Either sobers Mega Mod Or The Wolves Of Steel. 1. Patches to Enable in TDWs Generic File Patcher (GFP) v1.0.68.0 2. Advanced and Experimental Patches should not be Enabled without taking advice. 3. This is a basic set up that you can copy and use to set up your own (GFP). 4. If you are using TDWs NewUi 7-4-2 then there are no additional changes needed to be made. 5. If you are using TDWs NewUi 7-5-0 then changes need to be made where shown. 6. Opening the Generic File Patcher and seeing all of the 9 Patchers. (Picture 1) Picture 1  7. Seeing the 1st CameraManager Patcher. (Picture 2) Picture 2  8. Seeing the 2nd EnvSim Patcher. (Picture 3) Picture 3  9. Seeing the 3rd kernel Patcher. (Picture 4) Picture 4  10. Seeing the 4th SH5.exe Patcher. (Pictures 5 Parts 1 & 2 If you are using TDW NewUI 7-5-0 then enable the Real nav menu.txt entries. Want to know how to change the Map Colors then use the Tutorial below? Post #41 Change The Map Colours In TDW's Generic File Patcher Picture 5 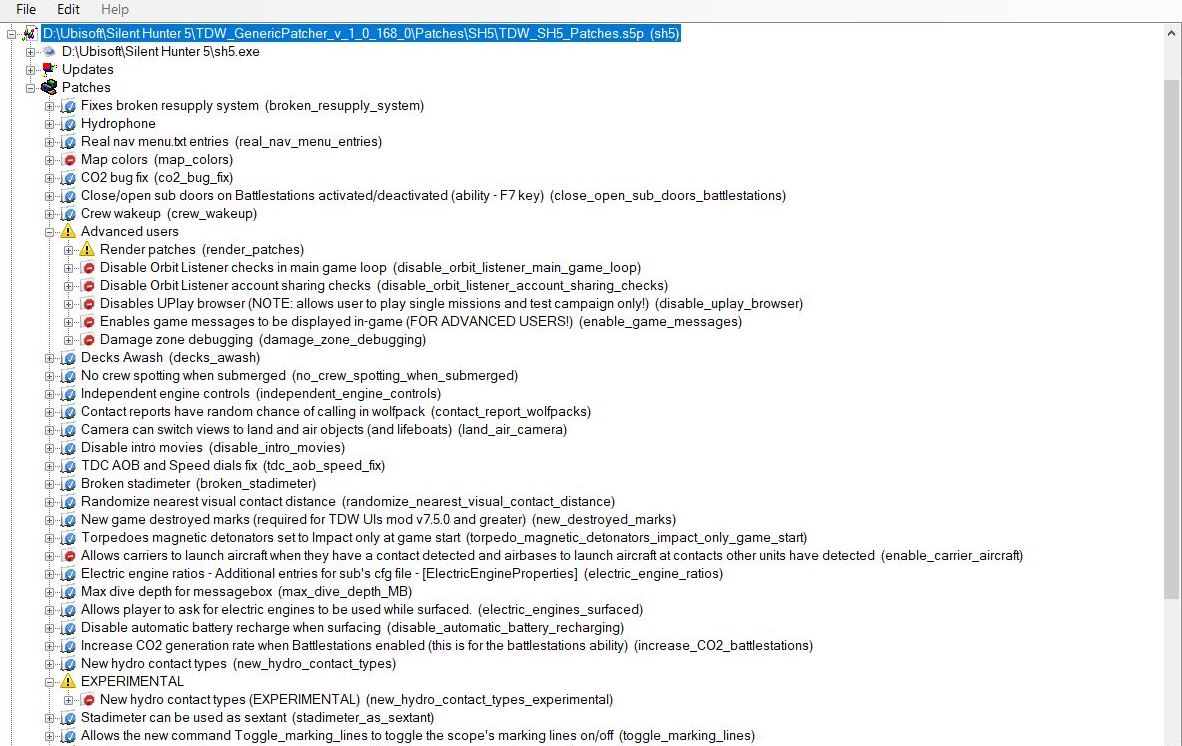 Picture 5 part 2 Second part of this long patch.  Seeing the 5th SHCollisions Patcher. (Picture 6) Picture 6 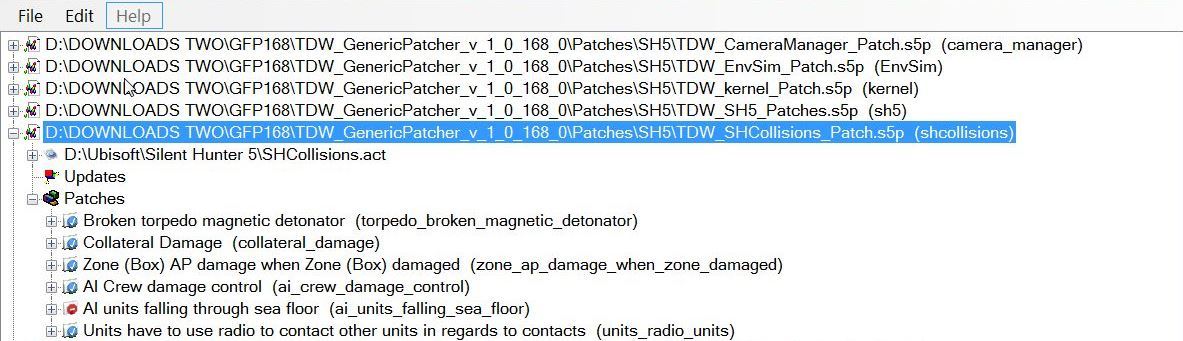 Seeing the 6th SHSim Patcher. (Pictures 7 Parts 1 & 2 This picture shows the 20 Torpedo Patches Enabled. Picture 7 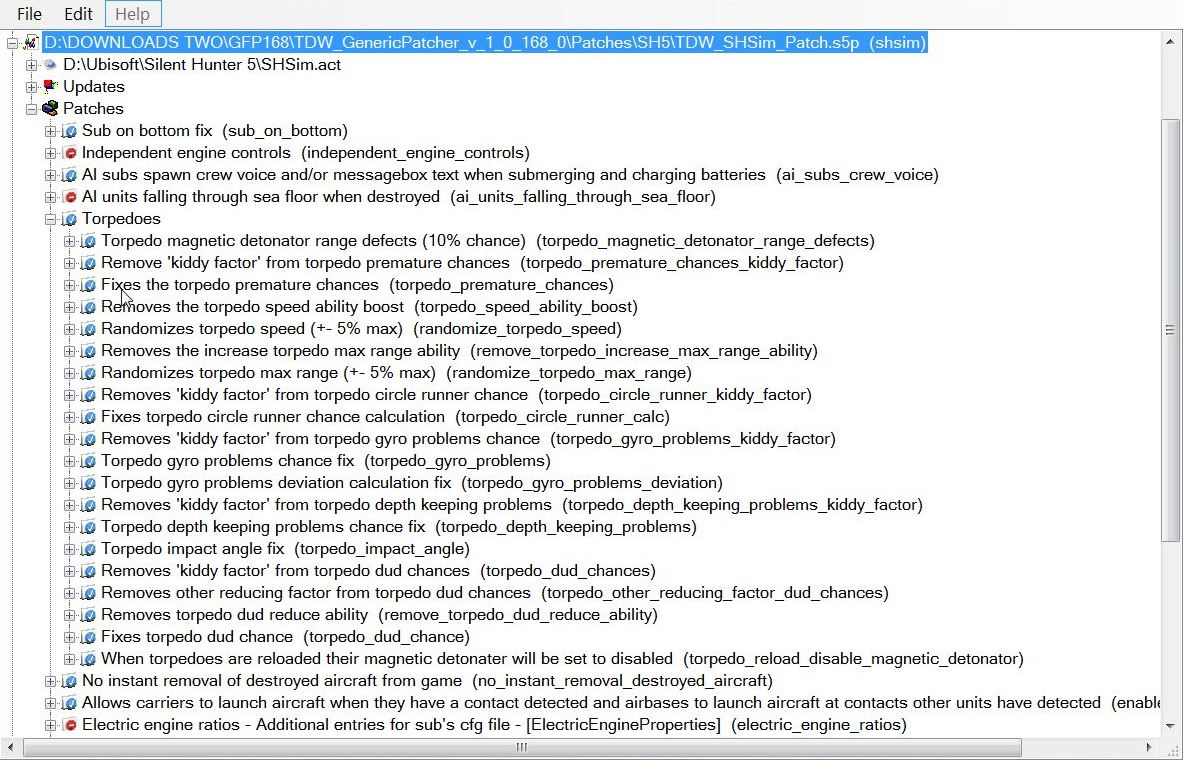 Picture 7 part 2 Second part of this long patch. 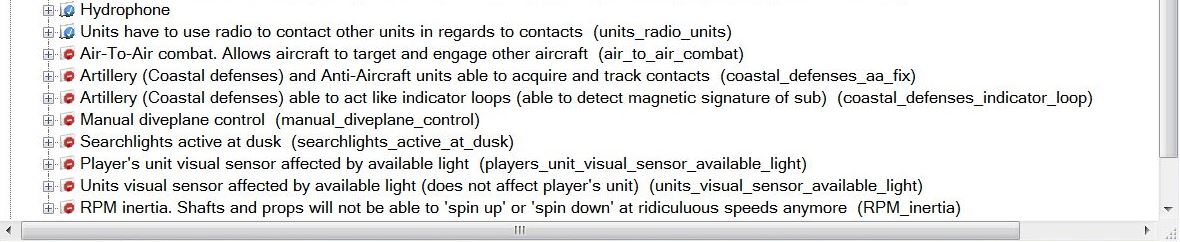 Seeing the 7th SHSound Patcher. (Picture 8) Picture 8 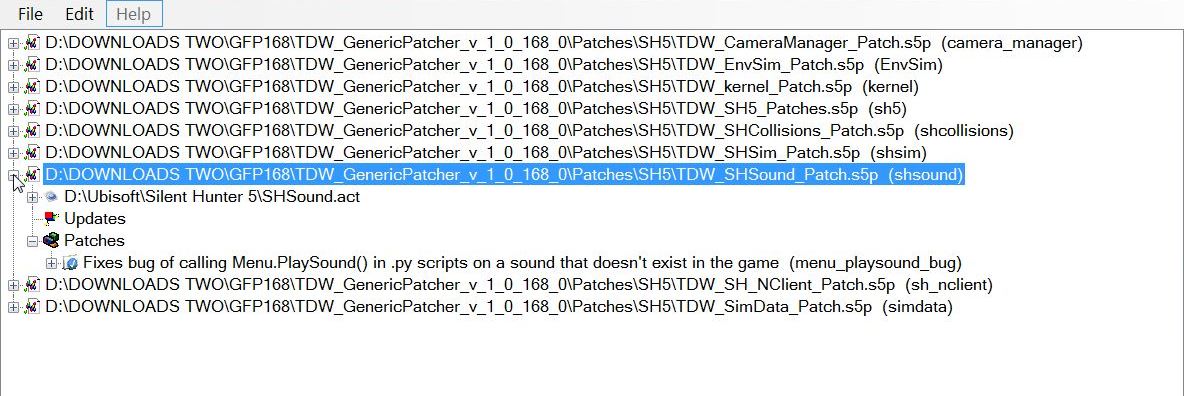 Seeing the 8th SHNClient Patcher. (Picture 9) Picture 9 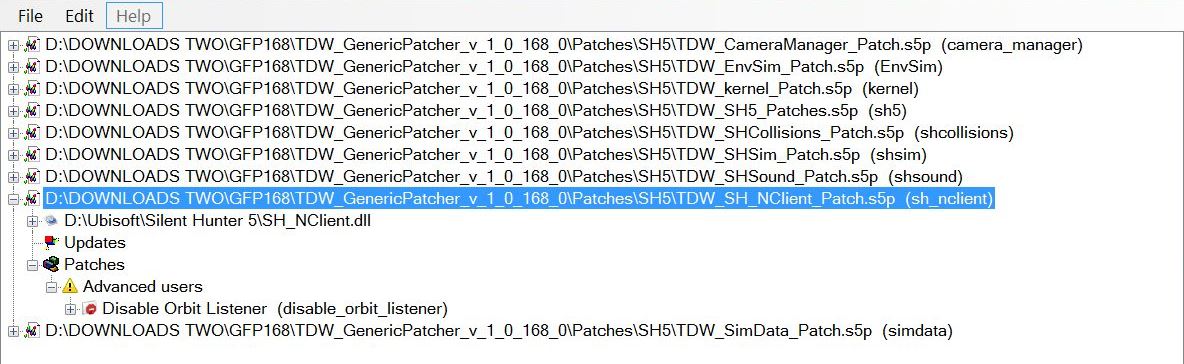 Seeing the 9th SimData Patcher. (Picture 10) Picture 10 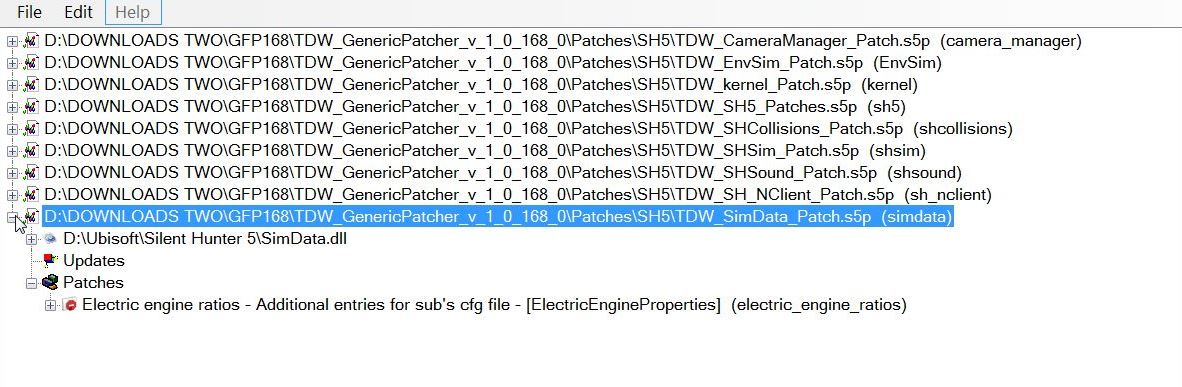 Download Link and information for TDW's GFP SH5.exe patches to fix bugs and add functionality Other GFP Tutorial Links. Courtesy acknowledgement to TheDarkwraith
__________________
LSH3-2015 <> TUTORIALS <> ALL YOU NEED TO KNOW <> ALL IN ONE PLACE SH4 <> TUTORIALS <> HOW TO DO IT <> INFORMATION <> DOWNLOAD LINKS SH5 <> TUTORIALS <> HOW TO DO IT <> INFORMATION <> DOWNLOAD LINKS Always Here To Help A Fellow 'Subber' | Need An Answer to A Question Just Send Me A PM Last edited by THEBERBSTER; 10-04-19 at 03:47 PM. Reason: Replaced missing pictures |

|

|
|
04-05-14, 11:00 AM
|
#2 |
|
Growing Old Disgracefully
Join Date: Dec 2012
Location: Hythe - Southampton
Posts: 9,609
Downloads: 1133
Uploads: 0
|
Last updated 21st January 2018
4 Bearing True Method Tutorial > Step By Step Instructions It is recommended that you use this Documented Tutorial in conjunction with the First Part of the mod Trevally Tutorial All v0.2 (for OHII v1.3) This can be found by selecting Tutorials and then 4 Bearings from the Main SH5 menu. Select Historical Missions >4 Bearing Tutorial. Select Start and the Tutorial will then load. This Tutorial Document has been edited so you can use it in your game play. It is assumed that you know how to use the map tools. Replace the Data you see here with your own. 1. This Tutorial is based on the first part of Trevallys Tutorial where the 15 minute Bearing Times have been used. 2. U-Boat speed >0 Knots. 3. U-Boat > Compass Bearing > 90 degrees. 4. U-Boat > Depth > 25 Meters. 5. Hydrophone Contact Bearing > 270 degrees. 6. Start > Stopwatch. 7. Time starting at 0 minutes for True Bearing 2. 8. Stopwatch Time >Each Bearing > 15 minutes. 9. Plot > Bearing 1. 10. Convert > True Bearing 90 + 270 = 360 or 0 11. Draw Bearing 1 from > Navigation Fix. 12. North > 0 degrees 13. Zoom out for accuracy. 14. You can Plot with Game Pause on. 15. Un-Pause Game to make any adjustments. 16. Draw out > 50km. 17. Start Stopwatch time > Each Bearing. 18. Trevally is using 15 minutes for this first example. 19. TIP >Compass place on top of the Bearing 1 Line towards the top and draw it out towards the Navigation Fix. Zoom out for accuracy. 20. 15 minutes later. 21. Contacts > True Bearing 2 > 56 degrees. 22. Stopwatch started 2nd time for Bearing 3. 23. Total time 15 minutes. (True Bearing 2 > 56 degrees) 24. Plot Bearing 2 25. Navigation Fix > 56 degrees. 26. Draw out > 50km. 27. Zoom out for accuracy. 28. Take note the way Contact is heading. 29. Bearing 2 is East of Bearing 1 30. Zoom out for accuracy 31. Target moving > West to East. 32. 15 minutes later > Bearing 3. 33. Stopwatch started 3rd time for the Predicted Bearing 4. 34. Total time 30 minutes. (True Bearing 3 > 61 degrees) 35. As soon as we get Bearing 3 we must Move the U-boat before we can take the 4th True Bearing. 36. Surface > U-Boat. 37. Ahead Standard. 38. Plot course Towards and to the Side of the last Contacts Position. 39. Bearing 61 degrees from > Navigation Fix. 40. Draw out 50km. 41. Zoom out for accuracy. 42. To get > Contacts Heading. 43. Pick a point over half way up on the Bearing 2 Line > Mark with an X. 44. Compass > on top of the Bearing 3 Line towards the end and draw it out towards > Navigation Fix. 45. Zoom out for accuracy. 46. Take both Compasses and place Parallel Across the X Mark you made on the Bearing 2 Line. 47. Zoom out for accuracy. 48. Draw a line 30 km long from where the Bearings Cross each other. 49. Bearing Line 1 to > Bearing Line 3. 50. TIP > Sometimes it is easier to Mark the two crossing points and then draw your line through them with the Ruler. < 51. Erase the > '2 Compass Circles. 52. Contacts Heading Line (CHL) > 151 degrees. 53. Predict now > Bearing 4. 54. If the Target is maintaining > Constant Speed. 55. Measure the Distance > Compass between Bearing 2 > Bearing 3. 56. Compass on > X Mark > Bearing 2 Line. 57. Compass Radius shows the Distance between Bearing 1 > Bearing 3 remains constant if plotted correctly. 58. Compass drag to where the Bearing Line and > CHL Cross. 59. Spacing showing on Bearing 1 and Bearing 3 must be the same. 60. The Edge will show where to Plot the Predicted > Bearing 4. 61. Predicted Bearing 4 > Draw so it matches the shape of the Bearing 1 Line is to the Compass Circle. 62. Predicted Bearing 4 > Plotted. 63. 15 minutes have passed. 64. During that time we have: 65. Moved our U-Boat 66. Dived 67. Speed > 0 68. Hydrophone > New Bearing 4. 69. True Bearing > 350 degrees. 70. Navigation Fix. 71. Stop the Stopwatch no longer needed. 72. Total time 45 minutes.(True Bearing 4 > 350 degrees) 73. Plot > Real Bearing 4. 74. Draw out 350 degrees from > Navigation Fix so it crosses the > Predicted Bearing 4 Line. 75. Compass > make Parallel Line > on 151 degrees CHL 76. Compass from CHL and place it Parallel until it also Crosses both the True Bearing 4 Line and Predicted Bearing 4 Line. 77. This is the Line coming out from the U-Boat. 78. We now know where the Target is. 79. Compass > Measure > Bearing 1 Line > True Bearing 4 Line. 80. Target > 9,000 meters > 45 minutes. 81. We can now find Target Heading Target Range AOB Speed. 82. Go to the Knots in Meters Per Minute Chart. 83. 9000 meters > Targets Speed 6.5 Knots. 84. Although in this particular scenario 15 Minutes between bearings has been used you can use any time gap as long as they are the Same between all Bearings. 85. Personally I do not like to use less than 20 minutes as you need to be able to have the accuracy from the bearings you plot. 86. If the bearings are too close to each other then you will not be able to achieve this. 87. Always allow enough time for > Map Work. 88. The further away and Slower the Target is you will need to allow Longer Times between each Bearings. 89. Set up Firing Position >90 degrees. 90. If playing with Real Navigation > Navigator > new position fix. 91. Protractor on > 90 degree Line to > New CHL. 92. Draw a line > U-Boat > CHL 93. This is > 62 degrees 94. Firing Point now need to move > 4,200 meters. 95. Surface the Boat. 96. Order > Ahead Slow. 97. Compass <> Rudder > 62 degrees. 98. Speed per Minutes Chart > 4,200 Meters. 99. Check set up on Firing Line > 90 degrees. 100. Prepare your attack. 101. Good Hunting Captain. Courtesy acknowledgement to Trevally Tip If you shade this Tutorial and then copy and paste it to your PC Notepad you can then edit it.
__________________
LSH3-2015 <> TUTORIALS <> ALL YOU NEED TO KNOW <> ALL IN ONE PLACE SH4 <> TUTORIALS <> HOW TO DO IT <> INFORMATION <> DOWNLOAD LINKS SH5 <> TUTORIALS <> HOW TO DO IT <> INFORMATION <> DOWNLOAD LINKS Always Here To Help A Fellow 'Subber' | Need An Answer to A Question Just Send Me A PM Last edited by THEBERBSTER; 01-21-18 at 03:15 PM. Reason: removed text spacing |
|
|
|
|
04-15-14, 07:44 AM
|
#3 |
|
Growing Old Disgracefully
Join Date: Dec 2012
Location: Hythe - Southampton
Posts: 9,609
Downloads: 1133
Uploads: 0
|
Last updated 13th April 2016
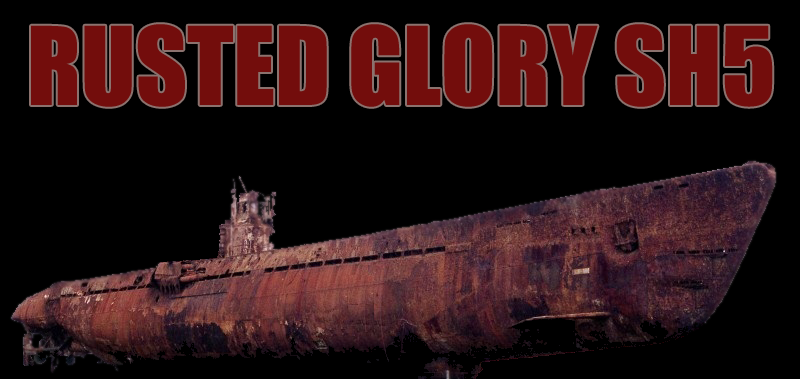 ------------------------ RUSTED GLORY SH5 >>> ------------------------ >>> THIS MOD IS JSGME READY. PLACE / EXTRACT INTO YOUR MODS FOLDER AND ENABLE WITH JSGME WHILE IN BUNKER. >>> IF YOU LOAD THIS MOD WHILE ON PATROL, YOU MAY NEED TO BUNKER SAVE AND RESTART THE GAME BEFORE YOU SEE THE CHANGES. >>> THIS MOD IS COMPATIBLE AND RECOMMENDED TO BE USED WITH STEELVIKINGS INTERIOR MOD V1.2 AND XENOMERV'S DARK_INTERIOR _V1. ENABLE RUSTED GLORY LAST IF USING ANY OF THOSE MODS AND BE SURE TO ENABLE IN THIS ORDER: STEELVIKINGS INTERIOR MOD V1.2 STEELVIKINGS INTERIOR MOD PATCH V1.2.2 DARK_INTERIOR_V1 RUSTED GLORY SH5 >>> ENABLE THIS MOD LAST ON YOUR LIST. ALLOW ANY CONFLICT. THERE WILL BE NO HARD CODE CHANGES WITH SAID CONFLICTS. ----------------------------------------- THIS MOD CHANGES THE FOLLOWING >>> ----------------------------------------- >>> RUSTED EXTERIOR FOR TYPE VIIA, VIIB, VIIC AND VIIC/41. THIS MOD WORKS WITH ((( ONLY THE COMMISSIONING PAINT SCHEME.))) I HAVE INCLUDED THE ADDITIONAL CONNING TOWER FOR THE VIIC/41 U-FLAK MOD RELEASED BY vdr1981 ON 2-23-2016. >>> RUSTED INTERIOR FOR TYPE VIIA, VIIB, VIIC AND VIIC/41. THIS INCLUDES RUSTED BULKHEADS, PANELS, PIPES, EQUIPMENT, HATCHES, ENGINES, LADDERS, PERISCOPE & MOST ANY PLACE NATURAL OXIDATION CAN OCCUR. >>> RUSTED U-BOAT BUNKERS >>> DIMMED THE LIGHTS WITHIN THE SUB INTERIOR CREATING A DARKER SETTING. THE HUE HAS ALSO BEEN ADJUSTED TO A MORE REALISTIC LIGHTING YOU WOULD EXPECT FROM BULBS IN THE 1940'S >>> THE CAPTAIN & NAVIGATION DESK PHOTOS HAVE BEEN CHANGED >>> THE TORPEDO HEAD COLOR HAS BEEN CHANGED TO RED >>> THERE IS A SUBSIM EASTER EGG TO BE FOUND AS A TIP OF THE HAT TO ONE OF THE BEST COMMUNITIES ON THE WEB. WITHOUT SUBSIM AND ITS MEMBERS, THIS MOD WOULD HAVE NEVER BEEN POSSIBLE. -------------------------------- FINAL NOTES & AGREEMENT >>> -------------------------------- RUSTED GLORY SH5, IS A SUBSIM.COM COMMUNITY MOD. PLEASE READ THE DOCUMENTATION FOR IMPORTANT INFORMATION. ITS TIME TO GET IN YOUR RUSTY SUB AND SINK 'EM ALL! Dwnload Subsim http://www.subsim.com/radioroom/down...o=file&id=4928 Download Media Fire http://www.mediafire.com/download/sw..._GLORY_SH5.rar  __________________ __________________Kaleun Frank Taylor Present Command: U-19 @ Lorient Bunker SH5 Type VIIB U-Boat "Evil Ashy"
__________________
LSH3-2015 <> TUTORIALS <> ALL YOU NEED TO KNOW <> ALL IN ONE PLACE SH4 <> TUTORIALS <> HOW TO DO IT <> INFORMATION <> DOWNLOAD LINKS SH5 <> TUTORIALS <> HOW TO DO IT <> INFORMATION <> DOWNLOAD LINKS Always Here To Help A Fellow 'Subber' | Need An Answer to A Question Just Send Me A PM Last edited by THEBERBSTER; 04-13-16 at 04:29 AM. Reason: Added additional download link |
|
|
|
|
04-15-14, 02:51 PM
|
#4 |
|
Growing Old Disgracefully
Join Date: Dec 2012
Location: Hythe - Southampton
Posts: 9,609
Downloads: 1133
Uploads: 0
|
Last updated 31st December 2014
Convoy Hunt For Ships In The Same Row - Tutorial Video's - With Real Navigation And 100% Realism In SH5 > Step By Step Instructions. This Tutorial by Stoianm shows you how to attack 3 Targets in a Row simultaneously. My Tutorial can be used in conjunction with Stoianms 4 videos that make up his Tutorial or as a standalone replacing Stoianms Data with your own. If you are using Map Contacts then you will need to disregard parts of this tutorial but you will still need to know how to take the different bearings. (Leave the TAI Map Minimised instead of Closing it. Link to video 1 (10 minutes) 1. Speed > 0. 2. Navigator Position Fix > 52 degrees. 3. U-Boat > Periscope Depth. 4. Search for > Convoy. 5. Contact Bearing > 301 degrees. 6. Go to > Battle Stations. 7. With Periscope Up. 8. Lock on Target with the Space Bar. 9. Go to the > Gunner Icon. 10. Follow Selected Target. 11. Ships Identification. 12. Toggle > Charts Icon. 13. Ship Recognition Manual. 14. Send Mast Height to > TDC. 15. Toggle > Charts Icon. 16. Stopwatch. 17. Wait for the Bearing in the TDC to change from 311 to 312 degrees. 18. Pause Game. 19. Open > TAI Map. 20. Select the > Ruler and draw the U-boats Heading > 52 degrees. 21. Zoom out for Accuracy. 22. Bearing Calculation > 360 312 = 48 degrees on the left. 23. Select the > Protractor and draw out the > 48 degrees. 24. Close the > TAI Map. 25. Move the > Periscope Line on to the > Targets Waterline. 26. Click the > Mouse to > lock the Periscope. 27. Go to > Range. 28. Go to > Stadimeter. 29. Stadimeter > shows the Range > 5050 meters. 30. Open the > TAI Map. 31. Select the > Compass and draw out the > 5050 meters. 32. Zoom out for Accuracy. 33. Select the > Marker and Mark an X where the lines intercept. 34. Start the > Stopwatch. 35. The > Stopwatch will be stopped after > 5minutes. 36. Un-Pause Game. 37. Do not > Erase any > Marks we will use these again. 38. 5 Minutes have now gone 39. Pause Game. 40. TDC Bearing after 5 Minutes is showing >322 degrees. 41. Bearing Calculation > 360 322 = 38 degrees on the left. 42. Open the > TAI Map. 43. Take the > Protractor and reposition to > 38 degrees. 44. Zoom out for Accuracy. 45. Close the > TAI Map. 46. Go to > Range. 47. Move > Periscope Line on to the > Targets Waterline. 48. Click the >Mouse to > lock the Periscope. 49. Select > Range. 50. The > Stadimeter shows the > Range > 4450 meters. 51. Open the > TAI Map. 52. Select the > Compass. 53. Reposition the > Compass to show > 4450 meters. 54. Zoom for Accuracy. Link to video 2 (10 Minutes) 55. Select the > Marker and > Mark an X where the lines intercept. 56. Select the > Eraser and just leave the > 2 X Marks. 57. Select the > Ruler. 58. From the > 1st X draw through the > 2nd X and past the > U-Boat. 59. Zoom out for Accuracy. 60. Select the > Compass and measure the distance between the > 2 Marks shows > 1000 meters. 61. Toggle the > Charts Icon. 62. Select the > Speed in Minutes chart. 63. Look at the > 5 Minute column. 64. The > Convoy Speed is showing > 6 Knots. 65. Toggle the > Charts Icon. 66. Select the > Protractor. 67. Draw > 90 degrees out from the > U-Boat to the > Targets Course Line. 68. Zoom out for Accuracy. 69. Un-Pause Game. 70. Adjust if necessary > Protractor. 71. Minimise the > TAI Map. 72. Order > Silent Running. 73. Select the > Ruler and take a > Bearing on the > U-Boats Course Line. > 45 degrees. 74. Order > Ahead Slow. 75. Adjust the > Compass or Rudder until the > Course is adjusted to > 44 degrees. 76. AOB > 90 degrees. 77. Scope Bearing > 0 degrees. 78. Order > All Stop. 79. While the > U-Boat is slowing down is good opportunity to set up the > Torpedoes. 80. Stoianm is going to fire > 3 Torpedoes at > 3 Different Targets. 81. If the Targets Scope Bearing is at > 355 degrees > 360 355 = 5 degrees. 82. AOB > 90 5 = 85 degrees. 83. The selection in a case like this is > 1 Slow - 2 Med - 3 Fast. 84. AOB is automatically adjusted on the next 2 targets because of the AOB on Target 1. 85. Set the > Torpedo Depths to 3 Meters. 86. It is important to set the 3 attacks spaced properly so as to get simultaneous hits. 87. Set to > Impact Detonation. 88. Minimise the > TAI Map. 89. Set the > Periscope to > 0 degrees. 90. Set the > AOB to > 90 degrees. 91. Set the > Speed to 6 Knots. Link to Video 3 (10 Minutes) Target 1 92. Select the > 3 Targets. 93. Pause Game. 94. Lock on > Target 1 with the > Space Bar. 95. Go to the > Gunner Icon 96. Follow Selected Target. 97. Ships Identification. 98. Toggle > Chart Icon. 99. Ships Recognition Manual. 100. Un-Pause Game. 101. Send the > Mast Height to the TDC. 102. Toggle > Chart Icon. 103. Pause Game. 104. Move > Periscope Line on to the > Targets Waterline. 105. Click the > Mouse to lock the > Periscope. 106. Go to > Range. 107. The > Stadimeter shows the > Range > 2900 meters. 108. Move the > Periscope to show > 4 degrees. 109. AOB is > 90 + 4 = 94 degrees 110. Un-Pause Game. 111. Fire 1 > Slow. 112. Unselect > Follow Target. Target 2 113. Select > Torpedo 2. 114. Select > Target 2 with the > Periscope. 115. Lock on > Target with the > Space Bar. 116. Pause Game. 117. Go to the > Gunner Icon 118. Follow Selected Target. 119. Ships Identification. 120. Toggle > Chart Icon. 121. Ships Recognition Manual. 122. Un-Pause Game. 123. Send the > Mast Height to the TDC. 124. Toggle > Chart Icon. 125. Pause Game. 126. Move > Periscope Line on to the > Targets Waterline. 127. Click the > Mouse to lock the > Periscope. 128. Go to > Range. 129. The > Stadimeter shows the >Range > 3100 meters. 130. Bearing Showing > 356 degrees. 131. Move the > Periscope to show > 356 degrees. 132. AOB is > 90 - 4 = 86 degrees Link to Video 4 (8 Minutes) 133. Un-Pause Game. 134. Fire 2 > Medium. 135. Unselect > Follow Target. Target 3 136. Select > Torpedo 3. 137. Select > Target 3 with the > Periscope. 138. Lock on > Target with the > Space Bar. 139. Go to the > Gunner Icon 140. Follow Selected Target. 141. Pause Game. 142. Ships Identification. 143. Toggle > Chart Icon. 144. Ships Recognition Manual. 145. Un-Pause Game. 146. Send the > Mast Height to TDC. 147. Toggle > Chart Icon. 148. Pause Game. 149. Move > Periscope Line on to the > Targets Waterline. 150. Click the > Mouse to lock the > Periscope. 151. Go to > Range. 152. The > Stadimeter shows the > Range > 2900 meters. 153. Bearing Showing > 351 degrees. 154. Move the > Periscope to show > 351 degrees. 155. 360 351 = 9 degrees 156. AOB is > 90 - 9 = 81 degrees 157. Un-Pause Game. 158. Fire 3 > Fast. 159. Unselect > Follow Target. 160. Ok Captain now > Go Silent Run Deep. 161. 3 Torpedoes > 3 Hits. 162. Good Luck Peter. Courtesy acknowledgement to Stoianm Tip Because of the length of this Tutorial I would recommend taking the following action. Right click and shade the text. Copy Paste to your PC Notepad or Word etc Save it. Take a Copy of your Original Keep the Original and Edit the Copy.
__________________
LSH3-2015 <> TUTORIALS <> ALL YOU NEED TO KNOW <> ALL IN ONE PLACE SH4 <> TUTORIALS <> HOW TO DO IT <> INFORMATION <> DOWNLOAD LINKS SH5 <> TUTORIALS <> HOW TO DO IT <> INFORMATION <> DOWNLOAD LINKS Always Here To Help A Fellow 'Subber' | Need An Answer to A Question Just Send Me A PM Last edited by THEBERBSTER; 01-17-18 at 05:56 PM. |
|
|
|
|
04-18-14, 12:04 PM
|
#5 |
|
Growing Old Disgracefully
Join Date: Dec 2012
Location: Hythe - Southampton
Posts: 9,609
Downloads: 1133
Uploads: 0
|
Last updated 31st December 2014
Convoy Hunt For Ships In The Same Column 3 Tutorial Video's - With Real Navigation And 100% Realism In SH5 This Tutorial by Stoianm shows you how to attack 4 Targets in a Column simultaneously. My Tutorial can be used in conjunction with Stoianms 3 videos that make up his Tutorial or as a stand-alone replacing Stoianms Data with your own. If you are using Map Contacts then you will need to disregard parts of this tutorial but you will still need to know how to take the different bearings. Link to video 1 (10 minutes) 1. Speed > 0. 2. Sonar Man Search for > Convoy. 3. Contact Bearing > 329 degrees. 4. U-Boat > Periscope Depth. 5. Navigator Position Fix > 0 degrees. 6. Go to > Battle Stations. 7. With Periscope Up. 8. Lock on Target with the Space Bar. 9. Go to the > Gunner Icon. 10. Follow Selected Target. 11. Ships Identification. 12. Toggle > Charts Icon. 13. Ship Recognition Manual. 14. Send Mast Height to > TDC. 15. Toggle > Charts Icon. 16. Stopwatch. 17. Pause Game. 18. Open > TAI Map. 19. Select the > Ruler and draw the U-boats Heading > 0 degrees. 20. Zoom out for Accuracy. 21. Bearing Calculation > 360 350 = 10 degrees on the left. 22. Select the > Protractor and draw out > 10 degrees to the left. 23. Close the > TAI Map. 24. Move the > Periscope Line on to the > Targets Waterline. 25. Click the > Mouse to > lock the Periscope. 26. Go to > Range. 27. Go to >Stadimeter. 28. Stadimeter > shows the Range > 5600 meters. 29. Open the > TAI Map. 30. Select the > Compass and draw out the > 5600 meters. 31. Zoom out for Accuracy. 32. Select the > Marker and Mark an X where the lines intercept. 33. Start the > Stopwatch. 34. The > Stopwatch will be stopped after > 5minutes. 35. Un-Pause Game. 36. Do not > Erase any > Marks we will use these again. 37. Stopwatch time shows 5 Minutes have gone 38. Pause Game. 39. TDC Bearing after 5 Minutes is showing >358 degrees. 40. Bearing Calculation > 360 358 = 2 degrees on the left. 41. Open the > TAI Map. 42. Take the > Protractor and reposition to > 2 degrees. 43. Zoom out for Accuracy. 44. Close the > TAI Map. 45. Go to > Range. 46. Move > Periscope Line on to the > Targets Waterline. 47. Click the >Mouse to > lock the Periscope. 48. Select > Range. 49. The > Stadimeter shows the > Range > 4726 meters. 50. Open the > TAI Map. 51. Select the > Compass. 52. Reposition the > Compass to show > 4700 meters. 53. Zoom for Accuracy 54. Select the > Marker and > Mark an X where the lines intercept. 55. Select the > Eraser and just leave the > 2 X Marks. 56. Select the > Ruler. 57. From the > 1st X draw through the > 2nd X and past the > U-Boat. 58. Zoom out for Accuracy. Link to video 2 (10 Minutes) 59. Select the > Ruler and measure the distance between the > 2 Marks shows > 1150 meters. 60. Toggle the > Charts Icon. 61. Select the > Speed in Minutes chart. 62. Look at the > 5 Minute column. 63. The > Convoy Speed is showing > 7 Knots. 64. Toggle the > Charts Icon. 65. Un-Pause Game. 66. Lower the Periscope. 67. Pause Game. 68. Select the > Protractor. 69. Draw > 90 degrees out from the > U-Boat to the > Targets Course Line. 70. Zoom out for Accuracy. 71. Un-Pause Game. 72. Adjust if necessary > Protractor. 73. Minimise the > TAI Map. 74. Order > Silent Running. 75. Select the > Ruler and take a > Bearing on the > U-Boats Course Line. > 41 degrees. (Shows 46 on compass not 41) 76. Order > Ahead Slow. 77. Adjust the > Compass or Rudder until the > Course is adjusted to > 41 degrees. 78. AOB > 90 degrees. 79. Scope Bearing > 0 degrees. 80. While the > U-Boat is slowing down is good opportunity to set up the > Torpedoes. 81. Stoianm is going to fire > 3 Torpedoes at > 3 Different Targets. 82. Set the > Torpedo Depths All to 3 Meters. 83. Set the > Torpedo Speeds All to Fast. 84. Set the > Torpedoes All set to Impact Detonation. 85. Order > All Stop when the Compass shows 41 degrees. 86. When Speed > 0 87. Open the TAI Map. 88. Navigator Position Fix 89. Adjust if necessary > Protractor to maintain 90 degrees. 90. Raise the Attack Scope. Link to video 3 (10 Minutes) 91. Take the Compass and measure out the Distance > 2900 meters. 92. Press the Red Button to change to Manual. 93. Enter the Range > 2900 meters. 94. Enter the Speed > 7 Knots. 95. Enter the AOB > 90 degrees Starboard. 96. Press the Green Button to change back to Auto. 97. Set both Gyro-Angles to 0 degrees. 98. The Scope Bearing will change to take this into account. 99. The 1st Torpedo will be fired when the Target enters the Cross Hair 100. Select the Targets. 101. Remember each time the Periscope is moved to make sure that you set it back so both the Gyro-Angles are at 0 degrees. 102. Fire each Torpedo as each Target enters the Cross Hair. 103. After firing your last Torpedo Run Silent Run Deep. 104. Good Hunting Peter. Courtesy acknowledgement to Stoianm Tip If you shade this Tutorial and then copy and paste it to your PC Notepad you can then edit it.
__________________
LSH3-2015 <> TUTORIALS <> ALL YOU NEED TO KNOW <> ALL IN ONE PLACE SH4 <> TUTORIALS <> HOW TO DO IT <> INFORMATION <> DOWNLOAD LINKS SH5 <> TUTORIALS <> HOW TO DO IT <> INFORMATION <> DOWNLOAD LINKS Always Here To Help A Fellow 'Subber' | Need An Answer to A Question Just Send Me A PM Last edited by THEBERBSTER; 01-17-18 at 05:57 PM. |
|
|
|
|
04-18-14, 12:10 PM
|
#6 |
|
Growing Old Disgracefully
Join Date: Dec 2012
Location: Hythe - Southampton
Posts: 9,609
Downloads: 1133
Uploads: 0
|
Last updated 26th January 2016
These percentages do not apply if using The Wolves Of Steel mega mod. Game Play Settings are selected from the Main Menu and then by selecting Options. Game Play Option Levels: Low > 2% Medium > 38% High > 77% Realistic > 100% Custom > % dependant on what is added or removed. The default setting showing in Game Play Settings is always determined by the setting originally selected when a New Campaign is chosen. Selections can be changed by either ticking, or un-ticking a box, this changes the default setting to become a Custom Game Play Setting. Limited Batteries > Medium > High When selected, the batteries that power your submarines electric engines are limited, this, in turn, limits the amount of time you can stay submerged before the batteries must be recharged. Limited Compressed Air > High When selected, your submarine uses an amount of compressed air to surface by blowing air in the ballast tanks. If you exhaust your supply, you will have difficulties in bringing the submarine to the surface. Compressed air is regenerated by your compressor when the submarine is running on the surface, so it is vital to keep that piece of equipment in good condition. Limited O2 > Medium > High When the submarine is submerged, the crew uses oxygen and generates CO2 (carbon dioxide). Over time, the air will become un-breathable, affecting the performance of the crew and possibly even leading to their death. When this option is selected, you must surface your submarine periodically to resupply your submarine with fresh air. Limited Fuel > High > Realistic When selected, your submarine has limited fuel, and therefore limited range. You must return to base before your fuel supply is exhausted. There are no refuelling submarines in the (stock) game. You will get a warning during the patrol when you have used 50% of your fuel. Realistic Repair Time > Medium > High > Realistic When selected, damage repairs will take longer. Manual Targeting System > High > Realistic When selected, you must enter the appropriate information in to the TDC when firing torpedoes. You cannot simply point the TBT or periscope at a target and fire. No Map Contact Update > Realistic When selected, hydrophone and visual contacts will not appear on the navigation map. Radio contacts, however will periodically appear on the map. No Deck Gun Projectile Path > High > Realistic The yellow line from the deck gun to the target is no longer shown. Realistic Sensors > Medium > High > Realistic When selected, the effectiveness of your hydrophone and radar is reduced. Dud Torpedoes > Medium > High > Realistic When selected, your torpedoes will periodically malfunction. Malfunctioning torpedoes will either detonate too early, or not detonate at all. Realistic Reload > High > Realistic When selected, it will take a considerable amount of time to reload the torpedo tubes. No Event Camera > Low > Medium > High > Realistic When selected, the event camera is disabled. You will not see your torpedo tracking to the target or when the target sinks beneath the waves. No External View > Realistic When selected, the external camera is disabled. No Stabilize View > Realistic When selected, your targeting optics (i.e the TBT and attack periscope) will be realistically affected by the submarines movement on the waves. This will make targeting more difficult in rough seas. No Ship Damage Meters > High > Realistic No explanation available. Multiplayer Settings Displays Submarine Owner Displays Torpedoes Owner Measurement Units Metric Imperial
__________________
LSH3-2015 <> TUTORIALS <> ALL YOU NEED TO KNOW <> ALL IN ONE PLACE SH4 <> TUTORIALS <> HOW TO DO IT <> INFORMATION <> DOWNLOAD LINKS SH5 <> TUTORIALS <> HOW TO DO IT <> INFORMATION <> DOWNLOAD LINKS Always Here To Help A Fellow 'Subber' | Need An Answer to A Question Just Send Me A PM Last edited by THEBERBSTER; 01-17-18 at 05:57 PM. |
|
|
|
|
04-25-14, 11:31 AM
|
#7 |
|
Growing Old Disgracefully
Join Date: Dec 2012
Location: Hythe - Southampton
Posts: 9,609
Downloads: 1133
Uploads: 0
|
Last updated 16th April 2015
These Tutorials will show you how to do the following. Tutorial 1. How to Take A Snapshot. Tutorial 2. How to Disable the Generic File Patches. Tutorial 3. How to Restore a Snapshot. The Snapshot Folder comes in the Generic File Patcher (GFP) Download. The Snapshot Folder is used to store taken Snapshots usually when changes have been made to the GFP and the decision is to have a new Snapshot record stored. It is not essential to use this Snapshot Folder in its current position. A Folder of any name and placed wherever you want to keep can be made. Tutorial 1 Take Snapshot 1. Open the GFP so you can see all 9 Patchers. 2. There is no need to open any of the 9 Patchers with this Tutorial. 3. Go to the File Tab and Click on it. (Picture 1) 4. Select Take snapshot (Picture 1) Picture 1  5. Find the Snapshot Folder if it does not automatically show it. 6. File Name is where you enter a description of your Saved Snapshot. (Picture 2) 7. Enter a File Name (Picture 2) Picture 2  8. For this Tutorial I have used the File Name 16.04.2015 7.5.0. + RN (Picture 3) 9. I have used extra information that reminds me that I am using NewUI 7-5-0 version and Real Navigation. (Picture 3) 10. Enter the File Name and Press Save. (Picture 3) Picture 3  11. The Saved gps File is confirmed. (Picture 4) 12. Press Ok to complete. (Picture 4) Picture 4  13. Tutorial Completed. Tutorial 2 Disabling Generic File Patches 1. Open the GFP so you can see all 9 Patchers. 2. There is no need to open any of the 9 Patchers with this Tutorial. 3. Go to the File Tab and click on it. (Picture 1) 4. Select Disable all patches (Picture 1) Picture 1  5. The GFP is shown in the process of Disabling Patches (Picture 2) Picture 2 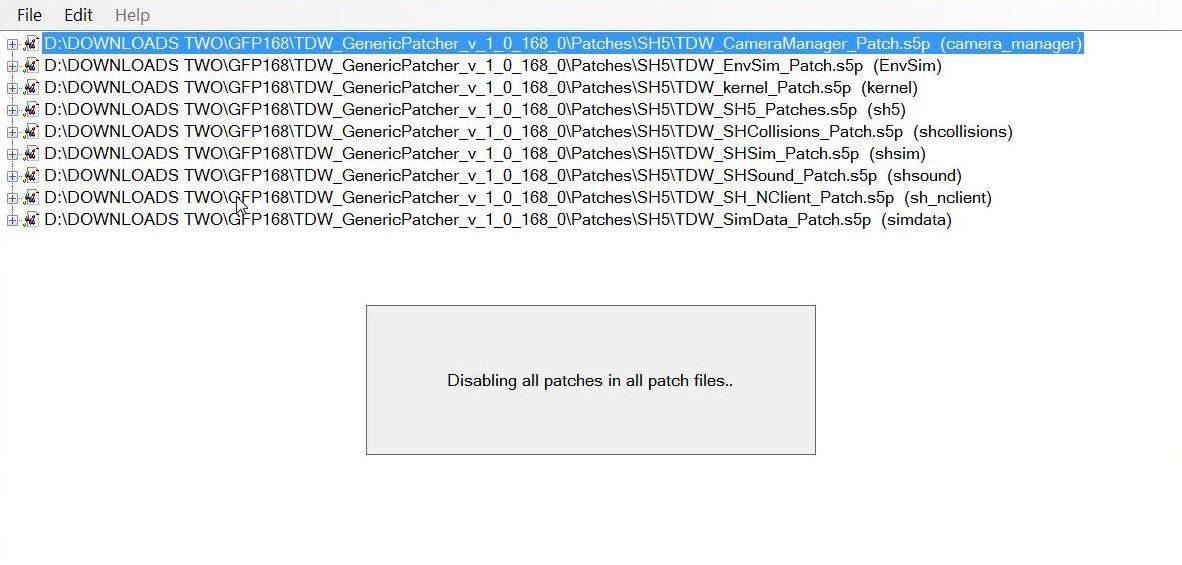 6. When all the Patches have Disabled you will see this confirmation. (Picture 3) 7. Press OK to complete. (Picture 3) Picture 3 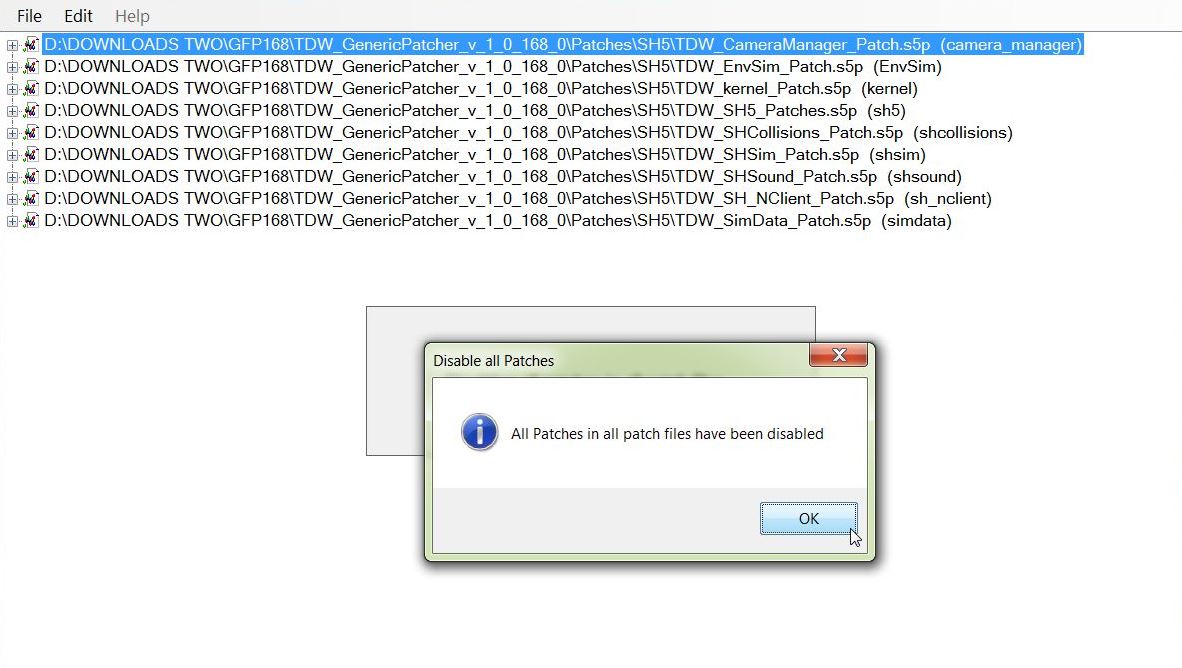 8. Tutorial Completed Tutorial 3 Restoring a Snapshot 1. Open the GFP so you can see all 9 Patchers. 2. There is no need to open any of the 9 Patchers with this Tutorial. 3. Go to the File Tab and click on it. (Picture 1) 4. Select Restore snapshot (Picture 1) Picture 1 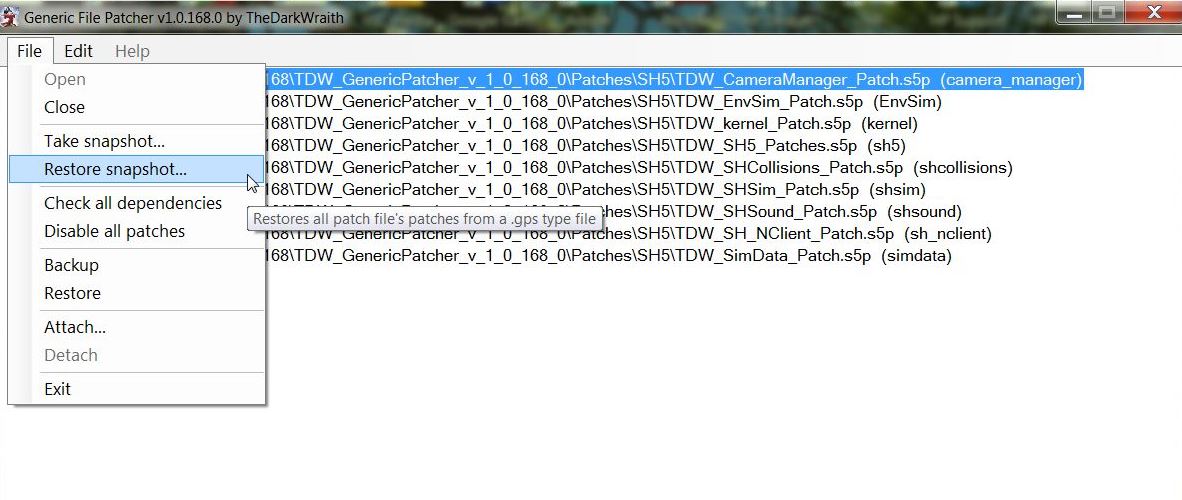 5. Find the Snapshot Folder if it does not automatically show it. 6. Double Click with the Mouse on the Snapshot you want to Restore. (Picture 2) 7. Or Press Open (Picture 2) Picture 2 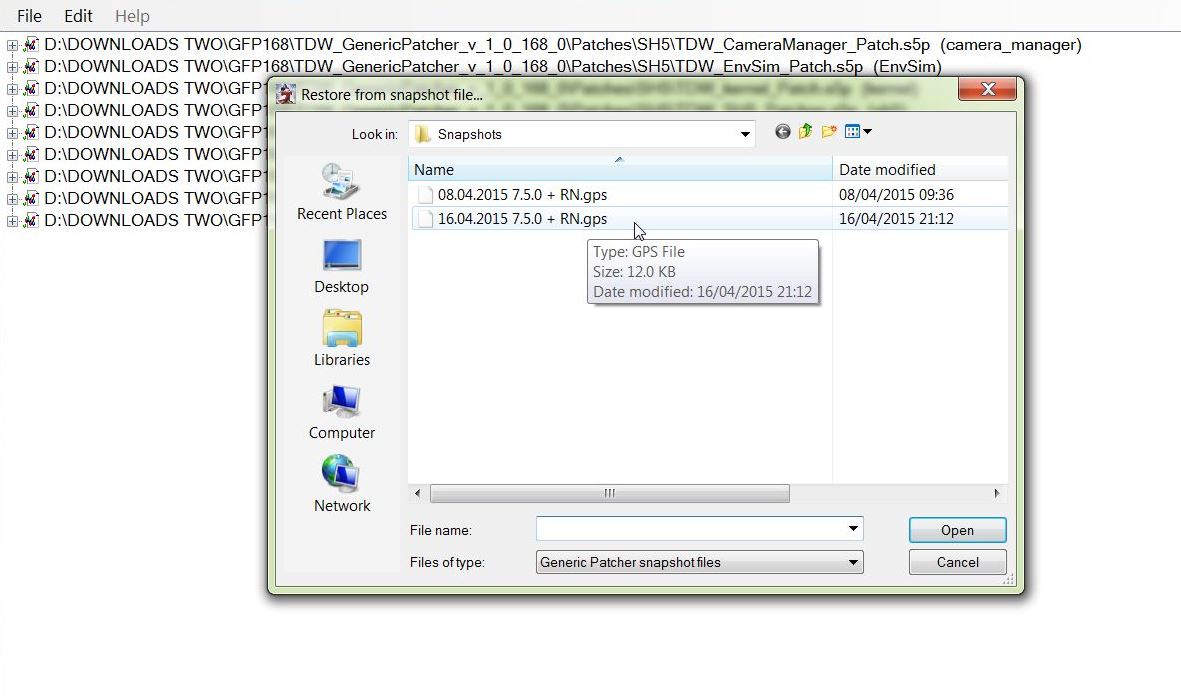 8. The GFP is shown in the process of Restoring all of the Patches (Picture 3) Picture 3 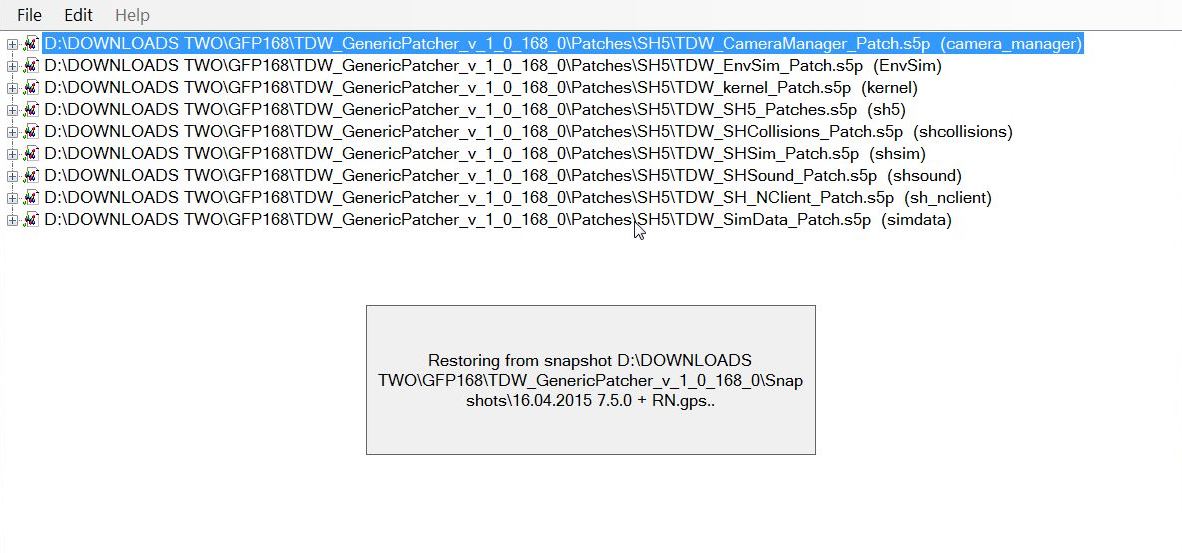 9. When all the Patches have Restored you will see this confirmation. (Picture 4) 10. Press OK to complete. (Picture 4) Picture 4 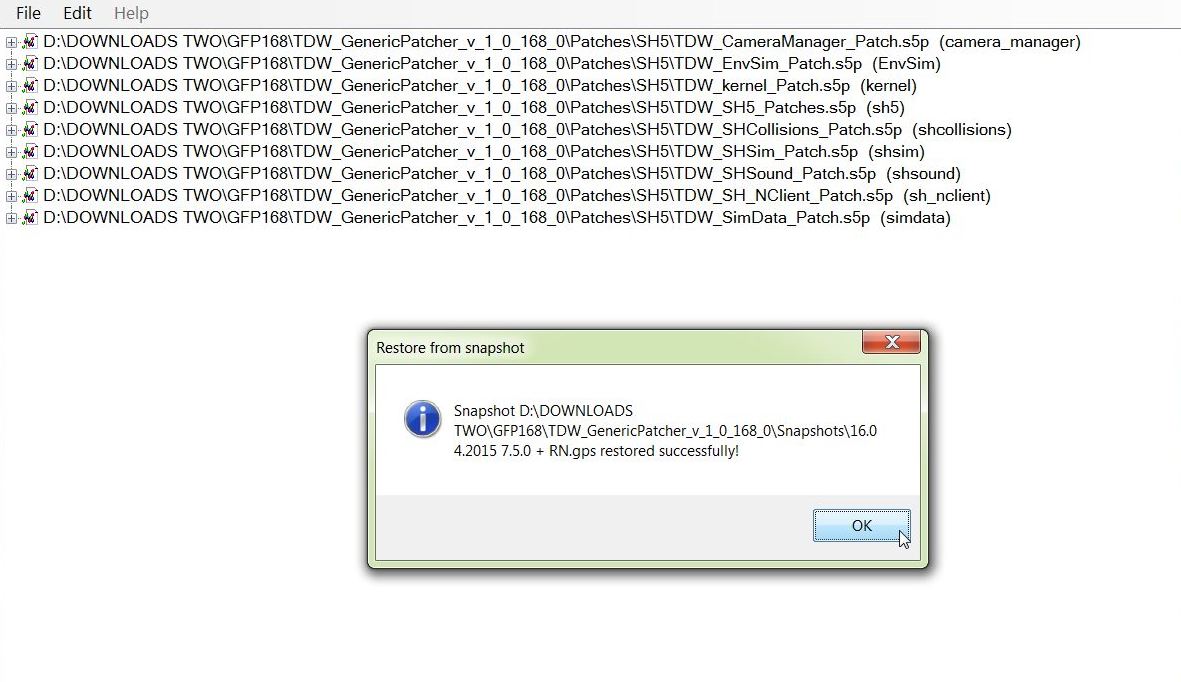 11. Tutorial Completed. Other Generic File Patcher Posts Post # 2 Installing TDW's Generic File Patcher Post #3 How To Make Changes In TDW's Generic File Patcher And Run Administrator Post #39 TDW Generic File Patcher Replacing My Old One With A New One! Post #41 TDW's Generic File Patcher Changing The Map Colours Post #56 TDWs Generic File Patcher Illustrated Settings You Can Use in Yours Courtesy acknowledgement to TheDarkWraith
__________________
LSH3-2015 <> TUTORIALS <> ALL YOU NEED TO KNOW <> ALL IN ONE PLACE SH4 <> TUTORIALS <> HOW TO DO IT <> INFORMATION <> DOWNLOAD LINKS SH5 <> TUTORIALS <> HOW TO DO IT <> INFORMATION <> DOWNLOAD LINKS Always Here To Help A Fellow 'Subber' | Need An Answer to A Question Just Send Me A PM Last edited by THEBERBSTER; 10-04-19 at 04:21 PM. Reason: Replaced missing pictures |
|
|
|
|
04-27-14, 10:10 AM
|
#8 |
|
Growing Old Disgracefully
Join Date: Dec 2012
Location: Hythe - Southampton
Posts: 9,609
Downloads: 1133
Uploads: 0
|
Last updated 17th May 2014 9.32pm
7A has a rear torpedo tube on the above water line and a Net Cutter on the front. 7B has a Net Cutter on the front, but no rear tube above the waterline. 7C has no Net Cutter or above water torpedo tube. 7C/41 has a built in radar and a radar housing built into the conning tower, no net cutter or above water torpedo tube. Courtesy acknowledgement to V13dweller
__________________
LSH3-2015 <> TUTORIALS <> ALL YOU NEED TO KNOW <> ALL IN ONE PLACE SH4 <> TUTORIALS <> HOW TO DO IT <> INFORMATION <> DOWNLOAD LINKS SH5 <> TUTORIALS <> HOW TO DO IT <> INFORMATION <> DOWNLOAD LINKS Always Here To Help A Fellow 'Subber' | Need An Answer to A Question Just Send Me A PM Last edited by THEBERBSTER; 01-17-18 at 05:59 PM. |
|
|
|
|
04-27-14, 10:37 AM
|
#9 |
|
Growing Old Disgracefully
Join Date: Dec 2012
Location: Hythe - Southampton
Posts: 9,609
Downloads: 1133
Uploads: 0
|
Last updated 21st April 2017
Campaign dates 31/08/39 - 09/05/45 Flotillas and dates Objective dates dd/mm/yy Coastal Waters 31/08/39 - 01/06/40 Flotilla 2nd Bases - Memel (31-08-1939 to 01-09-1939) Kiel (02-09-1939 to 31-09-1939) Wilhelmshaven (01-10-1939 to 31-06-1940) Stock boat issue - VIIA Baltic Operations 31/08/39 - 05/09/39 Eastern British Coastal Waters 04/09/39 - 01/12/39 Breaking The Fortress 10/09/39 - 15/10/39 North Western Approaches 21/09/39 - 01/04/40 South Western Approaches 01/01/40 - 01/06/40 Operation Wesserubung 20/03/40 - 11/04/40 Happy Times 15/06/40 - 01/03/41 Flotilla 2nd Bases - Wilhelmshaven (01-10-1939 to 31-06-1940) Lorient (01-07-1940 to 31-08-1944) Stock boat issue - VIIB Atlantic Air Gap 15/06/40 - 31/01/41 Western Approaches 01/10/40 - 01/02/41 Strategic Supplies 01/11/40 - 01/03/41 Mare Nostrum 15/03/41 - 01/12/41 Flotilla 23rd Transfer from 2nd flotilla Kiel 15-03-1941 with new boat. Bases - La Spezia (15-03-1941 to 31-05-1941) Salamis/Piraeus (01-06-1941 to 01-12-1941) Stock boat issue - VIIC Breakthrough Gibraltar 01/03/41 - 01/09/41 Deliveries for Malta 01/03/41 - 01/09/41 Siege of Tobruk 01/04/41 - 01/12/41 Middle East Supplies 01/06/41 - 01/12/41 10th Flotilla 01/09/41 - 30/11/41 East Mediterranean Convoys 01/09/41 - 01/12/41 Western Approaches 20/03/41 - 01/12/41 Flotilla 6th Transfer from 2nd flotilla Kiel 20-03-1941 with new boat. Bases - St Nazaire (05-04-1941 to 31-08-1944) Stock boat issue - VIIC British Supplies 20/03/41 - 01/12/41 Gibraltar Supply Route 20/03/41 - 01/12/41 Winston's Special 20/03/41 - 01/12/41 CENTRAL ATLANTIC SUPPLIES (was South Atlantic Supplies) 01/04/41 - 30/11/41 South Atlantic Convoys 01/04/41 - 01/12/41 Battle of the Mediterranean 15/12/41 - 01/09/42 Flotilla 29th Bases - La Spezia (15-12-1941 to 01-05-1942) Toulon (01-05-1942 to 31-12-1942) Stock boat issue - VIIC Siege of Malta 15/12/41 - 01/08/42 Fortress Gibraltar 15/12/41 - 01/09/42 Rommel's Supplies 15/12/41 - 01/09/42 Raid on Malta 01/01/42 - 01/06/42 Eastern Fleet 01/01/42 - 01/09/42 Operation Pedestal 07/06/42 - 20/08/42 Operation Drumbeat 12/12/41 - 01/09/42 Flotilla 2nd Bases - Lorient (12-12-1941 to 31-08-1944) Stock boat issue - VIIC U-Boat Blitz 12/12/41 - 01/02/42 Second Happy Time 12/12/41 - 01/08/42 Tanker Alley 01/03/42 - 01/09/42 Arctic Convoys 19/12/41 - 19/09/42 Flotilla 11th Bases - Bergen (19-12-1941 to 19-09-1942) Stock boat issue - VIIC PQ/QP Convoys 19/12/41 - 16/06/42 Soviet Waters 19/12/41 - 01/07/42 Arctic Blockade 01/01/42 - 19/09/42 Arctic Convoys 01/02/42 - 01/09/42 JW/RA Convoys 01/05/42 - 19/09/42 Distant Waters 15/09/42 - 15/02/43 Flotilla 3rd Transfer from 29th flotilla Toulon 15-09-1942 Bases - La Pallice (16-09-1941 to 31-08-1944) Stock boat issue - VIIC South America Supplies 15/09/42 - 31/12/42 Caribbean Oil 15/09/42 - 31/12/42 CapeTown Supplies 01/10/42 - 15/02/43 War in Distant Waters 01/11/42 - 15/02/43 The Black Pit 20/09/42 - 15/02/43 Flotilla 9th Bases - Brest (20-09-1942 to 20-02-1943) Stock boat issue - VIIC The Triumph of the Wolfpack 20/09/42 - 17/12/42 The Gap Closers 01/10/42 - 15/02/43 The Torch 20/10/42 - 15/02/43 Brittish Supplies 01/12/42 - 15/02/43 Turning Point 01/03/43 - 15/06/44 Flotilla 9th Transfer from Kiel 15-03-1943 with new boat. Bases - La Pallice (16-09-1943 to 30-05-1944) Wilhelmshaven (31-05-1944 to 30-09-1944) Stock boat issue - VIIC41 TW Spring 43 01/03/43 - 31/05/43 TW Summer 43 01/06/43 - 31/08/43 TW Autumn 43 01/09/43 - 30/11/43 TW Winter 43 01/12/43 - 39/02/44 TW Spring 44 01/03/44 - 15/06/44 Invasion Iminent 01/05/44 - 07/06/44 Monsun Gruppe 01/03/43 - 15/06/44 Flotilla 7th Transfer from La Pallice 02-03-1943 Bases - Penang (03-03-1943 to 01-08-1943) Singapur (02-08-1943 to 01-05-1944) Transfer to La Pallice 02-05-1944 Stock boat issue - VIIC41 Passage into The Rising Sun * 01/03/43 - 23/07/43 The Monsun Boats ** 20/04/43 - 01/11/43 (requires * pass/fail to activate) The Riches of India *** 01/07/43 - 20/04/44 (requires ** pass/fail to activate) Australia Isolation *** 01/10/43 - 20/04/44 (requires ** pass/fail to activate) Evacuation 01/03/44 - 15/06/44 (requires *** pass/fail to activate) The Final Years 01/07/44 - 09/05/45 Flotilla 9th Bases - Wilhelmshaven (01-07-1944 to 30-09-1944) Bergen (01-10-1944 to 09-05-1945) Transfer to Loch Ryan (Scotland - Operation Deadlight) 09-05-1945 Stock boat issue - VIIC41 Tonnage War 44 01/07/44 - 31/12/44 The North Sea 01/09/44 - 09/05/45 Tonnage War 45 01/01/45 - 09/05/45 Urgent Message 05/05/45 - 09/05/45 Courtesy acknowledgement to Trevally
__________________
LSH3-2015 <> TUTORIALS <> ALL YOU NEED TO KNOW <> ALL IN ONE PLACE SH4 <> TUTORIALS <> HOW TO DO IT <> INFORMATION <> DOWNLOAD LINKS SH5 <> TUTORIALS <> HOW TO DO IT <> INFORMATION <> DOWNLOAD LINKS Always Here To Help A Fellow 'Subber' | Need An Answer to A Question Just Send Me A PM Last edited by THEBERBSTER; 03-16-19 at 12:00 PM. Reason: picture added |
|
|
|
|
01-31-18, 12:41 PM
|
#10 |
|
Swabbie
 Join Date: Jan 2018
Posts: 5
Downloads: 1
Uploads: 0
|
Regarding post #57, the four bearing tutorial. Please delete this if it's not appropriate to ask here.
The in-game four bearing tutorial text says the course of the ship is 206. I keep coming up with a course of about 198 after the third bearing reading. The true bearing for the contact in order are 56, 61, and 68 according to the tutorial text. I've gone through and done the map work twice and get the same result. Any idea what I may be doing wrong? I did zoom in when drawing lines to get it as accurate as I could. I've done it enough that I get the concept and what I should be doing but I question it since I get a different result.... |
|
|
|
|
01-31-18, 01:23 PM
|
#11 | |||
|
Growing Old Disgracefully
Join Date: Dec 2012
Location: Hythe - Southampton
Posts: 9,609
Downloads: 1133
Uploads: 0
|
A Warm Welcome To The Subsim Community > bortass
Subsim <> Make A Donation <> See The Benefits <> Support The Community Tutorials And Other Information Links In My Signature Below Quote:
Quote:
Quote:
Long time since I did this tutorial. The tutorial is taken from Trevally's words and diagrams not from me.
__________________
LSH3-2015 <> TUTORIALS <> ALL YOU NEED TO KNOW <> ALL IN ONE PLACE SH4 <> TUTORIALS <> HOW TO DO IT <> INFORMATION <> DOWNLOAD LINKS SH5 <> TUTORIALS <> HOW TO DO IT <> INFORMATION <> DOWNLOAD LINKS Always Here To Help A Fellow 'Subber' | Need An Answer to A Question Just Send Me A PM |
|||
|
|
|
|
01-31-18, 02:02 PM
|
#12 | |
|
Swabbie
Join Date: Jan 2018
Posts: 5
Downloads: 1
Uploads: 0
|
Quote:
Thanks for the input and I'll check to see if I may be reading something wrong. I've yet to play the game. Got it last week and I've just been watching videos about it. |
|
|
|
|
|
01-31-18, 04:14 PM
|
#13 |
|
Growing Old Disgracefully
Join Date: Dec 2012
Location: Hythe - Southampton
Posts: 9,609
Downloads: 1133
Uploads: 0
|
Hi b
Don't forget to get a true bearing which is essential you have to take your own course bearing into account as well. That is why each time you do the tutorial the last bearing is likely to be different because you have moved the boat. Peter
__________________
LSH3-2015 <> TUTORIALS <> ALL YOU NEED TO KNOW <> ALL IN ONE PLACE SH4 <> TUTORIALS <> HOW TO DO IT <> INFORMATION <> DOWNLOAD LINKS SH5 <> TUTORIALS <> HOW TO DO IT <> INFORMATION <> DOWNLOAD LINKS Always Here To Help A Fellow 'Subber' | Need An Answer to A Question Just Send Me A PM |
|
|
|
|
05-12-18, 06:42 PM
|
#14 |
|
Nub
 Join Date: May 2018
Location: 90NM N.W. away from U-513
Posts: 4
Downloads: 4
Uploads: 0
|
Can i count the RPM and determine the speed with WOS mod?
I am in doubt because the mod page say its obsolete but here says update in 2018 |
|
|
|
 |
|
|


 Hybrid Mode
