
|
|
SUBSIM: The Web's #1 resource for all submarine & naval simulations since 1997
|
SUBSIM: The Web's #1 resource for all submarine & naval simulations since 1997 |
|
|
 04-01-14, 06:05 PM
|
#1 |
|
Growing Old Disgracefully

 Join Date: Dec 2012
Location: Hythe - Southampton
Posts: 9,609
Downloads: 1133
Uploads: 0


|
Hi bandit
If you have a look at the points that the Torpedo Man can be awarded he is able to make changes as to how the Torpedoes will then react in the game. This means that when you set up a firing position you cannot take into account these changes that the Torpedo Man has made. In other words it creates a firing corruption and you suddenly wonder why your Torpedoes are starting to miss even though all your calculations are correct. Peter
__________________
LSH3-2015 <> TUTORIALS <> ALL YOU NEED TO KNOW <> ALL IN ONE PLACE SH4 <> TUTORIALS <> HOW TO DO IT <> INFORMATION <> DOWNLOAD LINKS SH5 <> TUTORIALS <> HOW TO DO IT <> INFORMATION <> DOWNLOAD LINKS Always Here To Help A Fellow 'Subber' | Need An Answer to A Question Just Send Me A PM |

|

|
|
04-03-14, 03:20 PM
|
#2 | |
|
Medic
 Join Date: Dec 2011
Location: Oklahoma
Posts: 165
Downloads: 523
Uploads: 0
|
Quote:

|
|
|
|
|
|
04-03-14, 05:20 PM
|
#3 |
|
Growing Old Disgracefully
Join Date: Dec 2012
Location: Hythe - Southampton
Posts: 9,609
Downloads: 1133
Uploads: 0
|
Yes, Leave him well alone.
Any Bonus points will corrupt your firing solution. You will be wondering why you keep missing the target. If the 'Deck Gun' is fired by the 'Crew' then it is beneficial to give them the points as they will become more accurate and load quicker. If you always fire the gun then the points are wasted so giving at least some of them to your Sonar Man will have benefits. Peter
__________________
LSH3-2015 <> TUTORIALS <> ALL YOU NEED TO KNOW <> ALL IN ONE PLACE SH4 <> TUTORIALS <> HOW TO DO IT <> INFORMATION <> DOWNLOAD LINKS SH5 <> TUTORIALS <> HOW TO DO IT <> INFORMATION <> DOWNLOAD LINKS Always Here To Help A Fellow 'Subber' | Need An Answer to A Question Just Send Me A PM |
|
|
|
|
04-03-14, 06:10 PM
|
#4 | |
|
Ace of the deep .

Join Date: Jan 2006
Posts: 9,226
Downloads: 901
Uploads: 73
|
Quote:

|
|
|
|
|
|
04-04-14, 05:15 AM
|
#5 |
|
Growing Old Disgracefully
Join Date: Dec 2012
Location: Hythe - Southampton
Posts: 9,609
Downloads: 1133
Uploads: 0
|
Last updated 5th March 2017
Do Not Use These Settings For Either sobers Mega Mod Or The Wolves Of Steel. 1. Patches to Enable in TDWs Generic File Patcher (GFP) v1.0.68.0 2. Advanced and Experimental Patches should not be Enabled without taking advice. 3. This is a basic set up that you can copy and use to set up your own (GFP). 4. If you are using TDWs NewUi 7-4-2 then there are no additional changes needed to be made. 5. If you are using TDWs NewUi 7-5-0 then changes need to be made where shown. 6. Opening the Generic File Patcher and seeing all of the 9 Patchers. (Picture 1) Picture 1 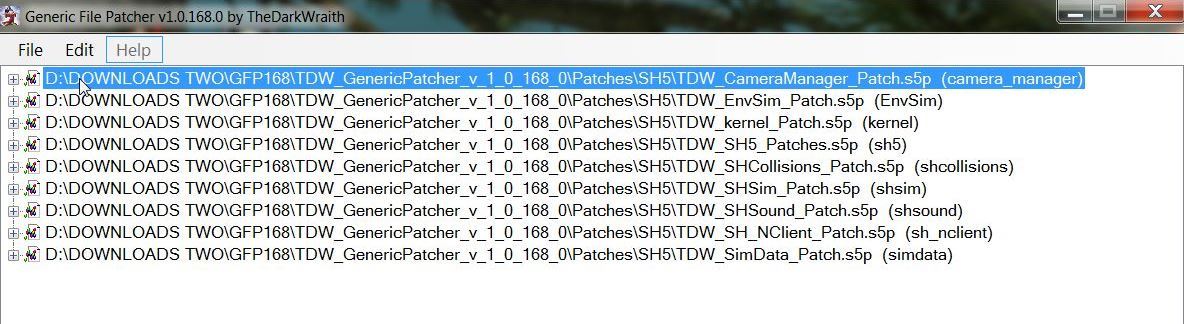 7. Seeing the 1st CameraManager Patcher. (Picture 2) Picture 2 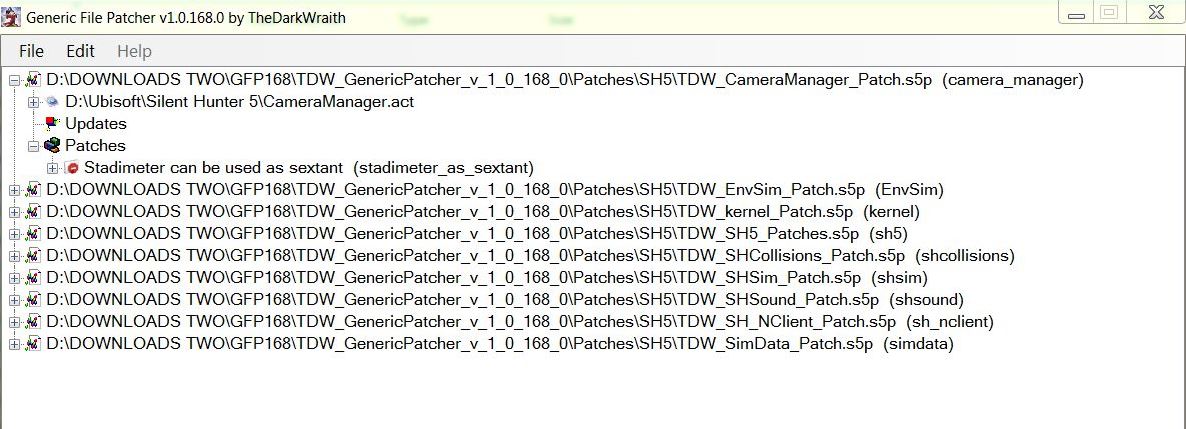 8. Seeing the 2nd EnvSim Patcher. (Picture 3) Picture 3 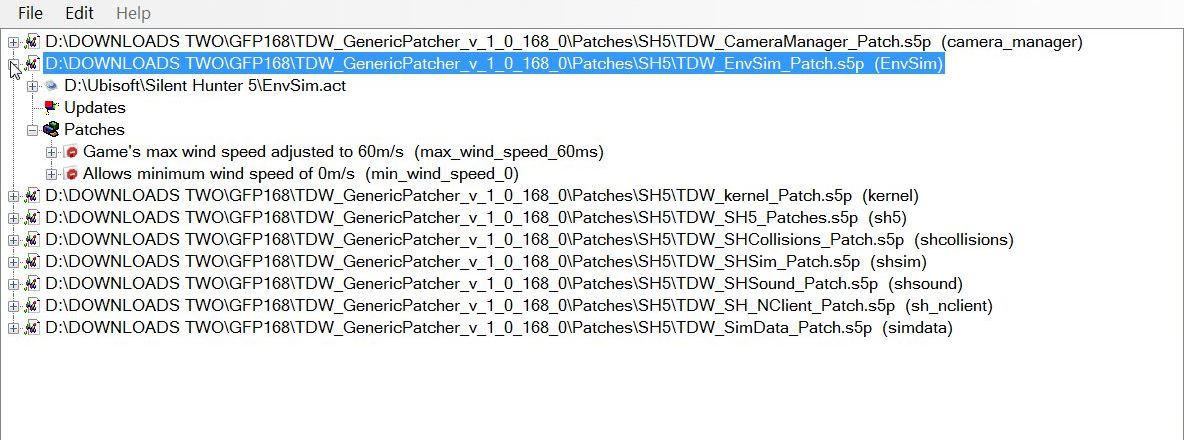 9. Seeing the 3rd kernel Patcher. (Picture 4) Picture 4 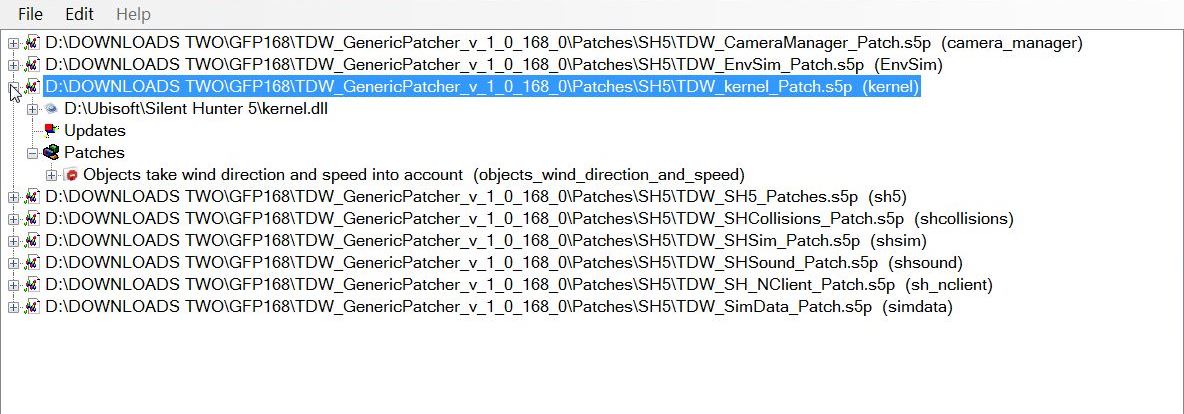 10. Seeing the 4th SH5.exe Patcher. (Pictures 5 Parts 1 & 2 If you are using TDW NewUI 7-5-0 then enable the Real nav menu.txt entries. Want to know how to change the Map Colors then use the Tutorial below? Post #41 Change The Map Colours In TDW's Generic File Patcher Picture 5 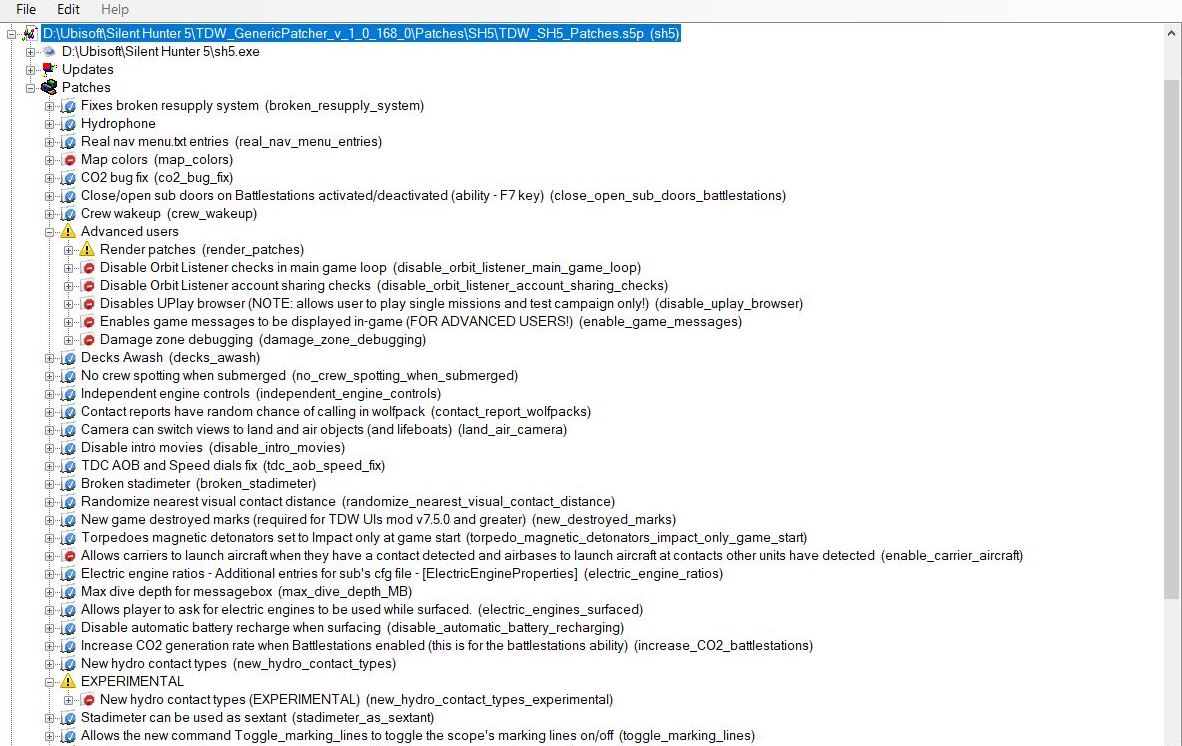 Picture 5 part 2 Second part of this long patch.  Seeing the 5th SHCollisions Patcher. (Picture 6) Picture 6 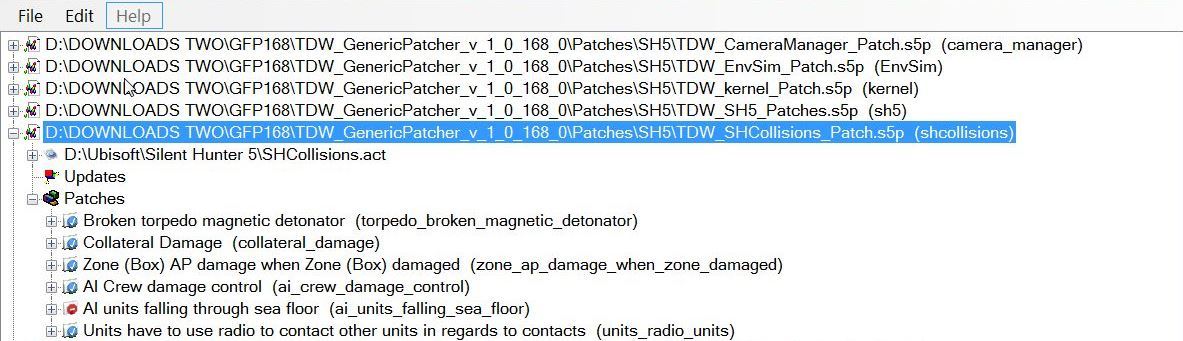 Seeing the 6th SHSim Patcher. (Pictures 7 Parts 1 & 2 This picture shows the 20 Torpedo Patches Enabled. Picture 7 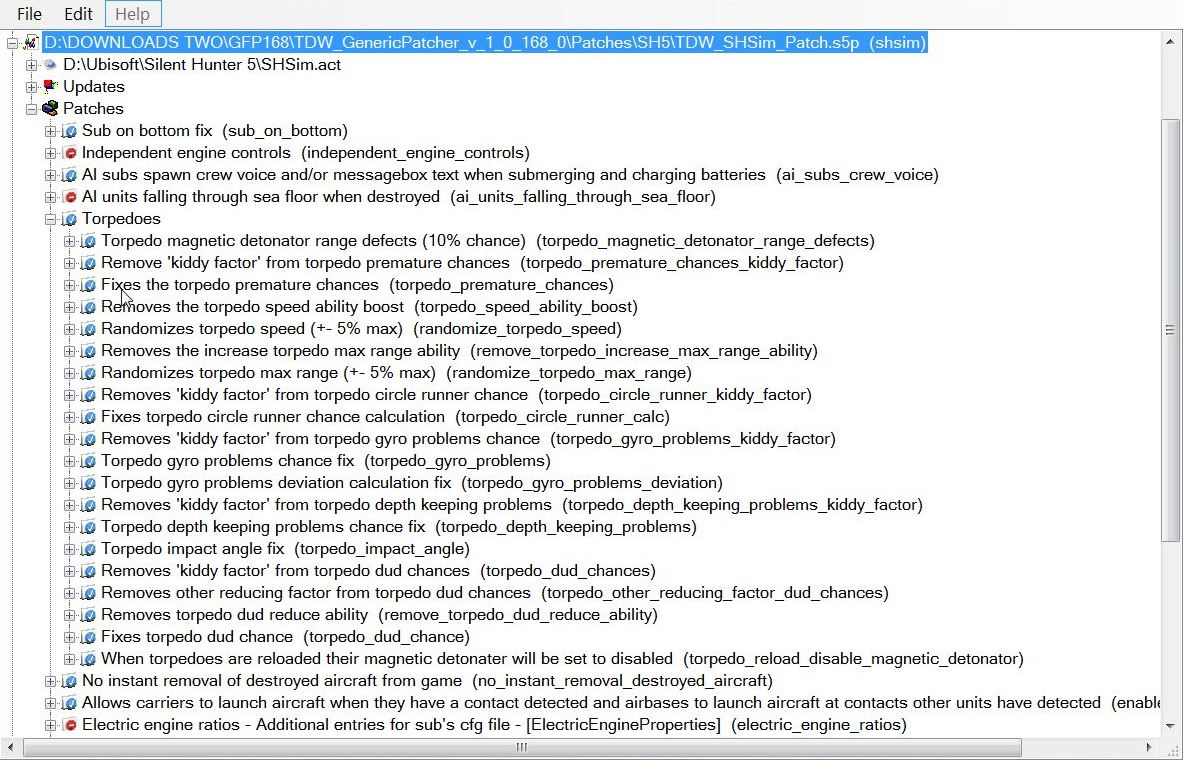 Picture 7 part 2 Second part of this long patch. 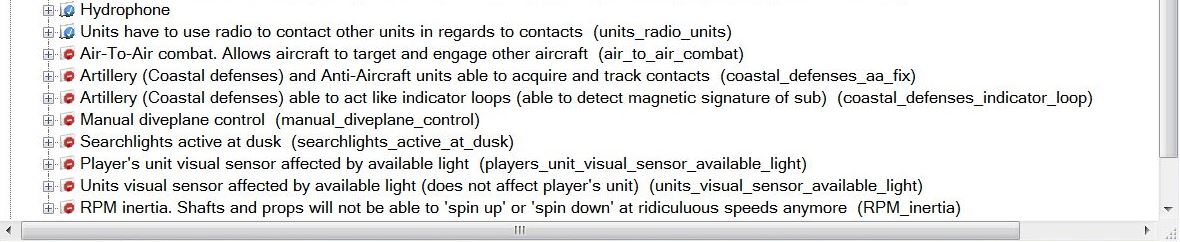 Seeing the 7th SHSound Patcher. (Picture 8) Picture 8 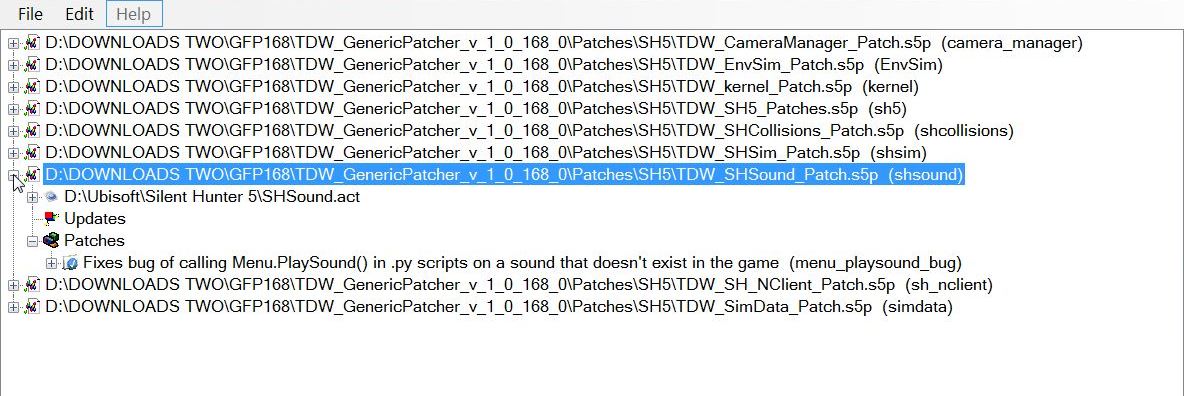 Seeing the 8th SHNClient Patcher. (Picture 9) Picture 9 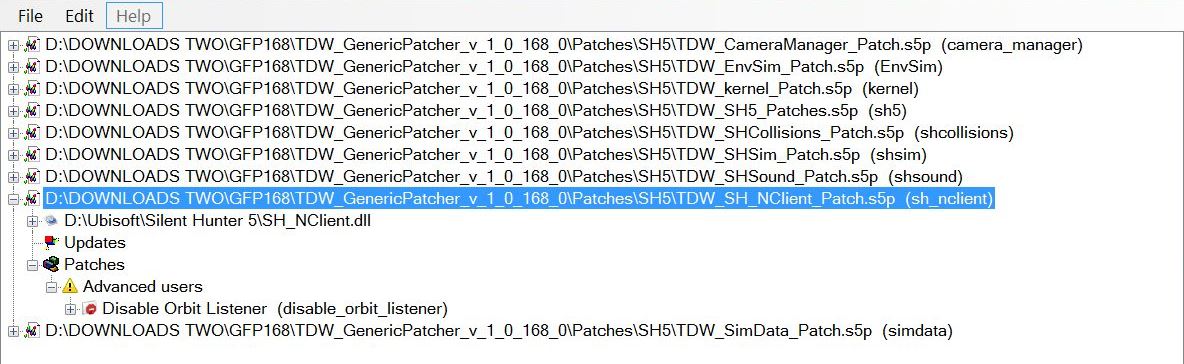 Seeing the 9th SimData Patcher. (Picture 10) Picture 10 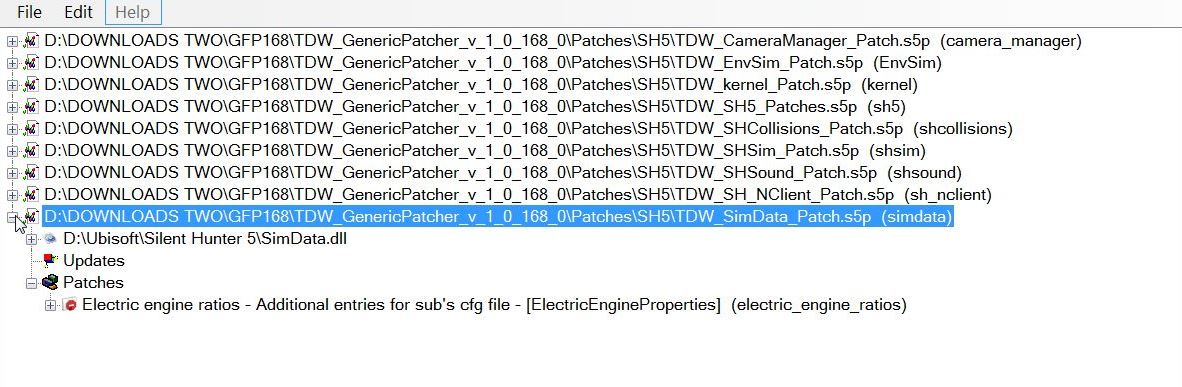 Download Link and information for TDW's GFP SH5.exe patches to fix bugs and add functionality Other GFP Tutorial Links. Courtesy acknowledgement to TheDarkwraith
__________________
LSH3-2015 <> TUTORIALS <> ALL YOU NEED TO KNOW <> ALL IN ONE PLACE SH4 <> TUTORIALS <> HOW TO DO IT <> INFORMATION <> DOWNLOAD LINKS SH5 <> TUTORIALS <> HOW TO DO IT <> INFORMATION <> DOWNLOAD LINKS Always Here To Help A Fellow 'Subber' | Need An Answer to A Question Just Send Me A PM Last edited by THEBERBSTER; 10-04-19 at 03:47 PM. Reason: Replaced missing pictures |
|
|
|
|
04-05-14, 11:00 AM
|
#6 |
|
Growing Old Disgracefully
Join Date: Dec 2012
Location: Hythe - Southampton
Posts: 9,609
Downloads: 1133
Uploads: 0
|
Last updated 21st January 2018
4 Bearing True Method Tutorial > Step By Step Instructions It is recommended that you use this Documented Tutorial in conjunction with the First Part of the mod Trevally Tutorial All v0.2 (for OHII v1.3) This can be found by selecting Tutorials and then 4 Bearings from the Main SH5 menu. Select Historical Missions >4 Bearing Tutorial. Select Start and the Tutorial will then load. This Tutorial Document has been edited so you can use it in your game play. It is assumed that you know how to use the map tools. Replace the Data you see here with your own. 1. This Tutorial is based on the first part of Trevallys Tutorial where the 15 minute Bearing Times have been used. 2. U-Boat speed >0 Knots. 3. U-Boat > Compass Bearing > 90 degrees. 4. U-Boat > Depth > 25 Meters. 5. Hydrophone Contact Bearing > 270 degrees. 6. Start > Stopwatch. 7. Time starting at 0 minutes for True Bearing 2. 8. Stopwatch Time >Each Bearing > 15 minutes. 9. Plot > Bearing 1. 10. Convert > True Bearing 90 + 270 = 360 or 0 11. Draw Bearing 1 from > Navigation Fix. 12. North > 0 degrees 13. Zoom out for accuracy. 14. You can Plot with Game Pause on. 15. Un-Pause Game to make any adjustments. 16. Draw out > 50km. 17. Start Stopwatch time > Each Bearing. 18. Trevally is using 15 minutes for this first example. 19. TIP >Compass place on top of the Bearing 1 Line towards the top and draw it out towards the Navigation Fix. Zoom out for accuracy. 20. 15 minutes later. 21. Contacts > True Bearing 2 > 56 degrees. 22. Stopwatch started 2nd time for Bearing 3. 23. Total time 15 minutes. (True Bearing 2 > 56 degrees) 24. Plot Bearing 2 25. Navigation Fix > 56 degrees. 26. Draw out > 50km. 27. Zoom out for accuracy. 28. Take note the way Contact is heading. 29. Bearing 2 is East of Bearing 1 30. Zoom out for accuracy 31. Target moving > West to East. 32. 15 minutes later > Bearing 3. 33. Stopwatch started 3rd time for the Predicted Bearing 4. 34. Total time 30 minutes. (True Bearing 3 > 61 degrees) 35. As soon as we get Bearing 3 we must Move the U-boat before we can take the 4th True Bearing. 36. Surface > U-Boat. 37. Ahead Standard. 38. Plot course Towards and to the Side of the last Contacts Position. 39. Bearing 61 degrees from > Navigation Fix. 40. Draw out 50km. 41. Zoom out for accuracy. 42. To get > Contacts Heading. 43. Pick a point over half way up on the Bearing 2 Line > Mark with an X. 44. Compass > on top of the Bearing 3 Line towards the end and draw it out towards > Navigation Fix. 45. Zoom out for accuracy. 46. Take both Compasses and place Parallel Across the X Mark you made on the Bearing 2 Line. 47. Zoom out for accuracy. 48. Draw a line 30 km long from where the Bearings Cross each other. 49. Bearing Line 1 to > Bearing Line 3. 50. TIP > Sometimes it is easier to Mark the two crossing points and then draw your line through them with the Ruler. < 51. Erase the > '2 Compass Circles. 52. Contacts Heading Line (CHL) > 151 degrees. 53. Predict now > Bearing 4. 54. If the Target is maintaining > Constant Speed. 55. Measure the Distance > Compass between Bearing 2 > Bearing 3. 56. Compass on > X Mark > Bearing 2 Line. 57. Compass Radius shows the Distance between Bearing 1 > Bearing 3 remains constant if plotted correctly. 58. Compass drag to where the Bearing Line and > CHL Cross. 59. Spacing showing on Bearing 1 and Bearing 3 must be the same. 60. The Edge will show where to Plot the Predicted > Bearing 4. 61. Predicted Bearing 4 > Draw so it matches the shape of the Bearing 1 Line is to the Compass Circle. 62. Predicted Bearing 4 > Plotted. 63. 15 minutes have passed. 64. During that time we have: 65. Moved our U-Boat 66. Dived 67. Speed > 0 68. Hydrophone > New Bearing 4. 69. True Bearing > 350 degrees. 70. Navigation Fix. 71. Stop the Stopwatch no longer needed. 72. Total time 45 minutes.(True Bearing 4 > 350 degrees) 73. Plot > Real Bearing 4. 74. Draw out 350 degrees from > Navigation Fix so it crosses the > Predicted Bearing 4 Line. 75. Compass > make Parallel Line > on 151 degrees CHL 76. Compass from CHL and place it Parallel until it also Crosses both the True Bearing 4 Line and Predicted Bearing 4 Line. 77. This is the Line coming out from the U-Boat. 78. We now know where the Target is. 79. Compass > Measure > Bearing 1 Line > True Bearing 4 Line. 80. Target > 9,000 meters > 45 minutes. 81. We can now find Target Heading Target Range AOB Speed. 82. Go to the Knots in Meters Per Minute Chart. 83. 9000 meters > Targets Speed 6.5 Knots. 84. Although in this particular scenario 15 Minutes between bearings has been used you can use any time gap as long as they are the Same between all Bearings. 85. Personally I do not like to use less than 20 minutes as you need to be able to have the accuracy from the bearings you plot. 86. If the bearings are too close to each other then you will not be able to achieve this. 87. Always allow enough time for > Map Work. 88. The further away and Slower the Target is you will need to allow Longer Times between each Bearings. 89. Set up Firing Position >90 degrees. 90. If playing with Real Navigation > Navigator > new position fix. 91. Protractor on > 90 degree Line to > New CHL. 92. Draw a line > U-Boat > CHL 93. This is > 62 degrees 94. Firing Point now need to move > 4,200 meters. 95. Surface the Boat. 96. Order > Ahead Slow. 97. Compass <> Rudder > 62 degrees. 98. Speed per Minutes Chart > 4,200 Meters. 99. Check set up on Firing Line > 90 degrees. 100. Prepare your attack. 101. Good Hunting Captain. Courtesy acknowledgement to Trevally Tip If you shade this Tutorial and then copy and paste it to your PC Notepad you can then edit it.
__________________
LSH3-2015 <> TUTORIALS <> ALL YOU NEED TO KNOW <> ALL IN ONE PLACE SH4 <> TUTORIALS <> HOW TO DO IT <> INFORMATION <> DOWNLOAD LINKS SH5 <> TUTORIALS <> HOW TO DO IT <> INFORMATION <> DOWNLOAD LINKS Always Here To Help A Fellow 'Subber' | Need An Answer to A Question Just Send Me A PM Last edited by THEBERBSTER; 01-21-18 at 03:15 PM. Reason: removed text spacing |
|
|
|
|
04-15-14, 07:44 AM
|
#7 |
|
Growing Old Disgracefully
Join Date: Dec 2012
Location: Hythe - Southampton
Posts: 9,609
Downloads: 1133
Uploads: 0
|
Last updated 13th April 2016
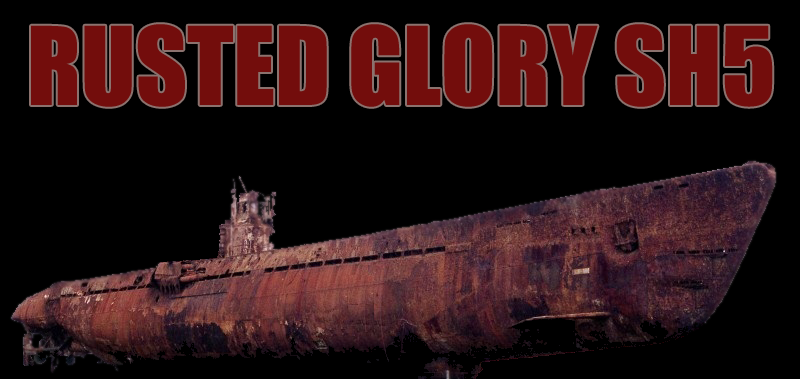 ------------------------ RUSTED GLORY SH5 >>> ------------------------ >>> THIS MOD IS JSGME READY. PLACE / EXTRACT INTO YOUR MODS FOLDER AND ENABLE WITH JSGME WHILE IN BUNKER. >>> IF YOU LOAD THIS MOD WHILE ON PATROL, YOU MAY NEED TO BUNKER SAVE AND RESTART THE GAME BEFORE YOU SEE THE CHANGES. >>> THIS MOD IS COMPATIBLE AND RECOMMENDED TO BE USED WITH STEELVIKINGS INTERIOR MOD V1.2 AND XENOMERV'S DARK_INTERIOR _V1. ENABLE RUSTED GLORY LAST IF USING ANY OF THOSE MODS AND BE SURE TO ENABLE IN THIS ORDER: STEELVIKINGS INTERIOR MOD V1.2 STEELVIKINGS INTERIOR MOD PATCH V1.2.2 DARK_INTERIOR_V1 RUSTED GLORY SH5 >>> ENABLE THIS MOD LAST ON YOUR LIST. ALLOW ANY CONFLICT. THERE WILL BE NO HARD CODE CHANGES WITH SAID CONFLICTS. ----------------------------------------- THIS MOD CHANGES THE FOLLOWING >>> ----------------------------------------- >>> RUSTED EXTERIOR FOR TYPE VIIA, VIIB, VIIC AND VIIC/41. THIS MOD WORKS WITH ((( ONLY THE COMMISSIONING PAINT SCHEME.))) I HAVE INCLUDED THE ADDITIONAL CONNING TOWER FOR THE VIIC/41 U-FLAK MOD RELEASED BY vdr1981 ON 2-23-2016. >>> RUSTED INTERIOR FOR TYPE VIIA, VIIB, VIIC AND VIIC/41. THIS INCLUDES RUSTED BULKHEADS, PANELS, PIPES, EQUIPMENT, HATCHES, ENGINES, LADDERS, PERISCOPE & MOST ANY PLACE NATURAL OXIDATION CAN OCCUR. >>> RUSTED U-BOAT BUNKERS >>> DIMMED THE LIGHTS WITHIN THE SUB INTERIOR CREATING A DARKER SETTING. THE HUE HAS ALSO BEEN ADJUSTED TO A MORE REALISTIC LIGHTING YOU WOULD EXPECT FROM BULBS IN THE 1940'S >>> THE CAPTAIN & NAVIGATION DESK PHOTOS HAVE BEEN CHANGED >>> THE TORPEDO HEAD COLOR HAS BEEN CHANGED TO RED >>> THERE IS A SUBSIM EASTER EGG TO BE FOUND AS A TIP OF THE HAT TO ONE OF THE BEST COMMUNITIES ON THE WEB. WITHOUT SUBSIM AND ITS MEMBERS, THIS MOD WOULD HAVE NEVER BEEN POSSIBLE. -------------------------------- FINAL NOTES & AGREEMENT >>> -------------------------------- RUSTED GLORY SH5, IS A SUBSIM.COM COMMUNITY MOD. PLEASE READ THE DOCUMENTATION FOR IMPORTANT INFORMATION. ITS TIME TO GET IN YOUR RUSTY SUB AND SINK 'EM ALL! Dwnload Subsim http://www.subsim.com/radioroom/down...o=file&id=4928 Download Media Fire http://www.mediafire.com/download/sw..._GLORY_SH5.rar  __________________ __________________Kaleun Frank Taylor Present Command: U-19 @ Lorient Bunker SH5 Type VIIB U-Boat "Evil Ashy"
__________________
LSH3-2015 <> TUTORIALS <> ALL YOU NEED TO KNOW <> ALL IN ONE PLACE SH4 <> TUTORIALS <> HOW TO DO IT <> INFORMATION <> DOWNLOAD LINKS SH5 <> TUTORIALS <> HOW TO DO IT <> INFORMATION <> DOWNLOAD LINKS Always Here To Help A Fellow 'Subber' | Need An Answer to A Question Just Send Me A PM Last edited by THEBERBSTER; 04-13-16 at 04:29 AM. Reason: Added additional download link |
|
|
|
|
01-31-18, 12:41 PM
|
#8 |
|
Swabbie
 Join Date: Jan 2018
Posts: 5
Downloads: 1
Uploads: 0
|
Regarding post #57, the four bearing tutorial. Please delete this if it's not appropriate to ask here.
The in-game four bearing tutorial text says the course of the ship is 206. I keep coming up with a course of about 198 after the third bearing reading. The true bearing for the contact in order are 56, 61, and 68 according to the tutorial text. I've gone through and done the map work twice and get the same result. Any idea what I may be doing wrong? I did zoom in when drawing lines to get it as accurate as I could. I've done it enough that I get the concept and what I should be doing but I question it since I get a different result.... |
|
|
|
 |
|
|


 Hybrid Mode
