
|
|
SUBSIM: The Web's #1 resource for all submarine & naval simulations since 1997
|
SUBSIM: The Web's #1 resource for all submarine & naval simulations since 1997 |
 08-25-13, 01:12 AM
|
#16 |
|
Sailor man
 Join Date: Mar 2011
Posts: 47
Downloads: 27
Uploads: 0
|
Automatic Targeting
With the Manual Targeting option disabled in Realism Settings the targeting process is very simple. All the player must do is point the periscope at the target and launch a torpedo. It is not necessary to find the range, AOB or speed of the target manually, as the entire process of plotting a solution is handled automatically by the game. Be sure to open the torpedo tube before you fire ('Q' key, or right click the weapons officer to enter his station, and flip the relevant switch). If you don't, it will take a few seconds to open and possibly spoil your shot. If you don't have the target locked, and you forgot to open the door, try to keep the crosshairs on target until the torpedo is launched. Even with Automatic Targeting you can still alter torpedo speed, depth and detonator type (impact or magnetic) Also, if you have a mixed load of torpedoes which have different speeds you need to click on the speed setting dial in the F6 TDC screen when switching tubes to update the firing solution. e.g. you fire a T1 then switch to a TII in another tube, you`ll need to click on the speed setting dial (even though the TII only has one speed) to get an accurate solution. See also: Salvo Periscope display Hit probability indicator In automatic targeting mode, the periscope or UZO will show a small coloured triangle when a contact is visible and centred in the optics. The triange can have three colours; green, orange or red, which correspond approximately to the chance of making a successful shot. The colour changes depending on the required Gyro angle of the torpedo when it leaves the U-Boat. Green - Gyro angle of +/-5°; that is from 355° to 004°. Orange - Gyro angle of +/15°; that is from 315° to 044° Red - Gyro angle of more than 15° in either direction. In general, the smaller the gyro angle, the more chance of a successful hit, but this can still be affected by target range, torpedo settings etc. Manual Targeting Table of contents [hide] 1 General Targeting Considerations 2 Notepad Method 2.1 Identify the target 2.2 Find the range 2.3 Estimate the AOB 2.4 Determine the speed 2.5 Taking the shot 3 Full Manual TDC 4 Credits General Targeting Considerations In short, the Torpedo Data Computer (TDC) is used to calculate a gyro angle for your torpedos. The gyro angle, in turn, determines the course a torpedo will take after leaving your u-boat en route to hitting a moving target. The TDC requires four pieces of information to calculate the correct gyro angle: Angle on bow (AoB) - This is the direction of travel of the target relative to your u-boat's direction. See Angle on bow for more information. Bearing - This is the angle at which you observe the target. Speed - This is the speed of the target. More precisely, it is the relative speed between you and the target. Range - Although it does not effect the gyro angle as much as the three above, range DOES have an effect on the angle and thus checking the range prior to shooting is always a good idea. There are two methods for entering the required data into the TDC, the Notepad Method, and Full Manual. Notepad Method The notepad method is the "standard" SH3 method of performing a manual attack. The notepad is visible in the top right-hand corner when you are at the attack (F3) or observation (O) periscope, or UZO (F6, if surfaced) stations. The following steps are much easier if you lock the target in your periscope or UZO using the 'L' shortcut key. To use the notepad, you must perform the following four steps in the correct order: Identify the target Find the range Estimate the AOB Determine the speed It is possible to use the notepad to enter just some of the targeting data. However each step is dependent on the earlier ones in the list, so you cannot, for example, determine the speed without having first estimated the AOB. You can, however, use the notepad to calculate the range and AOB, but then enter the speed directly into the TDC without using the notepad's target-speed tool. See the TDC page for more information. Identifying the target Enlarge Identifying the target Identify the target Once you have your target visible through your scope or UZO, press N to bring up the recognition manuals. Find the correct vessel, and tick the square box in the lower right-hand corner. Until you do this, none of the other functions will be possible. It is worth noting the Draft of the vessel while you have the recognition manual open. This will be useful if using magnetic triggers on your torpedoes. Find the range To find the range, you can use the stadimeter control. Click the word Range on the notepad to open the correct page. Using your mouse within the periscope view, put the central cross hair on the waterline of the target, and then click once on the stadimeter control icon in the corner of the notepad page. This changes your cursor to a line which can move and down within the periscope view. The idea is to move this line up to the top of the highest mast of the vessel, and then click again. By taking the angle between the centre-line and the line you've just set, along with the known height of the mast from the recognition manual, the game can automatically calculate the range. See the Stadimeter page for more detailed instructions on finding the range. Stadimeter The stadimeter is the range-finder built in to your Attack Periscope and UZO. In Silent Hunter III it is also available from your Observation Periscope. Using the stadimeter To operate the stadimeter, you must be using the notepad method of manual targeting. See that page for information on how to use the notepad. Once you have identified your target using the Recognition Manual, you can click on the word Range on the notepad to begin your range estimation using the stadimeter. Range finding The principle of the stadimeter is that you should align the horizontal line running through the centre of your periscope with the waterline of your target vessel, and the higher, moveable, line with the top of the highest mast of the target. By knowing the angle formed between these lines, and the height of the mast from the recognition manuals, the system can calculate the range to your target. If you are unsure of which is the highest mast, you can theoretically find this information on the relevant page of the Recognition Manual. This is still not always obvious however. In the image below, notice that the mast height is automatically filled in when you select the correct ship with the recognition manual. If you have not selected the correct ship then your range will not be accurate. Immediately before using the stadimeter, you should try to ensure that the central (lower) line is as close as possible to the waterline of the target. Then, after clicking on the Stadimeter icon (circled on the screenshot), you will be able to use the mouse to control the moveable upper line in your periscope view. It is also possible, although awkward, to move the periscope head (and therefore the lower line) using the up and down arrows (or Ctrl-Up and Ctrl-Down for finer movement) while the stadimeter is in use. When you are happy that the placement of the lines accurately reflects the height of the masthead, click once and your range will be filled in on the notepad page. You can repeat this process as often as you like until you are happy with the result. Once you are satisfied with your range, don't forget to then click the tick-box to send the range to the main notepad page! In the example image below the lines are perfectly positioned ready to submit the range. In heavy seas it is quite a challenge to come up with an accurate result using the stadimeter. Practice makes perfect! 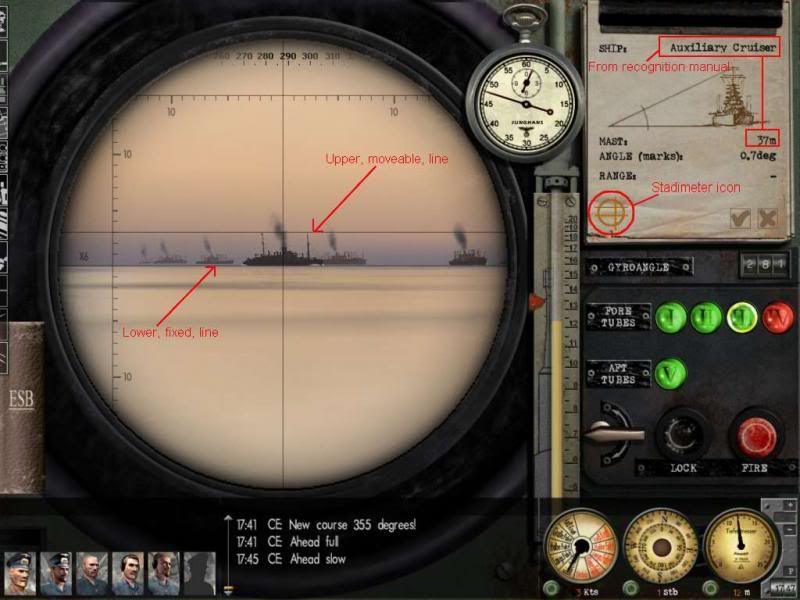 Once you have an estimated range, click the tickbox to send that range back to the main notepad page. Estimate the AOB Click on the words Angle on bow on the notepad to bring up the AOB page. Here you can estimate your angle on bow from the target, and mark it by dragging the icon around the ship on the diagram. Note that the central vessel in the diagram is your target, and you are estimating where your U-Boat is, in relation to that target. To assist in determining the AOB, you can use the AOB page on the recognition manual. You can also calculate it before-hand using knowledge of the target course and bearing from your U-Boat. Once satisfied with your estimated AOB, click the tickbox to send that range back to the main notepad page. Determine the speed The final step in the process is to determine the speed of the target. The notepad includes a tool to assist you in doing that. Click the word Speed and a small timer icon will appear. By clicking this, you will start a timer and, as long as you have the target locked the system will begin tracking how far across your field of view the target moves. Use the Stopwatch to monitor the duration of your timing. After a suitable length of time - perhaps 15 seconds, you can click anywhere to stop the timer and the speed will be displayed. It is important that you are stopped or moving very slowly for this to be accurate. In addition, you will not get accurate results if the target is moving directly towards you, or away from you. Ideally for this to be accurate, you should be at All Stop, at a 90° AOB from the target. In general, the notepad device for determining target speed is only of limited use. It's worthwhile learning additional techniques such as the Three Minute Rule to accurately detect your target's speed. As before, you should click the tickbox to send the speed to the main notepad page. Taking the shot It is important that once back on the main notepad page, you click the tickbox a final time to send the complete set of the data to the TDC. If you update any of the data subsequently, you must ensure that you click the main tickbox again or that new information will not be used. Also, make sure you fire right after you place the final checkmark. If you do not, the AoB will change (this effect increases if the target moves fast). As the result, the torpedo will miss astern or hit the ship in the very rear. As well, make sure you open the tube door beforehand. Enjoy Full Manual TDC Paul "Wazoo" Wasserman has put together an excellent tutorial on doing manual targetting at: Wazoo's Manual Charting & Targeting Tutorial http://www.subsim.com/radioroom/showthread.php?t=206381 |

|

|
|
|


 Threaded Mode