
|
|
SUBSIM: The Web's #1 resource for all submarine & naval simulations since 1997
 |
SUBSIM: The Web's #1 resource for all submarine & naval simulations since 1997 |
|
|||||||||
 |
|
|
Thread Tools | Display Modes |
 10-09-13, 02:21 AM
|
#1 |
|
Grey Wolf
 Join Date: Jul 2009
Location: Dark forest
Posts: 793
Downloads: 316
Uploads: 0
|
"All Hitler wants me to do is to cross a river, capture Brussels, and then go on to take Antwerp. And all this at the worst time of the year through the Ardennes when the snow is waist-deep and there isn’t room to deploy four tanks abreast let alone armoured divisions. When it doesn’t get light until eight and it’s dark again at four and with re-formed divisions made up chiefly of kids and sick old men – and at Christmas." -Sepp Dietrich, commander of Sixth SS Panzer Army 16th December, 1944 - 16th January, 1945. Battle of the Bulge time it is in The Operational Art of War III. Scenario's map scale is 2.5km per hex, time scale half-day turns and unit scale battalion/regimental level. Game length is 60 turns. I'll be playing the Germans. I'll be doing daily updates while the pace will be regularly irregular. Goal is to actually finish this in some time frame and I know I would feel pressured if I'd promise a certain pace and it would lead to not completing anything. In short, this scenario covers the German offensive through Ardennes forest which goal was to cross Meuse and take Antwerpen, which would cut off the British troops in the north from American units in the south, and the eventual allied counter-attack. Victory points will be received from different towns and citys marked in the map with American flags as well as all crossing points at Meuse. There will also be permanent victory point locations which means (I assume) that if I take them I will receive the points from then even if the allied forces captures them afterwards. * * * Plan for the first days is to stretch the scattered allied forces to the limit by attacking and exploiting in every direction. I will have the upper hand as well as more troops for a week and a half at least and I should try to advance as far and as fast to the West as possible. Unfortunately Panzer divisions will be delayed for two or three turns before they are released which represents the historic delay in preparing the crossing sites for them or decisions to lead the initial attack with infantry divisions. 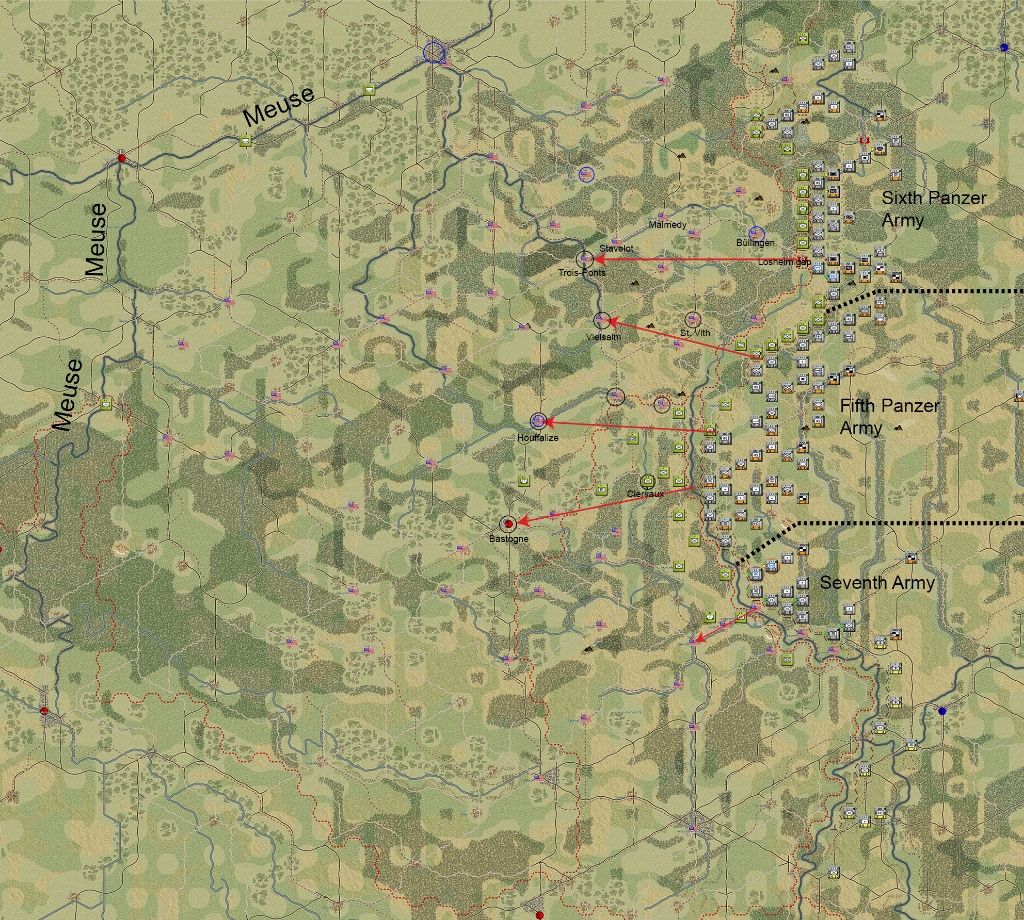 Legend: Dashed lines: army boundaries Red arrows: attack directions Black circles: key objectives Blue circles: if captured, Germans get a boost to supply Initial goal is to capture the objectives marked with black circles as they are vital crossing points or crossroads. If allied forces manage to hold them too long, advance to Meuse -at least in force- can be forgotten as my forces will get stuck in traffic jams. Plan is to create a gap between Trois-Ponts and Houffalize so the armoured divisions coming in few days can be channeled through quickly. But I will roll with the punches as more intel is gathered on whereabouts of allied forces. In that regard, Trois-Ponts - Houffalize sector should be quite lightly defended. 6th SS Panzer army will exploit the Losheim gap and drive West for Trois-Ponts. Leading unit will be Kampfgruppe Peiper composed of different armoured elements. Meanwhile other divisions will try to capture Büllingen with its supplies and push the enemy behind the river running from Trois-Ponts to Büllingen thus widening the corridor. 5th Panzer army is tasked to take St.Vith and Vielsalm and the roads leading to Houffalize and Bastogne. If the fight for Bastogne is getting too heavy, it will be bypassed and pocketed. 7th Army is quite weak with almost no armoured elements. Its goal for the first days is to take Ettelbruck and ultimately stall the allied reinforcements coming from the South and screen the Trois-Ponts - Houffalize gap. Initiative is mine for the first week and a half or so but after allied reinforcements start to come in and especially Patton's forces from the South, I will lose the initiative and I have to get defensive. But, we'll see how it goes. Probably not very well. * * *
Table of Contents December 16th December 17th December 18th December 19th December 20th December 21st
__________________
Every generation laughs at the old fashions, but follows religiously the new. -Henry David Thoreau Last edited by Crécy; 10-31-13 at 02:02 AM. |

|

|
 10-09-13, 07:55 AM
|
#2 |
|
Grey Wolf
 Join Date: Jul 2009
Location: Dark forest
Posts: 793
Downloads: 316
Uploads: 0
|
December 16th, 1944
In the early hours of December 16th, three German armies launch an attack against weakly defended Ardennes forest region. The allies are almost completely surprised as German divisions cross Our river and start a swift advance to the West. In the north Operation Greif, led by the infamous Otto Skorzeny aka Dr. Sola, was at least partially successful and the 150th Panzer brigade disguised as an American unit slipped through American lines and advanced near St. Vith. Meanwhile 3FJ Division pushed American troops troops towards Büllingen and opened a road for Kampfgruppe Peiper. In the afternoon Operation Stösser was launched and Von der Heydte's fallschirmjägers were dropped north of Malmedy to secure a crossroad and stall the American reinforcements. In the center engineers are tasked to repair the blown bridges crossing river Our for panzer divisions while infantry divisions advance across the river. 2.Pz division and Pz Lehr division are waiting for the bridges to be built. In the South 3FJ division captures Diekirch five kilometers North-East of Ettelbruck. Three other Volksgrenadier divisions advances south with ease. 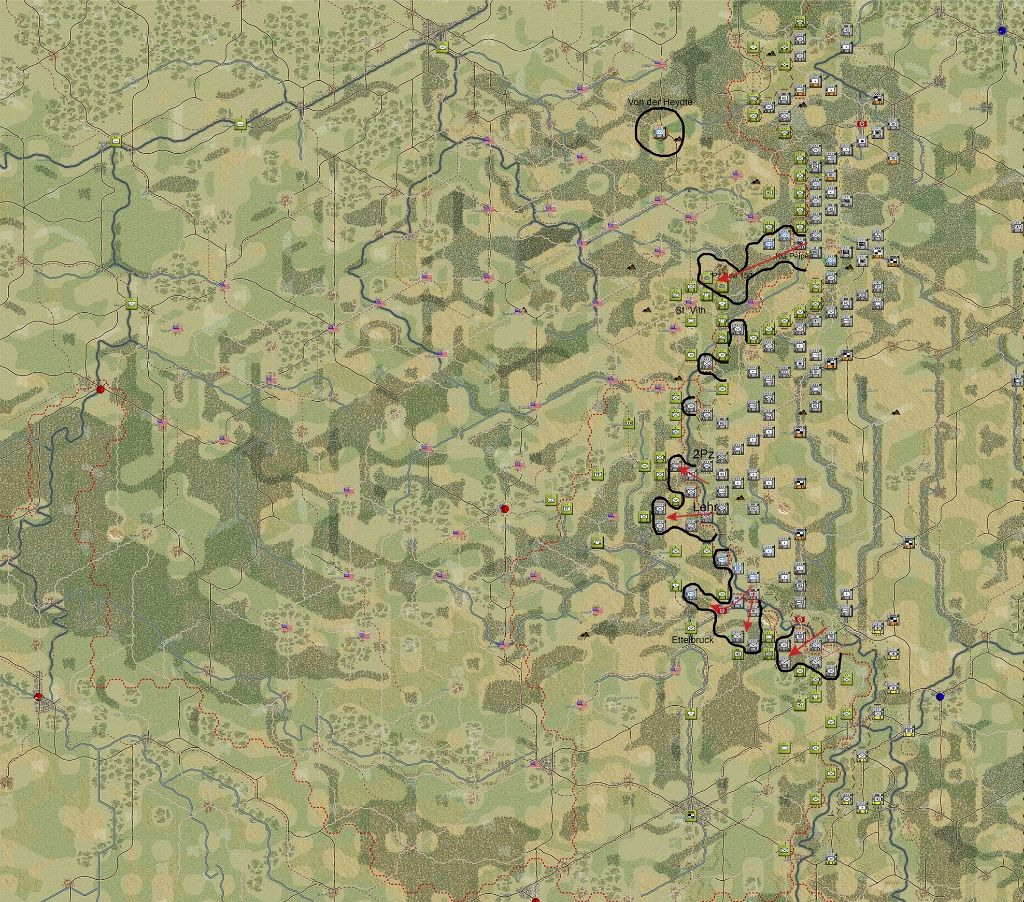 Positions at the end of the day.
__________________
Every generation laughs at the old fashions, but follows religiously the new. -Henry David Thoreau |

|

|
 10-09-13, 01:52 PM
|
#3 |
|
Grey Wolf
 Join Date: Jul 2009
Location: Dark forest
Posts: 793
Downloads: 316
Uploads: 0
|
[Maps got quite messy. Hopefully not too multicolored and cluttered... Also, I don't know why place names are not showing up properly.
December 17th, 1944 6th SS Panzer army sector 3FJ division cleared the road and captured Büllingen with its supplies. KG Peiper, 1SS Pz division and 12SS Pz division advanced almost unopposed towards Malmedy. Elements of Skorzeny Brigade captured Schönberg East of St. Vith and thus closes the Schnee-Eifel pocket. 1SS, 12SS and KG Peiper will not participate in the battle for St. Vith - it will be left for the 5th Panzer army - but slide around it and take Malmedy, Trois-Ponts and Vielsalm. Vielsalm might be a tough not to crack as an American armoured division just passed through it to reinforce St. Vith. In the far north Americans made their first attack with their newly arrived armoured division and forced a regiment of 272. VG Division to retreat. This forces me to direct just arrived 3. Panzer Grenadier Divisions there. Otherwise things are looking reasonably good. 3FJ Divisions might be tasked with taking Elsenborn, even though that wasn't the original plan, as it seems to be lightly defended. 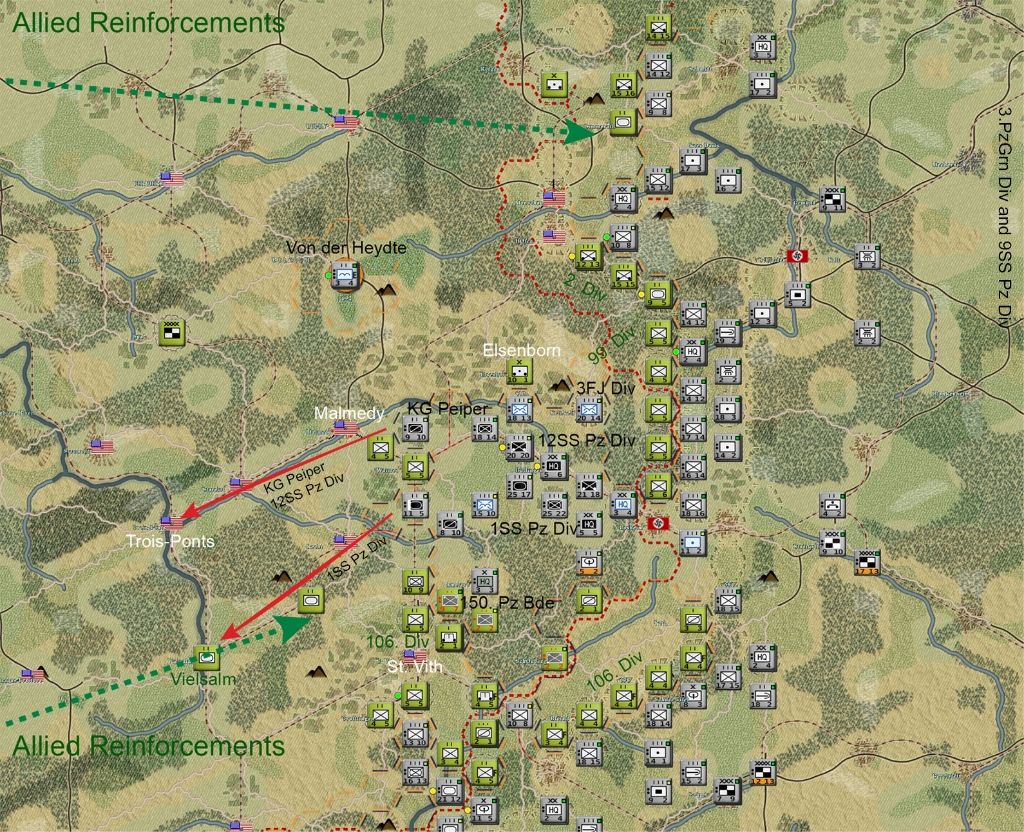 5th Panzer army sector 116. Panzer division and Führer Begleit division will take the important crossroad town of St. Vith and then turn West for Vielsalm to support 1SS division. Clervaux withstood the morning attack of the 2. Panzer division and the attack conducted by the Panzer Lehr in the afternoon. It should fall next morning. Otherwise Lehr will be gravely delayed. Speed is the key here and any delays, even half-day delays, might cause us to lose the race for Bastogne. 26. Volksgrenadier division is waiting for supplies and gathering its strength before moving towards the town of Wiltz, South-East of Bastogne. 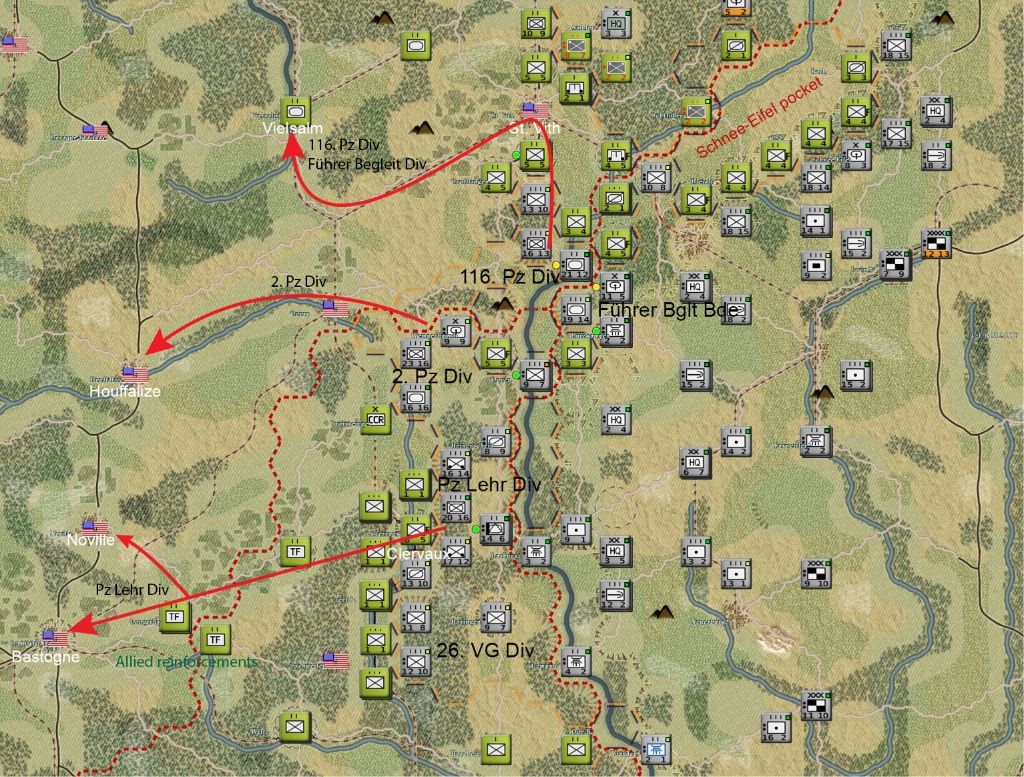 7th army sector 5FJ Division didn't manage to dislodge the American troops in Ettelbruck. The three other infantry divisions pocketed a mechanized and an armoured battalion around Beaufort. After taking care of the pocket and the town of Ettelbruck, 7th army will move South-West and start preparing a defensive line. The army is too weak to accomplish any significant advances. 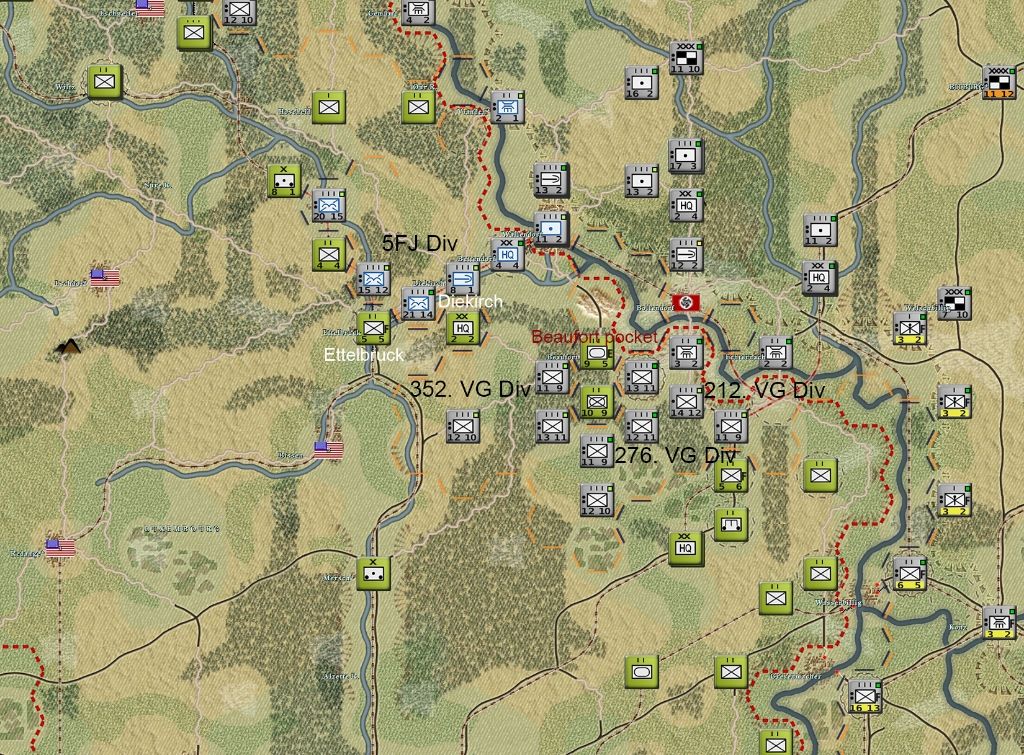 Positions at the end of the day 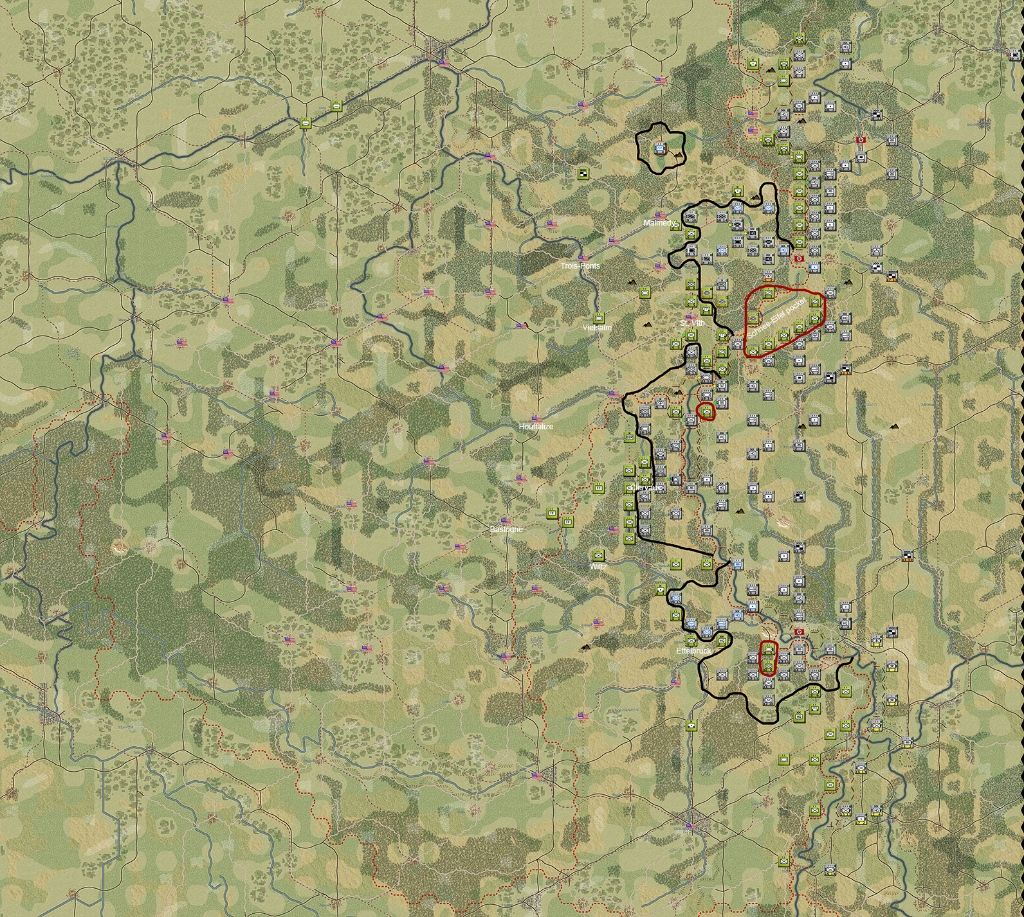 St. Vith is a bottleneck. The speed of the advance to the West is partly tied to the question of how long St. Vith will hold. One option might be pocketing it, but I fear it woud tie up too many units. In the North the 6th SS Pz Army has advanced more quickly than expected. Hopefully they will keep their pace.
__________________
Every generation laughs at the old fashions, but follows religiously the new. -Henry David Thoreau |

|

|
 10-09-13, 02:42 PM
|
#4 |
|
Navy Seal
 Join Date: Feb 2009
Location: Kentucky
Posts: 5,421
Downloads: 85
Uploads: 0
|
Is this the Bulge scenario that comes with TOAWIII?
Mine does not have the mountain/hill icons.  Or maybe you are using the optional icons. Or maybe you are using the optional icons.Oh this is the Ardennes secnario.Pretty good one. Last edited by Stealhead; 10-09-13 at 03:29 PM. |

|

|
 10-09-13, 05:48 PM
|
#5 |
|
Lucky Jack
 |
I must get TOAWIII one of these days, I had some sort of version of it a veeeery long time ago on a CD with Grigsbys Battle of Britain and...I think Gettysburg. Stupid me lost the damn disc back before I came to realise what I had. It confused the heck out of me back then, and I'm sure it'd confuse the heck out of me now, but the scenarios look fantastic.
|

|

|
 10-09-13, 08:52 PM
|
#6 |
|
Navy Seal
 Join Date: Feb 2009
Location: Kentucky
Posts: 5,421
Downloads: 85
Uploads: 0
|
Honestly TOAW does not have an overly complex set of rules.You just have to remember to give each stack their orders(dig in,reserve,that sort of thing).I find it much easier than HOI3 to attack and defend.You can also very easily order units to be in reserve.Also the stacks much more logically support each other.It seems pretty easy to me not to say that wining is easy but I can defend and advance as I want to/need to in order to deal with the developing situation if I begin to loose it is not due to failure to use stacks properly.
|

|

|
 10-10-13, 02:31 AM
|
#7 | |
|
Grey Wolf
 Join Date: Jul 2009
Location: Dark forest
Posts: 793
Downloads: 316
Uploads: 0
|
Yes. It seems to be quite well done. I'm not sure how it will handle the fuel and ammo shortage, though. Is it just reduced supplies or is it not represented. Or can it even be accurately represented in this game.
Quote:
As Steelhead pointed out, TOAW is not too complicated. Basically you can learn the fundamentals in a day but it will take some time to learn to use your forces effectively. I haven't learned to use them effectively. As it might be seen in the updates (and perhaps that's the reason I haven't delved in particular battles but have been only reporting in larger scale  ) )
__________________
Every generation laughs at the old fashions, but follows religiously the new. -Henry David Thoreau |
|

|

|
 10-10-13, 03:37 PM
|
#8 | |
|
Navy Seal
 Join Date: Feb 2009
Location: Kentucky
Posts: 5,421
Downloads: 85
Uploads: 0
|
Quote:
It says in the description that the Germans get a temporary supply boost for capturing Allied depots marked with a "*" after the village name.I think the fuel shortage is designed into this particular scenario of course it means low on all supplies.Most of the scenarios use different means to simulate things that the TOAW engine is unable to fully. The game does have a pretty good supply system except it simulates all supplies.(which is some what realistic typically the most effective army does have all of the supplies that it needs.) Anyway what said is true about unit types you do have to use them correctly or you will not get the best results.There are many different unit icons but the unit size is important.Page 30 and 31 tell you what the unit cards and all the numbers mean.One thing you should look for is an "E" on an enemy unit card (assuming you have the recon to know his disposition) and "E" means that unit is entrenched and will be very hard to assault.The numbers on the bottom left are the units attack strength and on the bottom right are its defensive strength. For example in the 3rd post the 2nd regiment of the 3rdFJ(near the hill) it has a fairly strong attack and offensive ability. Page 80 and 81 lists all of the unit icons if you are curious it can be hard to remember all of them. Last edited by Stealhead; 10-10-13 at 03:54 PM. |
|

|

|
 10-10-13, 11:15 PM
|
#9 |
|
Navy Seal
 Join Date: Feb 2009
Location: Kentucky
Posts: 5,421
Downloads: 85
Uploads: 0
|
Something else I forgot to mention are HQs they have a control radius that normally is not shown on the map.
In the "radio" section (right hand side of the screen) the 4th button down in the left most vertical row if you cycle that button one shows the command radius of HQ units.It will also show the attack radius of any artillery or air unit as well if you select such a unit. |

|

|
 10-11-13, 03:54 AM
|
#10 | |||
|
Grey Wolf
 Join Date: Jul 2009
Location: Dark forest
Posts: 793
Downloads: 316
Uploads: 0
|
Quote:
Quote:
I guess what I meant with not having learned to use forces effectively is that I have a feeling I'm not using units as effectively as they could be or not conducting attacks as effectively as they could be. To prove my statement I've been attacking Clervaux with Panzer Lehr and it being a fairly large town and with a battalion of entrenched infantry defending it, attacking with armoured and mechanized units is definitely not that effective. Quote:
__________________
Every generation laughs at the old fashions, but follows religiously the new. -Henry David Thoreau |
|||

|

|
 10-11-13, 04:24 AM
|
#11 |
|
Grey Wolf
 Join Date: Jul 2009
Location: Dark forest
Posts: 793
Downloads: 316
Uploads: 0
|
[All screenshots also show the allied turn of December 19th as they got to move at once December 18th was concluded. Arrow styles are outrageously stolen from Raptor1...]
December 18th, 1944 6th SS Panzer army sector 3. Panzergrenadier division reinforced the northernmost sector. The weak gap East of Monschau came crumbling down and the Americans broke through. The gap will be plucked with the newly arrived 246. Volksgrenadier division. I could also send the 2.SS Panzer division there but as I don't expect any real advance made in the Monschau sector I'd rather send it through Losheim gap. In the breakout the three divisions didn't make any real advances. Peiper and 12SS reached Stavelot and Malmedy but didn't manage to dislodge the engineer companies located there. Perhaps because armoured elements do not excel in attacking across a river to a town... Also more allied reinforcements arrived from the West. The 82nd Airborne division seems to have settled East of Werbomont while the other units fortified the Malmedy-Savelot sector and Monschau. 1SS pushed towards St. Vith, even though it was meant to be left for the 5th Panzer army, mainly to help it fall more quickly and because allied units had time to block the roads leading there. Taking St. Vith will open a new avenue of approach. 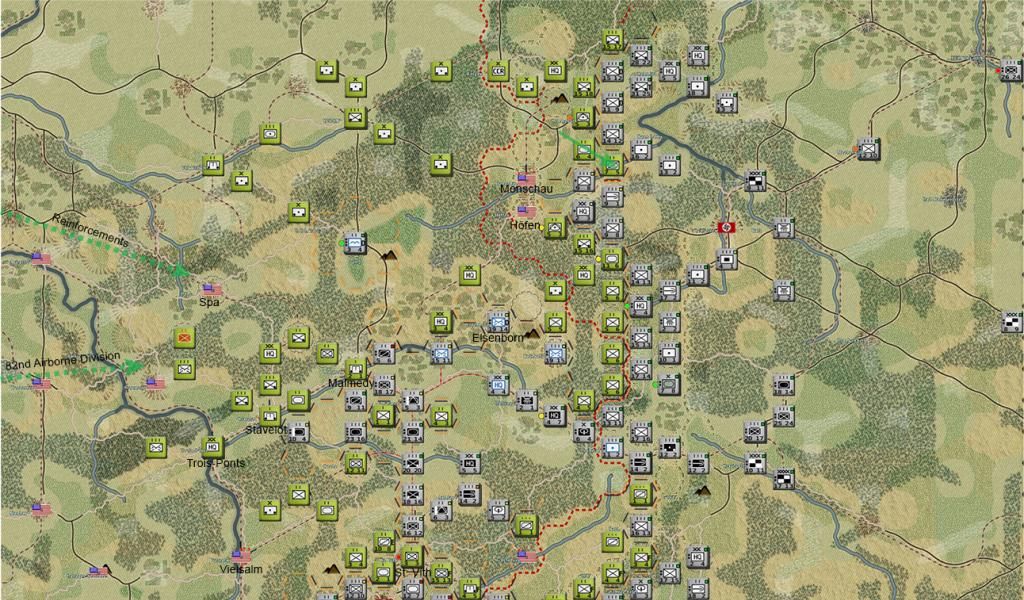 5th Panzer army sector Führer Begleit and 116Pz division arrived at the gates of St. Vith and it should fall within the next day with joint attack of 1SS division from the North. After taking St. Vith, Führer Bglt and 116Pz will attack Vielsalm with 1SS Panzer division. 2Pz division advanced 25 kilometers West unopposed and took Houffalize. They were stopped by American combat commands near Noville. Aggressive move left an opening for the allied units and they retook Heinerscheid. Panzer Lehr is still banging its head against Clervaux. I should have ordered them to go around it from the North and bypassed the town or got some infantry regiments to help taking it. 26. VG division crossed the river and headed into American infantry battalions and a regiment from the just arrived 101st Airborne division. 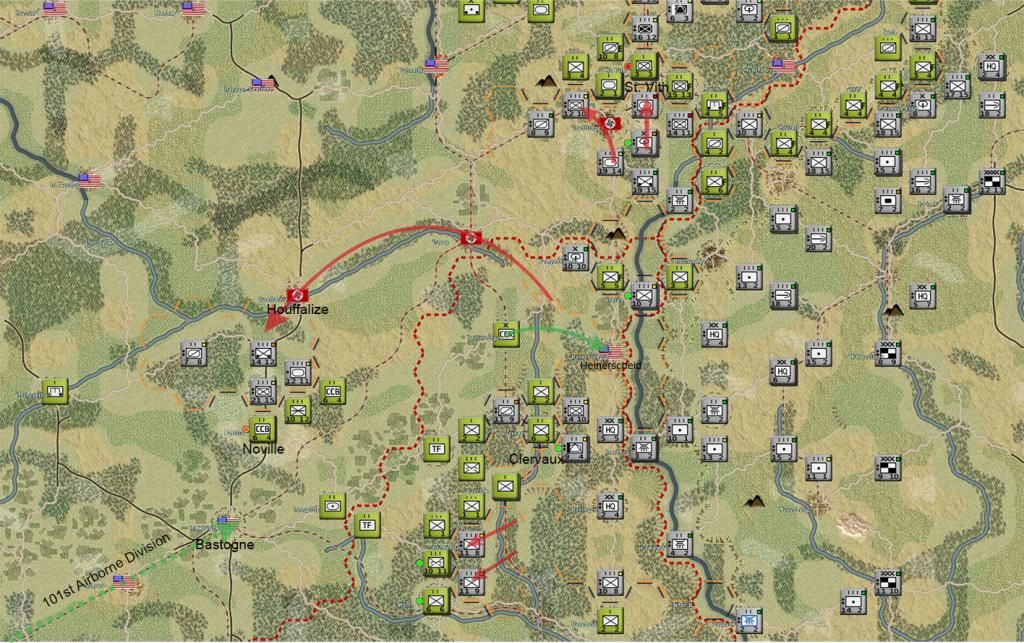 7th Army sector Ettelbruck finally fell in the attack of the 3FJ division. 276VG and 352VG divisions attacked the Beaufort pocket but the weakened Americans unit slipped past them. A strong combat command of mixed armoured units showed up from the South and cut the 212VG division from its headquarters in Echternach. 7th Army is just too weak to do anything else but tie up American forces and distract them. In a few days a Führer grenadier regiment should be received as a reinforcement and it will certainly help holding the Patton's vanguard, at least to some degree. 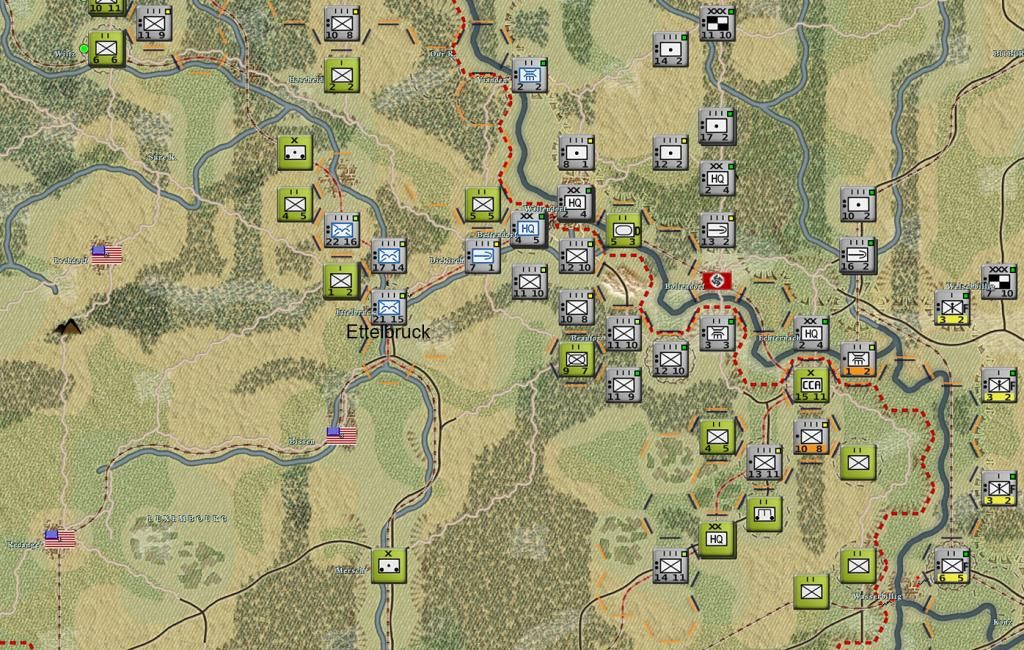 Positions in the morning of the 19th 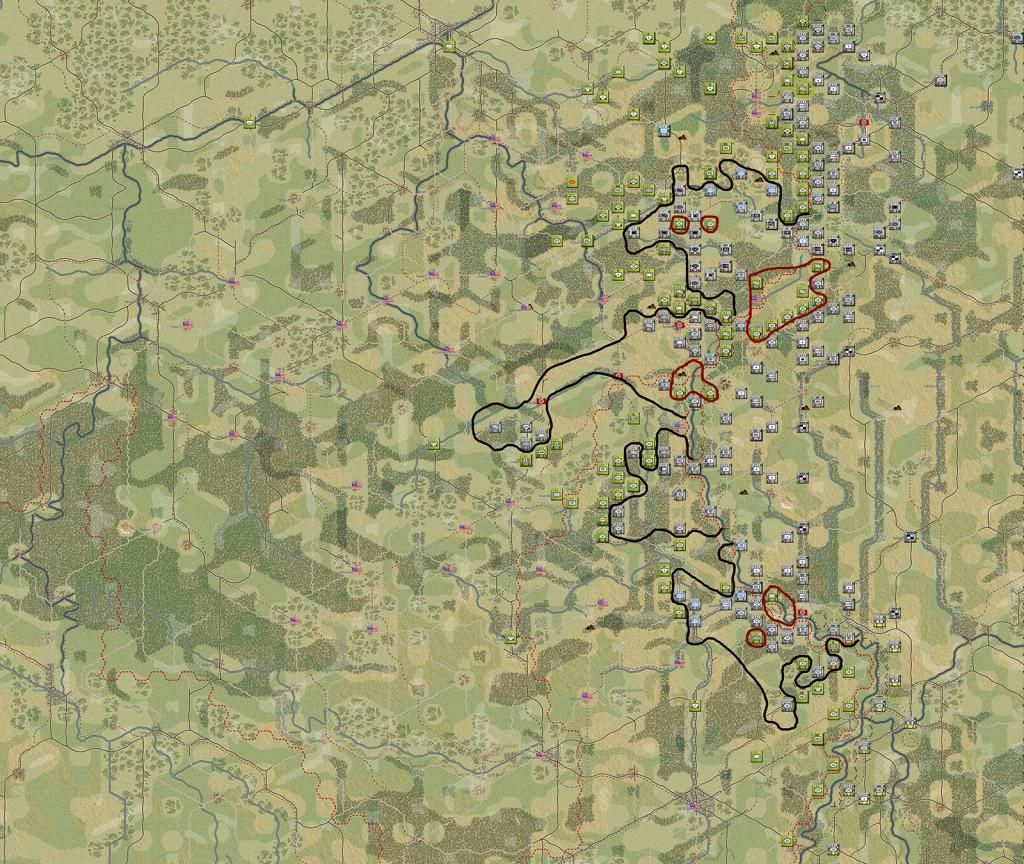
__________________
Every generation laughs at the old fashions, but follows religiously the new. -Henry David Thoreau |

|

|
 10-11-13, 07:37 AM
|
#12 |
|
Navy Seal
 Join Date: Jul 2007
Location: Stavka
Posts: 8,211
Downloads: 13
Uploads: 0
|
If you run into dug-in units which are particularly troublesome, it might be a good idea to bombard them with artillery for a few rounds before assaulting, since heavy guns can cause units to lose entrenchment.
Do you have any units capable of repairing railroads? The rail (and road) junction in Bastogne looks like it could be quite useful for keeping units heading towards the Meuse in supply. Though of course that wouldn't be very useful if you have no supplies to send in the first place...
__________________
Current Eastern Front status: Probable Victory |

|

|
 10-11-13, 12:13 PM
|
#13 | |
|
Grey Wolf
 Join Date: Jul 2009
Location: Dark forest
Posts: 793
Downloads: 316
Uploads: 0
|
Quote:
I do have a few engineer companies but I'm not sure of their railroad repairing capabilities.
__________________
Every generation laughs at the old fashions, but follows religiously the new. -Henry David Thoreau |
|

|

|
 10-11-13, 02:58 PM
|
#14 |
|
Navy Seal
 Join Date: Feb 2009
Location: Kentucky
Posts: 5,421
Downloads: 85
Uploads: 0
|
One thing I really like about TOAWIII is that making AARs is fairly easy as the game automatically records the data for you.All you have to do is compile it and take some larger screens at key points.
|

|

|
 10-13-13, 03:15 AM
|
#15 |
|
Grey Wolf
 Join Date: Jul 2009
Location: Dark forest
Posts: 793
Downloads: 316
Uploads: 0
|
That's true. I only yesterday realized how to get access to the log files game generates. News and battle reports. Quite handy, especially the battle reports as it seems to be impossible to take a screenshot from the game, at least with Fraps.
__________________
Every generation laughs at the old fashions, but follows religiously the new. -Henry David Thoreau |

|

|
 |
|
|
