
|
|
SUBSIM: The Web's #1 resource for all submarine & naval simulations since 1997
|
SUBSIM: The Web's #1 resource for all submarine & naval simulations since 1997 |
 10-21-08, 08:52 PM
|
#31 |
|
Navy Seal
 Join Date: Mar 2007
Location: DeLand, FL
Posts: 8,900
Downloads: 135
Uploads: 52


|
Uploading video now. Would you believe a successful daylight surface attack for the first John P Cromwell tutorial video? In a really great thunderstorm? I had to close to 1800 yards to see him at all and shot with the TBT. Although I say in the tutorial that I though I only hit two before the mission ended with target destroyed, on the audio you can clearly hear 4 impacts. In the video you can't see crap in the TBT.:rotfl:
I show how to do a vector analysis, where you can pick the torpedo track angle to the target (45º for the John P Cromwell attack) and draw a scale diagram to find the proper lead angle to aim the periscope. Then I show how to set up the attack in the TDC by rule of thumb that make the attack very simple to figure in your head without any outside tools whatever. In the process I explain what the S in S-Boat means, demonstrate how to drive like a drunken sailor and other semi-entertaining behaviors meant to demonstrate that I have no business making tutorial movies of anything. I still have to work on sound levels. 3/4 of the way through the movie the sound comes unsynchronized from the video by about 5 seconds. Too bad! I've never seen a surfaced daytime attack done before and it stays! We'll make other, clearer movies later. I'm just glad to get this one out of here. I thought I was cursed there for awhile and just want to get away from movie making for a few days. One hour and six minutes till showtime! 
__________________
Sub Skipper's Bag of Tricks, Slightly Subnuclear Mk 14 & Cutie, Slightly Subnuclear Deck Gun, EZPlot 2.0, TMOPlot, TMOKeys, SH4CMS |

|

|
|
10-22-08, 05:08 AM
|
#32 |
|
Navy Seal
Join Date: Mar 2007
Location: DeLand, FL
Posts: 8,900
Downloads: 135
Uploads: 52
|
Sorry about the delay. Here is the video for the basic longitudinal spread. Edit: now a much smaller 7zip file!
John P Cromwell attack technique See the description in my last post. This one is strictly shooting Dick O'Kane style: longitudinal spread (all torpedoes take the same path to the target and are distributed from target's bow to stern by timing alone). Coincidentally, because it wasn't planned that way, this is also the first video ever released of a successful daylight surface attack. I'll replace the above AVI with a 7zip later. Enjoy! Please ignore the loss of sound synchronization in the last part of the video. I was cursed from the moment Hitman said, "this probably isn't a good idea."  OK, written instructions on how to execute this thing, written purely from memory, so don't shoot me: With radar, plot two positions of the target 3 minutes apart onto the nav map. The distance between the two positions in hundreds of yards is the speed of the target, 600 yards equals 6 knots. Enter the speed into the TDC. On the nav map with the ruler, draw a line from the first position, through the target and extending past your submarine. Measuring with the compass rose obtained with tool help on you can determine the target's course. If this reveals that you can take a 45º approach angle to the track from ahead of the target, it's time to execute a John P Cromwell attack. Estimate the intercept point for a 45º approach. It doesn't matter if the estimate is wrong. With the protractor, click on the track further out from that point, then back toward the target at that estimated intercept point and lastly right beside your boat. Read the angle. It won't say 45º. Grab the vertex (the angle itself--the middle click point) and move it up or down the course until it says 45º. Now turn your boat parallel with that line. If you have the 360º bearing plotter (hope you have the 3000 yd/meter variety!) this is a trivial task. If you don't, read the course off the protractor line with the ruler or protractor compass rose. Pick your periscope aiming bearing. For a target coming from left to right, I'd pick 350º for fast Mark 14, Mark 23 or Mark 10, 345º for slow Mark 14 or Mark 18. Now you have to calculate the angle on the bow (AoB). This is easy, don't leave now! The AoB equals 45º minus your lead angle. If your shoot bearing is 350º, you are 10º from the zero bearing. So 10º is your lead angle. 45º minus 10º equals an AoB of 35º. Now which side of the target are you looking at? In the video it is the starboard side, so the angle on the bow is 35º starboard. For the other lead angle, our shoot bearing is 345º. That is 15º from the zero (360º) bearing. 45 minus 15 equals an AoB of 30º port or starboard, depending on whether the target is coming from the left or right. For whether the AoB is port or starboard, answer the question "what side of the target am I looking at?" There's your answer. Range doesn't matter but bearing does. Point your aiming device, usually periscope, up the shoot bearing you've selected and press the send range/bearing to TDC button. You are ready to shoot. Now it's a matter of remaining undetected and with the periscope pointed at the shoot bearing, send torpedoes as juicy parts of the target pass the crosshairs. Watch the destruction! Nisgeis will be by later with complete instructions on how to do the vector analysis, which will give you the periscope bearing for an attack giving you a perfect zero gyro shot every single time! Don't be afraid kiddies, a little math never hurt anybody. This is analytical geometery and very impressive to beautiful girls at the bar while you're in port! Demonstrate this on a napkin and they're YOURS!!!! Pay attention.
__________________
Sub Skipper's Bag of Tricks, Slightly Subnuclear Mk 14 & Cutie, Slightly Subnuclear Deck Gun, EZPlot 2.0, TMOPlot, TMOKeys, SH4CMS Last edited by Rockin Robbins; 10-22-08 at 08:45 AM. |
|
|
|
|
10-22-08, 06:21 AM
|
#33 |
|
Ocean Warrior
 Join Date: Jan 2008
Posts: 2,909
Downloads: 77
Uploads: 11
|
Robbins, you should try compressing it with DivX or XVid, it will give a compressed video and the quality will still be very good. I couldn't see the target in the TBT at all in the video. Nice explanation though!
You might find it easier to get the right course by using the navigation plotter waypoint and just dragging it so it's parallel, it's a lot easier than matching a course by hand.
__________________
-------------------------------- This space left intentionally blank. |
|
|
|
|
10-22-08, 06:30 AM
|
#34 |
|
Swabbie
 Join Date: May 2005
Location: UK
Posts: 6
Downloads: 217
Uploads: 0
|
RR, Nisgeis and anyone else who I have failed to mention...
Thank you for your time and effort in finding yet another method for sinking the enemy. I'm in the process of downloading your video, RR (comments to follow, if require!! Once again - Thanks for the time and effort you all put into our community. Yours Aye |
|
|
|
|
10-22-08, 07:20 AM
|
#35 |
|
Commander
 Join Date: Jun 2006
Posts: 476
Downloads: 21
Uploads: 0
|
I tried this attack technique last night, from 3500 yards, thus being able to use the high speed torpedo setting and also not being very close to the escorts. It works like a marvel
 . .10 torpedoes, 5 kills (each ship was attacked by 2 torpedoes, one set to minimal depth, one to keel depth, the former set to impact and the latter to magnetic). One large freighter was stubborn enough not to sink, but his engines were a wreck, so late in the night I was able to surface and finish him with the deck gun. 
|
|
|
|
|
10-22-08, 07:22 AM
|
#36 |
|
Ocean Warrior
Join Date: Jan 2008
Posts: 2,909
Downloads: 77
Uploads: 11
|
The formula for finding the correct bearing to fire on is too complicated to do on the fly without using a calculator and a rule of thumb just isn't accurate enough. To get round this, the easiest way to get the correctr bearing is to draw the problem on the navigation map. With your protractor, draw a straight line across, then put your second point and then make an angle equal to the intersection angle of your target's course. For the first example bewlo, that would be 135 degrees.
The basics of it are, to work out where an object will be prior to a collision. You can work out where two objects are when they collide easily enough - as they are at the same point. To work out where they would be, you just need to draw their paths back from where they came from. So, in the first example below, draw your 135 degree line, then from the centre of the angle draw out along the horizontal to a range equaling the speed * 100, which will give the range travelled in three minutes. The range is irrelevant, we're just making it a multiple of 100 so that there is enough accuracy in the ruler tool and you don't have to guess where the right point is. For the example below, you'd draw a line 1,200 yards long. Then down the other leg of the angle, draw a line equal to your torpedo's speed * 100. This will give the equivalent distance travelled by the torpedo when the target has travelled its speed * 100. Let's say you are using a Mk. 14 on fast, which travels at 46 knots. The scale of *100 yards is only relevant to get enough accuracy on what range you are drawing. You could if you wanted to draw speed * 1 mile, to give 12 miles for your target and 46 miles in the same time, or 12 feet and 46 feet, or 12 millimeters, but there's not enough range resolution for less than hundreds of yards. Feel free to plot in *1 km, or *100m whichever you are using - as it's a constant bearing problem, the range scale doesn't matter, only the angle matters. The drawing you have just made shows were the target and torpedo will be in relation to each other for any scale. Not all you have to do is to measure the angle between where the target is at the start and where the collision point is. So, with another protractor tool, click on the target start point, click on the collision point then finally click on the torpedo start point. This will give you the lead angle to fire at for a zero gyro angle shot. 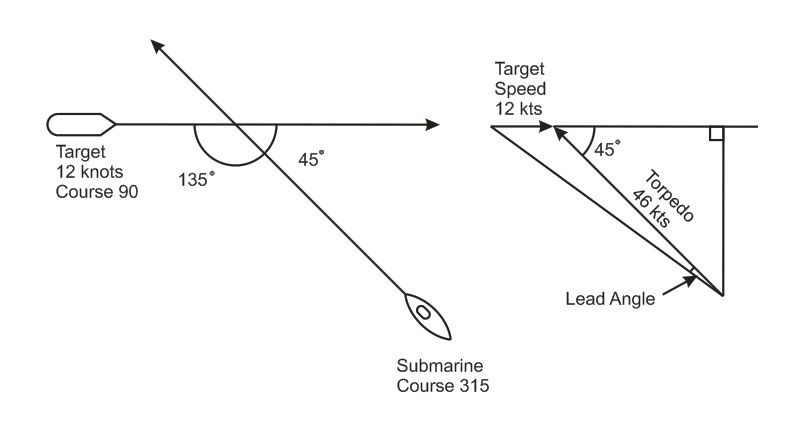 Example 1, Diagram for a 12 knot target and a 46 knot torpedo shot for a torpedo track angle of 45 degrees. You can also use this for any other angle you like:  Example 2, Diagram for a 12 knot target and a 46 knot torpedo shot for a torpedo track angle of 60 degrees. 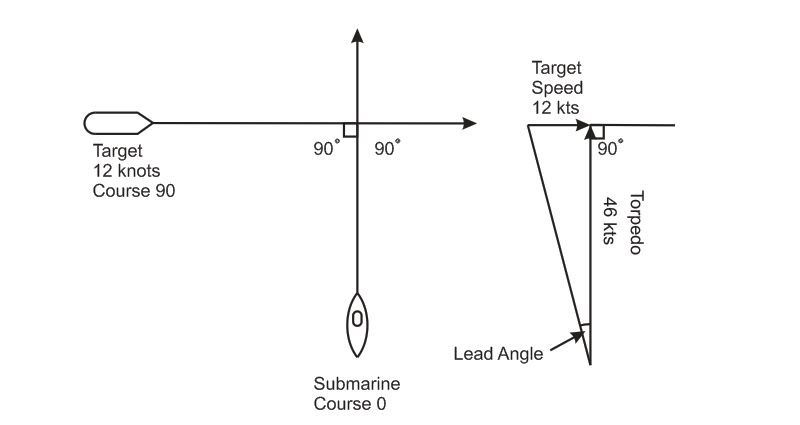 Example 1, Diagram for a 12 knot target and a 46 knot torpedo shot for a torpedo track angle of 90 degrees. I hope that's clear, but perhaps not. Any questions?
__________________
-------------------------------- This space left intentionally blank. |
|
|
|
|
10-22-08, 07:29 AM
|
#37 |
|
Swabbie
Join Date: May 2005
Location: UK
Posts: 6
Downloads: 217
Uploads: 0
|
Robbins,
As Nisgeis said - Nice explanation (as always) but that time lag with the sound and invisible target kinda puts a dampener on things. But, who am I to comment - I wouldn't know how to produce a video. Hell, I can't even put my signature on a website so I can URL it's location. Too long at sea playing with RADAR blips, not enough time behind a PC learning fundamentals!! Now I have to get my head around the editor to produce a practice mission to test the John P Cromwell method - "Gentlemen, I may be gone some time!!" Yours Aye |
|
|
|
|
10-22-08, 07:48 AM
|
#38 |
|
Navy Seal
Join Date: Mar 2007
Location: DeLand, FL
Posts: 8,900
Downloads: 135
Uploads: 52
|
Pick and choose. I choose both methods! There is plenty of time. Actually if you guess the wrong lead angle your gyro angle would be less than 5º off with a pretty terrible guess. That won't impact the accuracy of your shot.
We fuss and pick when we're making these tutorials, anticipating that equally fussy people will say, "You did this wrong! Your shoot bearing should have been 349º, not 350! You idiot!" Actually a torpedo with a 1º gyro angle is functionally as accurate as one with a zero gyro angle. So is one with a 5º or a 10º gyro angle. You'll NEVER be 10º off using a rule of thumb. Rules of thumb allow you to be just as accurate as the guy with the vector analysis who sends his torpedo straight up the zero line, but with rules of thumb you don't have to remember how fast that Mark 10 is, or make the mistake of selecting slow speed for your Mark 14 and drawing the vector analysis for fast speed. You can verify the bearing of the torpedo track on the attack map. In shooting, some things can be close enough, and others need to be accurate. In the John P Cromwell attack, speed measurement is more forgiving than the Dick O'Kane attack, but the AoB measurement is more critical. Fortunately, in both types of attack our AoB can be 100% accurate and calculated in your head in less than a second. There is no guesswork there, just a simple to remember rule. In the Dick O'Kane attack you are attacking 90º from the target track. The AoB is 90º minus the difference of your shoot bearing from zero. A shot sighted up the 350º bearing line is ten degrees from zero (360). It has an AoB of 90º minus 10º equals 80º port or starboard, depending on which side of the target you are looking at. In John P. Cromwell you are attacking 45º from the target track. The AoB is 45º minus the lead angle you select. A shot sighted up the 350º bearing line has an AoB of 45º minus the 10º lead angle equals AoB 35º starboard or port, depending on which side of the target you are looking at. These rules are neither difficult to calculate without a calculator, nor difficult to remember. They are exact results, not approximations. But both methods are prone to error. The vector analysis method is prone to the error of setting wrong torpedo speeds, or misremembering the torpedo speed. This error will result in a miss. The TDC/rules of thumb method is prone to an error of getting the gyro angle a couple of degrees from zero. This results in a sunk target and no knowledge of the error at all unless you investigate the results later or check the attack screen before you shoot. I'll take the error that sinks the target! Your results may differ. And there's plenty of time to do both! The video shows you how to do the vector analysis right on your nav map without pencil and paper. Use both and you check the possible errors of both methods with the strength of the other. That's the policy I recommend. These are complimentary, not competitive methods. 
__________________
Sub Skipper's Bag of Tricks, Slightly Subnuclear Mk 14 & Cutie, Slightly Subnuclear Deck Gun, EZPlot 2.0, TMOPlot, TMOKeys, SH4CMS |
|
|
|
|
10-22-08, 08:33 AM
|
#39 | |
|
Navy Seal
Join Date: Mar 2007
Location: DeLand, FL
Posts: 8,900
Downloads: 135
Uploads: 52
|
Quote:
 The admiral made me put a Student Driver magnetic sign on my fantail. The admiral made me put a Student Driver magnetic sign on my fantail.
__________________
Sub Skipper's Bag of Tricks, Slightly Subnuclear Mk 14 & Cutie, Slightly Subnuclear Deck Gun, EZPlot 2.0, TMOPlot, TMOKeys, SH4CMS |
|
|
|
|
|
10-22-08, 10:03 AM
|
#40 |
|
Swabbie
Join Date: Oct 2008
Posts: 7
Downloads: 0
Uploads: 0
|
When I first read about teh Dich O'Kane method, I thought "this is about the relation between the speed of the target vessel and the speed of your torpedo".
Yet in Rockin Robbins guide I only found two shooting bearings 10 deg for fast and 20 deg for slow torpedoes. So I set out calculation my own shooting bearings at target vessel speeds using the following formula: tan(a)=Vtarget/Vtorpedo a = invtan Vtarget/Vtorpedo where a = angle and V = speed So I came up with a nice table with shootingbearings for speeds from 1 to 20 knots for slow and fast torpedoes. As it turned out my whole table was a waste of time. You know why? Because your so damn close (> 1100 yards) that rough estimates like 10 deg for fast and 20 deg for slow torpedoes do the trick. Since the Cromwell attack is based on the same principle i.e. the relation between target speed and torpedo speed, you don't have to worry about precise schooting bearings if you take care that your in a well let's say 1500 yrd radius from your target. I use the Dick O'Kane method frequently and it works like a charm. It also gave me insight in how to figure out the AOB, which led me to use the Position Keeper. The PK is my friend now and I seldom miss. The only thing that I have trouble with is shooting two convoy targets at a time with the PK. I saw a videoguide for it once, but I can't find it anymore. Do any of you guys have some advice on this for me? |
|
|
|
|
10-22-08, 01:06 PM
|
#41 |
|
Navy Seal
Join Date: Mar 2007
Location: DeLand, FL
Posts: 8,900
Downloads: 135
Uploads: 52
|
The guy who has the best instructions on this is tale. Tale's instructions could work as well for Dick O'Kane or John P Cromwell too! He's got a great movie.
__________________
Sub Skipper's Bag of Tricks, Slightly Subnuclear Mk 14 & Cutie, Slightly Subnuclear Deck Gun, EZPlot 2.0, TMOPlot, TMOKeys, SH4CMS |
|
|
|
|
10-22-08, 01:57 PM
|
#42 |
|
Ace of the Deep
 Join Date: Jun 2005
Location: Palm Beach, Florida
Posts: 1,243
Downloads: 53
Uploads: 8
|
You can call it Cromwell or whatever you like I s'pose.
However, you should be able to use the TDC component of the PK to get the firing solution without having to draw things on the map. I know you dispatched with all that in your simplified DO'K method.... but there was a time when I mentioned that you should use the TDC component of the PK to calculate the intercept angle for you. My initial recommendation to mimic Fast-90 was to use the TDC to setup a firing solution (close to a zero gyro angle) without having the PK continue to track the target. http://www.subsim.com/radioroom/show...&postcount=134 I believe my exact same suggestion can be followed in this case only instead of a 20° bearing with a 70° AoB, it's 20° bearing and 35.5° AoB (or just 36°) You're not really describing anything different here... you just forgot (or never bothered to use) the TDC to setup the firing solution as I originally suggested. The nod to O'Kane was merely acknowledging his recording of the tactic, that both he and Morton used, which involved overriding the PK tracking and firing as points of interest passed the wire. Same thing here... Calling it Fast-90 was deemed inappropriate because the US Fleetboat optics didn't allow for pan-and-fire solutions (which was at the heart of Fast-90). But... I don't have any objections to you guys calling a 45° approach whatever you like.  It's all good...
__________________

|
|
|
|
|
10-22-08, 02:18 PM
|
#43 |
|
Navy Seal
Join Date: Mar 2007
Location: DeLand, FL
Posts: 8,900
Downloads: 135
Uploads: 52
|
There are a couple of reasons I included the vector analysis in the tutorial movie:
1. I love elegant solutions that can be verified by inspection. Vector analysis is fun, even for normally math-challenged people. 2. Respect for Nisgeis, who suggested this tactic to begin with and didn't understand my explanation of the Dick O'Kane attack. I thought "What if there are more like him who are having problems with the TDC method but could use the vector analysis method?" They deserve help too. 3. Although I believe the TDC method is less prone to error than the vector analysis method, it is true that one method can be used to verify the other. 4. While you are in port, you go to the local watering hole. Inside is this gorgeous piece of womanflesh. You approach her and find out she's some kind of philologist or something and you can't seem to make any kind of connection. You merely whip out a napkin and draw the vector analysis of your last torpedo attack. SHE'S YOURS PAL!!! Take her home.:rotfl: Aaronblood, I'm a promoter of ideas. Some of them are irrelevent, such as what the "s" in S-Boat stands for. Some, such as the vector analysis, may be good only for understanding the underlying concept behind the attack. The vector analysis can also be used to show why in this type of solution the range doesn't matter. What happens to the angles when you double all the measurements? (they remain the same). And vector analysis is just plain fun. Yeah, I'm crazy as you are!
__________________
Sub Skipper's Bag of Tricks, Slightly Subnuclear Mk 14 & Cutie, Slightly Subnuclear Deck Gun, EZPlot 2.0, TMOPlot, TMOKeys, SH4CMS |
|
|
|
|
10-22-08, 02:41 PM
|
#44 |
|
Ace of the Deep
Join Date: Jun 2005
Location: Palm Beach, Florida
Posts: 1,243
Downloads: 53
Uploads: 8
|
Vector math can be fun...
If only things had exploded when I got answers right in HS Algebra; would've made that class far more interesting. I kinda like using the TDC that's supplied in the game. Although I have my doubts about the historical accuracty of the in-game distance knob that disallows full manual input! Thankfully if we're working with close to zero-gyro shots, it doesn't really matter.
__________________
|
|
|
|
|
10-22-08, 02:49 PM
|
#45 |
|
Navy Seal
Join Date: Mar 2007
Location: DeLand, FL
Posts: 8,900
Downloads: 135
Uploads: 52
|
I agree. Vector math is fun if there's a boom at the end, but a mechanical computer is even more fun and it helps eliminate some errors that are easy to make in the vector chart. Now if I can figure out how the thing does e-mail...
Oh, there is a mod that allows for direct range input to the TDC. I'll dig it up.
__________________
Sub Skipper's Bag of Tricks, Slightly Subnuclear Mk 14 & Cutie, Slightly Subnuclear Deck Gun, EZPlot 2.0, TMOPlot, TMOKeys, SH4CMS |
|
|
|
 |
|
|


 Linear Mode

