
|
|
SUBSIM: The Web's #1 resource for all submarine & naval simulations since 1997
|
SUBSIM: The Web's #1 resource for all submarine & naval simulations since 1997 |
|
|
 06-09-18, 10:54 AM
|
#1 | |
|
Crusty
 Join Date: Jun 2005
Location: USA
Posts: 649
Downloads: 334
Uploads: 0
|
Quote:
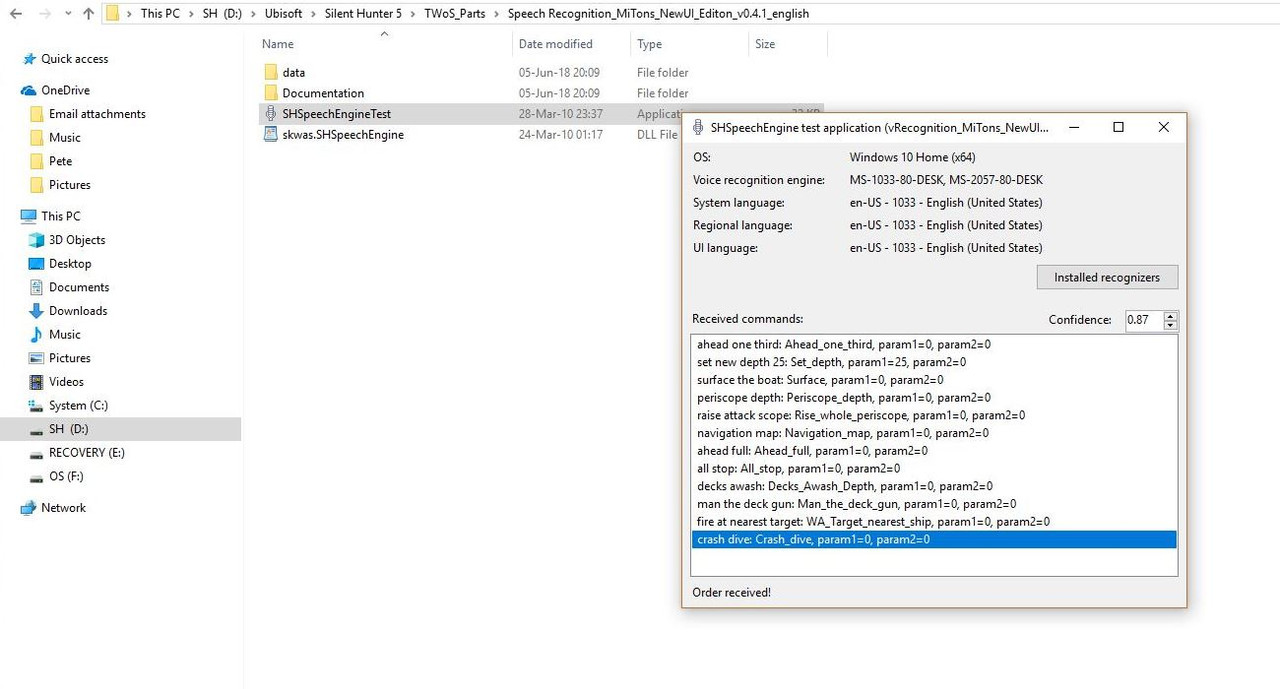
I will say.. when it comes to basic commands for navigation etc .. I use this for the rest I Click .. and yep it is installed correctlly
__________________
Captain AJ 
|
|

|

|
|
06-18-18, 04:28 AM
|
#2 |
|
Growing Old Disgracefully

 Join Date: Dec 2012
Location: Hythe - Southampton
Posts: 9,609
Downloads: 1133
Uploads: 0


|
A Visual Display And Understanding Of TDWS Option File Editor Viewer (OFEV) Part 1
TDWS Option File Editor Viewer (OFEV) contains some 35 Tabs containing over 200 patches. When first opened you will find some patches enabled and others disabled. This tutorial is basically a visual display to show you all the Tabs and Patches as you would see them on your own system without opening the OFEV. Patches you see here enabled or disabled may be set differently on your OFEV. Submarine > Contains 4 patches. Note: Allows you to add a snorkel to your u-boat. Note: This snorkel is mounted on the left side of the bridge and not on the hull casing.  Patches > Contains 4 patches. Note: Enabling the Decks Awash Patch here in the OFEV also needs TDWs Generic File Patcher Decks Awash patch to be enabled as well. Note: This will add a new icon below your surface icon.  UI > Contains 2 patches. Note: Allows you to change the UI from the default Enhanced UI to 3 Dials UI.  HUD > Contains 13 patches.  Maps > Contains 5 patches.  Heading > Contains 6 patches.  Radio > Contains 22 patches. 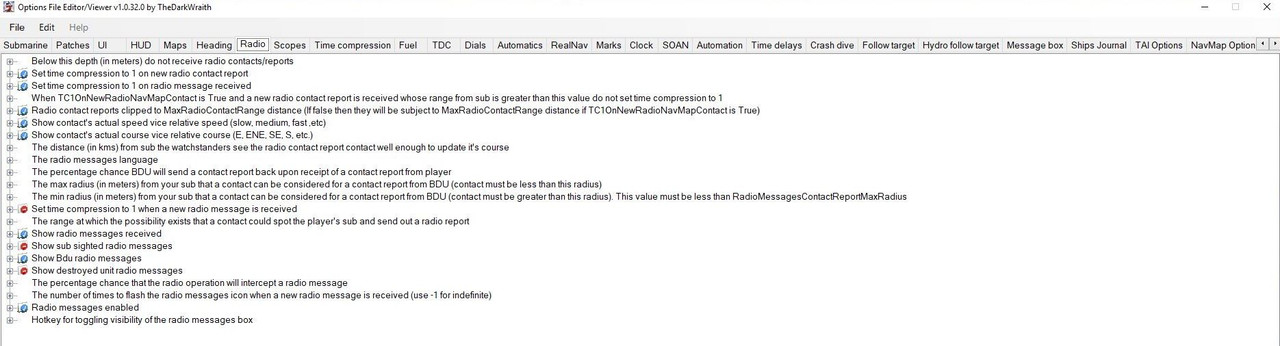 Scopes > Contains 7 patches.  Time Compression > Contains 3 patches.  Fuel > Contains 2 patches.  TDC > Contains 15 patches. 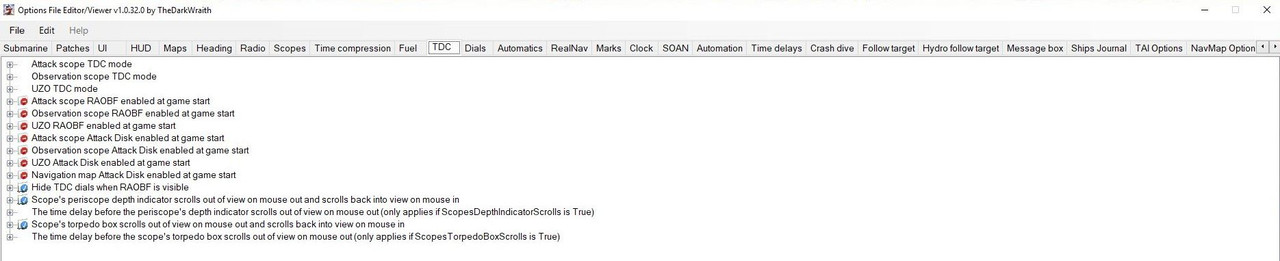 Dials > Contains 20 patches. 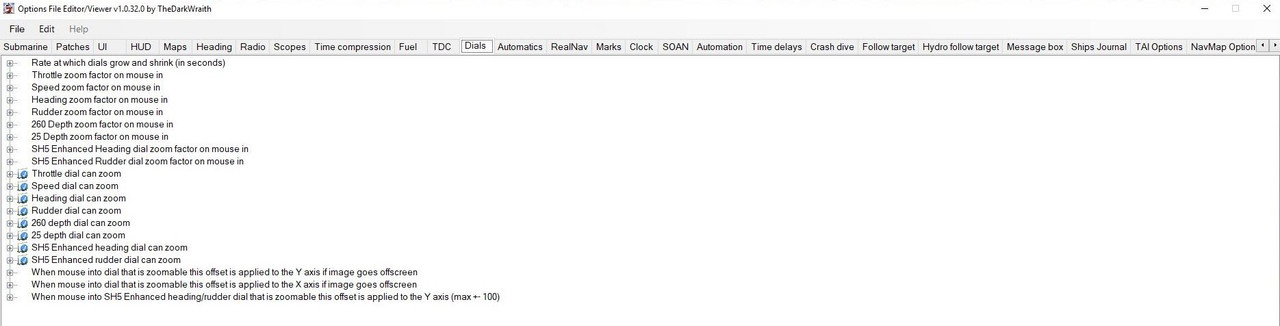 Automatics > Contains 15 patches. 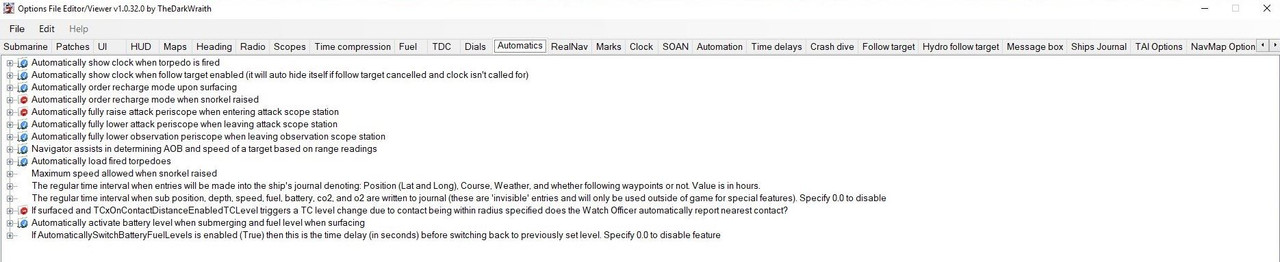 Real Nav > Contains 8 patches. Note: Only used if the Real Navigation Mod is enabled in JSGME.  Marks > Contains 7 patches.  SOAN > Contains 2 patches.  Automation > Contains 7 patches. Note: Allows you to pre-set keys for use on automated scripts. 
__________________
LSH3-2015 <> TUTORIALS <> ALL YOU NEED TO KNOW <> ALL IN ONE PLACE SH4 <> TUTORIALS <> HOW TO DO IT <> INFORMATION <> DOWNLOAD LINKS SH5 <> TUTORIALS <> HOW TO DO IT <> INFORMATION <> DOWNLOAD LINKS Always Here To Help A Fellow 'Subber' | Need An Answer to A Question Just Send Me A PM Last edited by THEBERBSTER; 08-22-18 at 03:34 PM. |
|
|
|
|
06-18-18, 04:38 AM
|
#3 |
|
Growing Old Disgracefully
Join Date: Dec 2012
Location: Hythe - Southampton
Posts: 9,609
Downloads: 1133
Uploads: 0
|
A Visual Display And Understanding Of TDWS Option File Editor Viewer (OFEV) Part 2
Time Delays > Contains 9 patches.  Crash Dive > Contains 4 patches.  Follow Target > Contains 4 patches.  Hydro Follow Target > Contains 4 patches.  Message Box > Contains 17 patches. 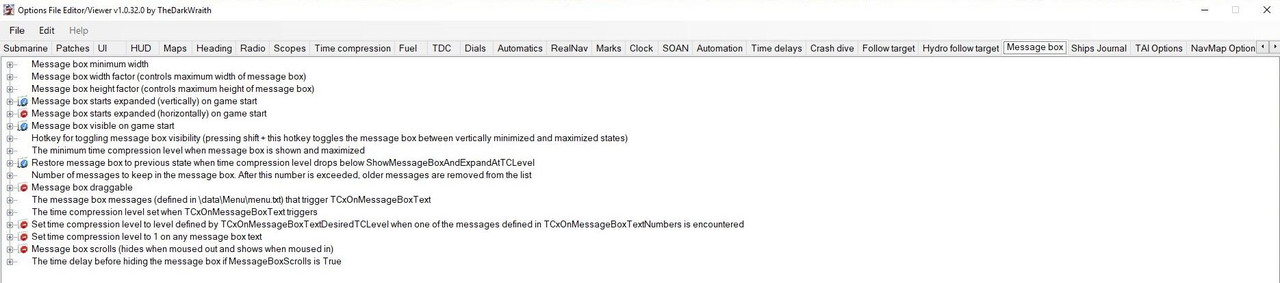  Ships Journal > Contains 4 patches. Note: Here you can enter your U-boat number. Note: Here you can enter your Captains Name. Note: These patches will update your saved games and career if selected. TAI Options > Contains 41 patches. Note: Many of these patches can be changed in the game from the OFEV settings but only for the current gaming session.  Nav Map Options > Contains 38 patches. Note: Many of these patches can be changed in the game from the OFEV settings but only for the current gaming session. 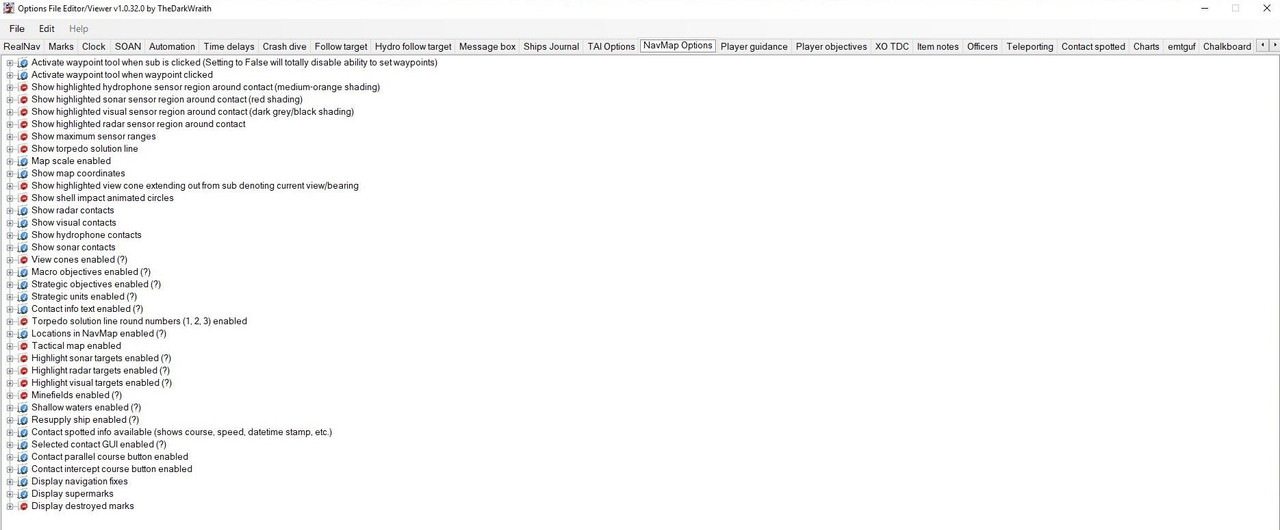 Player Guidance > Contains 1 patch  Player Objectives > Contains 2 patches.  XO TDC > Contains 4 patches.  Item Notes > Contains 1 patch  Officers > Contains 9 patches.  Teleporting > Contains 15 patches. 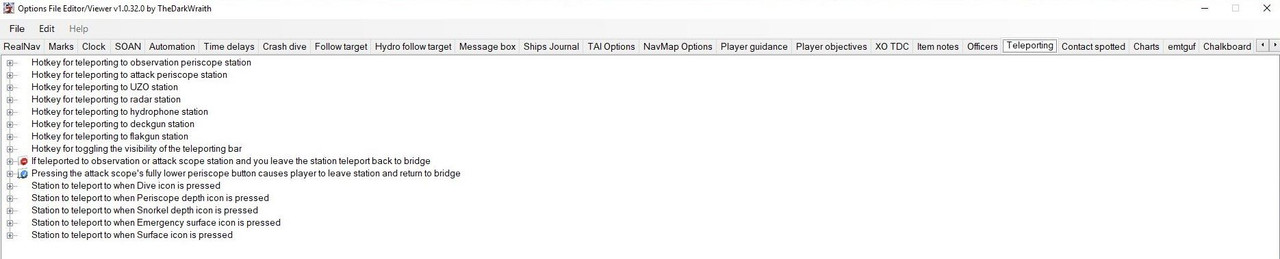 Contact Spotted > Contains 1 patch.  Charts > Contains 3 patches.  emtguf > Contains 1 patch.  Chalkboard > Contains 3 patches. 
__________________
LSH3-2015 <> TUTORIALS <> ALL YOU NEED TO KNOW <> ALL IN ONE PLACE SH4 <> TUTORIALS <> HOW TO DO IT <> INFORMATION <> DOWNLOAD LINKS SH5 <> TUTORIALS <> HOW TO DO IT <> INFORMATION <> DOWNLOAD LINKS Always Here To Help A Fellow 'Subber' | Need An Answer to A Question Just Send Me A PM Last edited by THEBERBSTER; 09-20-21 at 01:11 PM. |
|
|
|
|
06-18-18, 04:40 AM
|
#4 |
|
Growing Old Disgracefully
Join Date: Dec 2012
Location: Hythe - Southampton
Posts: 9,609
Downloads: 1133
Uploads: 0
|
The Wolves of Steel (TWOS) Restore Captains Icons Pack V.2 by JCWolf
Download here. The Wolves of Steel (TWoS) Restore Captains Icons Pack by JCWolf Installation Instructions. Make a New Folder. Picture 1 > Download the Zip file into the New Folder.  Picture 2 > Open the Zip file and you will see a folder called TWOS restore captains icons pack V.2 by JC Wolf. Click on the Extract Tab. 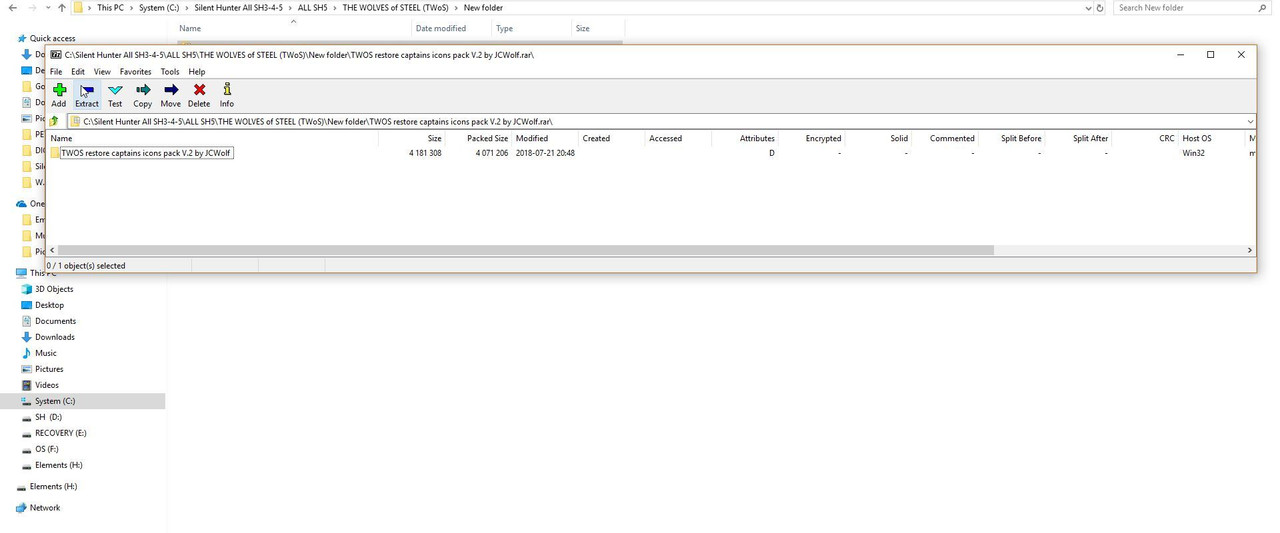 Picture 3 > Press OK to confirm. 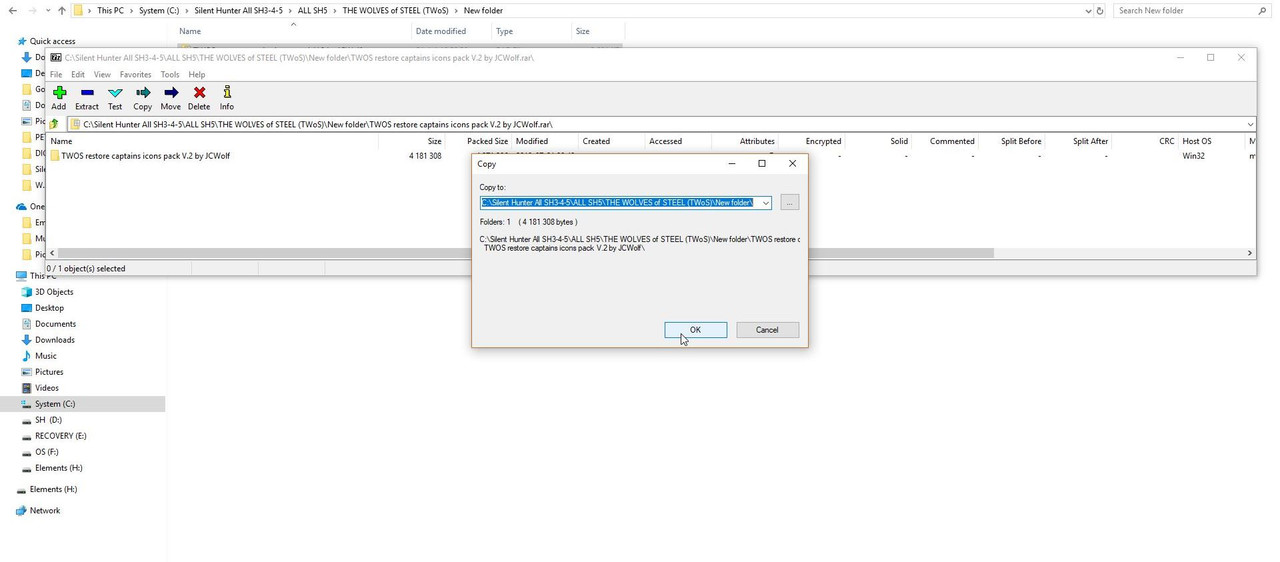 Picture 4 > X to Exit the file. 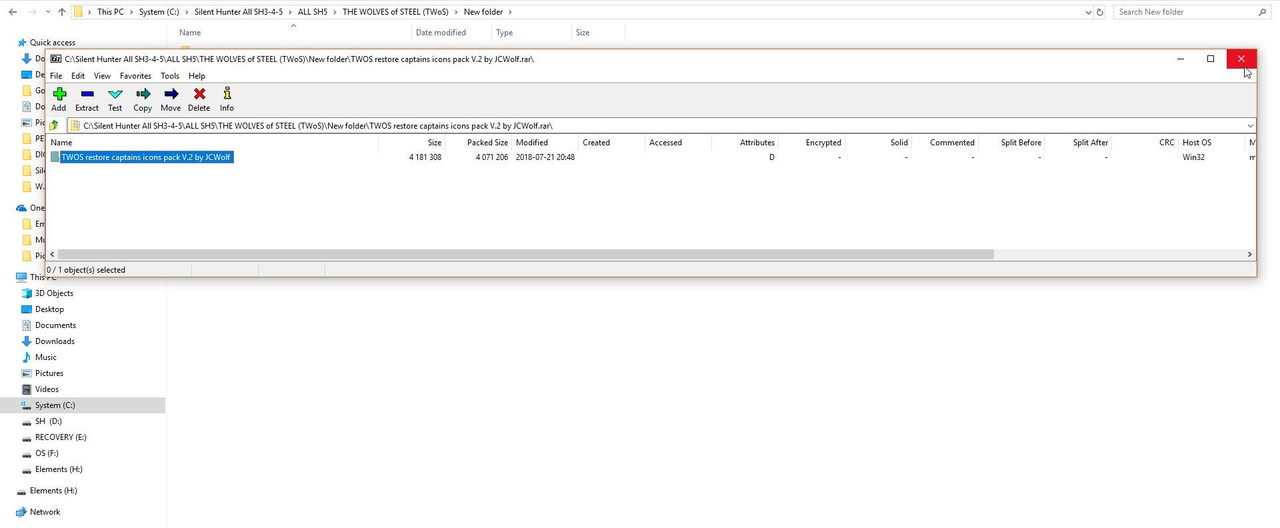 Picture 5 > You now see the Extracted folder and the Zip file in the New Folder together.  Picture 6 > Open the file folder Make your captain selection from the 10 pictures showing and remember the picture number.  Picture 7 > Open the 10 individual mods here folder. Copy and paste the mod number for the selected picture into the TWoS_Parts folder found in your SH5 main game folder. Enable JSGME.  Courtesy acknowledgement to JC Wolf
__________________
LSH3-2015 <> TUTORIALS <> ALL YOU NEED TO KNOW <> ALL IN ONE PLACE SH4 <> TUTORIALS <> HOW TO DO IT <> INFORMATION <> DOWNLOAD LINKS SH5 <> TUTORIALS <> HOW TO DO IT <> INFORMATION <> DOWNLOAD LINKS Always Here To Help A Fellow 'Subber' | Need An Answer to A Question Just Send Me A PM Last edited by THEBERBSTER; 03-18-19 at 03:09 PM. |
|
|
|
|
09-12-18, 11:55 AM
|
#5 |
|
Growing Old Disgracefully
Join Date: Dec 2012
Location: Hythe - Southampton
Posts: 9,609
Downloads: 1133
Uploads: 0
|
Auto TDC Tutorial Attacking An Escorted Convoy > Pictorial
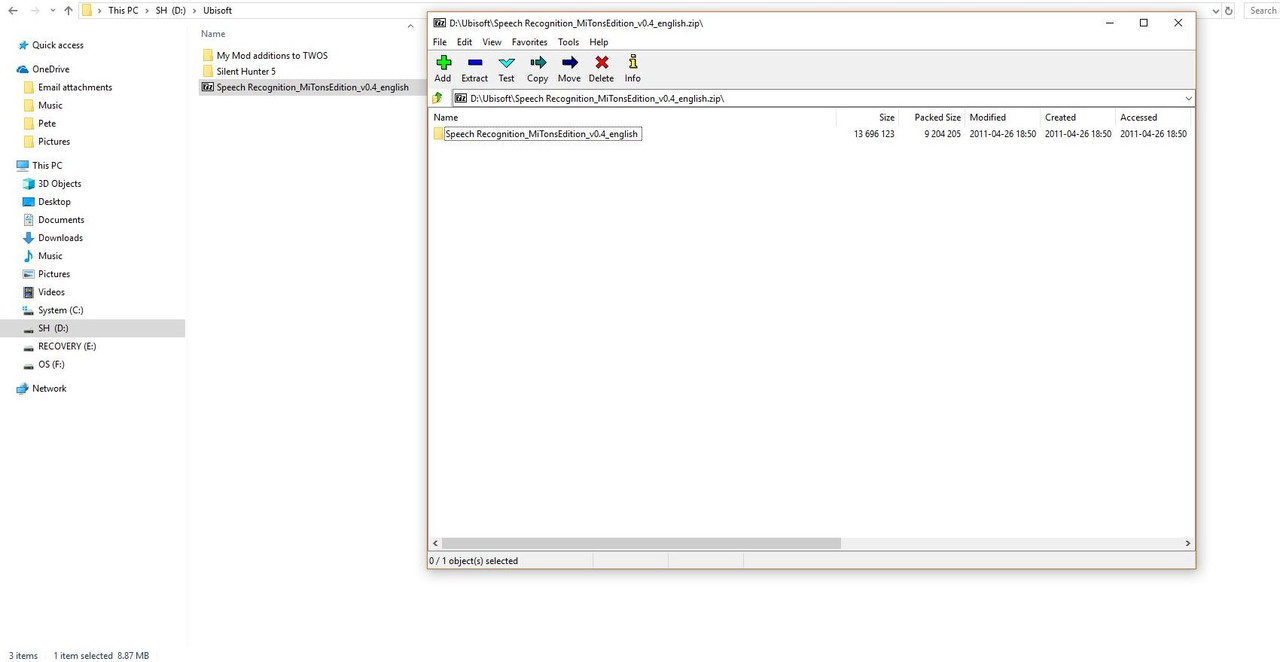
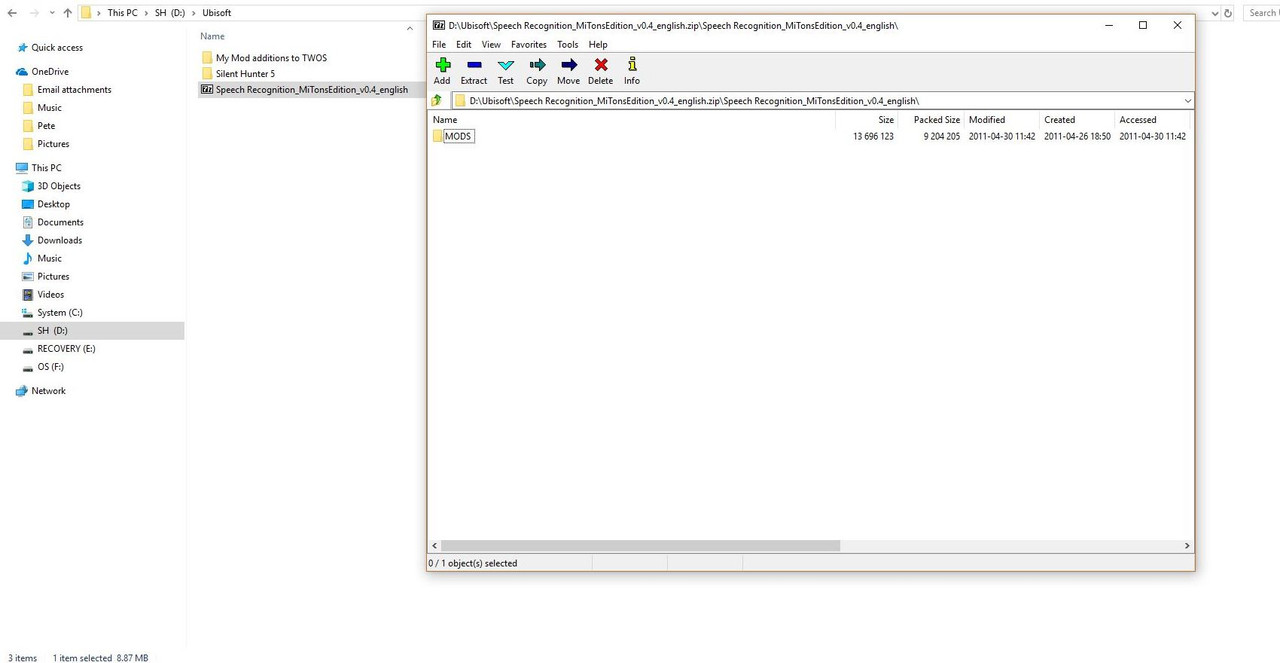
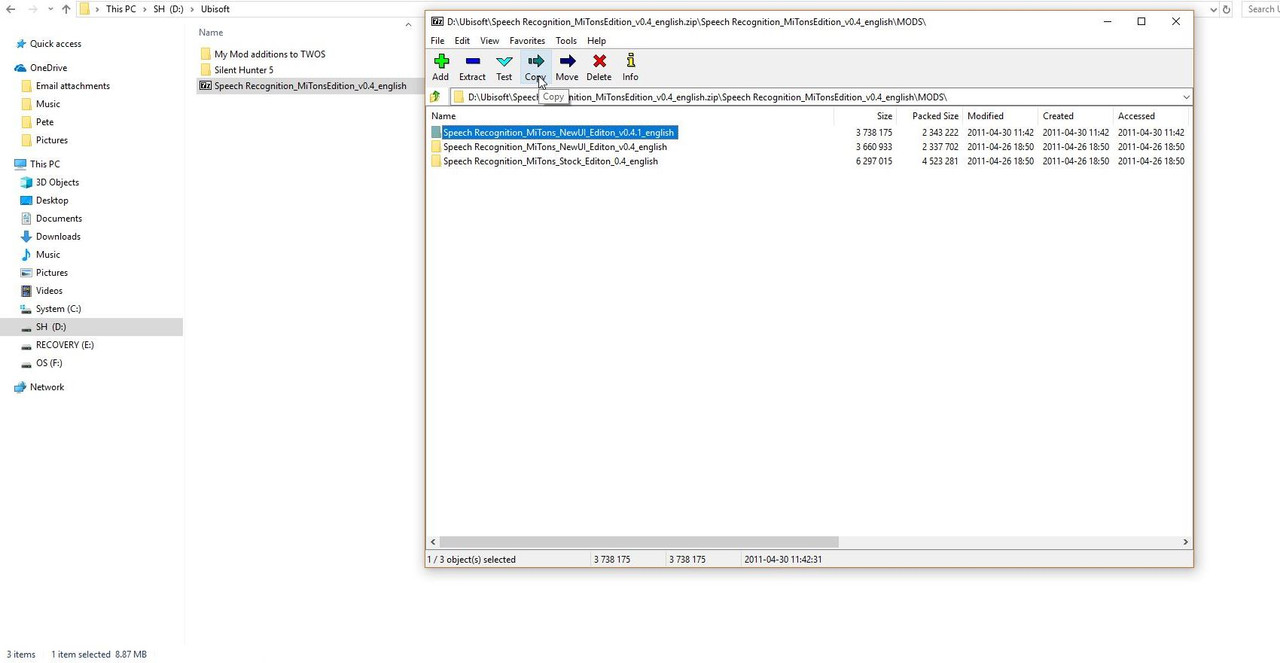
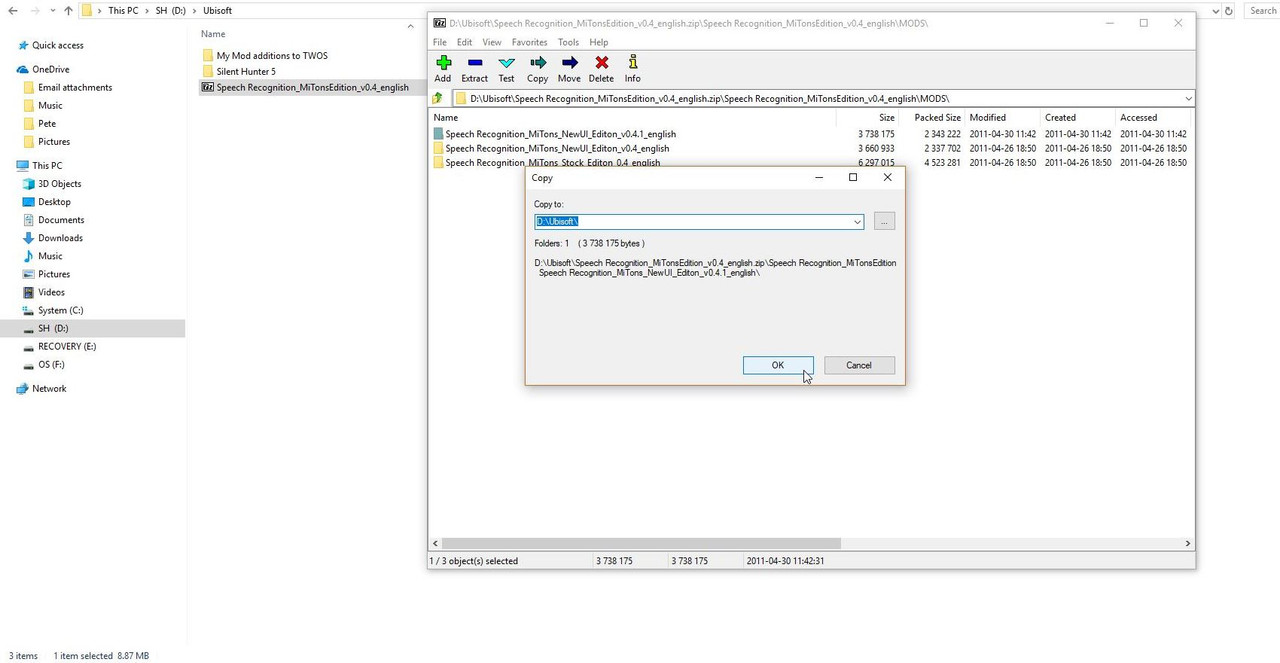
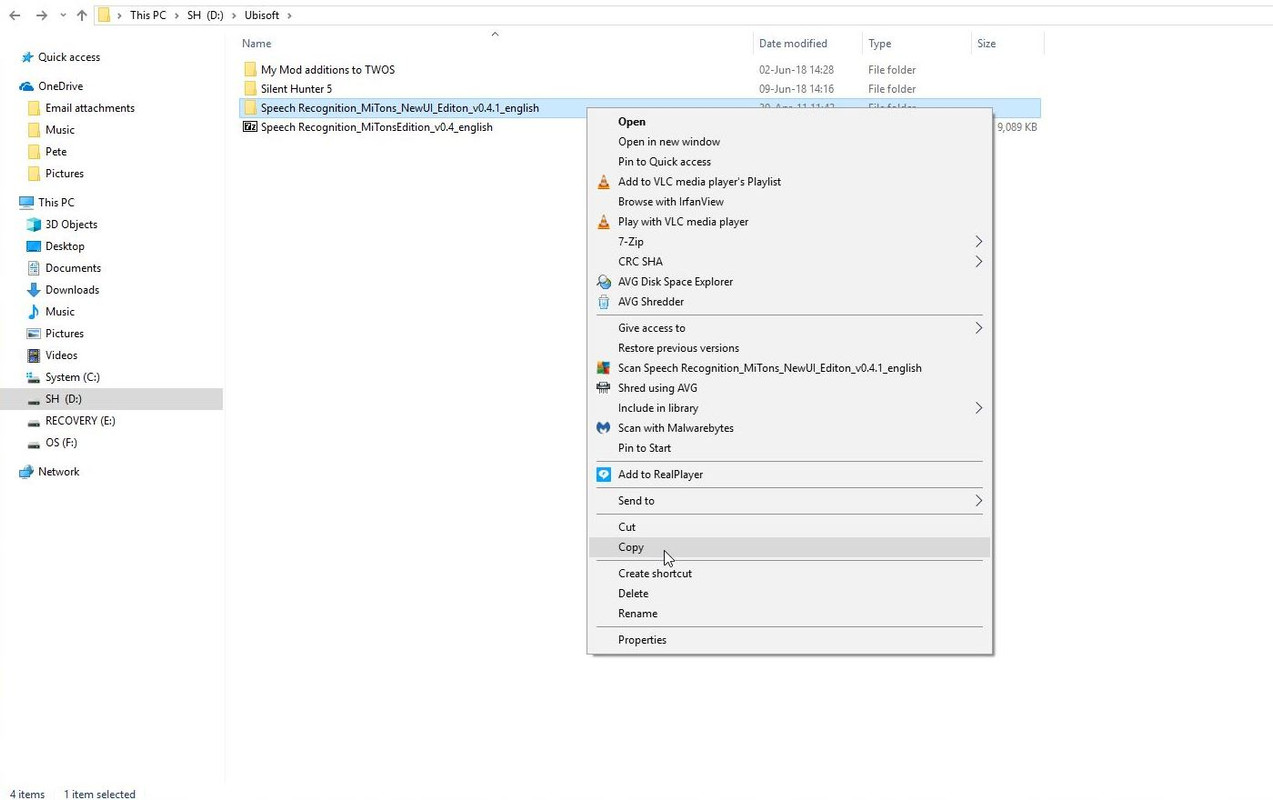
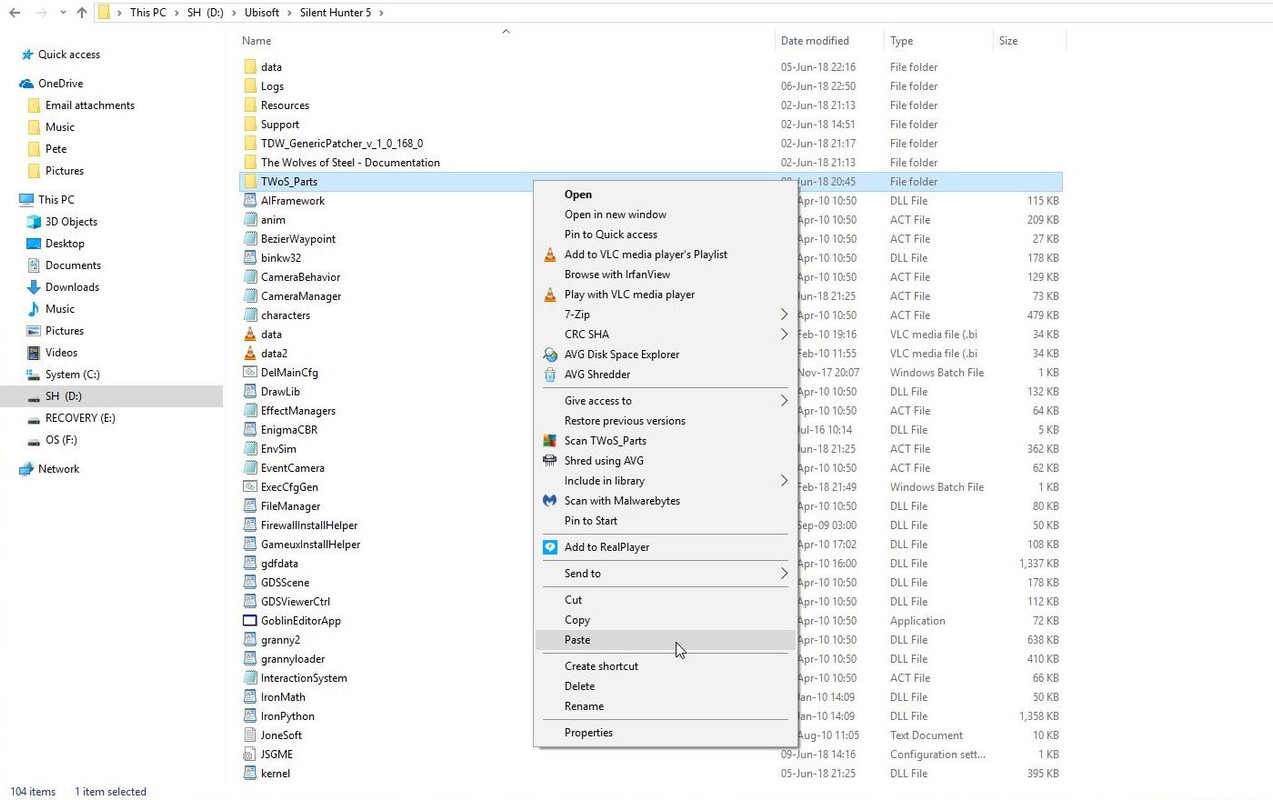
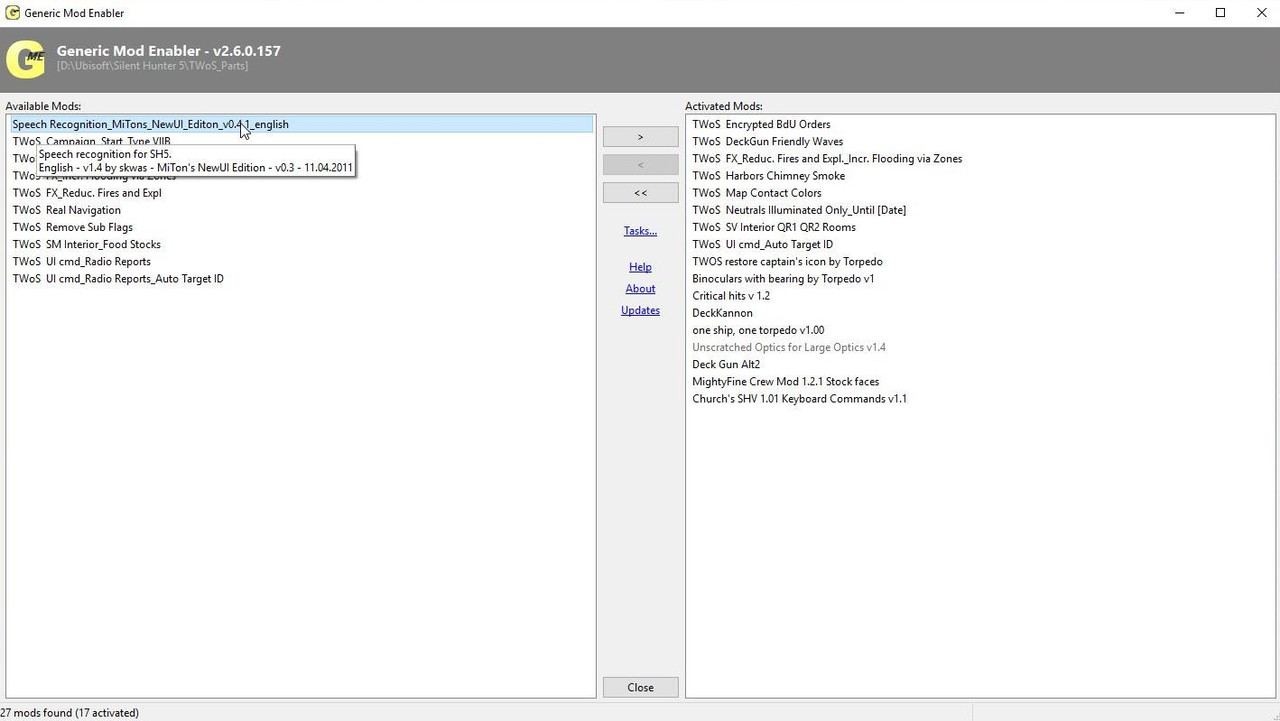
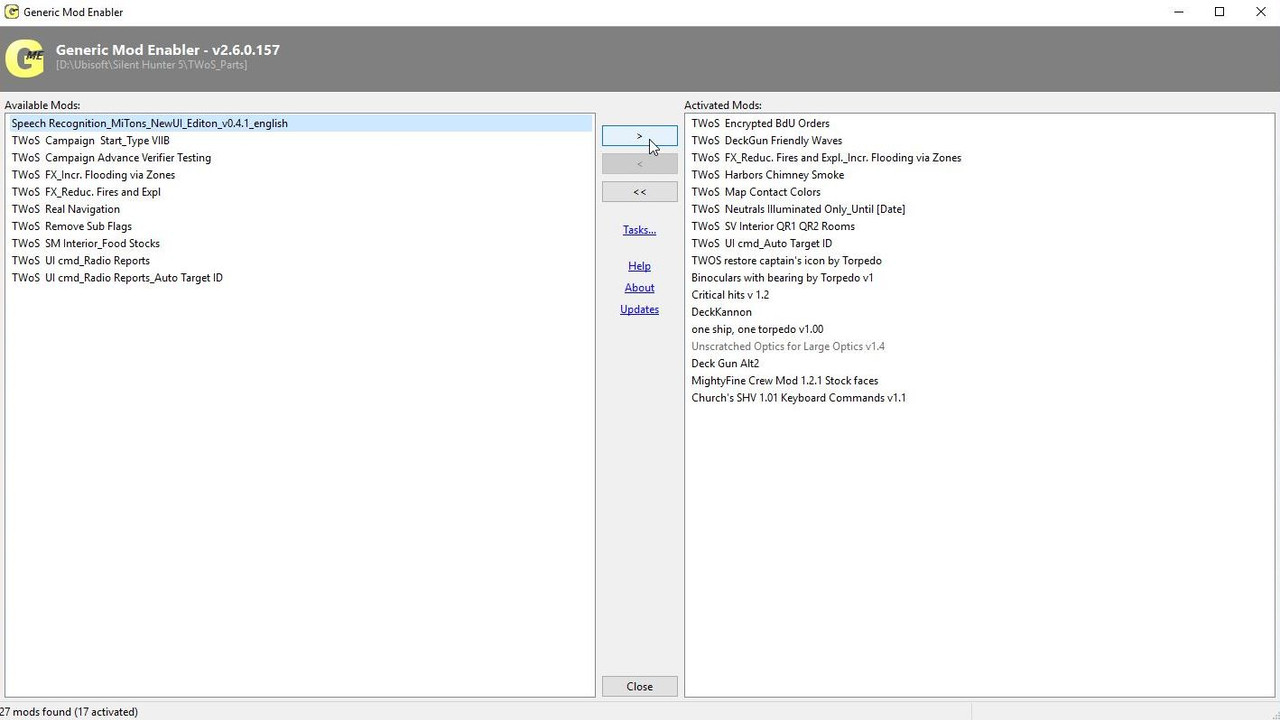
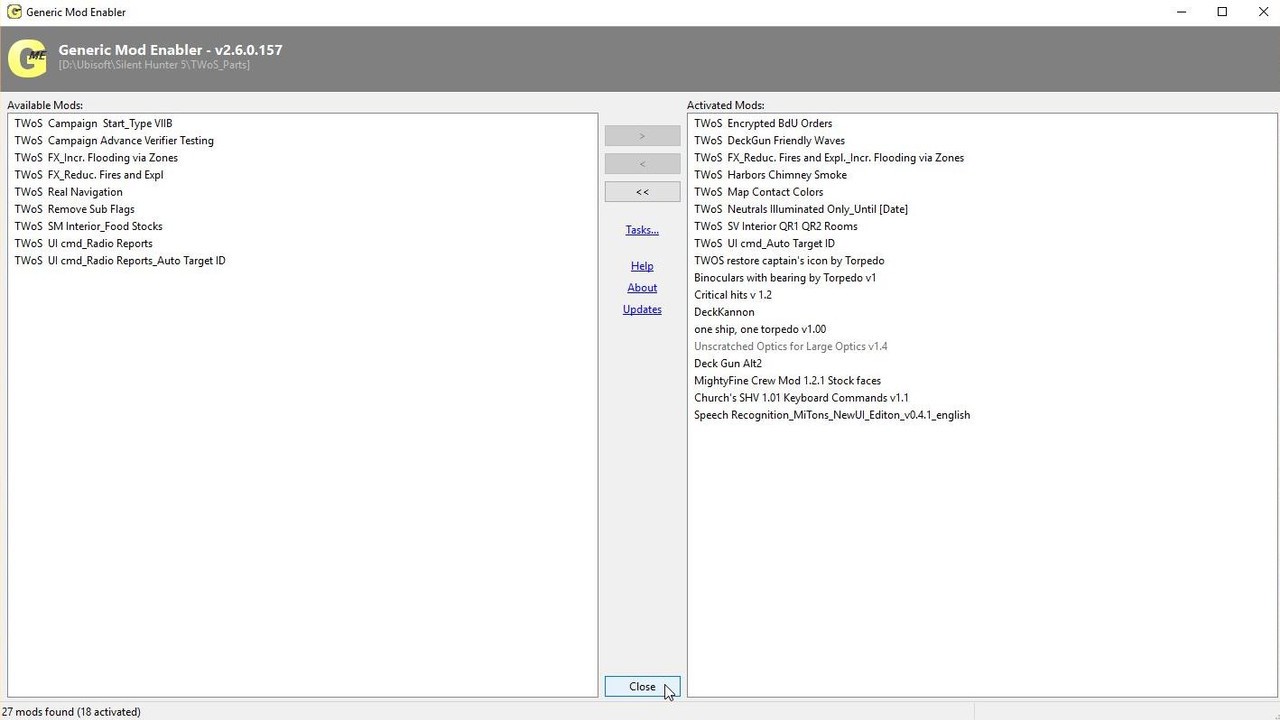
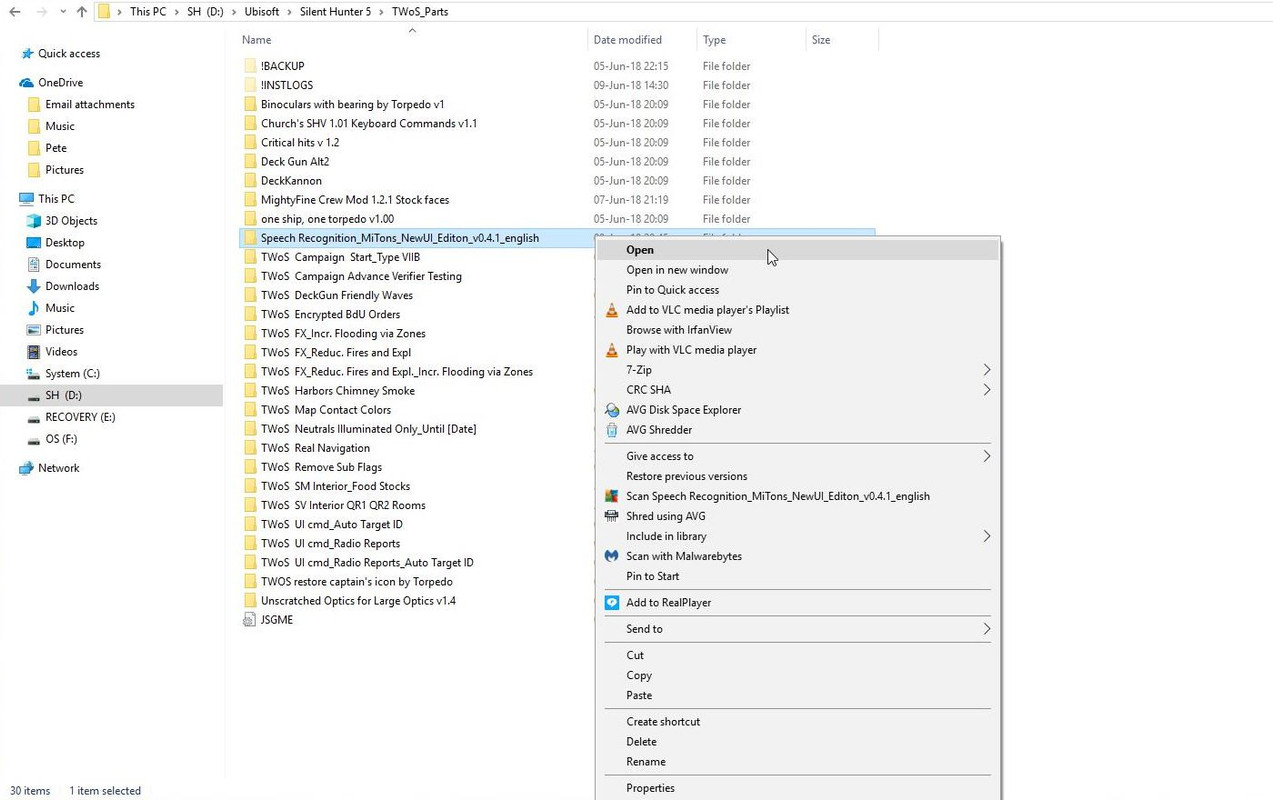
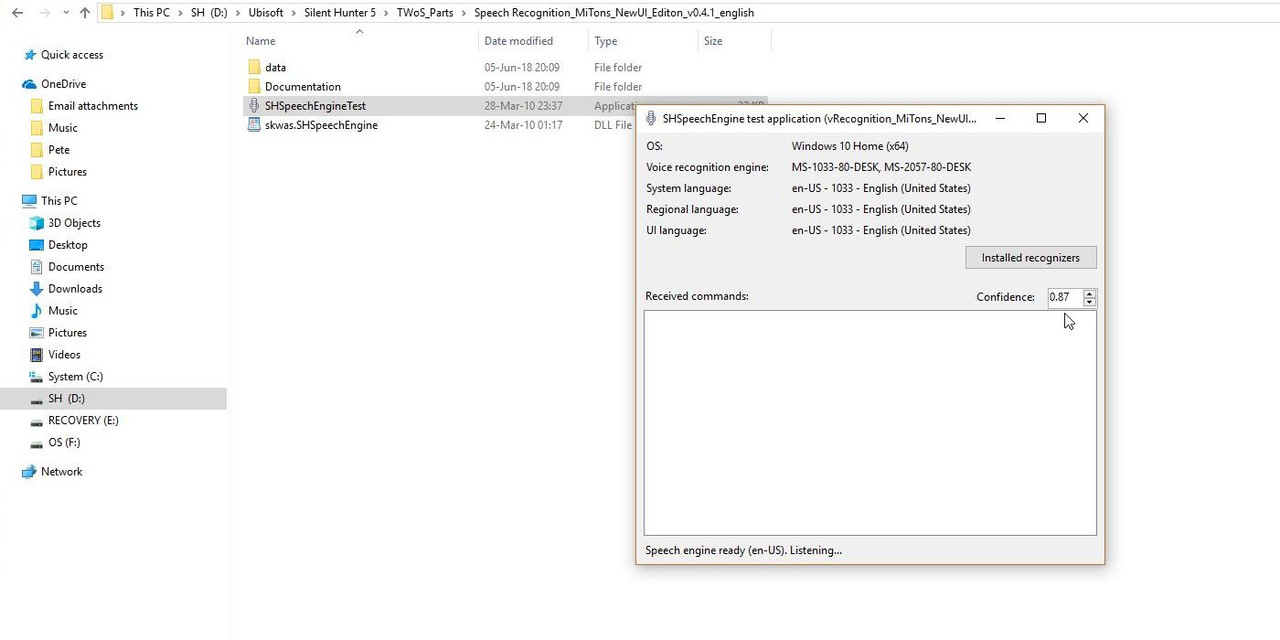
My WO has suddenly told me there is a ship off my port bow long range. Picture 1 > I have measured the distance to be 4,000 meters. I can see this warship is quite fast around 10 or 11 knots. I am at around 90 degrees to this warship and I am too close to him to close the distance without being seen so I need to make a flanking movement.  Picture 2 > I have scrolled the map out so I can find the warships course 102 degrees. 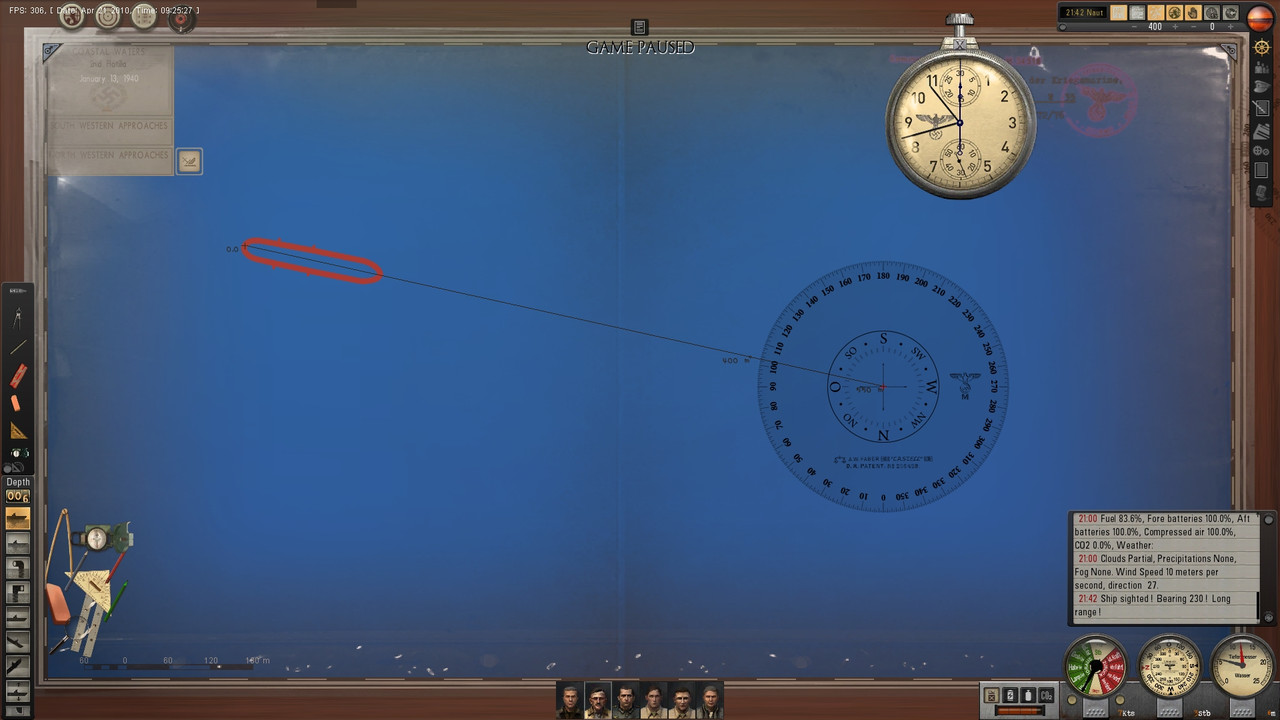 Picture 3 > I need to change my speed from Slow Ahead and also change course to run parallel with the warship. 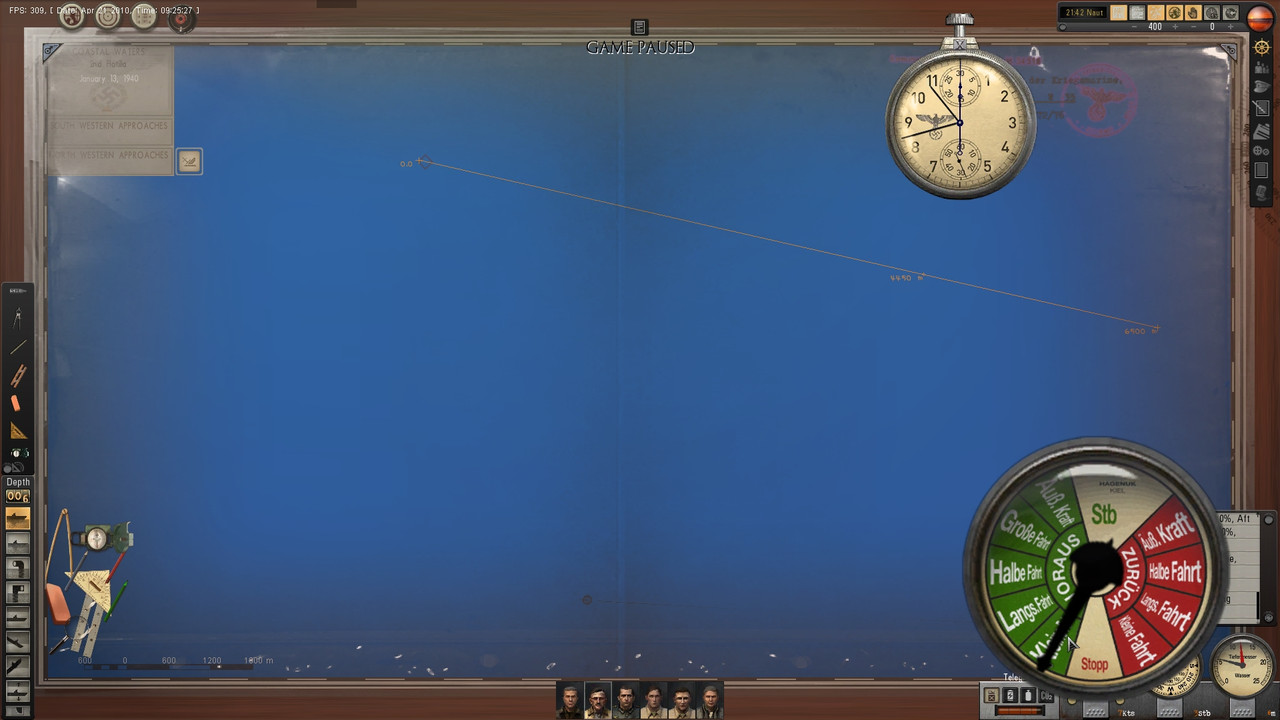 Picture 4 > Speed increased to Ahead Flank and my course altered to 102 to run parallel. 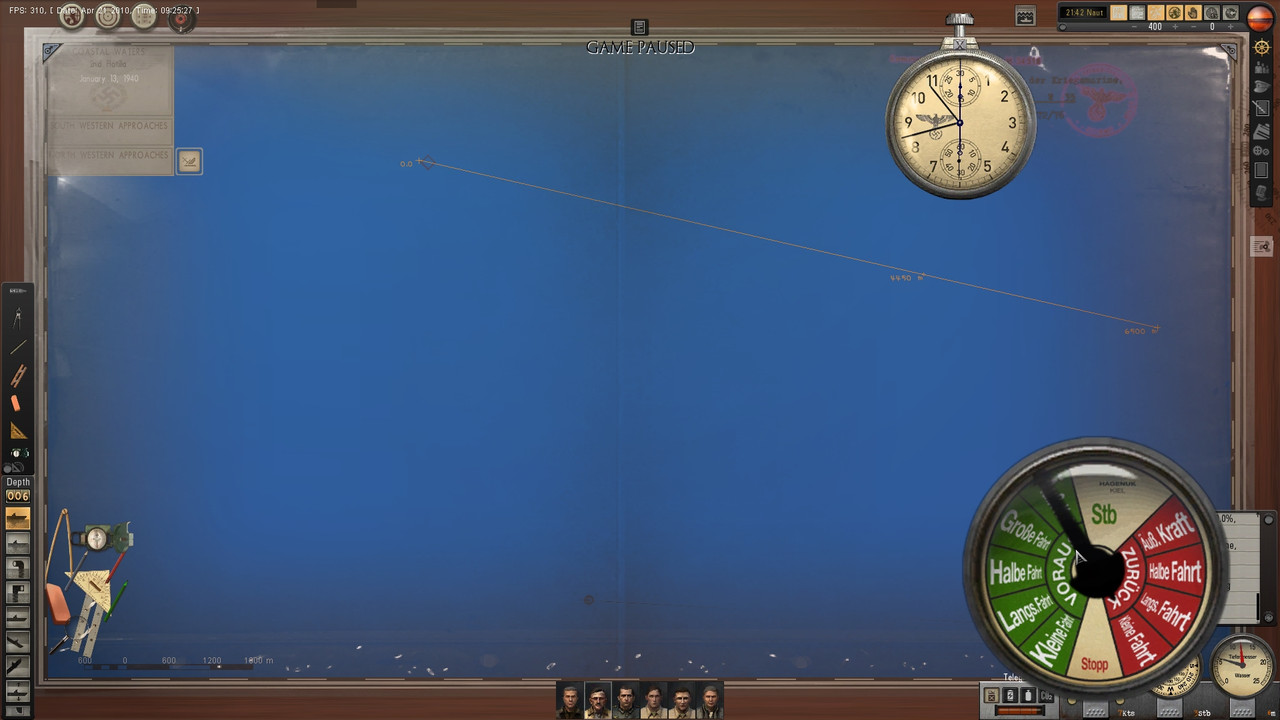 Picture 5 > Deleted Picture 6 > The X mark was where I last saw the warship. I have a 4 or 5 knots advantage so my course can be changed a few degrees to 100 in the mean time I want to set up an attack position. Notice there are only 2 course lines under 700 meters apart. 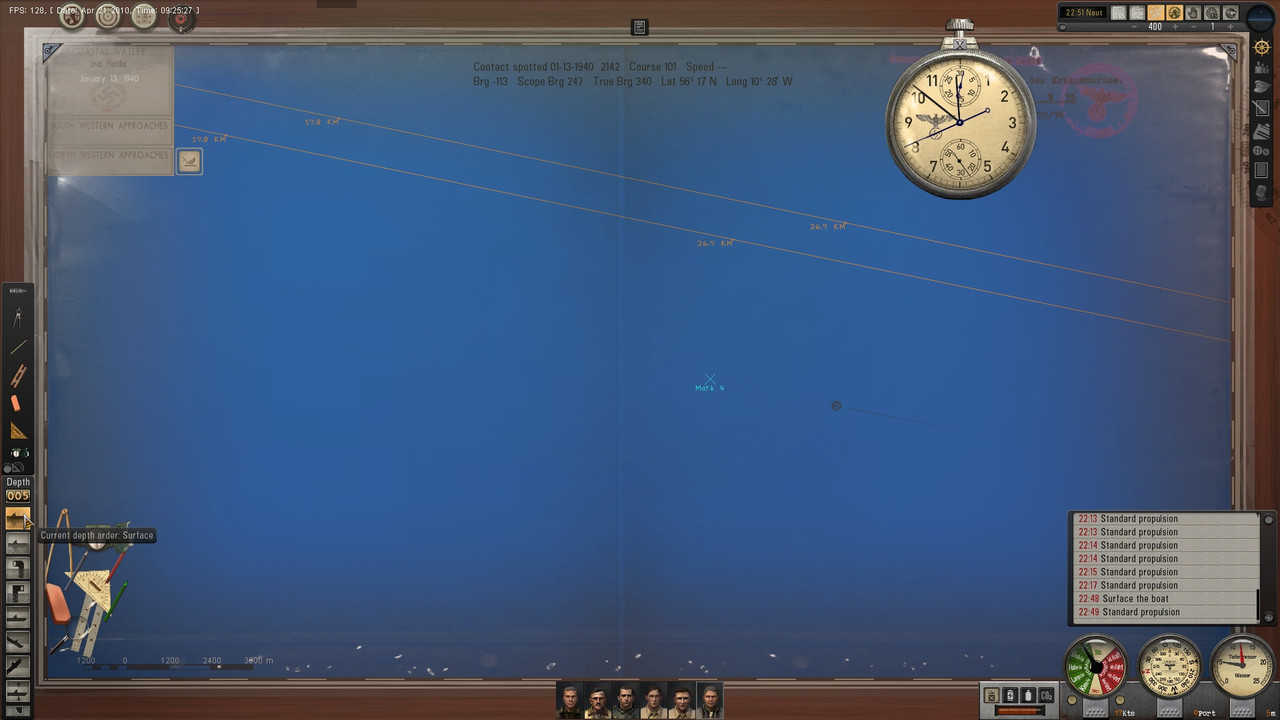 Picture 7 > I have setup an attack position. Notice this is 63km from where I first spotted the warship. There is no guarantee at this distance that the warship will still be on the course line I drew out as wind speed and wind direction at this distance is likely to pull him off course even if he maintains the original 102 course. 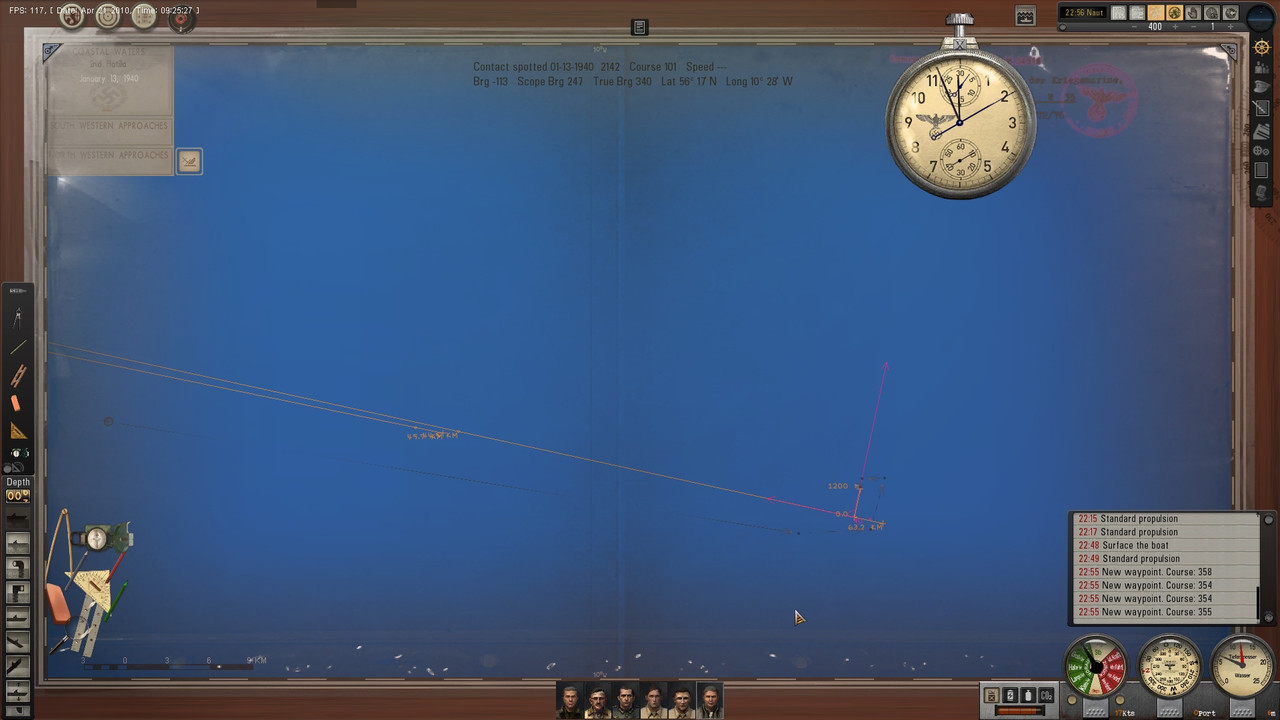 Picture 8 > I am at All Stop and gliding into my attack position. I do not want to be to close as I do not want to be picked up on his asdic. With Auto TDC you can still hit targets even at 5,000 meters distance. 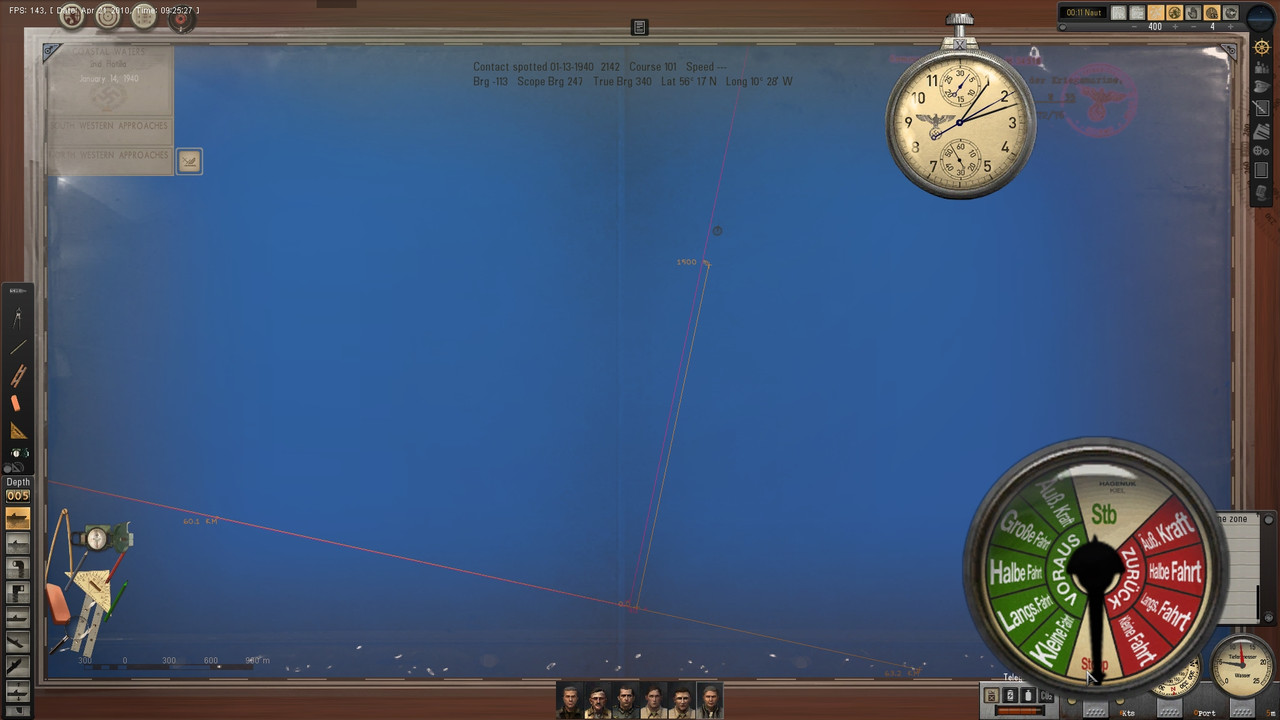 Picture 9 > Now at periscope depth I have set the crew to Battle Stations and have ordered Silent Running. I waited while surfaced for the ships to come into view and then drew out the 2 course lines. I should hopefully be able to setup a multiple attack on these 2 course lines.  Picture 10 > My Sonar man has picked up a number of contacts. 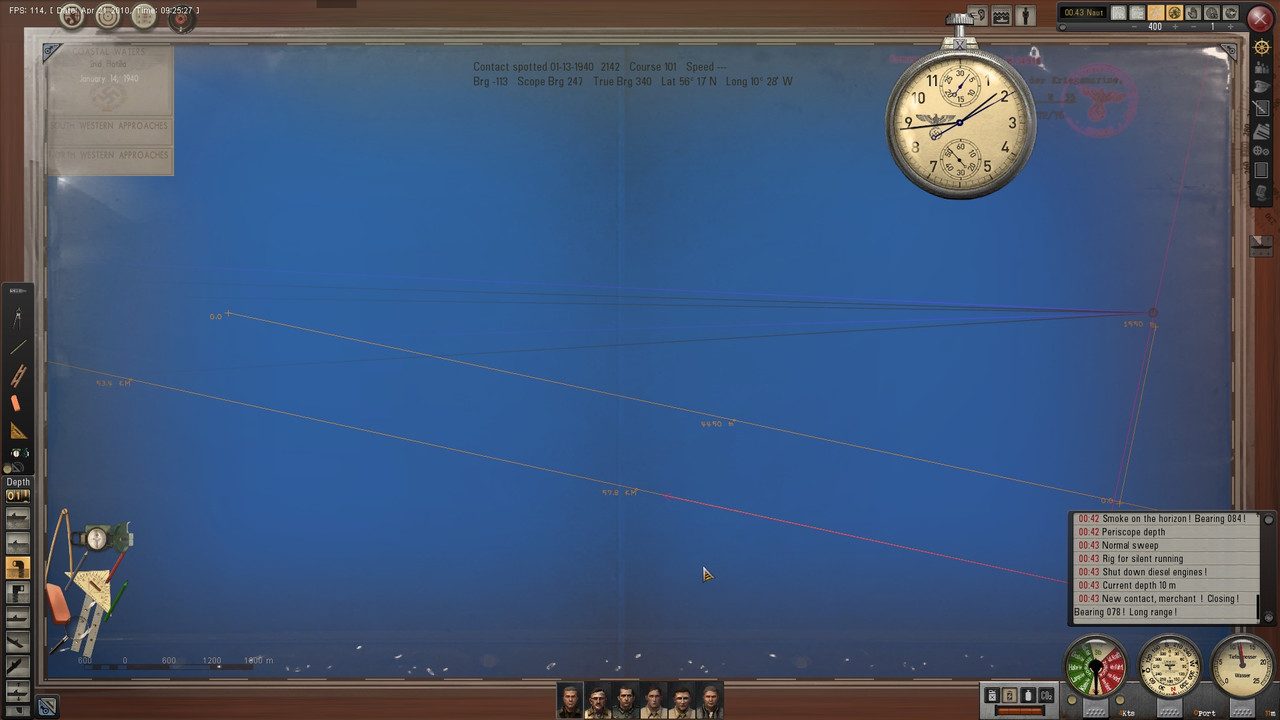 Picture 11 > Opening the tube doors and setting all 4 torpedoes to fast, however this may change. Very important to make sure the tube doors are open otherwise you will miss the target  Picture 12 > I am setting the 4 torpedoes depth. I know there are 2 Troopships/AMCs which will have a decent draft. I will fire 2 torpedoes at each target, each one with a different depth. I am only carrying G7a torpedoes, the electric G7e torpedoes I replaced with the G7a. Torpedo depths > 2 at 3.4 and 2 at 3.7 meters. The wind speed was 10 so they should not run too deep. 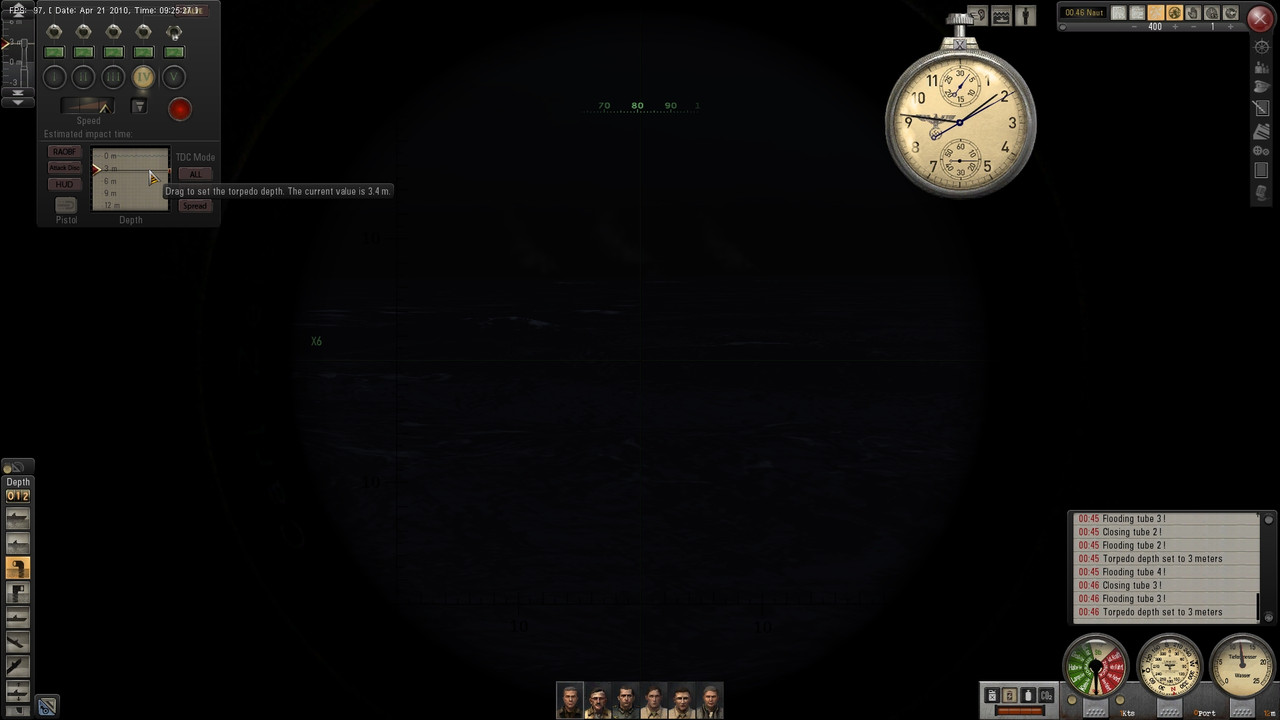 Picture 13 > The target locked is a Small Replenishment Ship as showing on the TAI map. Must be new from TWoS as I have never seen one of these before in SH5. Break/Lock is a setting in TDWs Options File Editor Viewer (OFEV) that shows that the target is locked. 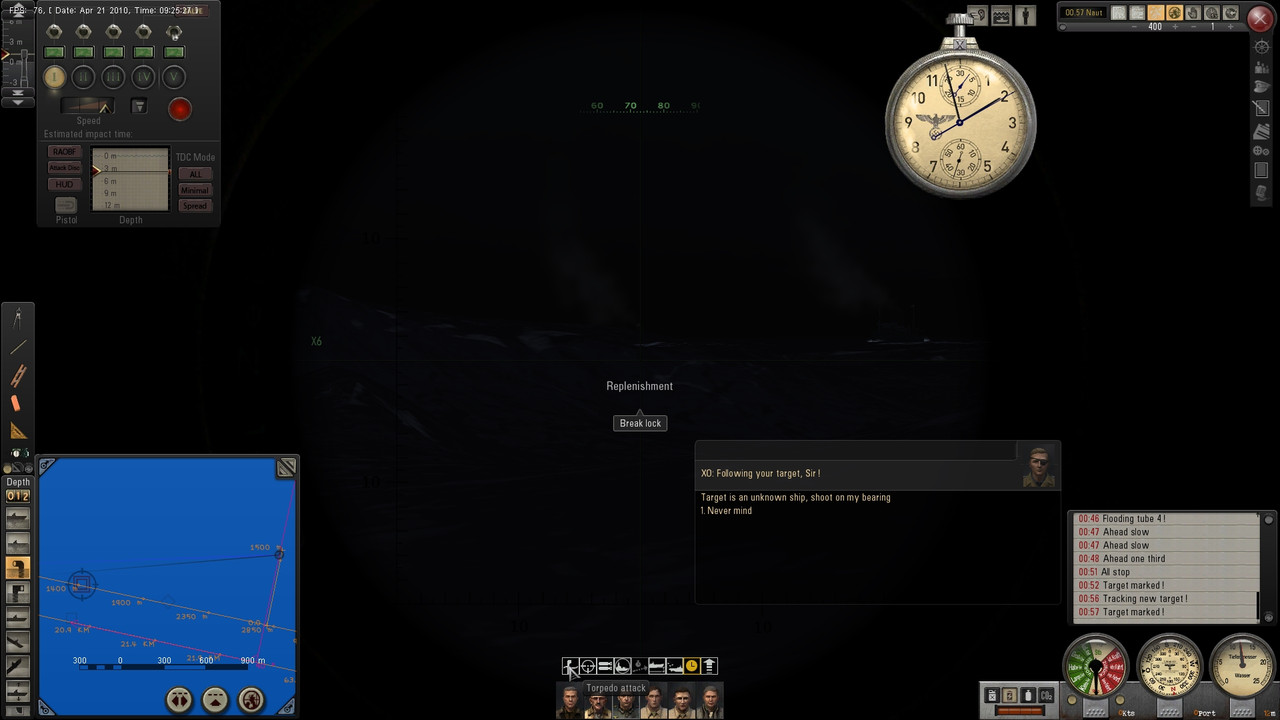 Picture 14 > Shows how small this ship is by the torpedo depth gauge. I am using the Torpedo man, officer icon 3 to identify the targets by clicking on icon 1 the one on the left each time to identify targets. 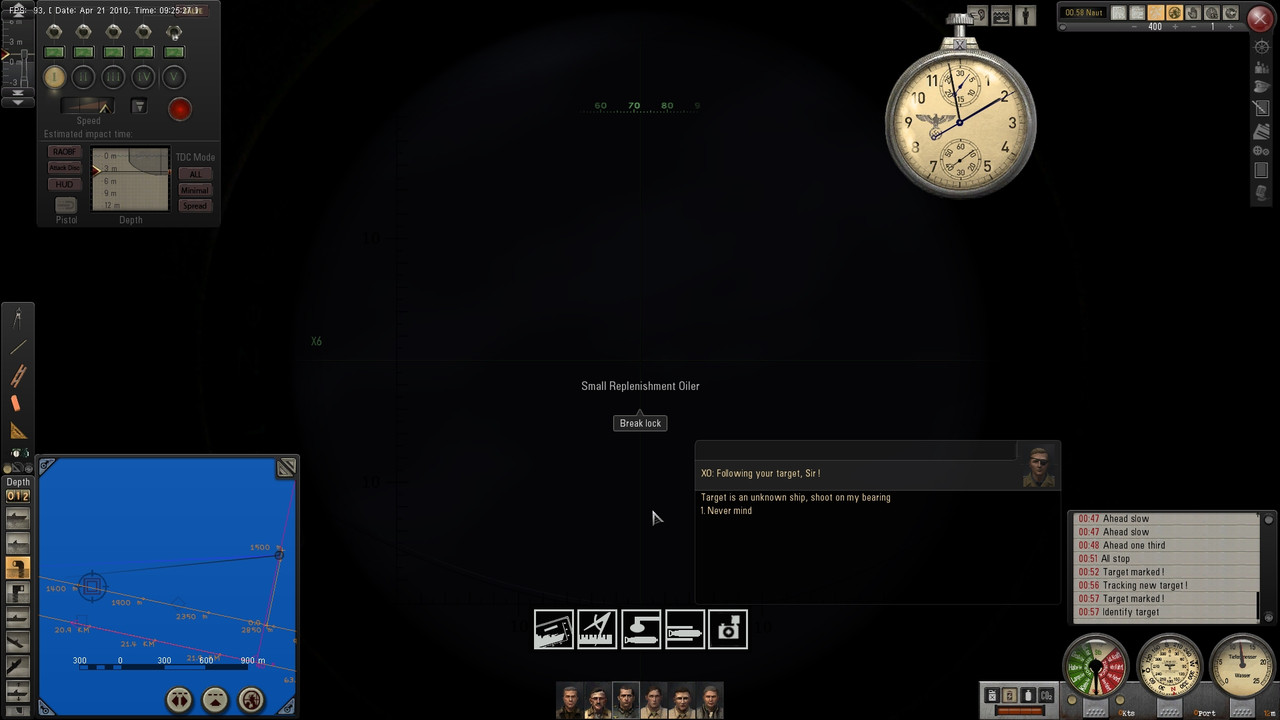 Picture 15 > The TAI map is showing a second ship, ringed Troop Transport or possible AMC. Picture 16 > I am now targeting the Troop Transport you can see the difference on the torpedo depth gauge between this ship and the previous one.  Picture 17 > It is time to configure the TAI Map by pressing the button showing.  Picture 18 > Notice the change on the TAI Map when I click on the Torpedo solution line. Shows the Torpedo solution line going through the middle of the Troop Transport. Exit TAI map features. 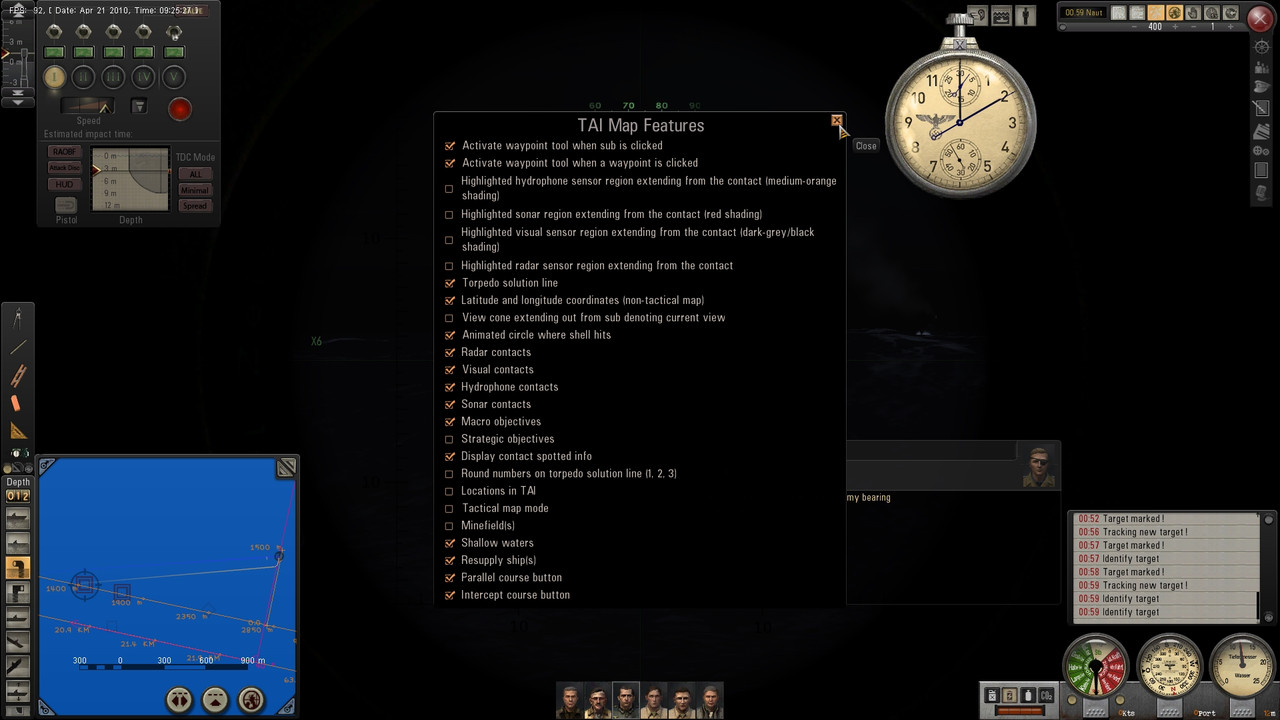 Picture 19 > New Target on second course line showing locked is another Troop Transport Notice the torpedo solution line.  Picture 20 > Now look again at the torpedo solution line position when I unlock the target and notice the difference. Auto TDC has calculated this is where the torpedo needs to impact to hit the target.  Picture 21 > All 4 torpedoes are now away. 2 torpedoes were re-set to slow for the nearest Troop Transport. 2 torpedoes set to fast for the the other Troop Transport furthest away. As is often the case the torpedoes have been spotted and all the ships are trying to take evasive action.  Picture 22 > 1 hit and 3 misses. The other 3 torpedoes would have hit the 2 targets which were extremely lucky and it was undoubtedly their speed which saved them. As they say some you win and some you lose. I am using a mod where 1 torpedo will sink any size ship but I always fire 2 in case 1 is a dud. 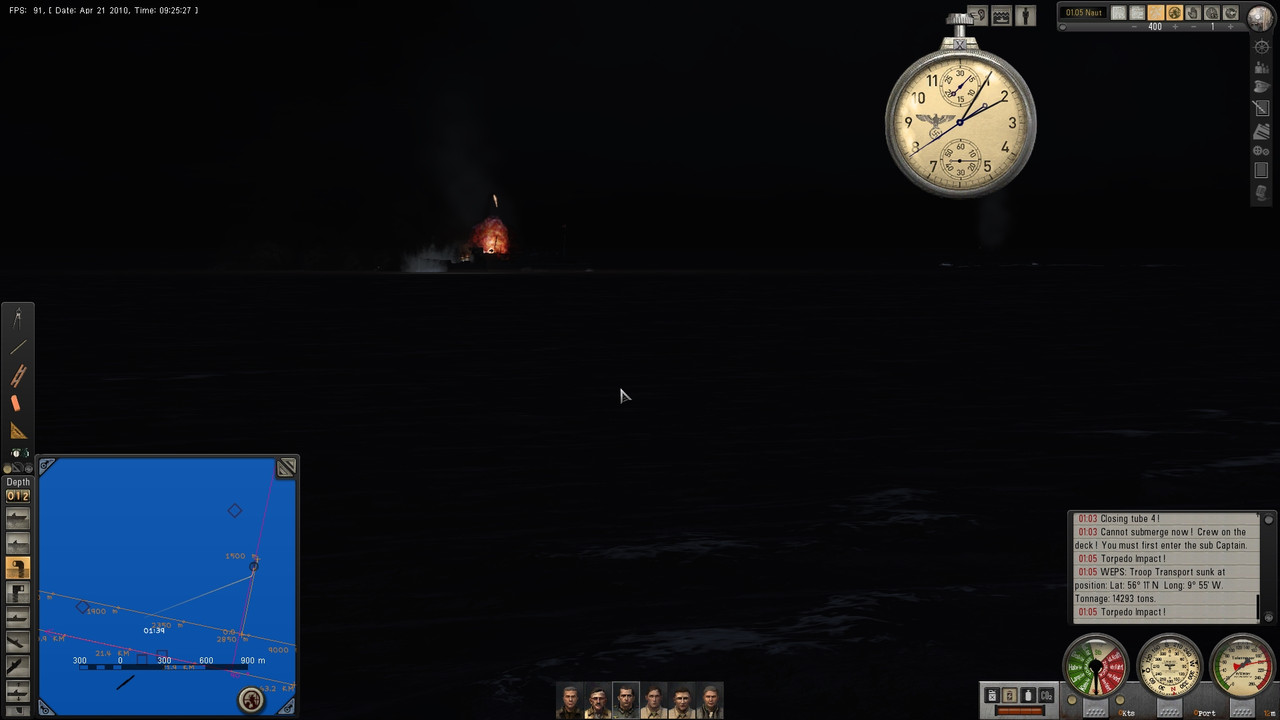 Picture 23 > Destroyed mark showing the Troop Transport. 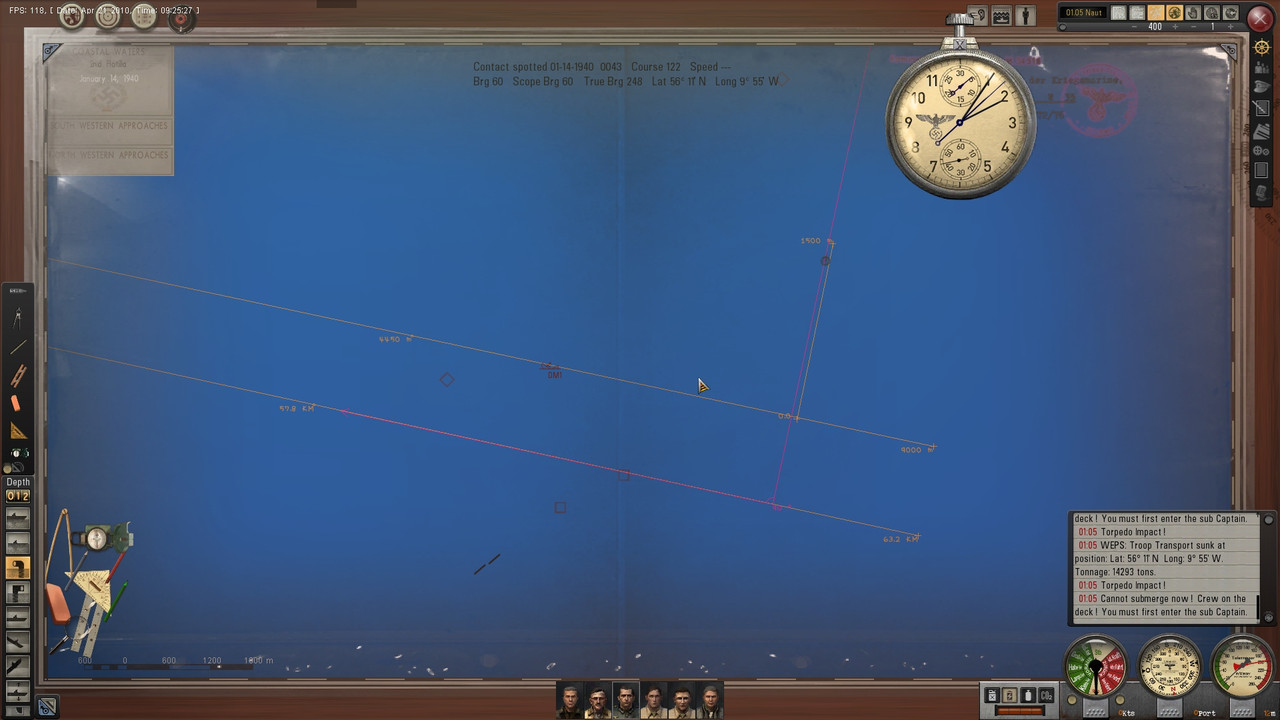 Picture 24 > Captains Log. Notice the year and day corruption this is now quite normal and is not a problem. I have a tutorial how to edit and correct this but personally I do not bother. 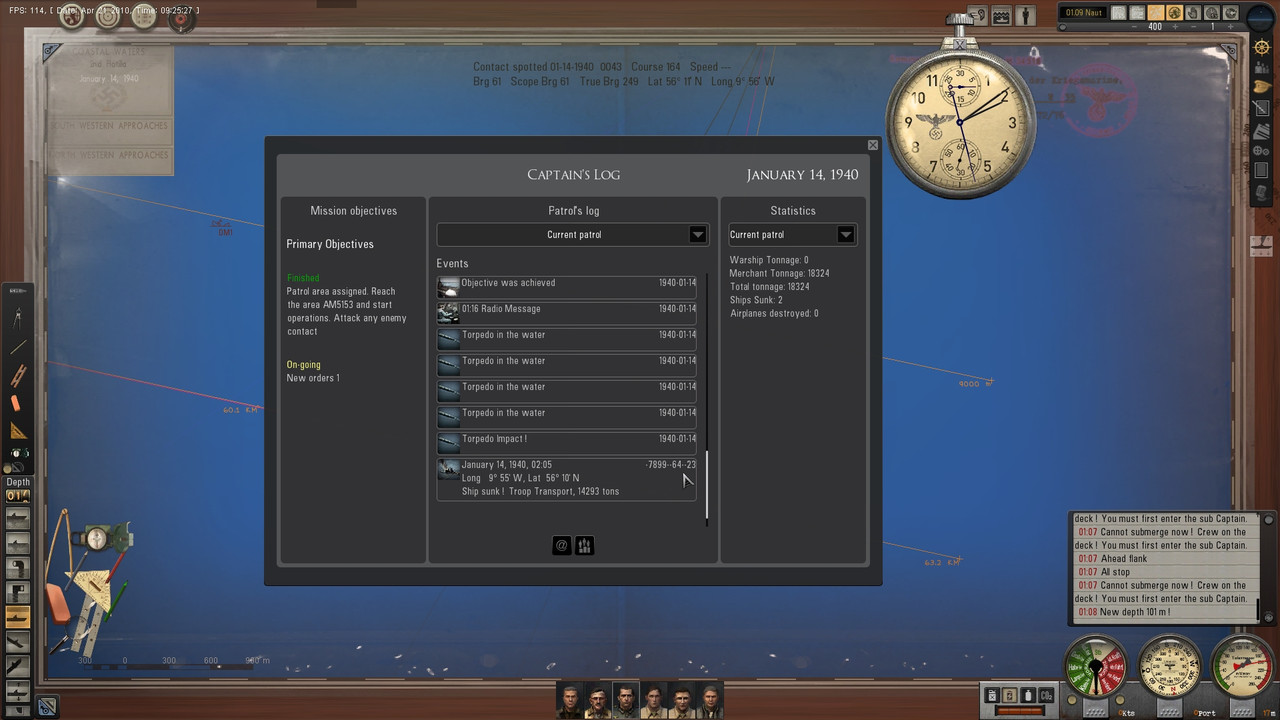 Mods used can be either found in my Tutorials or come with TWoS. Generic Mod Enabler - v2.6.0.157 [D:\Ubisoft\Silent Hunter 5\TWoS_Parts] TWoS DeckGun Friendly Waves TWoS FX_Reduc. Fires and Expl._Incr. Flooding via Zones TWoS Harbors Chimney Smoke TWoS Map Contact Colors TWoS Neutrals Illuminated Only_Until [Date] TWoS SV Interior QR1 QR2 Rooms TWoS UI cmd_Auto Target ID Critical hits v 1.2 DeckKannon one ship, one torpedo v1.00 MightyFine Crew Mod 1.2.1 Stock faces Speech Recognition_MiTons_NewUI_Editon_v0.4.1_english TWOS restore captain's icon 4 by JCWolf Unscratched Optics for Large Optics v1.4 Binoculars with bearing by Torpedo v1 Church's SHV 1.01 Keyboard Commands v1.1 Chart Colour Scheme 3 TWoS Glass Covered GUI Dials So there you have it, as usual not everything going to plan but still a result. Any questions just let me know.
__________________
LSH3-2015 <> TUTORIALS <> ALL YOU NEED TO KNOW <> ALL IN ONE PLACE SH4 <> TUTORIALS <> HOW TO DO IT <> INFORMATION <> DOWNLOAD LINKS SH5 <> TUTORIALS <> HOW TO DO IT <> INFORMATION <> DOWNLOAD LINKS Always Here To Help A Fellow 'Subber' | Need An Answer to A Question Just Send Me A PM Last edited by THEBERBSTER; 09-20-21 at 01:41 PM. |
|
|
|
|
09-12-18, 11:57 AM
|
#6 |
|
Growing Old Disgracefully
Join Date: Dec 2012
Location: Hythe - Southampton
Posts: 9,609
Downloads: 1133
Uploads: 0
|
How To Change Game Play Settings At Sea When On Patrol
This Tutorial will show you how you can make various changes as and when you want to while in a Mission/Patrol and not in the Bunker. You can make one or any number of changes as long as each file shows the same changes have been made. The Tutorial is structured so all the changes follow a logical sequence from first to last so there is less chance of confusion taking place. This is your starting point > Go to > C:> Documents > SH5 > data > cfg > you must be able to see this path in the main menu to be able to make any changes. Please take careful note of the paths as you move through each of the 8 changes needed to complete the processes, many of the files have the same names and identical structure, but are in different places. Tutorial 1 > Pictorial Procedures Picture 1 > Open > cfg > SaveGames File folder. 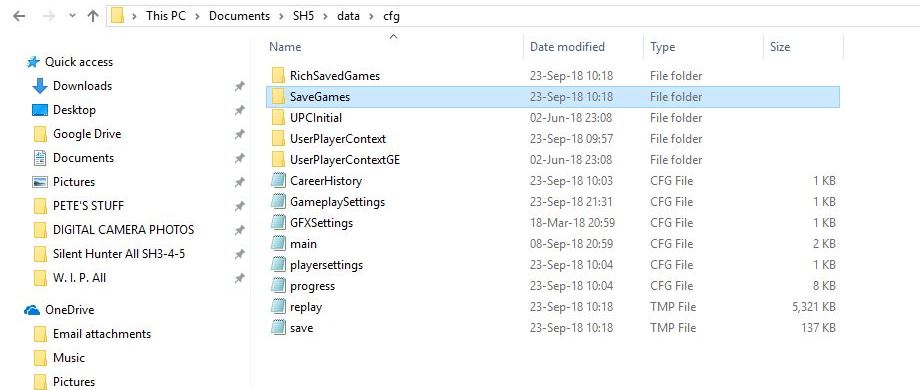 Picture 2 > You will now see all of your Save Games folders. Open > SaveGames > 00000000 this is the master Save Game folder. 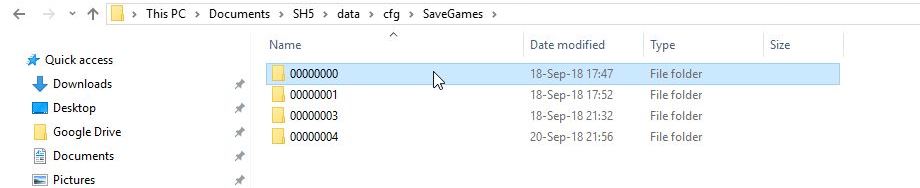 Picture 3 > Open > 00000000 > UPCInitial File folder. 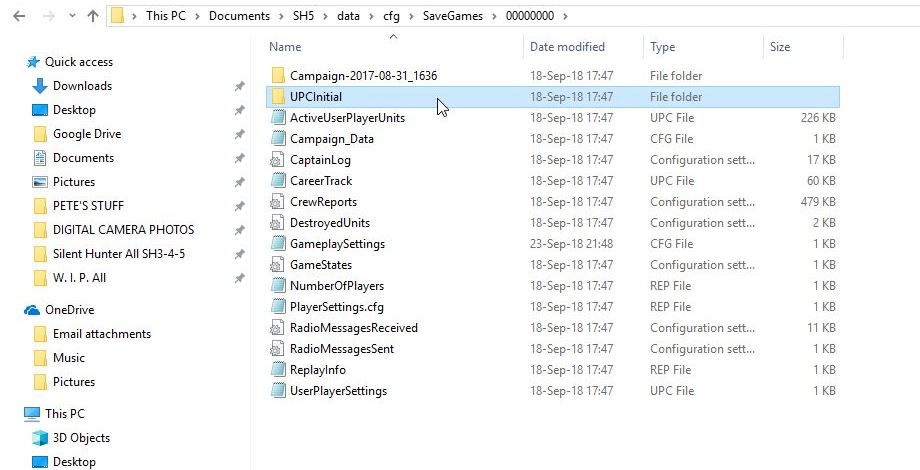 Picture 4 > Open > UPCInitial > GameplaySettings. Take note of Pictures 5 6 7 8 as these are repeated in all sequences. These pictures have been minimized for this Tutorial. 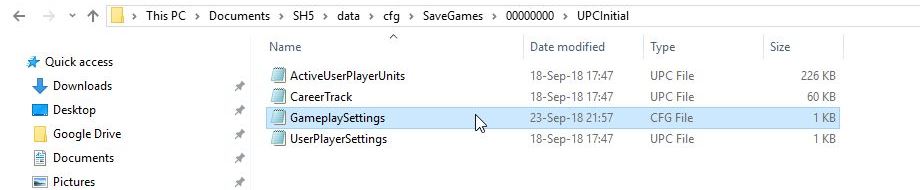 Picture 5 > Notepad > LimitedFuel= true is the current setting.  Picture 6 > Notepad > After change > =false. 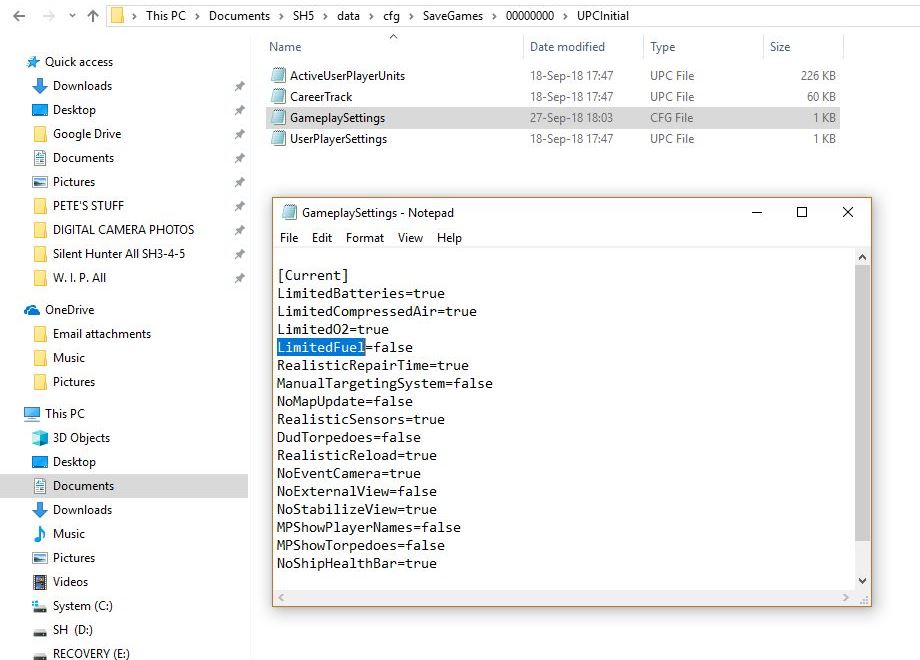 Picture 7 > Press the X after changes are completed. 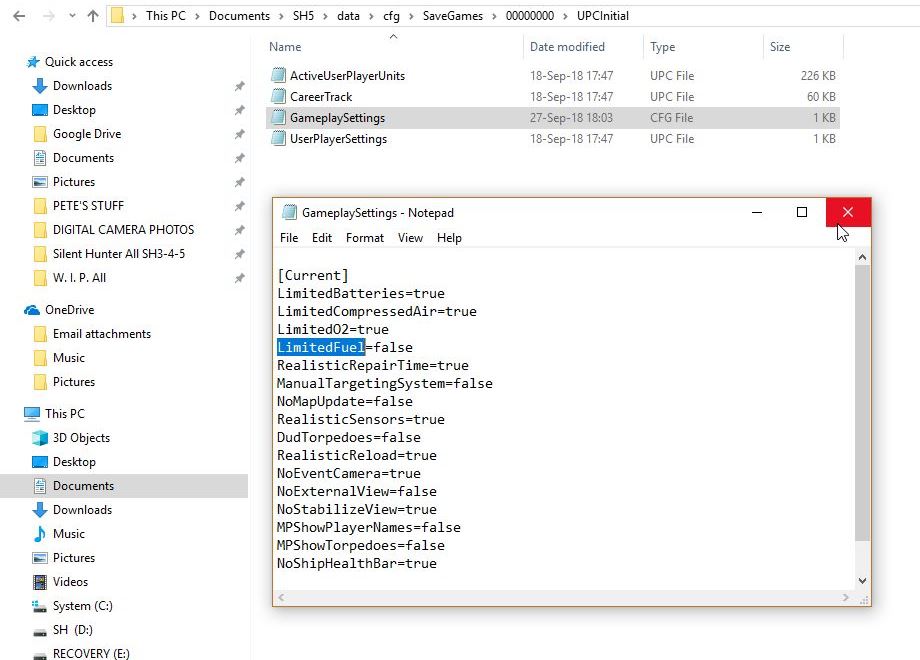 Picture 8 > Click on Save to accept changes . 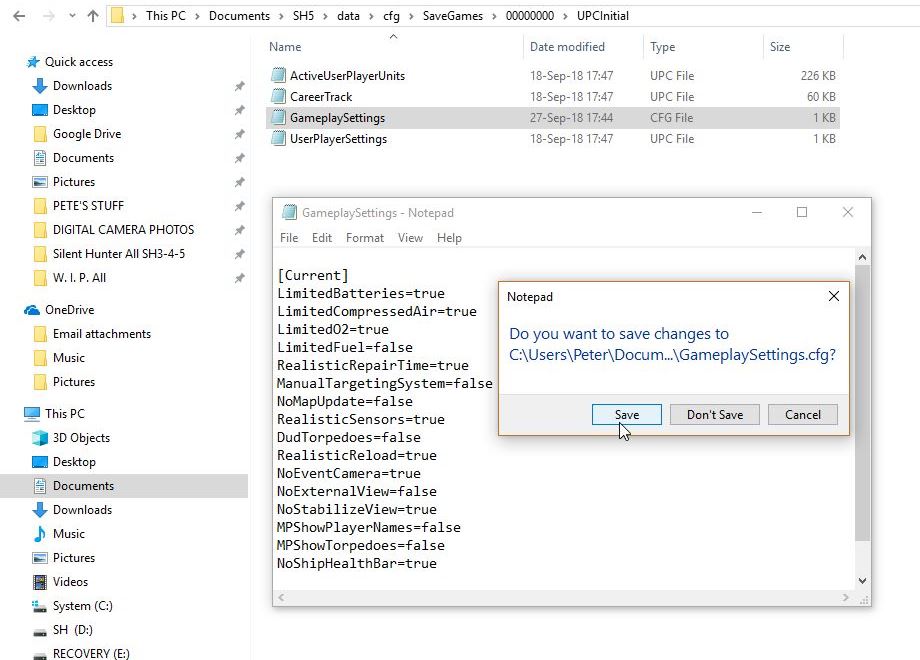 Picture 9 > Select 00000000 from the path. 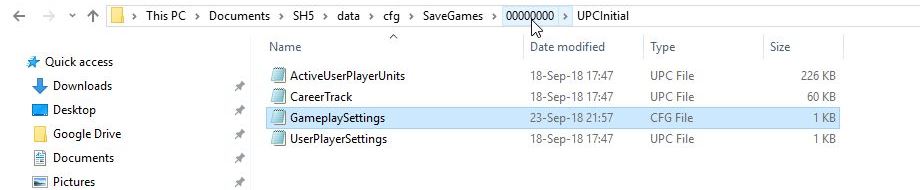 Picture 10 > 00000000 > Select Gameplay Settings.. Repeat Pictures 5 > 6 > 7 > 8. 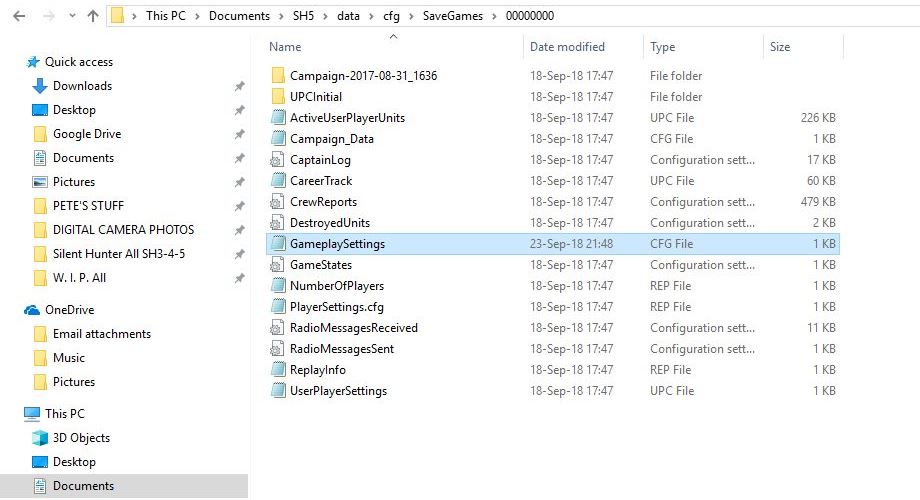 Picture 11 > Select SaveGames from the path. 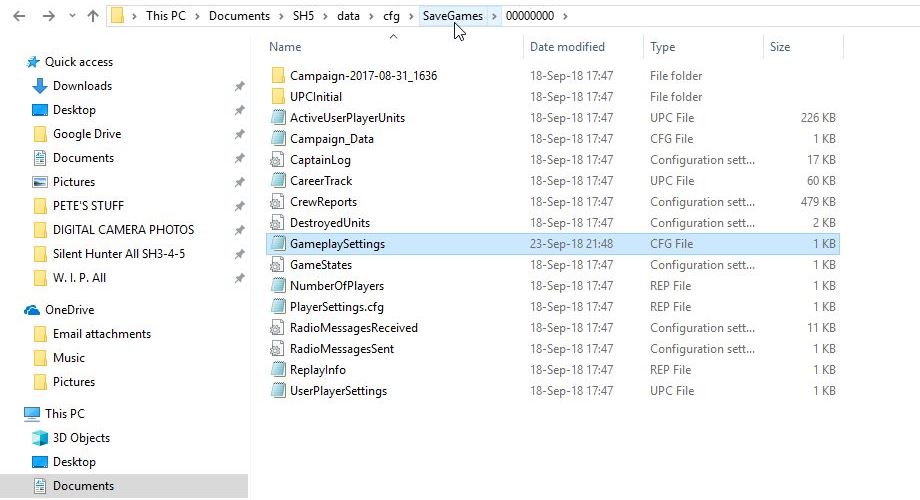 Picture 12 > SaveGames > Shows My Last Save Game 00000004 highlighted. You now need to find your last saved games. Do not expect the saved game with the highest number to be your last save. At some point you will have a mixture of 7 numbers and 1 alphabet letter. Always select your last saved game by > Day > Month > Year > Time. In the example this is > 20-Sep-18.21.56 which is saved game 00000004 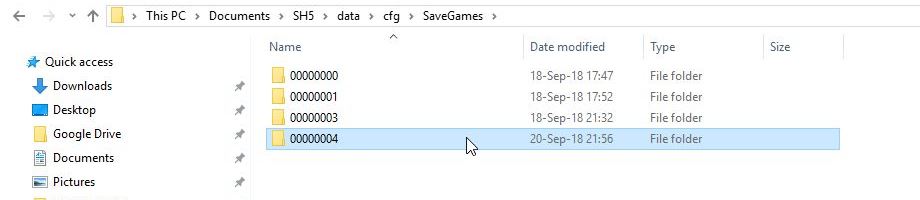 Picture 13 > 00000004 > Open UPCInitial File folder. 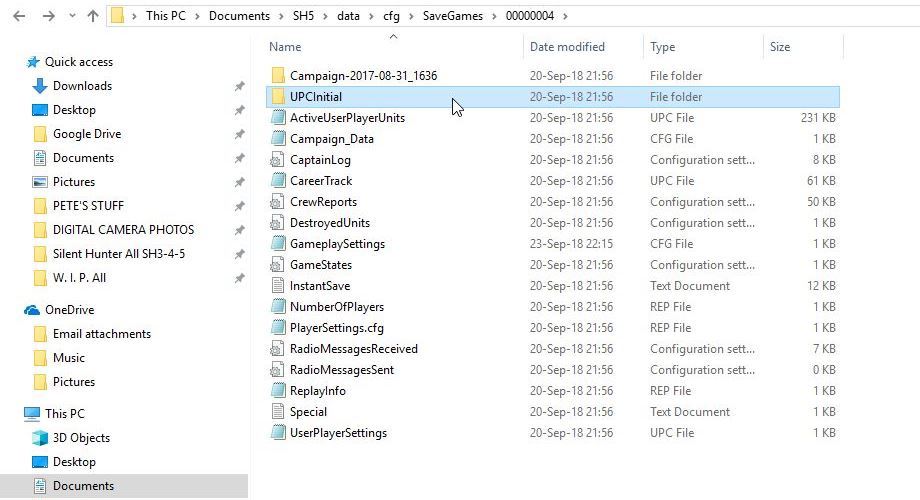 Picture 14 > UPCInitial > Open GameplaySettings CFG File. Repeat Pictures 5 > 6 > 7 > 8.  Picture 15 > Select 00000004 from the path. 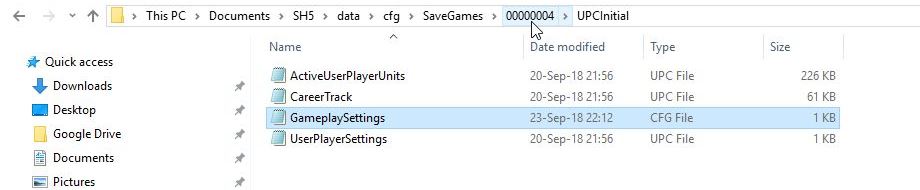 Picture 16 > 00000004 > Shows UPCInitial highlighted, this needs to be changed to go to the nest procedure.  Picture 17 > 00000004 > Open GameplaySettings CFG File. Repeat Pictures 5 > 6 > 7 - 8.  Picture 18 > Select cfg from the path. 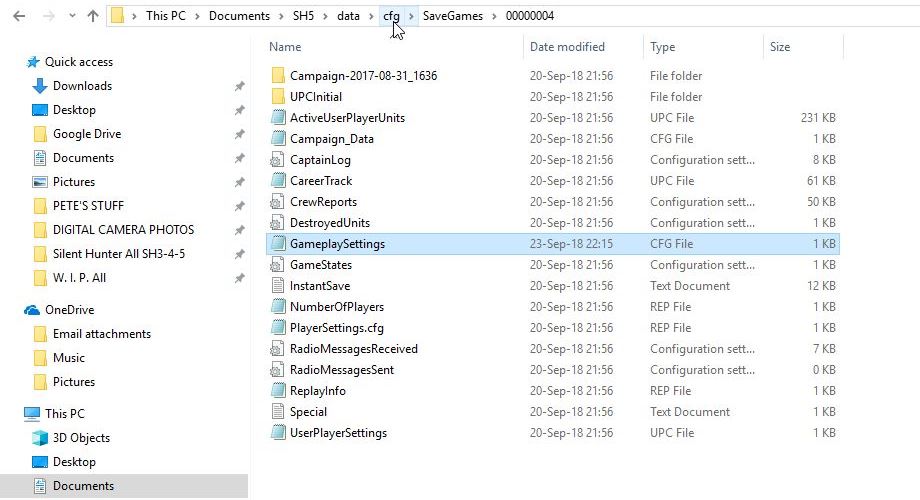 Picture 19 > cfg > Shows SaveGames folder now completed. 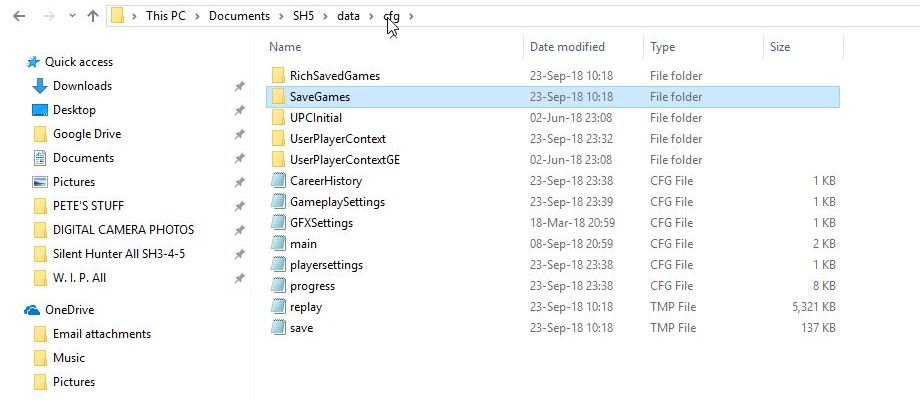 Picture 20 > cfg > Open UPCInitial File folder. Repeat Pictures 5 > 6 > 7 > 8. 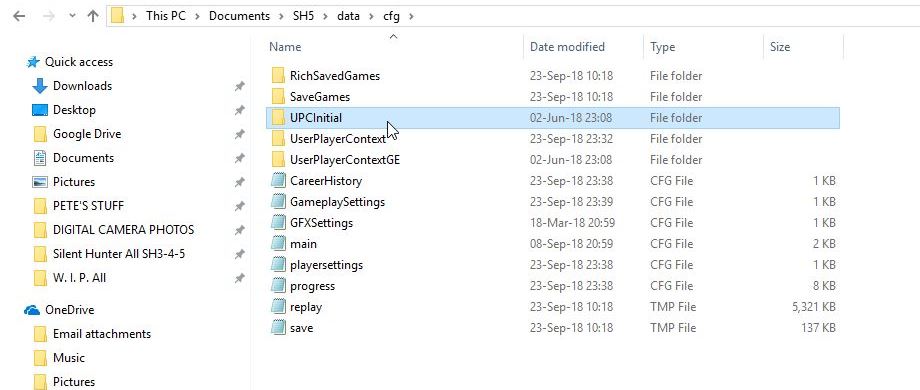 Picture 21 > UPCInitial > GameplaySettings CFG File. Repeat Pictures 5 > 6 > 7 - 8. 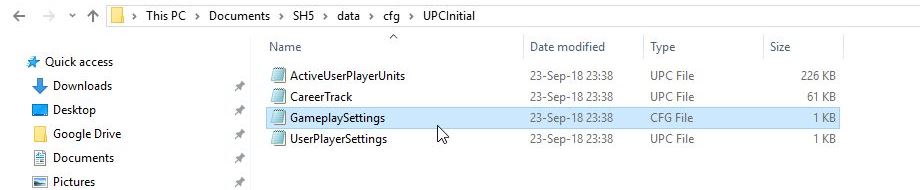 Picture 22 > Select cfg from the path. 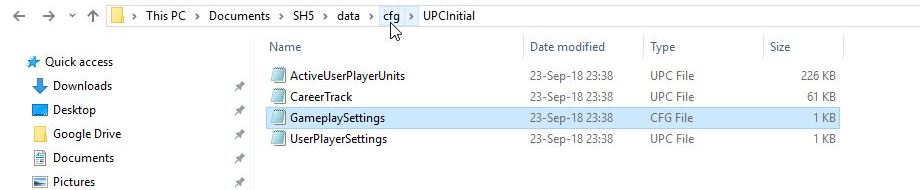 Picture 23 > Shows cfg > UPCInitial highlighted. 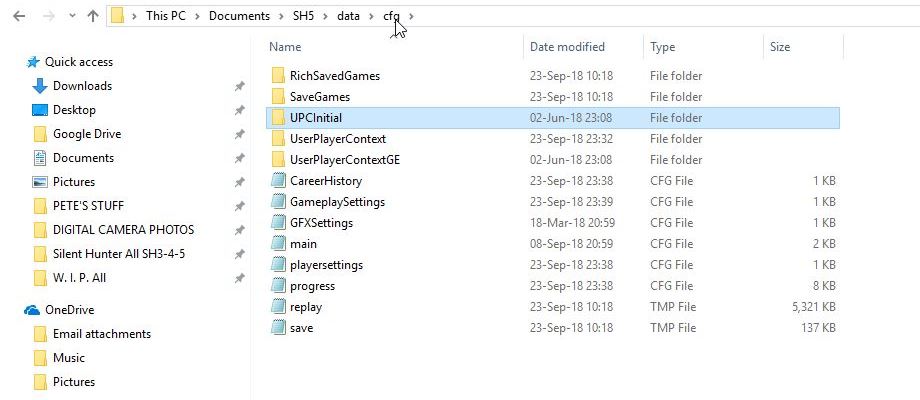 Picture 24 > cfg > Open GameplaySettings CFG File. Repeat Pictures 5 > 6 >7 > 8. 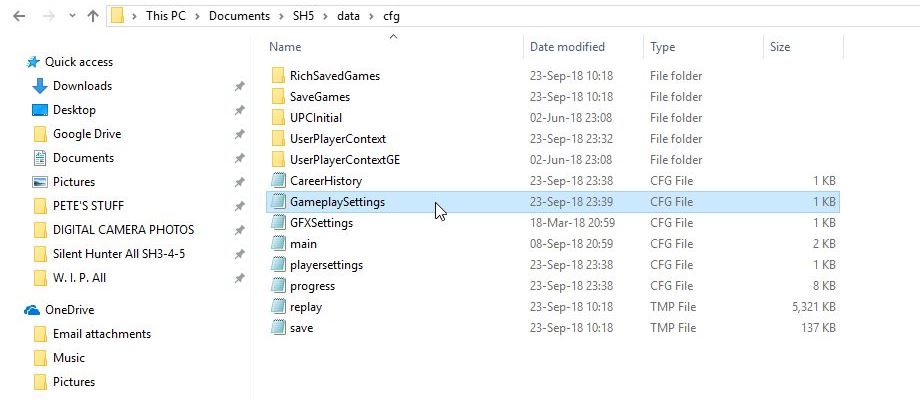 Picture 25 > Ciick on X to Exit Changes are now completed. 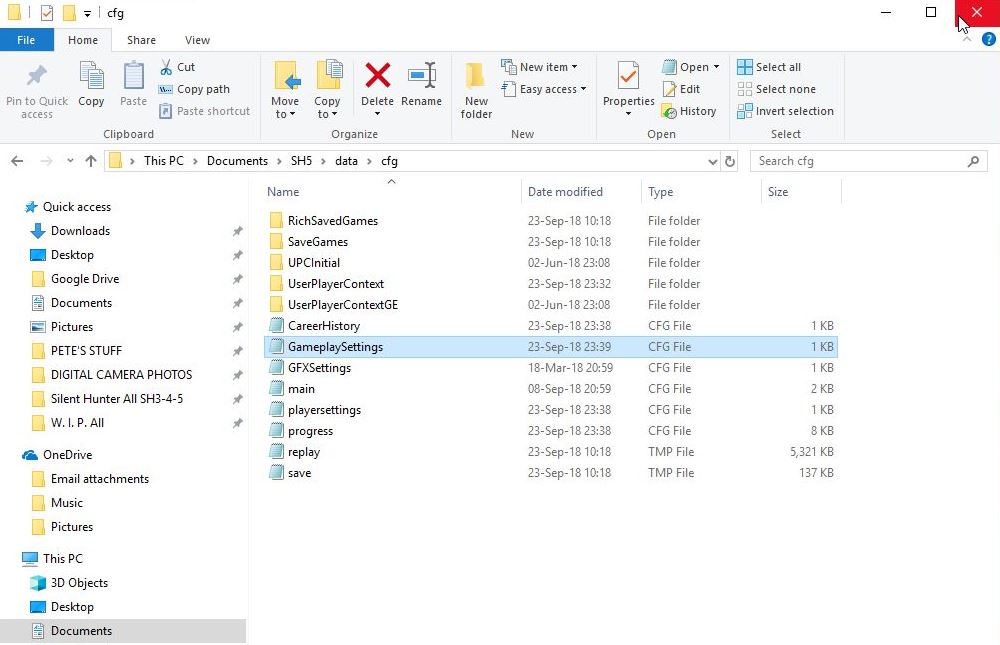 Start your game and check that Picture 6 is showing the change or changes that you made to the files. If it is not then you have missed a file change somewhere. Picture 26 > Options >Game Play Settings before making changes. 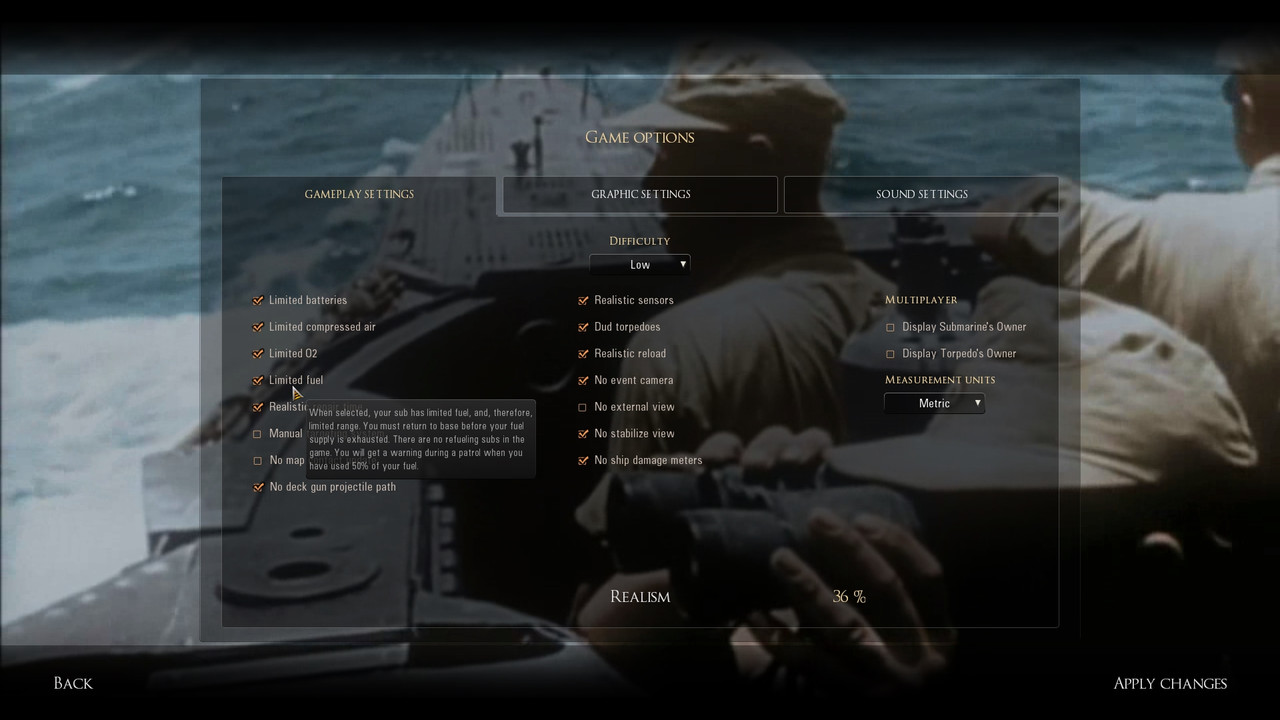 Picture 27 > Options > Game Play Settings after changing shows Limited Fuel is now disabled. What you see is what you will get in your game. Always check here after making any changes. 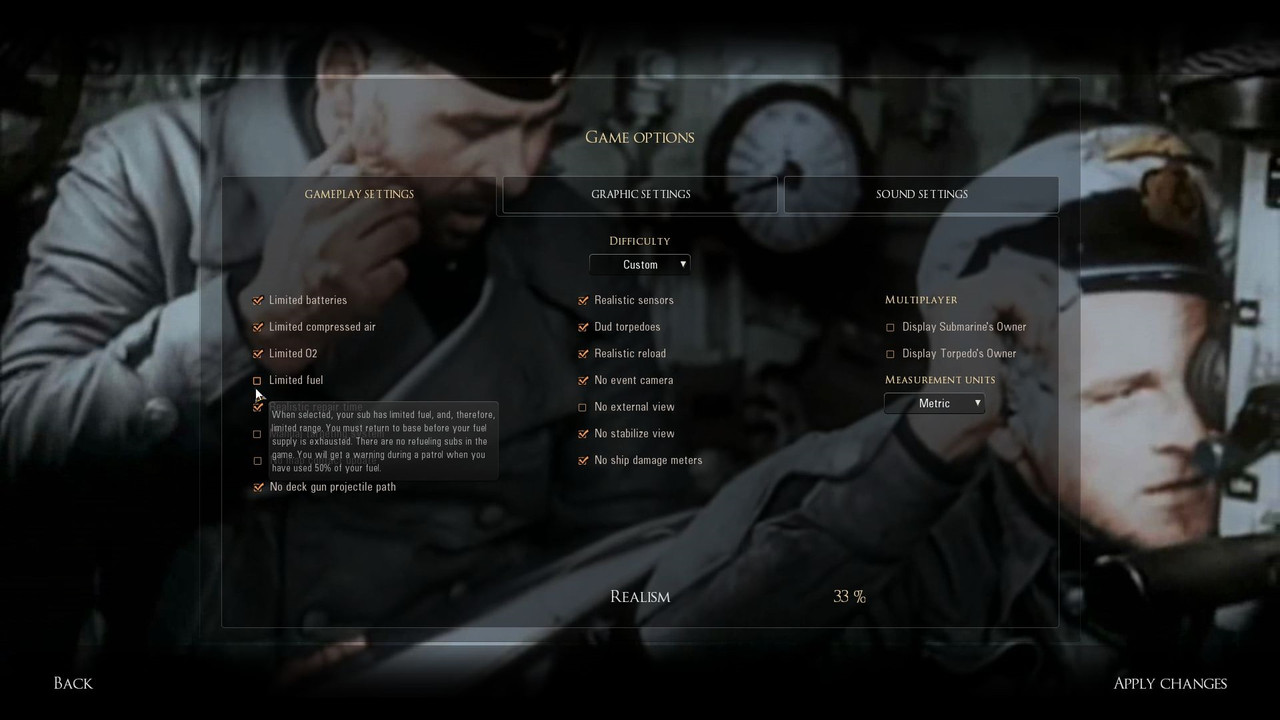 Note. If you see that your changes have not taken place the first place to check is your last save game. Check that you selected correctly from > day > date > and time. Picture 28 > On patrol at sea the picture shows Fuel 100%  Tutorial 2 Option > Full Listing Procedures by Groups C: > Documents > SH5 > data cfg > Group 1 cfg > SaveGames File folder cfg > SaveGames > 00000000 cfg > SaveGames > 00000000 > UPCInitial cfg > SaveGames > 00000000 > UPCInitial > Gameplay Settings CFG file cfg > SaveGames > 00000000 > UPCInitial > Gameplay Settings CFG file > Notepad Notepad is now open to make any changes. cfg > SaveGames > 00000000 > UPCInitial > Gameplay Settings CFG file > Notepad > X to Exit cfg > SaveGames > 00000000 > UPCInitial > Gameplay Settings CFG file > Notepad > Save cfg > SaveGames > 00000000 > UPCInitial > Gameplay Settings CFG file Group 2 cfg > SaveGames > 00000000 cfg > SaveGames > 00000000 > Gameplay Settings CFG file cfg > SaveGames > 00000000 > Gameplay Settings CFG file > Notepad Notepad is now open to make any changes. cfg > SaveGames > 00000000 > Gameplay Settings CFG file > Notepad > X to Exit cfg > SaveGames > 00000000 > Gameplay Settings CFG file > Notepad > Save cfg > SaveGames > 00000000 > Gameplay Settings CFG file Group 3 00000004 > Use your own last save game here. cfg > SaveGames cfg > SaveGames > 00000004 cfg > SaveGames > 00000004 > UPCInitial cfg > SaveGames > 00000004 > UPCInitial > Gameplay Settings CFG file cfg > SaveGames > 00000004 > UPCInitial > Gameplay Settings CFG file > Notepad Notepad is now open to make any changes. cfg > SaveGames > 00000004 > UPCInitial > Gameplay Settings CFG file > Notepad > X to Exit cfg > SaveGames > 00000004 > UPCInitial > Gameplay Settings CFG file > Notepad > Save cfg > SaveGames > 00000004 > UPCInitial > Gameplay Settings CFG file Group 4 cfg > SaveGames > 00000004 cfg > SaveGames > 00000004 > Gameplay Settings CFG file cfg > SaveGames > 00000004 > Gameplay Settings CFG file > Notepad Notepad is now open to make any changes. cfg > SaveGames > 00000004 > Gameplay Settings CFG file > Notepad > X to Exit cfg > SaveGames > 00000004 > Gameplay Settings CFG file > Notepad > Save cfg > SaveGames > 00000004 > Gameplay Settings CFG file Group 5 cfg > cfg > UPCInitial File Folder cfg > UPCInitial > Gameplay Settings CFG file cfg > UPCInitial > Gameplay Settings CFG file> Notepad Notepad is now open to make any changes. cfg > UPCInitial > Gameplay Settings CFG file> Notepad > X to Exit cfg > UPCInitial > Gameplay Settings CFG file> Notepad > Save cfg > UPCInitial > Gameplay Settings CFG file Group 6 cfg > cfg > Gameplay Settings CFG file cfg > Gameplay Settings CFG file> Notepad Notepad is now open to make any changes. cfg > Gameplay Settings CFG file> Notepad > X to Exit cfg > Gameplay Settings CFG file> Notepad > Save cfg > Gameplay Settings CFG file> Exit An acknowledgement to my friend Sam.Willow for giving me the idea for this Tutorial.
__________________
LSH3-2015 <> TUTORIALS <> ALL YOU NEED TO KNOW <> ALL IN ONE PLACE SH4 <> TUTORIALS <> HOW TO DO IT <> INFORMATION <> DOWNLOAD LINKS SH5 <> TUTORIALS <> HOW TO DO IT <> INFORMATION <> DOWNLOAD LINKS Always Here To Help A Fellow 'Subber' | Need An Answer to A Question Just Send Me A PM Last edited by THEBERBSTER; 03-11-19 at 04:37 PM. |
|
|
|
|
09-12-18, 02:22 PM
|
#7 |
|
Growing Old Disgracefully
Join Date: Dec 2012
Location: Hythe - Southampton
Posts: 9,609
Downloads: 1133
Uploads: 0
|
Dial Options In Periscope View
Pressing the 2 buttons on the display changes which dials you see. Picture 1 > shows a basic setup for Auto TDC. 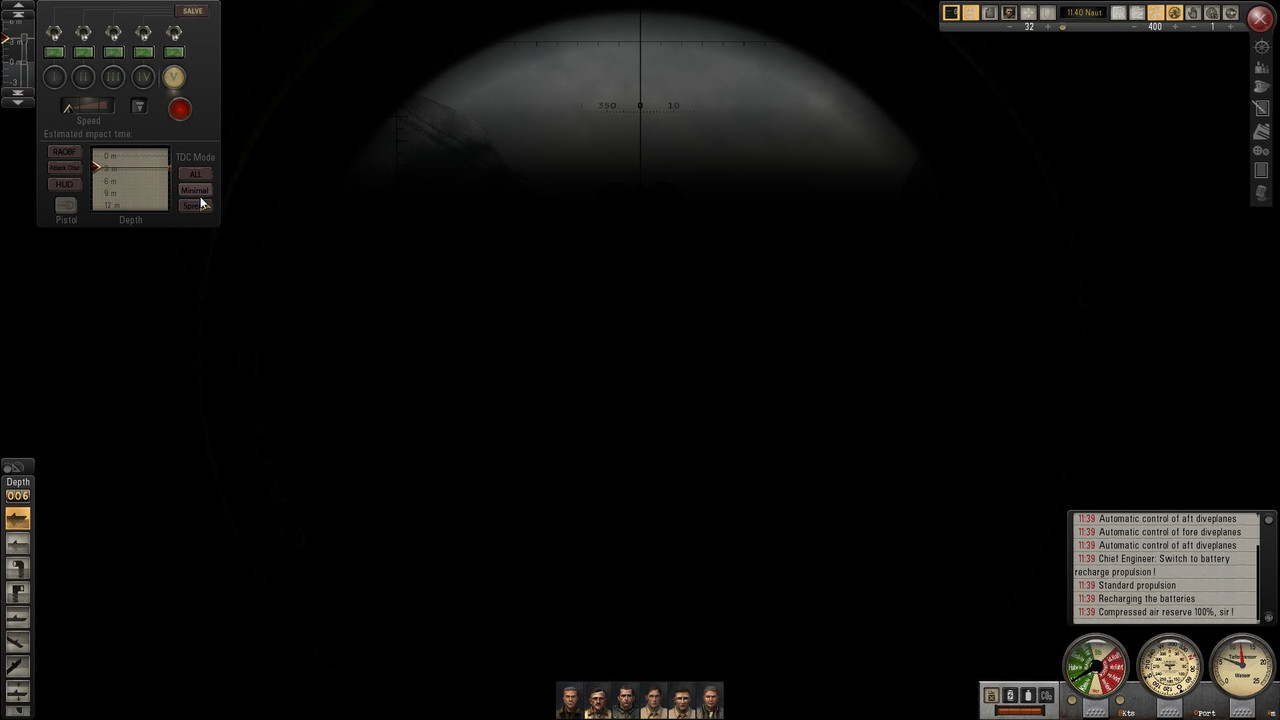 Picture 2 > is as picture 1 with the additional dials by pressing MINIMAL now gives you the option to change the dials manually using the on/off button showing. 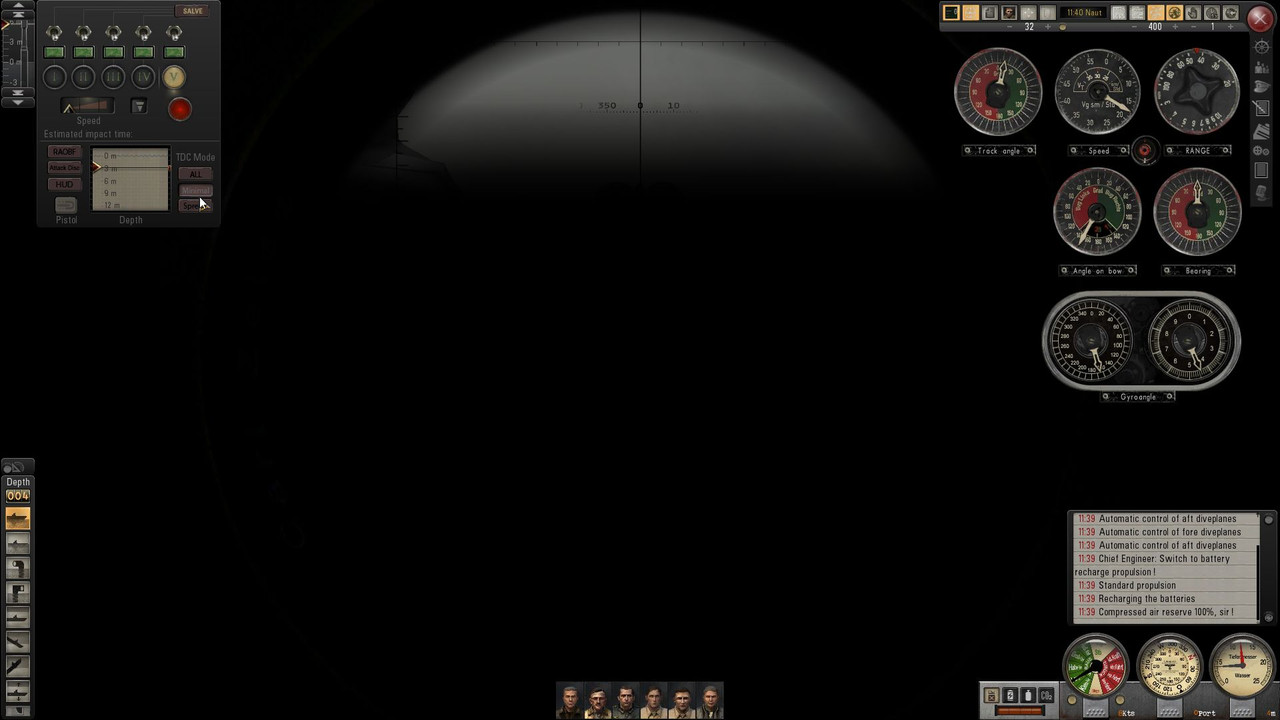 Picture 3 > replaces picture 1 when pressing ALL adds a full set of dials to picture 2 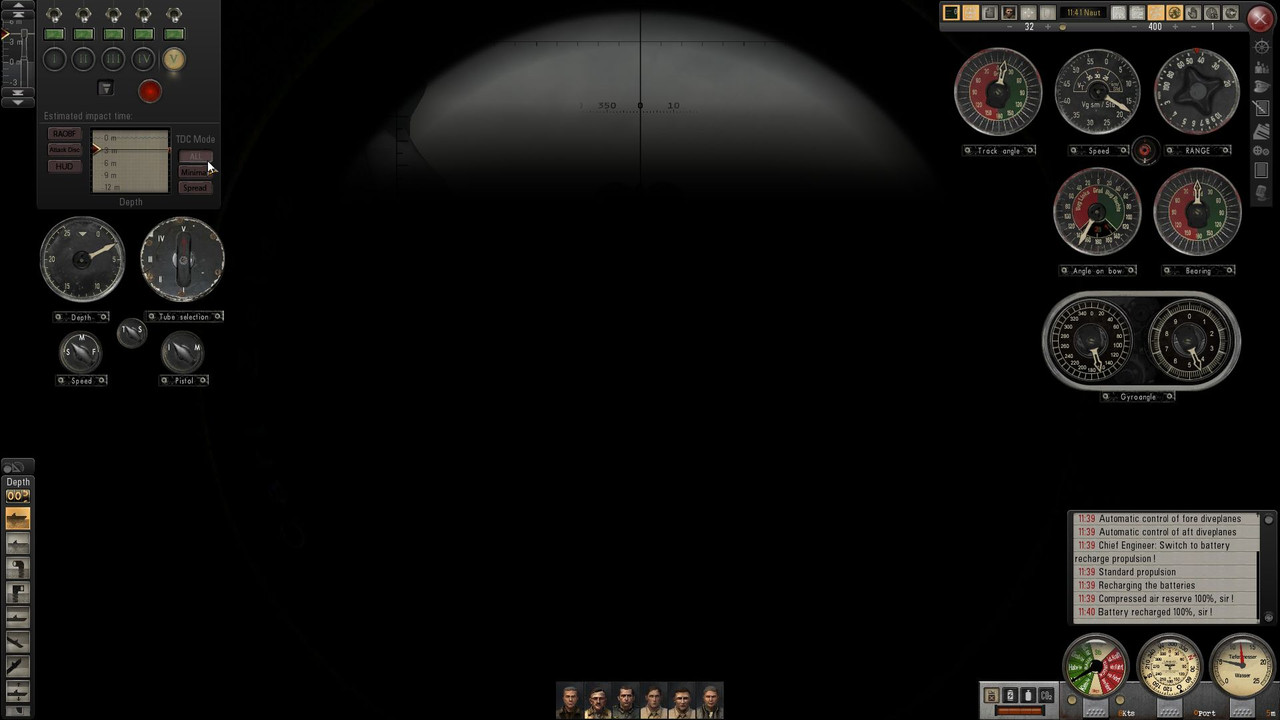 Dial Options In Periscope View Picture 4 > reverts back to picture 2 by depressing the ALL button. 
__________________
LSH3-2015 <> TUTORIALS <> ALL YOU NEED TO KNOW <> ALL IN ONE PLACE SH4 <> TUTORIALS <> HOW TO DO IT <> INFORMATION <> DOWNLOAD LINKS SH5 <> TUTORIALS <> HOW TO DO IT <> INFORMATION <> DOWNLOAD LINKS Always Here To Help A Fellow 'Subber' | Need An Answer to A Question Just Send Me A PM Last edited by THEBERBSTER; 03-07-19 at 06:02 PM. |
|
|
|
 |
| Thread Tools | |
| Display Modes | |
|
|


 Hybrid Mode
