
|
|
SUBSIM: The Web's #1 resource for all submarine & naval simulations since 1997
|
SUBSIM: The Web's #1 resource for all submarine & naval simulations since 1997 |
|
|
 03-21-14, 12:40 AM
|
#1 |
|
Seaman
 Join Date: Mar 2005
Location: Portland, Or
Posts: 39
Downloads: 53
Uploads: 0
|
So frustrated. I've spent hours following your well laid out instructions. I load the game and it immediately freezes and sends me to the desktop.

|

|

|
|
03-21-14, 05:21 AM
|
#2 |
|
Growing Old Disgracefully

 Join Date: Dec 2012
Location: Hythe - Southampton
Posts: 9,609
Downloads: 1133
Uploads: 0


|
Hi Johnson
Tell me exactly what the problem is and I will help you. Peter
__________________
LSH3-2015 <> TUTORIALS <> ALL YOU NEED TO KNOW <> ALL IN ONE PLACE SH4 <> TUTORIALS <> HOW TO DO IT <> INFORMATION <> DOWNLOAD LINKS SH5 <> TUTORIALS <> HOW TO DO IT <> INFORMATION <> DOWNLOAD LINKS Always Here To Help A Fellow 'Subber' | Need An Answer to A Question Just Send Me A PM |
|
|
|
|
03-21-14, 06:57 AM
|
#3 |
|
Canadian Wolf

Join Date: Jul 2006
Location: Canada. The one and only, East Coast
Posts: 10,886
Downloads: 946
Uploads: 5

|
Great work here THEBERBSTER
 
|
|
|
|
|
03-21-14, 07:27 AM
|
#4 |
|
Growing Old Disgracefully
Join Date: Dec 2012
Location: Hythe - Southampton
Posts: 9,609
Downloads: 1133
Uploads: 0
|
Last updated 15th March 2019
Beginners Guide To Manual Targeting Fast 90 Degree Attack Setup A Fast 90ᴼ Attack or similar terminology you may have heard of but not really understood what this actually means. The easiest way to explain this is taking up an attack position which will give a high percentage result where you only need 3 essentials. The Targets Speed. Torpedo Speed. Correct Gyro Angles of 0ᴼ of your U-Boat course to the Targets course. You do not need to identify or lock the Target unless you wish to get information from the Recognition Manual. Drawing a line from the Target past your U-boat gives you his Course. You take up a position using the Protractor so you are at an angle of 90ᴼ at about 800 to 1000 meters to his Course Line. With the Periscope at 0ᴼ you have an AOB of 90ᴼ. You cannot shoot at that angle because by the time your Torpedo arrives the Target will have passed and you will always miss. Click the TDC Button to go to Manual Input. Put the Periscope at 0ᴼ. I will assume you know how to get the Targets speed. Enter the Targets Speed in the TDC. Move the AOB Dial to 90ᴼ at the Periscopes 0ᴼ Bearing. Check whether you are entering the correct direction Port or Starboard. Your ideal firing position should be around 800 to a 1000 meters away. A Range must be entered in the TDC even though it is not a factor in setting up the attack, it just means something has to be entered to complete setting up the TDC. Click on the Button to close Manual TDC. You will notice that the AOB Dial you set at 90ᴼ will adjust as you move the Periscope automatically. Set the Torpedo Speed ideally to fast. Reset the Periscope Bearing so the 2 Gyro Angle Dials are both pointing at 0ᴼ. Depending on the Torpedo Speed entered will determine the number of degrees the periscope needs to be moved to align the TDC Gyro Angles to 0ᴼ. You Fire the Torpedoes when the Target passes across the Periscopes Vertical Cross Hair. You need to set a depth for the Torpedoes. You can do this by sizing how big the target is or by using the Recognition Manuals information. Remember, the Tube Doors must be open and ready or the Attack will fail when the Fire Button is pressed. That's it done.
__________________
LSH3-2015 <> TUTORIALS <> ALL YOU NEED TO KNOW <> ALL IN ONE PLACE SH4 <> TUTORIALS <> HOW TO DO IT <> INFORMATION <> DOWNLOAD LINKS SH5 <> TUTORIALS <> HOW TO DO IT <> INFORMATION <> DOWNLOAD LINKS Always Here To Help A Fellow 'Subber' | Need An Answer to A Question Just Send Me A PM Last edited by THEBERBSTER; 03-15-19 at 05:14 PM. Reason: New tutorial |
|
|
|
|
03-21-14, 11:11 AM
|
#5 |
|
Navy Seal
 Join Date: Jan 2011
Location: CJ8937
Posts: 8,215
Downloads: 793
Uploads: 10
|
Great thread. Well done THEBERBSTER

|
|
|
|
|
03-22-14, 08:30 AM
|
#6 |
|
Growing Old Disgracefully
Join Date: Dec 2012
Location: Hythe - Southampton
Posts: 9,609
Downloads: 1133
Uploads: 0
|
Last updated 31st December 2014
This Tutorial has been written to work with Stoianms 3 part videos How to Intercept a Convoy Received By Radio from BDU in SH5. This Tutorial is played With Real Navigation. This means the U-Boats current position will not be known until the Navigator plots a new one. If you are playing With No Map Contacts then you may also find this Tutorial useful. My Documented part of this Tutorial will assist you in your own Game Play to tell you when to make the right movements and calculations. Video Part 1 of 3 (10 minutes) BDU Information Received A BDU Radio message was received at 14.28 hours (11 minutes ago) Convoy Speed > 10 Knots Convoy Course > 306 degrees. U-Boat Information from the Navigator U-Boats Compass Heading > 276 degrees Range to Convoy > 86 Km Bearing > -114 degrees (Port Side) True Bearing > 161 degrees. Periscope Bearing > 246 degrees. It is important that we start plotting as soon as possible. This can be done with the Game Paused. 1. Take the Ruler and draw the U-Boats Heading of 276 degrees. 2. Take the Protractor and draw the Bearings 114 degrees out to the left side. 3. Take the Compass and place it on the U-Boat and draw out the Range 86 Km alongside the Bearing Line. 4. Take the Marker and mark an X on the Bearing Line where the Compass Circle crosses it. 5. To know where to intercept the Target we use what is known as the Multiplication Factor Formula. 6. This is the distance from the U-Boat and the Targets distance 86 Km. It is divided by 86/100 = 0.86 x 3.33 = 2.86 MF (Multiplication Factor.) 7. Take the Ruler and from the X mark on the Bearing Line draw out the Targets Course of 306 degrees. 8. We know the Convoys speed is 10 Knots. 9. The calculation is going to be 2.86 MF x 10 Knots = 28.6 Km. 10. Take the Marker and mark an X 28.6 Km along the Convoy Course Line. Video Part 2 of 3 (10 minutes) 11. We now need to get the U-Boats calculaton. 12. MF 2.86 x Our Speed 15 Knots at Ahead Flank Speed = 42.9 Km. 13. From the 28.6 Km mark on the Convoy Course Line take the Compass and draw out 42.9 Km. 14. Erase previous Compass Circle. 15. Where the Compass Circle crosses the U-Boat Bearing Line take the Marker and place an X. 16. Now we need to take the Protractor to make an angle from the X mark on the Convoys Course Line to the X mark we have just made on the Bearing Line. 17. This shows us that the angle is 23 degrees. 18. We need to use this angle of 23 degrees so that we can get an intercept point on the Convoys Course Line. 19. Take the Protractor and draw out 23 degrees from the U-Boat so it goes through the Convoys Course Line. 20. Take the Marker and mark an X where the lines intercept. 21. Take the Eraser and remove all except Convoys Course Line and the two X marks. 22. The next thing we need to know is how long will it take to reach the Target. 23. Taking the Compass and measuring the distance between the two X marks shows that it is 39.3 Km. 24. Looking at the Speed Charts shows that the time to travel this distance is around 2 hours and 10 minutes. 25. Looking at the U-Boat clock is showing 14.28 hours. 26. 14.28 + 2.10 = 16.38 rounded to 16.40 hours. 27. To find our heading we take the Ruler from the U-Boat down to the intercept X mark. 28. (Alternative Option) You could of course at this point head straight down to the Convoys Course Line from where you are and set up a 90 degree firing position and just wait the extra time for the Convoy to reach you. 29. (Resuming Our Plan Of Action) This shows we need to change course to 185 degrees. 30. Order Ahead Flank. Video Part 3 of 3 (10 minutes) 31. Change the Message Box icon to 1TC. 32. This is the 1st icon on the right next to the digital clock. 33. You can now use some Time Compression but need to keep an eye on the clock. 34. At 16.00 Hours the Navigator will automatically give a new positional fix. 35. At 16.20 hours we will order the Navigator to fix our position. 36. We will Stop at 16.30 hours. 37. The Message Box is showing Task Force Sighted. 38. Go to the Watch Officer Icon 1 (from right to left). 39. Go to Icon 6 Nearest Visual Contact. 40. He has now given us a bearing of 266 degrees and a range of 2600 meters. 41. Order the Navigator to give a new position fix. 42. Is it time to Submerge. 43. Your decision Captain. 44. Good Hunting. If the speed is not shown in the Message Box but shows Slow Medium or Fast always take the fastest relative speed. It is better to be early rather than late. Courtesy acknowledgement to Stoianm Tip If you shade this Tutorial and then copy and paste it to your PC Notepad you can then edit it.
__________________
LSH3-2015 <> TUTORIALS <> ALL YOU NEED TO KNOW <> ALL IN ONE PLACE SH4 <> TUTORIALS <> HOW TO DO IT <> INFORMATION <> DOWNLOAD LINKS SH5 <> TUTORIALS <> HOW TO DO IT <> INFORMATION <> DOWNLOAD LINKS Always Here To Help A Fellow 'Subber' | Need An Answer to A Question Just Send Me A PM Last edited by THEBERBSTER; 01-17-18 at 05:44 PM. |
|
|
|
|
03-22-14, 04:33 PM
|
#7 |
|
Growing Old Disgracefully
Join Date: Dec 2012
Location: Hythe - Southampton
Posts: 9,609
Downloads: 1133
Uploads: 0
|
Last updated 10th September 2017
This John P Cromwell 45ᴼ method adapted from imperial to metric for SH5 is very useful when used against convoys, especially if you are one of those gamers who like to get inside a convoy between the lanes. Unlike the 90ᴼ shoot where you are in front of the first convoy lane and you want to get to a target in a different lane it is quite easy to hit the wrong target. Another advantage with this method especially if you are using the G7e type torpedo is evading the escorts who will expect the attack coming from 90ᵒ and are likely to search for you in the wrong place which can buy you some valuable time. The formula used is the same whether the targets speed is 5 or 25 knots. The 2 angles always remain constant as you will see as you use it. Getting the Targets speed using the 3 minutes and 15 seconds method. 1. Mark an X on the targets bow. 2. Run the 3 minutes and 15 second speed method. 3. Mark an X on the targets bow again. 4. Measure the distance to both X marks i.e. 600 metres = 6 knots. 5. Draw a line through both the X Marks to make a course (TCL) past the U-boat. 6. Place a 45ᴼ angle on the top of the TCL at a convenient place. 7. Move the U-boat on to 45ᴼ line if possible or parallel to it. 8. Use the Formula below for the attack. This is the Formula used by making a separate diagram on the navigation map. This is for reference purposes only as this has already been done for you. 1. Draw the targets covered distance i.e. 600 metres. 2. Using the protractor place the 45ᴼ angle so it rests on top of the end of the 600 metres nearest to your boat. 3. Take the Ruler and draw a line for the nearest torpedo range that you are going to use 1,700 metres. 4. The calculation is Torpedo speed Slow 28 knots x Targets speed 6 knots = 1,680 metres. 5. Place the ruler on top of the 45ᴼ protractor angle and draw out 1,700 metres. 6. Take the ruler again from the other end of the 600 metres line and draw out so it reaches the 1,700 metres line. 7. Carefully make sure that each end of the line on the end the 600 metre line and the other end on top of the 1,700 metres lines is correctly placed. 8. With the protractor make an angle on top of the 2 lines = 12ᴼ (Starboard). 9. This 12ᴼ angle is used for setting the AOB. 10. Move the periscope until it shows 0ᴼ = 45ᴼ 11. The firing point is 360ᴼ 12ᴼ = 348ᴼ on the periscope bearing with the 2 Gyro dials vertical. 12. The AOB always starts at 45ᴼ whether Port or Starboard. 13. The AOB calculation is 45ᴼ - 12ᴼ = 33ᴼ AOB Starboard in this scenario. Entering the data in the TDC. 1. In this scenario the target is coming from the left to right (Starboard) 2. The targets speed we know is 6 knots. 3. The torpedo speed is Slow = 28 knots for both G7a and G7e type torpedoes. 4. Enter the data in to the TDC with the periscope bearing on 0ᴼ. 5. Enter the AOB as 45ᴼ on the 0ᴼ periscope bearing. 6. With the TDC closed move the 0ᴼ bearing until you see both the 2 Gyro angle dials vertical. 7. The bearing showing is the firing point. 8. As soon as the periscope is moved the TDC will recalculate the new data automatically. 9. A range to the Target needs to entered in the TDC but has no effect in the solution. Torpedo speeds (Multiply the torpedo speed by targets speed) G7a 44 knots = Fast. G7a 40 knots = Medium G7a and G7e 28 knots = Slow 45ᴼ Attack Angle Attack > Targets speed based on 3 minutes and 15 seconds. Formula G7a and G7e Torpedo Speed Slow 28 Knots > AOB 45ᴼ-12ᴼ=33ᴼ Port or Starboard Periscope Bearing Starboard >360ᴼ-12ᴼ=348ᴼ Periscope Bearing Port >0ᴼ+12ᴼ G7a Torpedo Speed Medium 40 Knots > AOB 45ᴼ-9ᴼ=36ᴼ Port or Starboard Periscope Bearing Starboard > 360ᴼ-9ᴼ=351ᴼ Periscope Bearing Port > 0ᴼ+9ᴼ G7a Torpedo Speed Fast 44 Knots > AOB 45ᴼ-8ᴼ=37ᴼ Port or Starboard Periscope Bearing Starboard > 360ᴼ-8ᴼ=352ᴼ Periscope Bearing Port > 0ᴼ+8ᴼ The easiest way to set your AOB is when the periscope bearing is showing 0ᴼ and you can easily enter 45ᴼ in the AOB dial. Port <-- is the target traveling from Right to Left. Starboard - -> the target is traveling from Left to Right. It is important that the periscope bearing needs to be adjusted until both of the gyro dials needles are vertical to give you the 45ᴼ shoot. (J.P.C. is an Imperial method converted here for Metric use.) If you would like to see this method in action then there is a tutorial here although unfortunately the quality is not particularly good but you will at least see how things evolve. Picture 1 > Setting out the convoy lanes. 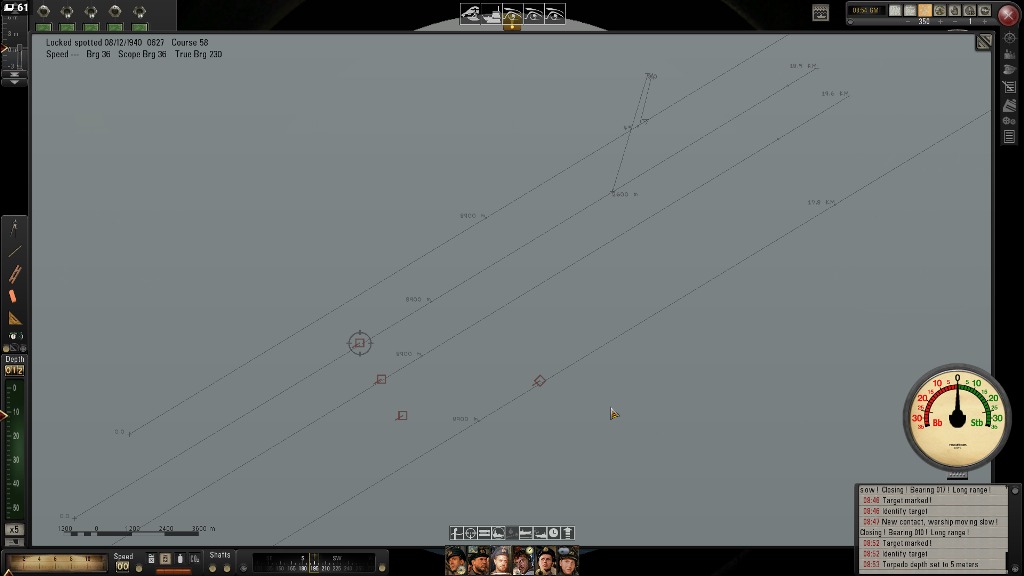 Picture 2 > Setting the angle with the protractor. The distance to the second convoy lane is 2,400 metres and is within the range for using G7e torpedoes. This 45ᴼ angle will put you closer to the first convoy lane, so you need to be aware if there is an escort close enough it may pick you up. This is why I would advise using this method inside a convoy as this will maximise your potential.  Picture 3 > The periscope bearing is on 0ᴼ The AOB will be entered as -45ᴼ The convoy is moving from right to left = Port 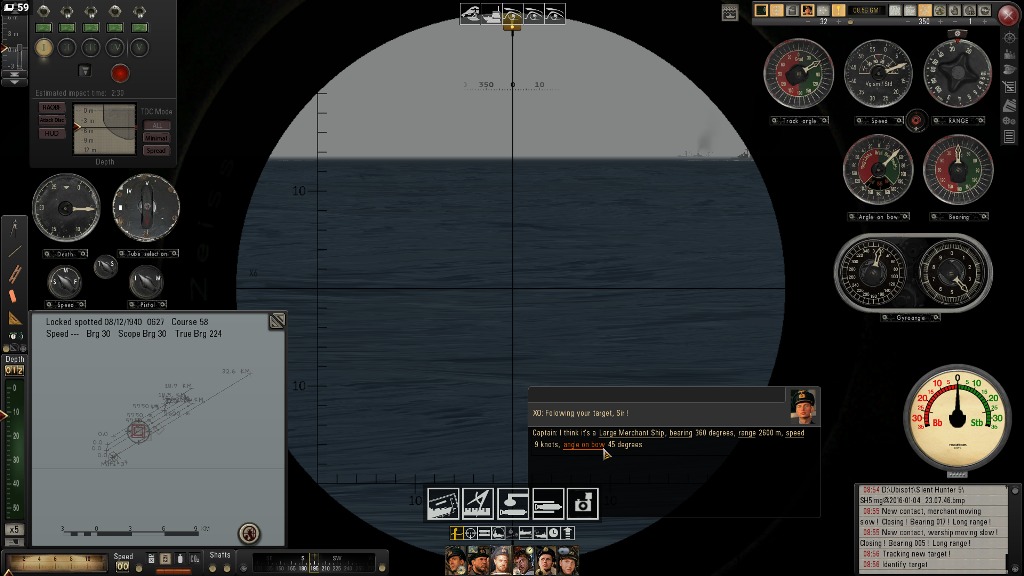 Picture 4 > The speed 9 knots and range 2,400 metres have been entered in the TDC The periscope and TDC bearing is showing 17ᴼ as it is being tracked. Taking the target off being tracked and moving the periscope to the 12ᴼ firing position you can then fire each torpedo where you want it to hit the target as it crosses the periscopes cross hair. The G7e solution is 28 knots x targets speed 9 knots = formula 252 (2,520 metres) This has already been worked out as 12ᴼ is when the torpedoes are fired. 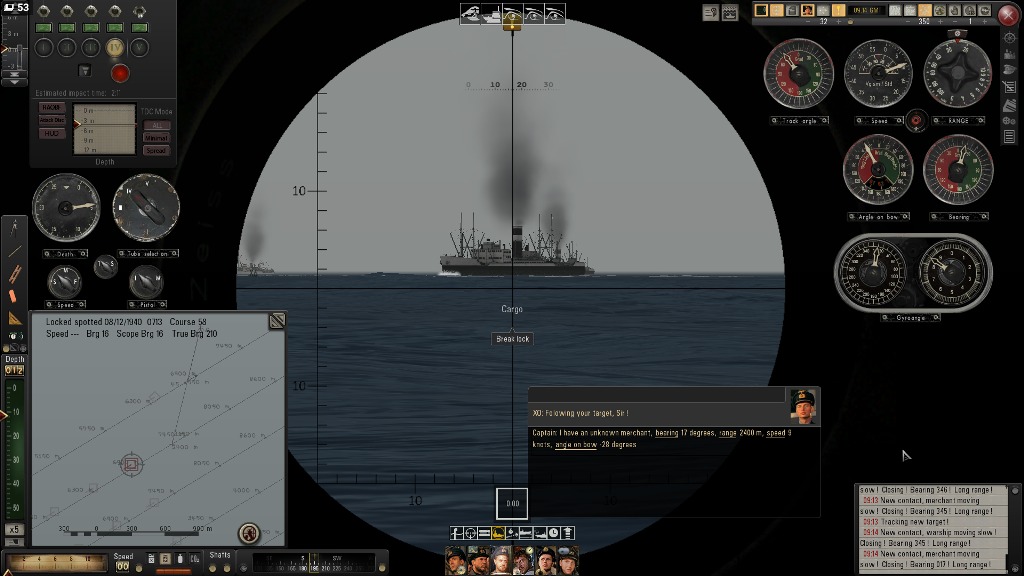 Picture 5 > G7e torpedo 1 impacting on the target.  Picture 6 > G7e torpedo 2 impacting on the target. Courtesy acknowledgement to RockinRobbins
__________________
LSH3-2015 <> TUTORIALS <> ALL YOU NEED TO KNOW <> ALL IN ONE PLACE SH4 <> TUTORIALS <> HOW TO DO IT <> INFORMATION <> DOWNLOAD LINKS SH5 <> TUTORIALS <> HOW TO DO IT <> INFORMATION <> DOWNLOAD LINKS Always Here To Help A Fellow 'Subber' | Need An Answer to A Question Just Send Me A PM Last edited by THEBERBSTER; 10-04-19 at 11:00 AM. Reason: Replaced missing pictures |
|
|
|
 |
| Thread Tools | |
| Display Modes | |
|
|


 Hybrid Mode
