
|
|
SUBSIM: The Web's #1 resource for all submarine & naval simulations since 1997
|
SUBSIM: The Web's #1 resource for all submarine & naval simulations since 1997 |
|
|
 11-11-10, 07:11 PM
|
#1 |
|
Rear Admiral
 Join Date: Dec 2008
Location: on the Dan
Posts: 10,880
Downloads: 364
Uploads: 0

|
For one I will have the base speed long before I attack, when cams offs using radar mod or just a guess based on if I can parallel it's course and match speed, pass it, ect. Most TF run at 17-19kts. Usually I let them find me on radar and will run from the group so they will go into zig mode, that slows them down and I will run away until the escorts turn back and track my end around.
When I want to attack I will have course by making marks and using the tools to figure his base track, again using radar mod or if contacts on rather simple, no need to explain. The only TF I've seen hit 30kts of more are the fast dd groups in the slot, but I attack them all the time as they come in one line. Usually when I pull the DD's away and dive I hope to be 3-5000 yards off my attack track and not come back to surface. I did surface once in my Y attack because I was able, but that's rare.. If you can pull the escorts away at about 5nm's I've never had a problem diving going flank and putting them 3000 yards behind me hunting out of sonar range. If a TF is going faster say 24kts...you still should be able to travel 1500 yards at flank before they can reach 5nms, giving you a 1500 yard shot. Sort of think of it as a triangle. The TF the tip coming down the left line, the escorts coming faster down the right line and you the bottom line right moving left wanting to be where the left line connects your base before the TF gets there and the escorts should be searching at the base right line when you attack. When I attack, I'm setting up a normal two stad measurments for course and speed, leave PK locked, unlock scope, reset bearing at the bow and shoot by the wire. The group should be zigging, you may even get into the middle of it before you need to shoot and can use all tubes on several targets. Often you'll have to guess AOB based on his zig pattern, not what it is at the moment. |

|

|
|
11-11-10, 10:13 PM
|
#2 |
|
Ocean Warrior
 Join Date: Sep 2008
Location: Notify command we have entered the Grass Sea
Posts: 2,822
Downloads: 813
Uploads: 0
|
17 miles due north of Samar from the center of the Island, the Jap Fleet was travelling at 32-33 kts. heading in a south easterly direction. On their return trip, it was travelling at 22-23 kts. I fired a blind salvo at around 8,000yds and had three hits on a BB (a true once in a lifetime strike.) The torepdoes were set for less than 10 ft running depth and did not slow the target down. The TF was travelling two rows and was LARGE, completely ringed by escorts.
|
|
|
|
|
11-12-10, 05:59 AM
|
#3 |
|
Rear Admiral
Join Date: Dec 2008
Location: on the Dan
Posts: 10,880
Downloads: 364
Uploads: 0
|
I've never seen that group going that fast... I assume you're talking about Kurita's fleet coming through the San Bern, which is a good place to ambush it. If you're playing RSRD the fastest easternly leg is 22kts coming through the the Sibuyan Sea through the San Bern. Once it exits it shows it going 27kts heading SSE towards the US jeep carriers, on the return leg, back to 22kts. Obvious if it spots you, it should zig slowing down to probably 17kts. This group had both Y classes, is that what you hit? Also has a few Kongo's and one Fuso. The ratings on all the ships in this group, including the DDs is only competent....making it easy to fool the escorts.
This group leaves Singy on the 18th, gets to Brunei despawns, spawns back the 22 and heads for the San Bern on the 25th. |
|
|
|
|
11-12-10, 08:28 AM
|
#4 | |
|
A-ganger
 Join Date: Aug 2003
Location: Back at Sea
Posts: 75
Downloads: 87
Uploads: 0
|
Quote:
|
|
|
|
|
|
11-12-10, 10:06 AM
|
#5 | |
|
Ocean Warrior
Join Date: Sep 2008
Location: Notify command we have entered the Grass Sea
Posts: 2,822
Downloads: 813
Uploads: 0
|
Quote:
|
|
|
|
|
|
11-12-10, 07:08 PM
|
#6 |
|
Rear Admiral
Join Date: Dec 2008
Location: on the Dan
Posts: 10,880
Downloads: 364
Uploads: 0
|
No doubt it's the Center Force of Kurita that comes through the Sibuyen Sea through the San Bern, two long rows of capital ships encircled by many DD's. The Yamato's bring up the rear. As this group exits the San Bern it heads sort of SSE where it comes in slight contact with the US jeep carrier force. Soundd like you found them coming around Samar going fast. Lurker has them turning back on each other so they don't do a massive battle or the Yamato's would eat them alive, but I've seen a few DD's do battle. A good place to catch the group is in the San Bern, so narrow the group will have to come over you.
If you miss it, just remember it comes back the 26th. As you stated it's faster than your sub so if it gets ahead, you're not gonna catch it either way. The other force is the Southern Force that comes through the Surigao Strait same night, but just two Kongo's and several CA's and DD's, but you'll see several US TF that easily deal with it. Nice surface battle and you can easily finish off many damaged ships. Course also the northern carrier group, battle of Cape Equano as discussed in another thread. Here is an old SS of the two lines. If you catch it in the Sibuyan Sea..think that's how it's spelled the 24th you can watch it get attacked in mass by planes, another good time to attack it and you have more room. 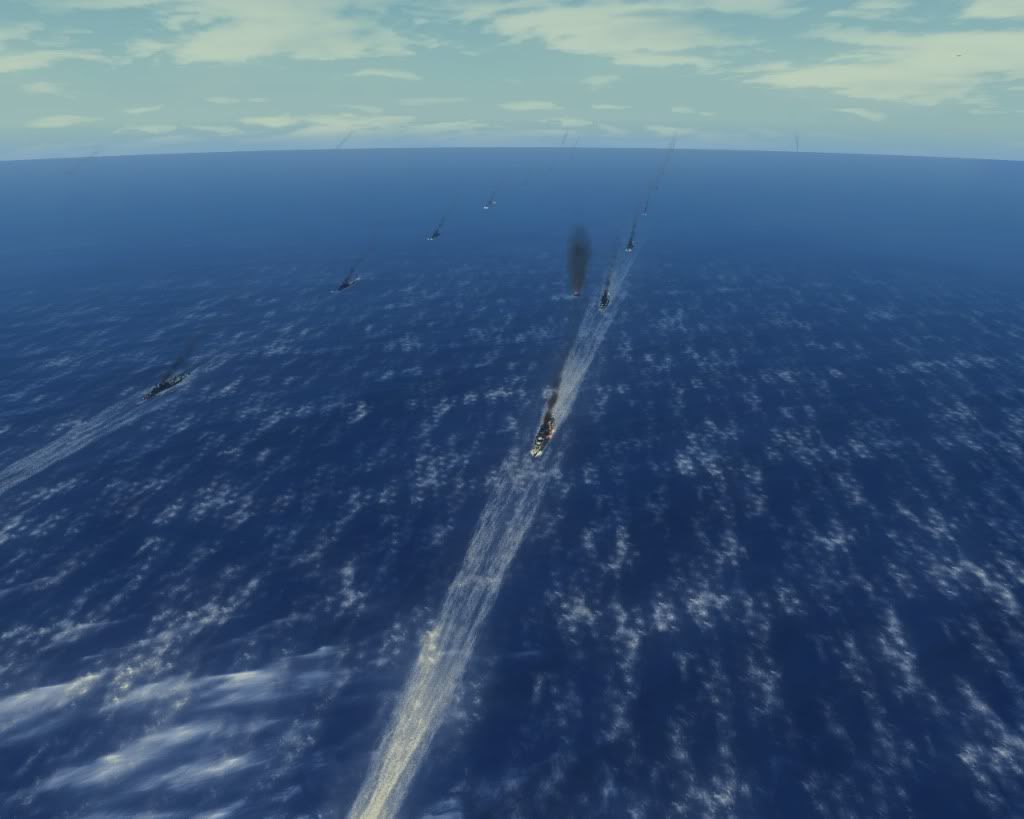 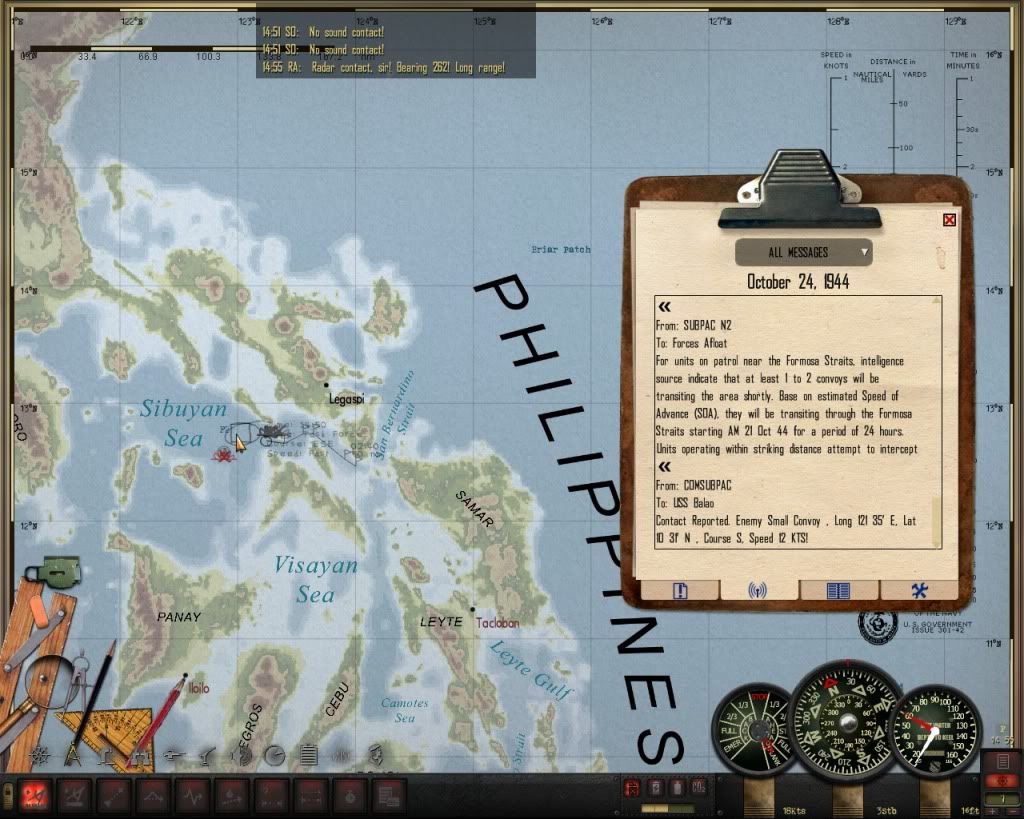
|
|
|
|
|
11-12-10, 08:48 PM
|
#7 |
|
Ocean Warrior
Join Date: Sep 2008
Location: Notify command we have entered the Grass Sea
Posts: 2,822
Downloads: 813
Uploads: 0
|
That looks like the TF! It is a LARGE TF and well guarded. Nice work finding it. You must have dissected Lurker's TF history!
Couple of issues on the subject of attacking a TF at 100 percent realism with map contacts enabled (the activation box is unchecked.) I stll cannot seem to escape the dds and escorts. I have tried pointing my bow at the lead dd and diving under it, moving further ahead of the TF after after the dds spot my boat, etc. Nothing has worked. They find me. Maybe someone can put up a tutorial with screen shots? Also, I have not been able to get speed per the 3 minute rule because the TF silouettes do not appear until after the dds have pounced. I just do not have time. I have tried to get speed per the speed dial key on the Attack Tool speed dial if and when I am able resurface close to the TF main line. A screen shot tutorial would be a great help. I assume it would involve TMO 2.0 activated, map contacts enabled, PK activated, Easy Aob Mod activated, but who knows what, if anything will be posted? I could use a visual of the tactics to get into firing position. I do not think there is a good tutorial on attacking TFs. This is advanced sim warfare especially when the dds and escorts have the AI programmed by Ducimus. I can try the long range shot, but closing for a kill as Armistead has described appears beyong me without a good tutorial to show the way. Robbins could use it in his bag of tricks tutorial. Last edited by I'm goin' down; 11-12-10 at 11:47 PM. |
|
|
|
|
11-24-10, 10:08 PM
|
#8 | |
|
Swabbie
 Join Date: Jul 2004
Location: Oregon
Posts: 13
Downloads: 100
Uploads: 0
|
Quote:
Sorry for all the questions - I just want to make sure I'm doing it right. It seems like once PK is set, the TDC is going to be constantly updating lead angle for the target - which is why I am a little confused by the unlock scope-leave PK on-set wire on target bow and set bearing-shoot by wire. It seems like setting the bearing again with wire on target bow could cause fish to have an even greater lead angle and run ahead. Let me know if I'm thoroughly confused  Thanks! Thanks!
|
|
|
|
|
|
11-25-10, 02:08 AM
|
#9 |
|
Ocean Warrior
Join Date: Sep 2008
Location: Notify command we have entered the Grass Sea
Posts: 2,822
Downloads: 813
Uploads: 0
|
How do you get a stadimeter reading for target bearing? (I do not think you can.)
1. The target's bearing is the number degrees displayed on the periscope when you have it locked on the target. You get speed by clicking the speed button on the Speed Dial, but, as I recall, you have to be locked on the target for this method to work. Of course, you can measure speed by other methods such as the three minute rule. 2. You get range from the range dial. 3. You set the Aob per the Easy Aob mod by setting it to match the target's true course per the compass tool. If you use Easy Aob, once speed and course are established and entered on the Attack Dials, you can turn on the PK. The TDC should begin following the target. You can input range after the PK is activated, as the TDC is tracking the target's course and speed. (Note, using Easy Aob: If more than one target is on the same course, after firing at the first target, all that is required is a range adjustment to track the second target.) As for firing by the wire, I have no idea what Armistead is talking about. Take a look in the Bag of Tricks thread re Rock n Shoals constant bearing method in lieu of the O'Kane method. You can use it at long distance without activating the PK. Now for Armistead to impart his brillance... How he avoids dds is beyond me, if TMO is applied using its original AI. Last edited by I'm goin' down; 11-25-10 at 10:48 PM. Reason: made some changes |
|
|
|
|
11-25-10, 10:56 AM
|
#10 |
|
Seasoned Skipper
 Join Date: Mar 2008
Posts: 698
Downloads: 262
Uploads: 0
|
It's my understanding that you don't ever turn on the PK when using the O'Kane method. AT least I never do when doing a 90 degree O'Kane style attack but I'll let the experts chime in to confirm. That may be where you are getting your misses from.
|
|
|
|
|
11-25-10, 10:47 PM
|
#11 | |
|
Ocean Warrior
Join Date: Sep 2008
Location: Notify command we have entered the Grass Sea
Posts: 2,822
Downloads: 813
Uploads: 0
|
Quote:
This thread is not about O'Kane, which does not require the PK to be activated--just like the constant bearing method. My issue is how to avoid the dds in TMO 2.0, which, if explained by others, needs further amplification. |
|
|
|
|
|
11-26-10, 07:26 AM
|
#12 | |
|
Seasoned Skipper
Join Date: Mar 2008
Posts: 698
Downloads: 262
Uploads: 0
|
Quote:
Carry on with the DD evasion discussion....a topic I am also interested in learning more about. |
|
|
|
|
|
11-27-10, 03:12 AM
|
#13 | ||||
|
Watch
 Join Date: Sep 2010
Location: All around occident
Posts: 28
Downloads: 28
Uploads: 0
|
Ok, I think we need some more info from our friend Down 'cause this thread is going sideways. It is also a subject I love to debate.
Personaly I managed to learn how to avoid Ducimus' escorts just by reading page 40 to 45 of TMO_20.pdf manual (and a lot of reading in this forum). If you want more explanation about the last paragraph "So what the hell do i do if i have multiple escorts camping out up top?" then Bubblehead1980 is being very useful here. I found those threads very useful as well. You'll find various opinions, as various as there is attack situations: Quote:
Anyway, if you can hit a target moving at more than 20 knots from a distance 4,500 yds, you definitely don't need advice on the attack technique. I'm totally unable to do that range with constant bearing. I agree with Armistead when he said that fixed attack method is dangerous. It is dangerous especially when you are stubborn to stick to only one attack method. Most probably sticking to constant bearing technique IS the reason why you fail and reload your game endlessly. Are you ending up too close (closer than 2500 yds) to a DD if the main line is at 4500 yds and the flank escort is around 2500 yds in between? Are you making too much noise trying to catch up or keep your constant bearing? Don't let the escorts get closer than 2500 yds and stop even making noise by breathing when they are that close. Even the repair crew have to be disabled. Quote:
If you are not in a good position to attack then Armistead technique to lure the DDs away is a good approach, although I never manage to do this one succesfully against a task force. Making them believe you are somewhere else is a potential approach but you need enough distance to disappear and not too much distance to catch up with the target... More maths on the map. Let me quote our guru RR on this one: "Once you're detected, the hunt for merchies is over and you're engaged in evasion of escorts. In the meantime, the merchies will get away. So rule #1: don't be detected." Even more true with a task force, you have one pass and you are lucky if you can make a second pass to finish the damaged ships. Sometimes you have to accept your position is too crappy and let go the attack. Try to figure out where they are going or if they are coming back, ambush them in a strait or next to their destination port or just curse the engineers that gave you so lousy diesels. If you don't want to let it go then find what gets you detected or cowboy your way around the DDs to spray and pray. Quote:
If you want to know more about the AI, search by user for Ducimus in this forum. I believe you know he's the AI scientist here and I got most of my info by searching his posts. You can avoid any depth charge attack by being deep, evasive and at flank speed. There is no reason run silent if you hear depth charges getting wet. Remember also that the depth is set before launch so changing depth can save your ass as well. I spent a lot of time in the slot during 1942 pissing off the 6 to 12 DD convoys by shelling them and then practice evasion. 'Died a lot of times but it was worth it. Quote:
My first guess trying to figure out your situation is: They know you're here already, get as close/fast as you can to take your shot. The attack method really depends on your position and how much borrowed time you have. I don't have any mod installed making the solution faster than what's in the game and TMO already BUT, I've been practicing all attack methods so I can switch quickly depending on the situation. I also prioritize on gathering plot info a.s.a.p. They are most probably zigzagging already so forget about constant bearing or PK. More possibility of error means you need a more error tolerant method. I would go for Cromwell or O'kane but once again I don't know your position. One thing that doesn't change: Closer is better The speed and angle on bow will have to be an average on their true bearing. The best is to have their true bearing marked before they start zigging. Otherwise you have to make an assesment of their zigs: You can make an assesment by using periscope up/map while taking their speed. You simply mark for the speed 3 minutes on the true bearing line ignoring the zigs. AoB is also taken from the relative true bearing. While the chrono is ticking you have enough time to figure out how wide is a zig and how much time they take to complete one. Once your solution is set the attack map will tell you how much time it will take for your torpedo to get there. Try to time your shot so the torpedo will hit when the target AoB is the closest to 90 degrees. It's obvious that spreading the shots are also maximizing your chance in this case.  huh, what? I'm still typing? ok enough aready huh, what? I'm still typing? ok enough aready . . -----------TF attacks:
http://www.subsim.com/radioroom/showthread.php?t=177317 Hope this was somehow helpful. 
__________________
"My fellow Americans, I am pleased to tell you today that I've signed legislation which outlaws Russia forever. The bombing begins in five minutes." - Ronald Reagan - Some help finding big battles using RSRDC: Combined Fleet and Pacific War Animated Last edited by ZigmundFreund; 11-27-10 at 03:53 AM. Reason: more info spotted |
||||
|
|
|
|
11-27-10, 07:23 AM
|
#14 | |
|
Rear Admiral
Join Date: Dec 2008
Location: on the Dan
Posts: 10,880
Downloads: 364
Uploads: 0
|
Quote:
My first one is almost always at the bow or in front of it to hold a ship in place from speeding up so the others will hit. Usually I'll hit with all. Sometimes I'll even then change speed a few knots slower to make a spread. If a group is zigging and I can figure AOB of both legs, I split the difference. Still, most the time I guess where my torps need to be and set it up that way. MOT...Middle of the Target. Last edited by Armistead; 11-27-10 at 07:35 AM. |
|
|
|
|
 |
| Thread Tools | |
| Display Modes | |
|
|


 Hybrid Mode
