
|
|
SUBSIM: The Web's #1 resource for all submarine & naval simulations since 1997
|
SUBSIM: The Web's #1 resource for all submarine & naval simulations since 1997 |
|
|
 12-02-09, 04:03 PM
|
#1 |
|
Ocean Warrior
 Join Date: Sep 2008
Location: Notify command we have entered the Grass Sea
Posts: 2,822
Downloads: 813
Uploads: 0
|
I have bitched and moaned about repeatedly being sunk when trying to attack warships, especially in TMO, the mod I live with. The dd's and de's find me too early in attack, and I usually never get a chance to "get my torpedoes off" in a manner of speaking. Then, once my boat is spotted I spend the rest of my short lived mission jumping around like a cowboy who is attempting to dodge pistol shots at his feet from a six shooter fired by an angry outlaw - just before he empties its chamber with a shot that finishes me.
Then ducimus, bless his soul, reposted his thread that a link to tutorial on active and passive sonar. http://www.ducimus.net/sh415/ai.htm. Apparently RR posted it his sticky thread re Bag of Tricks after I posted the link in this forum about a week ago. With that background, we now move forward. I recently played a single mission from 1943, Tsungaro Gauntlet, which I believe was created by a member. After making it through the straights to the sea of Japan, I came accross the task force. The goal is to destroy its carriers. First mission - could not intercept as the task force was running 16.5 kts. Second mission - I replayed first mission from point of map contact. I submerged to 300 feet, followed radar until the dds passed, and surfaced to find that the carriers had also sailed by, leaving me to take on a dd, which I declined to do for reasons discussed above. I was not in position to complete the mission, so I exited stage right. Third mission - I replayed first mission from point of map contact. I submerged to 350 feet and followed the same strategy used in the second mission, but this time surfaced earlier. Just my luck --the prime target was bearing down on my position and almost ran my boat down. I switched to aft tubes and fired four shots, and then switched to forward torpedeos and tried a hail Mary with a single shot, all of which missed. I never got a good aspect ratio although I was not far off in the calculations considering I had no time to id the carrier, prepare for the course adjustment, etc. Fourth mission - I replayed first mission from point of map contact. I submerged to 200 feet and followed the same strategy used in the second mission, but this time surfaced when the carrier was closing from 16 degrees port at fairly long range. I set deep depth for the torpedeos, and target course at 180 degrees. I could not get a great aspect ratio because the carrier was far out, but I fired six shots and sunk the bastard. My course was off, but it made no difference in the end, as I hit 6 for 6 from the forward tubes. I used the Easy AoB mod to get range and aspect ratio. The dds did not pick me up under the above scenarios, because my boat was below radar depth. I still have my reserve torpedoes in the fourth mission, and as the mission continues and I am on the hunt for the other carrier. The radar tutorial seems to be quite useful when going after warships. The downside is that it is difficult to identify and follow your target (i.e. a capital ship in a task force protected by dd's and de's) because you are submerged below radar depth if you use the strategy I employed. You can gauge speed and plot the task force course while at a long distance with map contacts on easily enough, but getting close enough to fire without being spotted is really tough. So, you submerge, follow the task force on radar, wait till the escorts pass, surface, make adjustments to the traget dials on the Attack Data Tool (as it is defined by Capn Scurvy's tutorial on High Realism), time permiting, and either engage or withdraw. Time works against you in this scenario. Here are the ways I think an attack on a task force could work, but they are limited. 1. The technique above. You can use manual targeting with the Easy Aob. mod (i.e. avoid the dd's and de's and fire from close range, but your time to check target course, range and aspect ratio will be compromised.) 2. Gutted's constant bearing techique using the Solution Sover. (Long range, and probably outside of radar/sonar defense perimeter.) I have not tried this technique at long range, but theoretically it should work. 3. O'Kane technique. Using this technique at long range is risky because you are estimating the lead angle and the technique was intended to apply to targets at close range. 4. Cromwell technique. Long range, and probably outside of radar/sonar defense perimeter.) Time consuming to set up, but accurate at long range. 5. Easy AoB at any range as long as you can get a good aspect ratio. Here are my questions, and I invite comments/answers, if you have something to say. 1. Are there other techniques available to avoid escorts at short range when attacking warships, assuming that the enemy is at battle stations with their radar and sonar fully operational? 2. Has anyone figured out if gutted's Solution Solver can be used to plot attacks at other than 90 degrees? If so, please post the technique. Eg. I you could use the Solution Solver at an attack angle of 45 degrees (i.e. the Cromwell technique), it provides the lead angle automatically once you input the target's speed. If so, it could be the answer to a lot of the problems arising from attacking a task force at long range (day or night attacks). Last edited by I'm goin' down; 12-03-09 at 02:00 AM. |

|

|
|
12-02-09, 04:34 PM
|
#2 |
|
Navy Seal
 Join Date: Mar 2007
Location: DeLand, FL
Posts: 8,900
Downloads: 135
Uploads: 52


|
Against carriers, the Dick O'Kane technique is absolutely accurate and deadly from 2500 to 3000 yards. I don't recommend 3000 yards as a fair percentage of your torpedoes will shut down before reaching the target.
If you don't like the 90º angle to the track, then using the vector analysis method will give you the correct lead angle for any approach angle to the track. Again, I'd be 2000 to 2500 yards out, torpedoes on high speed for greatest accuracy. With the Cromwell method you have a MUCH greater chance of the target seeing the torpedoes and avoiding. I'd not use a longitudinal spread here. I'd shoot stern, MOT, bow in that order to get a divergent spread, less likely to be avoided. I haven't updated Sub Skipper's Bag of Tricks yet. There is a bug in the forum software that isn't letting me edit any of my posts in that thread for some reason. When it's working again, I'll make the addition to the first post, which contains all the links.
__________________
Sub Skipper's Bag of Tricks, Slightly Subnuclear Mk 14 & Cutie, Slightly Subnuclear Deck Gun, EZPlot 2.0, TMOPlot, TMOKeys, SH4CMS |
|
|
|
|
12-03-09, 12:07 AM
|
#3 | |
|
Soundman
 Join Date: Dec 2007
Posts: 142
Downloads: 109
Uploads: 0
|
Quote:
So, here's my data, entered into Gutted's solution solver: 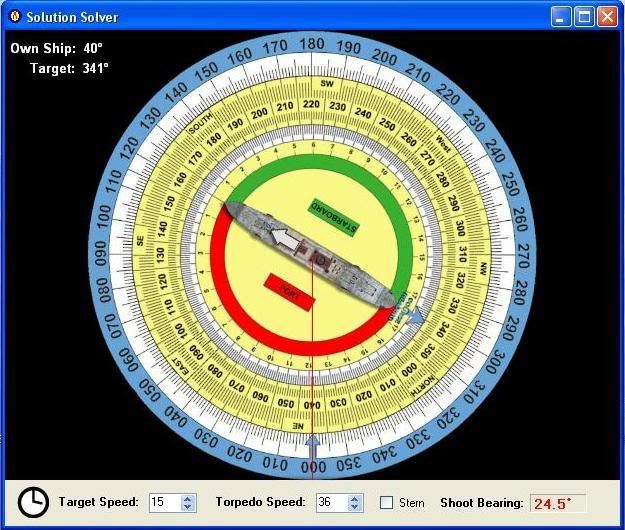 My course is 40 and the target's course is 341. I've got the speed for the target (15 kn) and the speed of the torpedoes (Mk 10, travels at 36 kn). The red "periscope line" doesn't matter a whit since we're not trying to find the current AOB of the target, but right now in the solution solver the target is at the AOB that it would be if it were right in front of the bow (about 120 to port--not the right angle that you would see in a standard fast-90 attack). You can see in the bottom-right corner that the "Shoot Bearing" box displays 24.5 degrees...that's the shooting solution for a constant bearing attack. So, in other words, if our data is perfect, we can shoot when the target crosses 24.5 and expect clean hits. Here's how the attack plays out: I set up with a course of 40 degrees, with a 0 bearing AOB of 120 degrees: 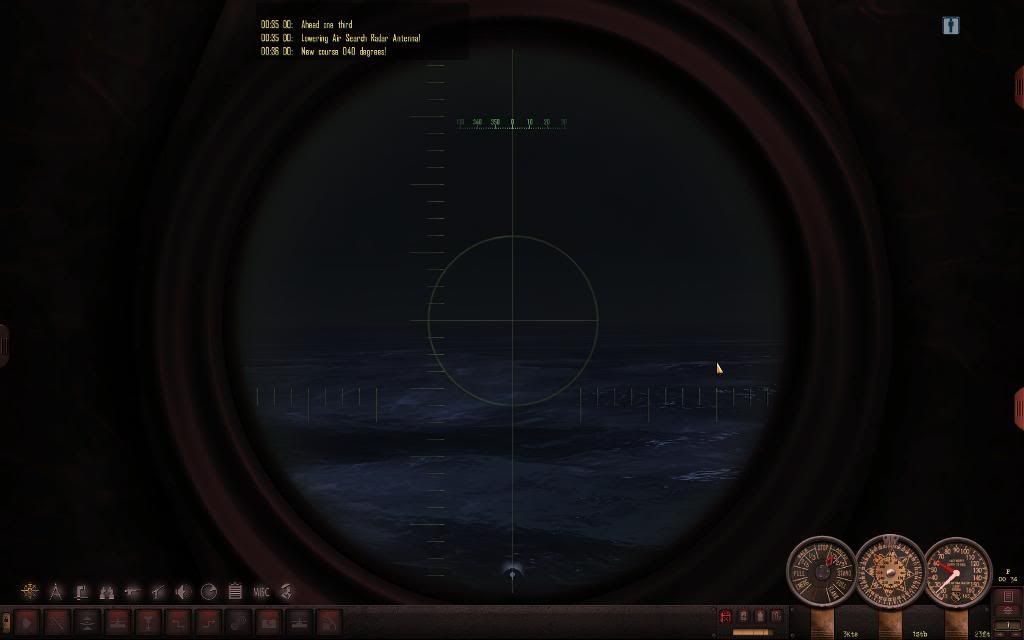  I set my scope to 24-25 degrees, as directed by the Solution Solver, and fire my torpedoes: 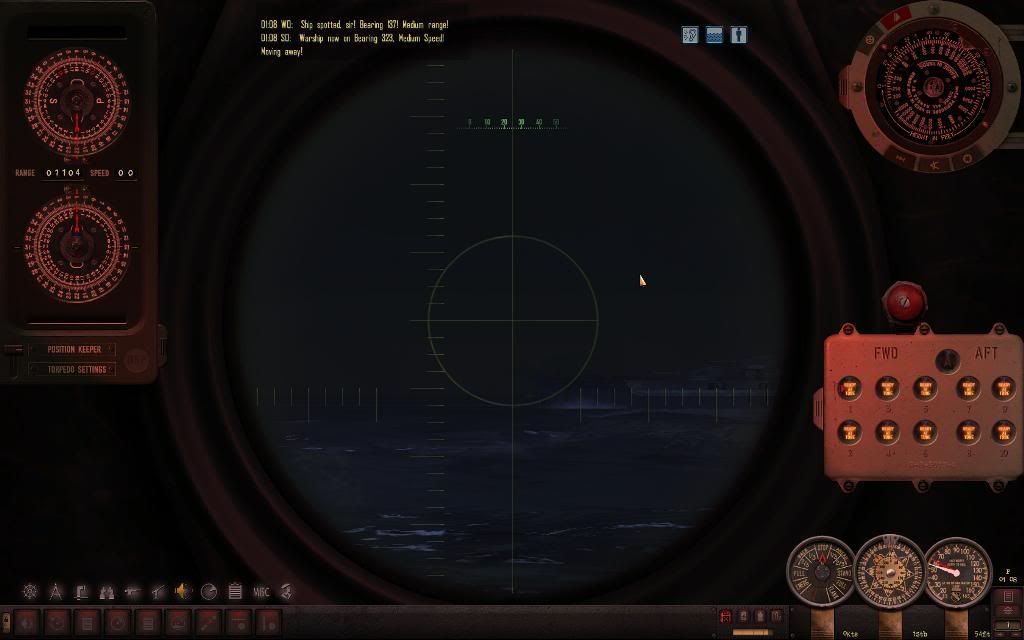 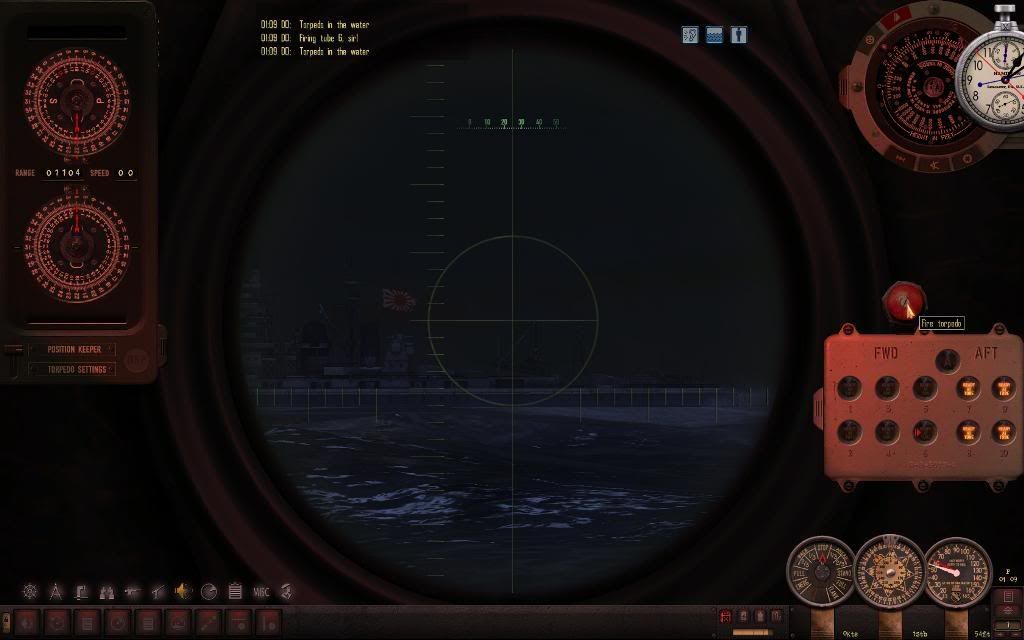 Returning to 0 bearing, you can see the torpedoes on their straight course:  Hits!  I land five of six torpedoes. Because I was shooting straight at him (and not adjusting the torpedo course like the video) he manages to outrun the last fish, but I still inflict massive damage:   And, as an added bonus, the errant torpedo finds a target in the far column: 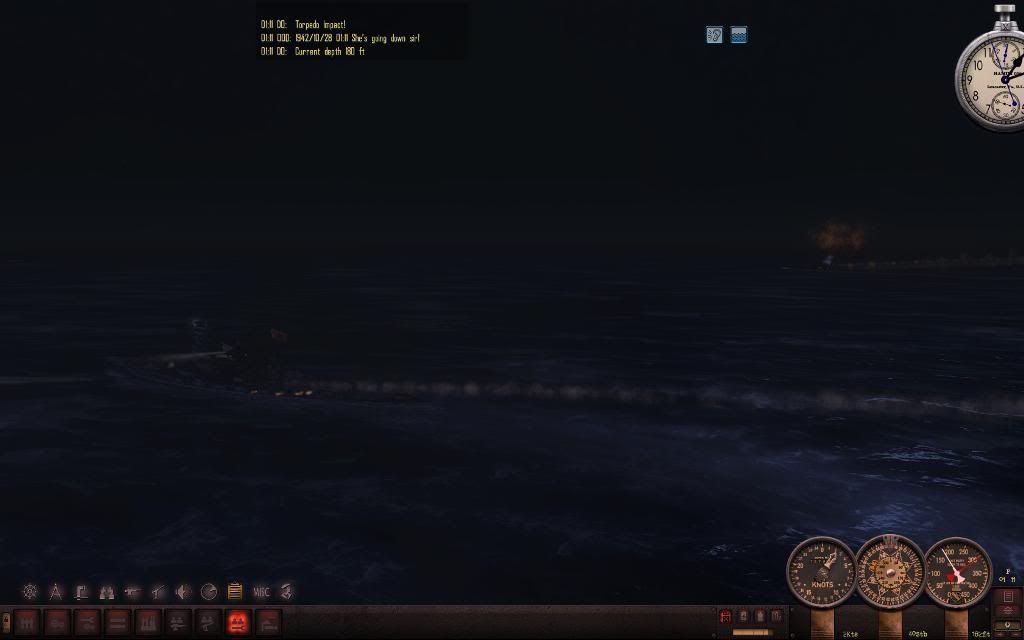 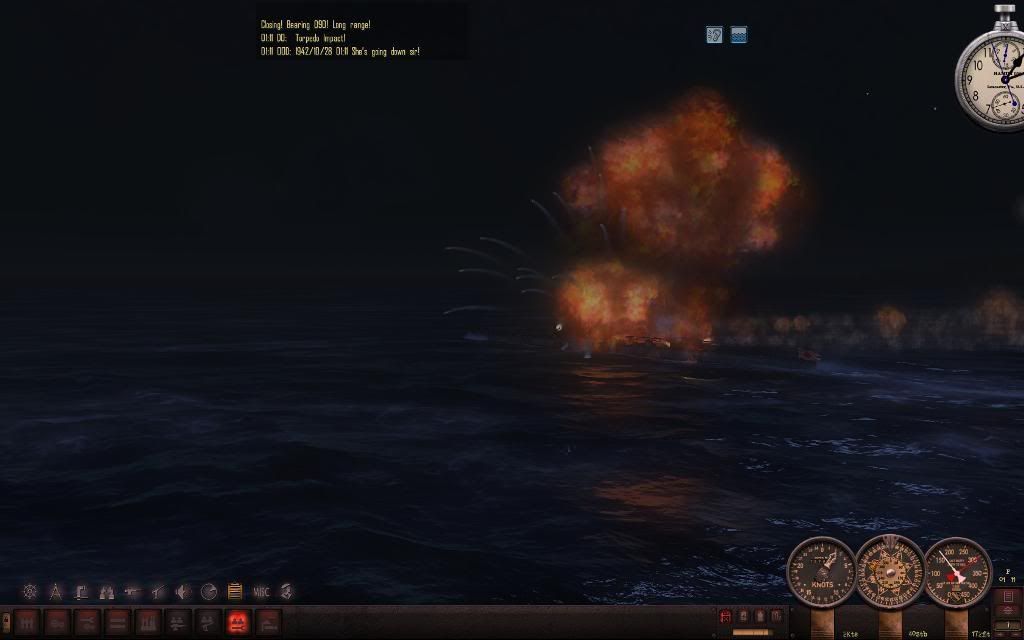 So yes, you can use the Solution Solver to find a constant bearing solution for whatever angle you like or whatever angle you happen to be on, not just 90 or 45. I was shooting at very close range, but I think this proves the theory. |
|
|
|
|
|
12-03-09, 12:42 AM
|
#4 | |
|
Sea Lord
 Join Date: Sep 2007
Location: Reno Nevada USA
Posts: 1,860
Downloads: 85
Uploads: 0
|
As Laconic says gutted's little tool is just a very handy and accurate way of obtaining a vector analysis solution, it's very accurate at long ranges and any approach angle. Long range shooting is one way to beat Ducmius DD's
Laconic nice post there. Quote:
  Magic
__________________
 Reported lost 11 Feb. 1942 Signature by depthtok33l |
|
|
|
|
|
12-03-09, 01:19 AM
|
#5 |
|
Ocean Warrior
Join Date: Sep 2008
Location: Notify command we have entered the Grass Sea
Posts: 2,822
Downloads: 813
Uploads: 0
|
Laconic has anawered Question No. 2 of the original post.
That is an excellent presentation of the use of the Solution Solver to attack at a steep angle. It adds a dimension to the Cromwell attack. Since the attack is at close range in his example, we might want to try it at long range in an attempt to perfect it. What I envision is a long range attack at night. Assuming the same scenario as Laconic displays, the radar man will announce the target's position as it moves along its course. When it closes to 24 degrees (as its port side is crossing laconic's boat's bow), a salvo with a spread could result in torpedo impacts as the target crosses the wire at 24.5 degrees. I assume that the target's range or weather conditions when it crosses the wire prevent visual observation at that moment in time. If the attack is successful, it will be an advancement to the game. Rockin Robbins may want to consider adding it to the Solution Solver thread in his bag of tricks. Using the Easy AoB in my hypothetical would be difficult. It is difficult to get a good estimate of range and aspect ratio at night, and often times it is not possible to see the target at all. That effectively nullifies use of the Easy Aob. With the Solution Solver the radar man should update the target's position if he is worth his salt. Since this is a constant bearing attack, range and aspect ratio are not required. With map contacts on, target speed and course can be ascertained. That is all that is needed, except for a steady hand on the torpedo firing buttons and a conservative torpedo running depth. The crew will love you. Laconic's screen shots and explanation make a fine tutorial. You can zoom the screen to make out the messages from the radarman. Excellent job, Captain. Your reply is most appreciated. Last edited by I'm goin' down; 12-03-09 at 02:14 AM. Reason: Revised to use more concise language; proofreading. |
|
|
|
|
12-03-09, 09:26 AM
|
#6 |
|
Navy Seal
Join Date: Mar 2007
Location: DeLand, FL
Posts: 8,900
Downloads: 135
Uploads: 52
|
Please note that the further you get from a 90º angle to the track with the target approaching, the more likely they are to see the oncoming torpedoes and the easier it is to avoid the longitudinal spread. In the daytime, avoidance will approach 100% with a 45º approach. I would only shoot the Cromwell attack at night or in very heavy seas.
Actually the most tolerant attack for target speed and course is simply firing when the target is at a 90º angle on the bow. Yes, this means the torpedo track angle is aft of the beam, about 100º to 110º, even higher with a high speed target. Intuitively this seems wrong, but World War II analysis shows that this will actually get you more hits. Make sure you always use high speed settings for Mark 14s. This is vital against a high speed target as you need every last speck of accuracy you can muster.
__________________
Sub Skipper's Bag of Tricks, Slightly Subnuclear Mk 14 & Cutie, Slightly Subnuclear Deck Gun, EZPlot 2.0, TMOPlot, TMOKeys, SH4CMS |
|
|
|
|
12-03-09, 10:33 AM
|
#7 |
|
Ocean Warrior
Join Date: Sep 2008
Location: Notify command we have entered the Grass Sea
Posts: 2,822
Downloads: 813
Uploads: 0
|
I was successful with one our to six shots at very long range using the Solution Solver with an AoB of 80 degress as a huge liner was moving away. I hit one out of six. The hard part is setting the precise angle on the Solution Solver when at long range. The target was doing 12.5 kts. The firing angle, therefore is based upon the average of the firing angles at 12 and 13 kts., as the Solution Solver does not calculate based upon fractions of kts. At long range, a slight error in the firing angle can result in a miss. At night, if you rely on the target crossing the wire when you hear the radioman call out the range, you will have to have a decent spread of torpedoes to hit the target. If the firing angle is 344.5 degrees, you will probably fire when the radioman calls out the target's bearing is 344 degrees. You will have to have a spread to have a hit at long range. You may not miss by much, but a miss is what it may likely be.
|
|
|
|
|
12-05-09, 03:57 PM
|
#8 | |
|
Ocean Warrior
Join Date: Jan 2008
Posts: 2,909
Downloads: 77
Uploads: 11
|
Quote:
In game of course, it doesn't help that all ships have magic brakes and ultra powerful engines for instant acceleration. That tends to spoil a lot of perfectly good shots.
__________________
-------------------------------- This space left intentionally blank. |
|
|
|
|
 |
|
|


 Hybrid Mode
