
|
|
SUBSIM: The Web's #1 resource for all submarine & naval simulations since 1997
|
SUBSIM: The Web's #1 resource for all submarine & naval simulations since 1997 |
 10-12-10, 02:54 AM
|
#1 |
|
Rear Admiral
 
Join Date: May 2005
Posts: 12,987
Downloads: 67
Uploads: 2
|
This is liable to be the last tutorial i ever write. Not that i wrote many to begin with, im just at the point where i dislike opening game files. Id much rather be shooting zombies in L4D or something. Took me a couple beers just to get the motivation to do this.
 So then, how does one render crewman in the interiors? I'll take this step by step, with pictures, since a pic is worth a 1000 words, and i hate typing. Step 1: Make a template:  What i did here? - I took a conning tower dat file, and renamed it to template - I took the two nodes associated with a crewman, and removed the parent/child relationship it had with the root node. - I deleted EVERYTHING else from the dat file. - I renamed the nodes to what you see there. - I renamapped the ID's, so the nodes aren't duplicate. - I zeroed out the nodes position because The whole idea of this, is to make it easier for myself to create new 3d crewman next go around. Step 2: Character name  Name it same as the node. Not the Dummy node, the first node. Step 3: Assign the animation graph 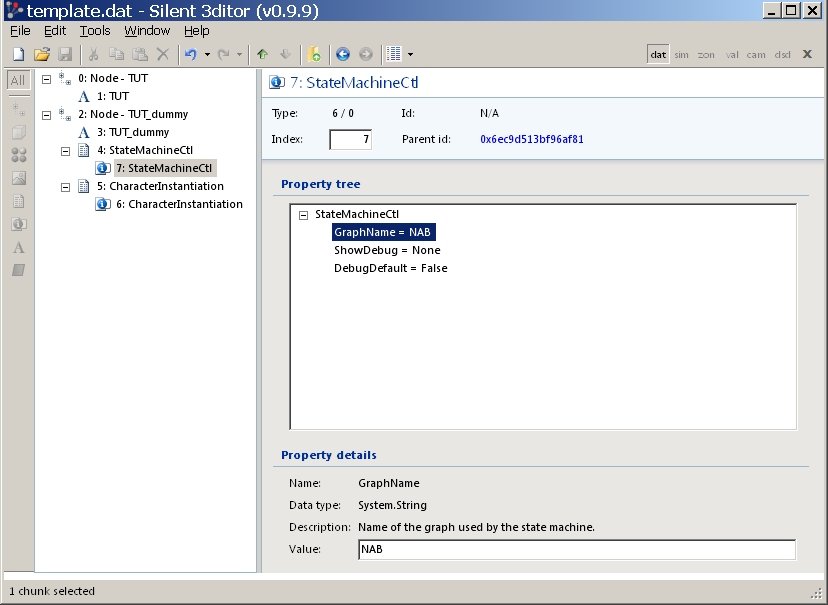 Note that NAB is assigned. What exactly is NAB, where does it come from? It comes from here: 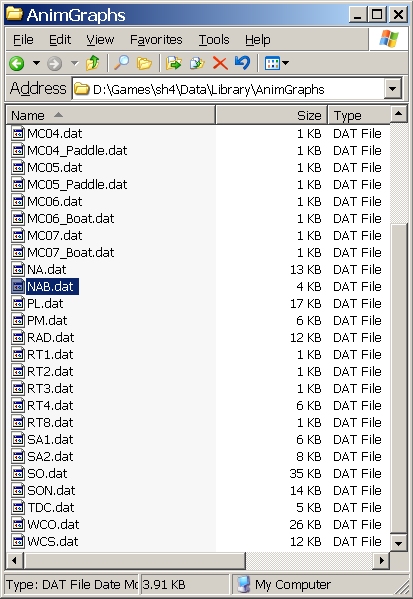 So what exactly is in that file?  The contents of this rather powerful file, is a tutorial in itself. Which i am not covering in this tutorial. The gist is it controls what animations are played, and when. You can dictate speech, response to orders, etc. For the purposes of this tutorial, all you need to know is where the name of the graph is being assigned. If you want to duplicate a graph for whatever reason, you'll need to copy the file, rename it, assign a new graph name, and remap the controller ID. For the purposes of this tutorial, i decided to use a Uboat crewman graph. The navigator to be exact. 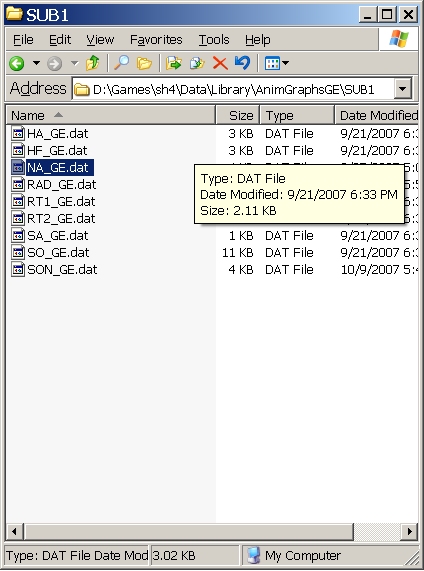 For what I have i mind on adding a new crewman, it just might work. So im going to use this graph, instead of NAB. Step 4: Inserting the template node into an interior dat. 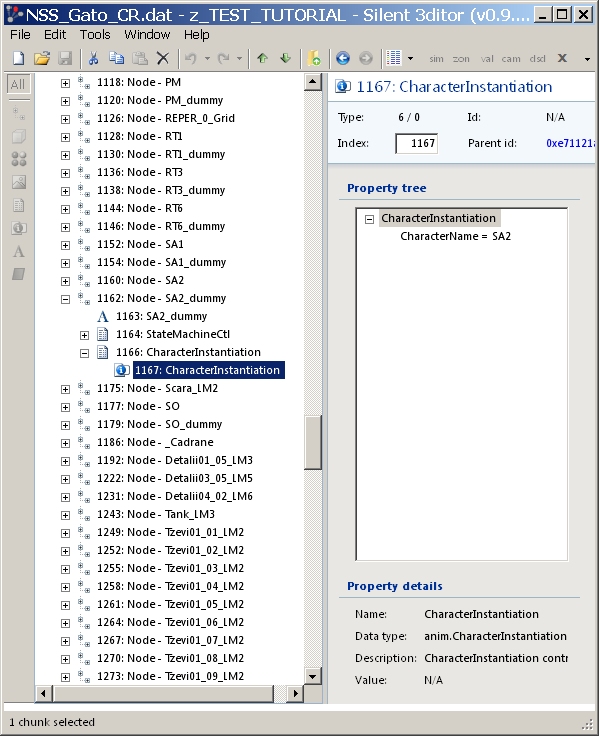 The reason i wanted to try the german navigator crewman graph, is because I want to place a new crewman at the table in the rear of the control room of a gato.. since the place is currently unoccupied. What i want you to note in this picture is placement. With the item i have highlighted in this picture, what i did there, was - right click - insert dat file. Whenever you insert a dat file, it takes the index number of the item preceeding it. Since I want my new nodes to appear right after this crew node, i must insert my new nodes, directly after the existing ones so the index order is correct. (this is important) Once i have inserted my new nodes, i then assign them the parent ID of the interior root node. My new nodes, then fall into the correct place, right where i want them, as illustrated in the following picture 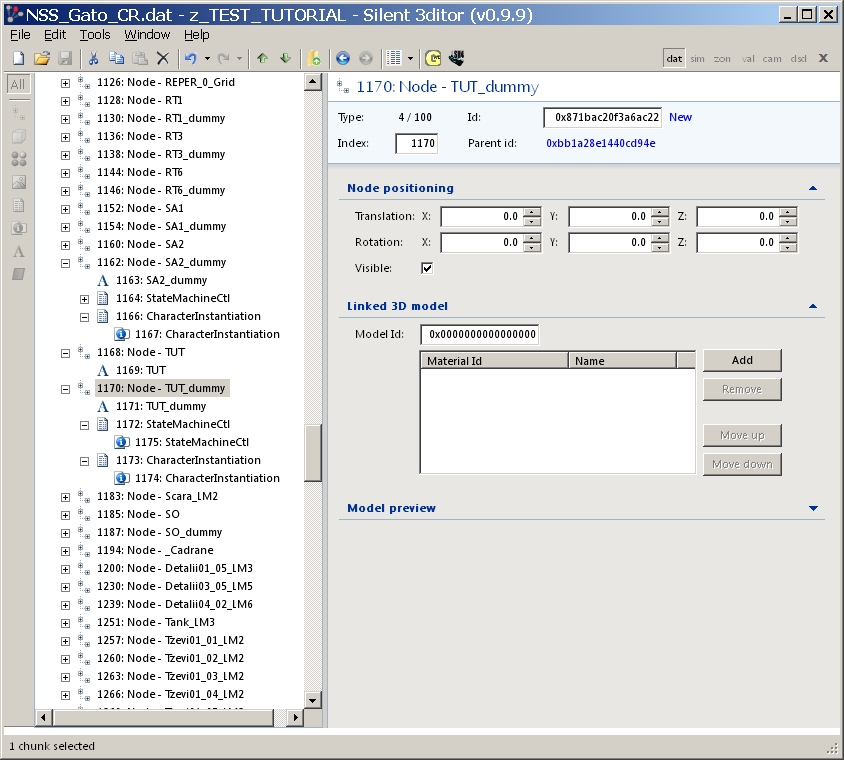 Step 5: Placing the node in 3d 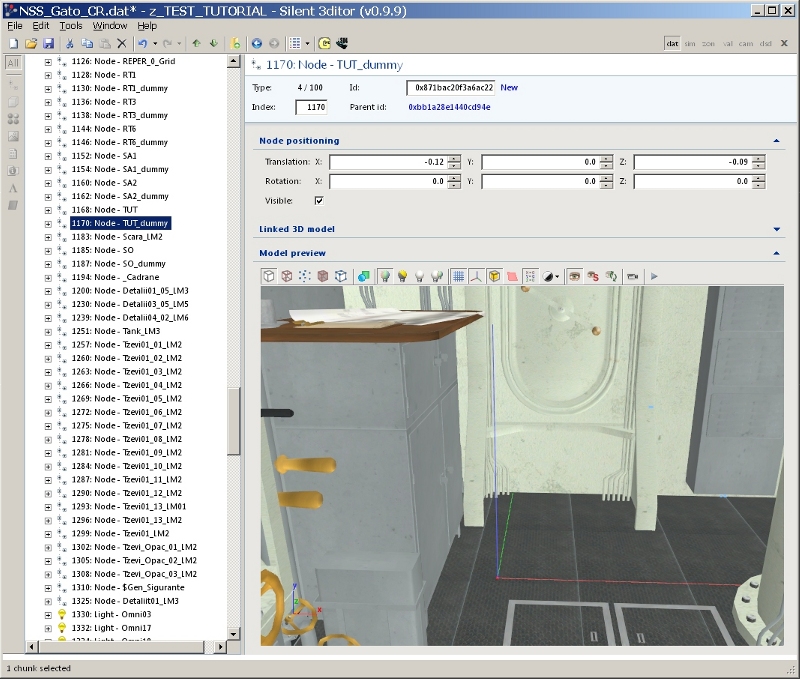 Now that ive inserted the new crewman nodes into the dat file in the proper index order, i need to place them in proper 3d location. S3D makes this easy for the most part. Some trial and error is still involved because the node orientation will change based on the animations within the graph file.. But considering I want this crewman standing next to this table... this looks like a good place to start. Step 6: Assigning a crewman to the 3d location Just because i created a new 3d crewman node in the interior, doesn't mean he will appear. You must assign a crewman to the node. Since im working with the gato, i just scrolled down in the gato UPC file, tell i found some crewman who were not assigned to any 3d location. Node highlighted section. Also note battle station section right below it (more on that later) 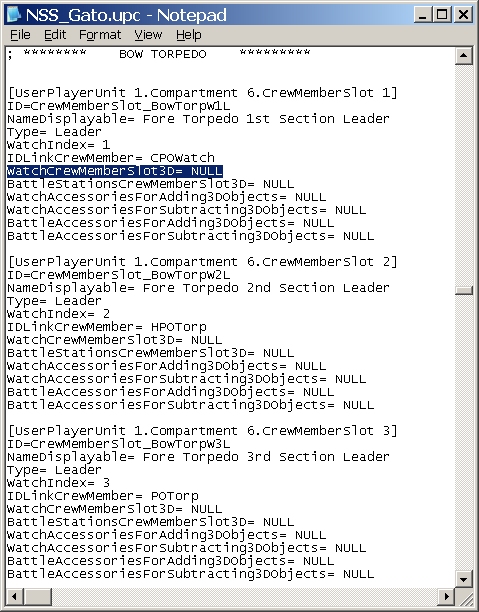 (*note: where a crewman appears in 3d, isn't limited to what compartment he resides in in the UPC file) Now, remember what i named that crewman node in the dat file? The naming syntax the game seems to use is -Name -Name_dummy Since it's the dummy note that has the instantiation controller, that is the node we assign in the UPC file. 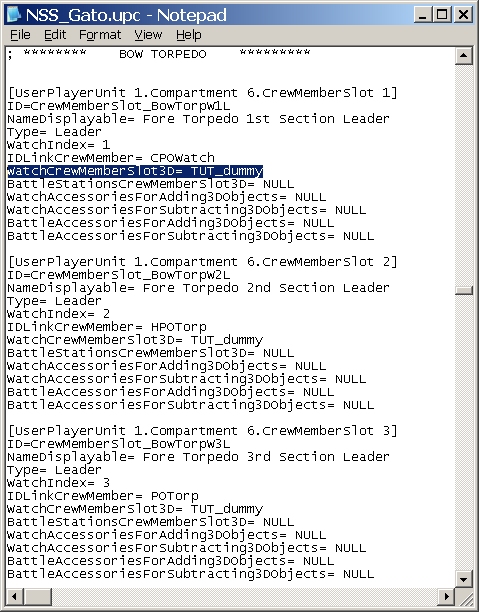 Save the file.... and lets fire this baby up in Sh4 and see what we got here.... 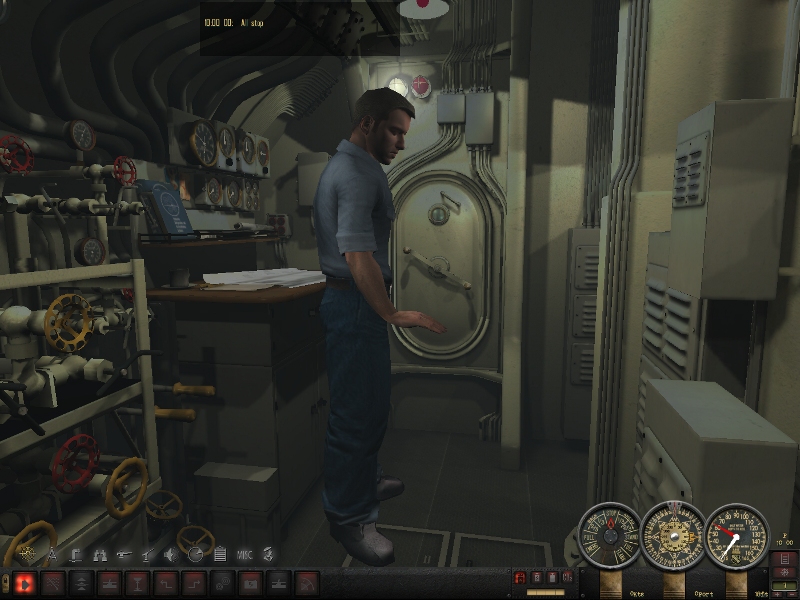 Hmmm, wrong way. Remember, the node position will vary depending on the orientation of the animation contained within the graph file your using for this crewman position. Soo, time to quit the game. Disable our WIP/test modlet, load the interior up in S3D and make our adjustments. In this case, im going to rotate this dude 180 degrees. (comes out to about -3.14 on the Y axis if i remember right). Which gave me this....  Well, damn. Doesn't that suck? His hand is too low. I could raise him up, so the hand matched the table, but then his feet would be 8 inch's off the floor. So, the german navigtor animation is unusable here. Which brings up a point. Your limited to what animations already exist. Unless you know how to edit existing animations (I don't, and neither does S3D), your just going to have to be creative on what animations you use, and where. (See examples of "creative usage" of existing animations here http://www.subsim.com/radioroom/show...&postcount=121 ) Now for the most part, this tutorial is done. I just explained how to get a crewman to display on a watch rotation. But that's the problem, currently this crewman only displays on watch rotations, but what about battle stations? Now if you refer back up to step 6, i could easily assign one of the three watch leaders the same TUT_dummy node while at battle stations. But, i wanted to illustrate something different. Lets say you want a crewman to completely change posture while at battle stations. To do this, requires the creation of a new set of character nodes. So i went back to my template dat file: 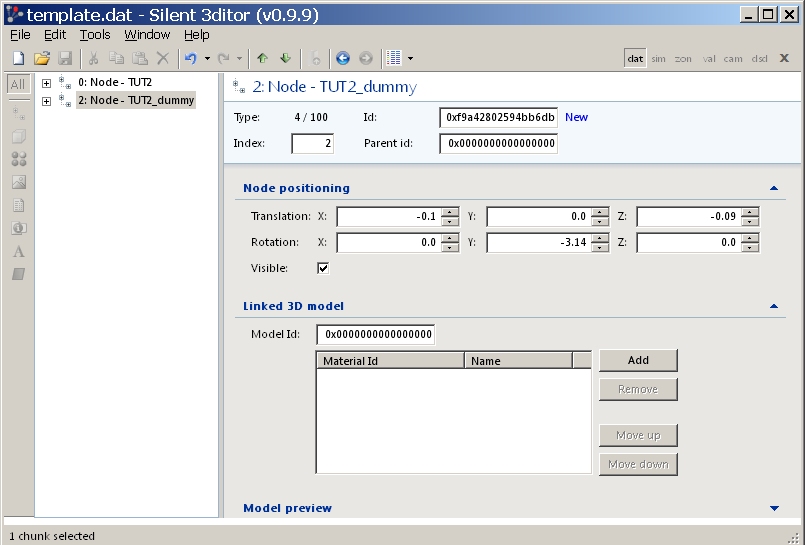 And the first thing i did, was remap all the ID's to avoid duplicates. Then i chose a new name in all places illustrated in step 1, and a new graph file. On a lark, i decided to use one of the commando graph files. Also, i used the same 3d coordinates on this node, as the original tut node, since I had an idea on where i wanted this crewman to appear. I then inserted this set of nodes, in the same manner as described in step 4. Only i put them in so their index order was after the original tut_dummy node. I then went back and assigned this new node, to the battlestations portion of the same block of code in the UPC file. 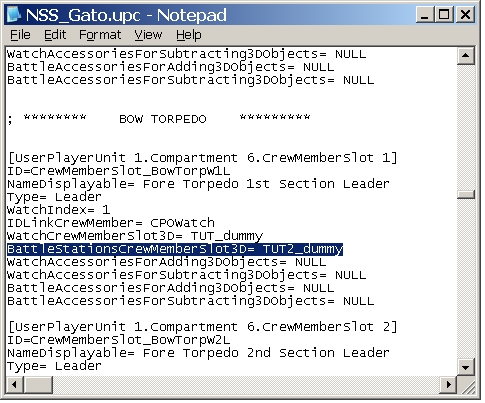 So now, when i call battle stations, the crewman goes from his stance as dictated by the german navigator graph that wasn't quite working out for me, to this: 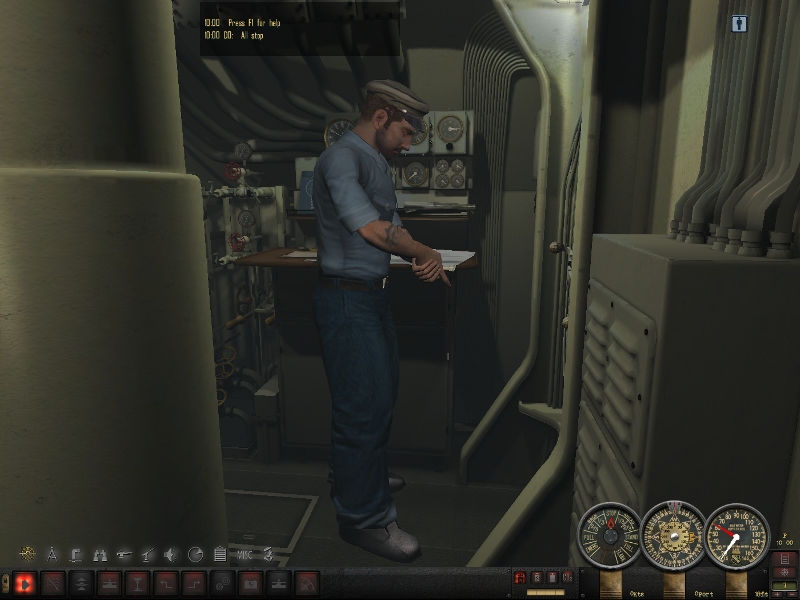 Hmmm, somethings missing here, no?  Back to the UPC file! 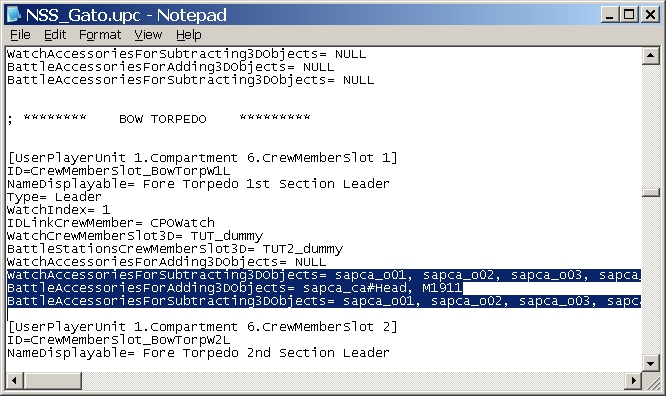 One thing i learned, is that if you want a crewman to wear a helmet, you must subtract every individual hat. Global commands won't work here. You must list, every single individual hat that crewman can wear. Whats a global command? Note the "Sapca_CA#head" Each hat is numbered. the #head means, "include all of them", since not all hats fit all head models. Why global works for adding items and not subtracting items i have no idea. Also note, that you can add more then one 3d accessory. These parameters are not limited to one argument. You can place several, or subtract several. One thing to note about helmets. You have to subtract all possible hat combinations. So whenever a crewman is assigned this node, his hat goes away, and the only possible thing he can wear on his head, is the helmet, and its either on during battle stations, or off during normal watch. If you don't, you'll get clipping issues as the crewman tries to wear both. As illustrated here. So what did i get with all of this? This! 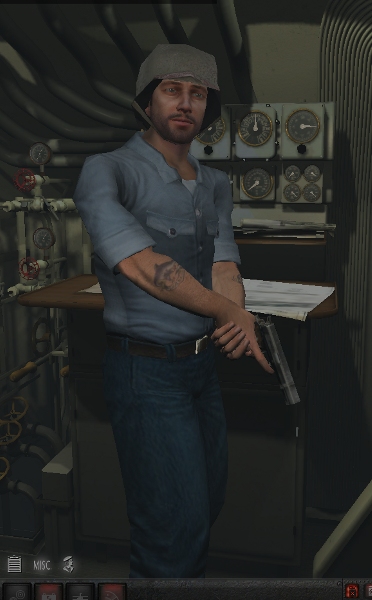 Pretty cool huh? And that gents, concludes this tutorial. Hopefully the pictures loaded for you, and I don't have any major grammatical errors making it hard to understand what im trying to illustrate, or i didn't leave out anything important. *rolls eyes* Last edited by Ducimus; 10-12-10 at 12:57 PM. |

|

|
|
10-12-10, 05:17 AM
|
#2 |
|
Silent Hunter
 Join Date: Feb 2008
Location: Milan Italy
Posts: 4,999
Downloads: 114
Uploads: 18
|
 Ducimus ! Ducimus !
__________________
"Honorable Builder of Sinking Ships" 
|
|
|
|
|
10-12-10, 10:08 AM
|
#3 |
|
Eternal Patrol

 Join Date: Nov 2002
Location: High in the mountains of Utah
Posts: 50,369
Downloads: 745
Uploads: 249


|
Looks good, reads clearly. I didn't understand half of it, but that's my fault. Maybe I'll actually learn something.
__________________
Never do anything you can't take back. Rocky Russo |
|
|
|
|
10-12-10, 10:19 AM
|
#4 |
|
Ace of the Deep
 Join Date: Oct 2006
Posts: 1,151
Downloads: 152
Uploads: 0

|
Beers Rulez!!
 Excellent tutorial! Thanks, Duci! 
|
|
|
|
|
10-12-10, 12:25 PM
|
#5 |
|
Sonar Guy
 Join Date: Apr 2007
Posts: 381
Downloads: 281
Uploads: 0
|
Thank you!!!

|
|
|
|
|
10-12-10, 11:13 PM
|
#6 |
|
Navy Seal
 Join Date: Apr 2009
Location: Florida USA
Posts: 7,121
Downloads: 605
Uploads: 44

|
Ducimus, would it be possible to add the kapok(the dark blue) lifejackets to the deck gun and AA gun crews when alerted, since you put their helmets on them.The gun crews usually wore helmets and the kapok life jackets for battle surface.Would be a neat touch.
|
|
|
|
|
10-13-10, 02:31 PM
|
#7 |
|
Eternal Patrol
Join Date: May 2004
Location: Aeoteroa
Posts: 7,382
Downloads: 223
Uploads: 1
|
Wow! This is a great tutorial.
|
|
|
|
|
10-15-10, 12:34 PM
|
#8 |
|
Grey Wolf
 Join Date: Aug 2005
Posts: 930
Downloads: 23
Uploads: 0
|
....I might actually summon up the nerve to try this, LOL.
On a similar note, I posted this in the Mods forum but will try here; Not sure if this has been asked before. Given that uniforms etc can be modded/improved (as Ducimus has so eloquently indicated here)has anyone looked at adding their own face to a crew member? Is it even possible? Just curious as it would be kinda cool, LOL. i.e. given the pictorial examples above, can the face alone be changed to incorporate a graphic of your own face? Thanks again Ducimus. 
|
|
|
|
|
10-16-10, 01:04 AM
|
#9 | |
|
Silent Hunter
 Join Date: Apr 2005
Posts: 4,709
Downloads: 300
Uploads: 0


|
Quote:
|
|
|
|
|
|
10-16-10, 08:45 PM
|
#10 |
|
Grey Wolf
Join Date: Aug 2005
Posts: 930
Downloads: 23
Uploads: 0
|
roger, tracking. Thanks for the info.
|
|
|
|
|
10-22-10, 10:40 AM
|
#11 |
|
Navy Dude
 Join Date: Jan 2008
Posts: 174
Downloads: 25
Uploads: 0
|
I vote to Sticky this thread
__________________
No Guts....No Glory |
|
|
|
 |
| Thread Tools | |
| Display Modes | |
|
|


 Linear Mode

