Running Silent Hunter On Windows XP
|
This file was graciously donated
to subsowespac.org by Don V. Wells, Jr., for the benefit of all
individuals who are seeking a way to run Silent Hunter under Windows
XP. I emphasize that this web page and all of its contents are the
property of Mr. Wells. None of the graphics or information appearing in
this web page may be reproduced without his prior consent.
Don has used the procedures
described below to get Silent Hunter running successfully under Windows
XP on two PC's. He has requested the assistance of our community in
evaluating these "beta" procedures and in helping him to fine tune
them. If you decide to give it a try, please use our
ezboard Forum to
provide feedback to Don on how it worked for you and what problems, if
any, you encountered. Hondo will also publish this information on
BattleBelow.com, and I think we both feel that this effort will possibly
prevent Silent Hunter from becoming obsolete as users inevitably upgrade
their PC's and operating systems.
I wish to convey my sincere thanks
to Don for allowing me to publish this information, and for allowing us
to help him to evaluate these procedures.
Ed Howard
|
Silent Hunter
(SSI)
Installation and Operation under Windows XP (SP1)
by
dvwjr
Version 1.0
December 7th, 2002
Background:
Silent Hunter is a still very popular Microsoft DOS 5.0+ (DPMI)
based WWII submarine simulation/game marketed in the mid-1990s by the
now-defunct SSI. Since the release of Windows XP in the third quarter
of 2001, many owners of this game have been attempting to make it function
directly under the Microsoft Windows XP Operating System, usually
with little success. Therefore, the typical solution to this failure was to
create a dual-booted (multi-OS) PC, with either some previous version
of DOS or Win95/98/ME used to execute the Silent Hunter simulation.
In many cases modern video and sound adapters have driver issues for DOS or
Win95/98/ME which may cause problems. This HTML document will attempt to
bore you to death with a little technical background detail before providing
overly detailed instructions about configuring both Windows XP (SP1) and
Silent Hunter to allow it to operate just as any other application under
the Microsoft Windows XP (SP1) operating system.
Previous efforts to run Silent Hunter "under" Windows XP:
Eric Hrogard came
up with a method titled "How to run SH on Win XP" which utilizes an
MS-DOS floppy bootdisk created by the Windows XP "Format a boot disk"
option in the Drive A: right-click context menu. This method of operating
Silent Hunter on PCs with Windows XP installed uses the Windows XP
created floppy bootdisk which is actually the internal DOS version 8.0 from
Windows ME, and this DOS 8.0 understands FAT32/FAT16 disk partition
structures. This DOS 8.0 bootdisk is used to access either FAT16 or FAT32
partitions, but not NTFS partitions that are only accessible when Windows XP
is loaded. If your PC hard disk does not have either FAT32 or FAT16
partitions, but only the default Windows XP NTFS partition(s), then this DOS
8.0 bootdisk method will not permit the execution of Silent
Hunter, since even DOS 8.0 cannot "see" NTFS partitions without
the use of additional third-party NTFS DOS disk drivers.
This method just uses a modern WinXP PC as a very fast, somewhat
incompatible DOS 8.0 based dedicated game PC accessing FAT32/FAT16
partitions which might contain Silent Hunter. Basically, boot the
WinXP created floppy with its DOS 8.0; add in the required DOS device
drivers for the mouse, sound card, and VESA support if the BIOS in the video
card does not provide such support natively. The user must then deal with
maintaining enough memory below 640 KB to allow the game to execute. Next,
revisit all the device driver and TSR configuration issues from the DOS
"Config.sys" and "Autoexec.bat" files to properly configure the
real DOS environment to allow the proper execution of Silent Hunter.
Probably the biggest technical issue is the fact that most modern-day PCI
audio cards do not directly support the SoundBlaster-style hardware
interfaces for which the older DOS games had relatively hard-coded
references or sometimes a somewhat more flexible access via sound
configuration files. Sometimes "bridge" or "wrapper" DOS
drivers can be found to try to make the modern day PCI sound-cards try to
emulate the older sound-card hardware interfaces required by most older DOS
based games when operating under DOS or the DOS environment provided by
Win95/98/ME.
Of course, while booting the WinXP capable PC with just DOS (DOS 8.0
at that!) you loose all access to the flexibility that Windows XP
provides in the first place, a real operating system which provides
multi-tasking, concurrent access to all of the applications on your WinXP
based PC, and good backwards compatibility for older DOS/Win applications.
Furthermore, many individuals desire only NTFS partitions for security and
directory/file permission reasons, since FAT32/FAT16 partitions do not
provide such security granularity under Window XP. Why give all of that up
just to play Silent Hunter? What if you wanted to pause the game and
get on the Internet to check out some Silent Hunter websites with
additional scenarios, FAQs, editors, etc. This is at least one DOS-based
game for which you do not have to return to the single-tasking old "DOS
days" of the PC world circa 1981 to 1992 just to play the game on modern
Windows XP capable PC hardware.
Matt Tammen on the "Sub Pac Discussion Board" dated April 29th,
2002 came up with a method which attempted to make Silent Hunter
actually operate under the Windows XP DOS (NTVDM) emulation environment.
Matt did an implementation of the method followed in this document by using
the VDMSound/LaunchPad approach. Matt evidently got the procedure to work on
his PC, probably by skipping over the opening video credits and combat
scenes. Matt had a substantial portion of the procedure correct, it just
needed to be generalized a bit more, so many thanks to he and
Bob Rodgers for the solution to the "slow/sluggish" mouse pointer
for SSI games operating under the Windows XP DOS emulation (NTVDM).
Silent Hunter - Technical Details:
This game is a DOS
DPMI
application, which will execute under operating system environments which
provide version 0.9 (or above) level support. Under DOS this is provided by
a linked-in DOS Extender (DOS/4GW v1.96) which provides a protected
mode environment and the API support for DOS (DPMI) applications. Windows XP
provides v0.9+ level DPMI support for DOS applications operating in its
WinXP DOS emulation NTVDMs. The "DosX.exe" interface/stub NTVDM support file
in Windows XP provides this DPMI support.
Silent Hunter - System Requirements (version 1.0) under DOS:
We know you're anxious to begin SILENT HUNTER, but before you do,
please be sure that your system meets the following minimum system
requirements:
• 486DX/66 MHz IBM PC or compatible • 8 MB of RAM • MS-DOS 5.0 - 6.22 •
An Uncompressed hard drive with 35 MB free for the small install • A 1 MB
SVGA graphics adapter with a color SVGA Monitor (VESA mode 101h) •
A 2X speed CD-ROM drive (350 ms access and 300 KB transfer rate) • A 100%
Microsoft or Logitech compatible mouse • Microsoft mouse driver version
9.0 or higher, or Logitech mouse driver 6.24 or higher
The minimum amount of free base RAM required is:
• 500,000 BYTES OF FREE BASE RAM   (487 KB RAM)
• 6,900,000 BYTES OF FREE XMS    (6,739 KB XMS)
Remember, 1K is equal to 1024 bytes. For example, 500K equals 512,000
bytes. Users with 8 MB systems who have TSR (Terminate and Stay Resident)
files loaded high (including RAM caches such as Smartdrive) may have to
create a boot disk to run SILENT HUNTER. Refer to the "Troubleshooting"
section for more details.
If you get the following error when you begin the game: "Failed to Init
Heap", then you must create a boot disk. (This error means that your
computer doesn't have enough XMS to run the game). NOTE: Hard drive
size and total system memory available have no bearing on free RAM. Follow
the directions in the "To Check Your Free Base RAM" section to determine
if you have enough available memory to run the game.
Source:
Silent Hunter Commanders Edition, Data Book page 1
Silent Hunter - System Requirements (version 1.31) under DOS:
MEMORY ISSUES: Important Note: For those of you with 8 Megabytes
of RAM, when there are many ships, contacts, and weapons being fired, in
other words when things are getting very exciting, some of the sound
effects may not play to conserve memory. Adding new features to Silent
Hunter has made us push the very limits of 8 megabytes. The features added
to Silent Hunter since V1.0 have enhanced the simulation but the result is
that there are now limitations on the functionality and stability of the
game when running with only 8 Megabytes of RAM. It is strongly recommended
that if you play Silent Hunter with large scenarios that you consider
upgrading your system to 16 Megabytes of RAM or more.
Source: ReadMe3.Txt from the (version 1.30/1.31) Silent Hunter updates
Silent Hunter - System Requirements (version 1.31) for Windows XP
(SP1):
• Windows XP
• Service Pack 1 (SP1)*
• Hard disk space available 250 MB
• Mouse, or trackball or pointing device
• CD-ROM drive, or CD-RW drive, or DVD drive
• Sound-card or built-in sound-hardware; speakers
• 128 MB RAM minimum, 256 MB (or higher) RAM preferable
• Video adapter with at least 16mb of on-board video RAM
• Current, stable video drivers for installed video adapter
• Current, stable sound drivers for installed sound card, DirectX 8.1 capable
*Note: Windows XP (SP1) among many other fixes provides a revised NTVDM
documented at
Microsoft Knowledge Base Article - 320694
Given the above requirements, and the current configuration of most WinXP
PCs, the resources provided by Windows XP to the full-screen DOS application
Silent Hunter and any additional required support are as listed below:
• XP processor is more than fast enough for DOS games, by definition
• XP provided memory (DPMI) is more than sufficient in DOS emulation NTVDM
• XP emulated DOS version, NTVDM and DPMI support is OK
• XP large hard drive allows for the 83 MB for a full install
• XP large hard drive allows for an additional 115 MB for the "*.SMK"
files
• XP kernel/Video drivers provide some required VESA 1.2/2.0
support
• XP kernel/NTVDM provides incomplete SoundBlaster emulation on IRQ 5
• XP sound drivers provides NTVDM SoundBlaster emulation with VDMSound
• XP provides NTVDM with emulated DOS CD-ROM support via MSCDEXNT
• XP CD-ROM will not be needed for execution, only installation
• XP mouse pointer in NTVDM will function sluggishly until accelerator TSR
is loaded
"For the first time, DOS support has been given a real boost. While
Windows NT up to 2000 have in fact contained a version of DOS 5 (running
on top of Windows, rather than the vice-versa approach of Win9x), support
for DOS games has been poor - no SoundBlaster support or VESA screen modes
were allowed. This is because Windows NT/2000/XP stop any program from
talking directly to the hardware - meaning you gain a lot of stability at
the expense of compatibility. Third part products have appeared, but these
in effect emulate a SoundBlaster card, meaning you get poor performance.
Windows XP has SoundBlaster emulation built into the NTVDM (NT DOS
Virtual Machine - the part of XP that runs DOS apps), meaning that you get
almost full support for sound in old DOS games. It's not perfect (for
those that care, you don't get OPLx emulation if your sound card doesn't
have an OPLx chip on it, and some DSP functions don't work), but it works
for most things. When used in conjunction with SoundFX NT (the 3rd party
SoundBlaster emulator), you get almost perfect emulation. I expect this
will improve by the final release. Some newer DOS games (such as Duke
Nukem 3D) use VESA, the nearest DOS has to DirectX, for high resolution
graphics. As with SoundBlasters, using VESA requires talking direct to the
graphics card, bypassing Windows. Microsoft have implemented VESA
support in the XP kernel, meaning most DOS games will run flawlessly -
a magnificent feat of engineering. An option has been added to make a
bootable DOS disk (not present in NT up until now), which creates a boot
disk with DOS 8 (from WinME) on it - meaning you actually get 2 versions
of DOS with Windows XP!"
Source:
DooYoo, Computers, "Microsoft Windows XP (Whistler)" by Retron, dated
08/01/2001.
Well, not all DOS games run, though XP does have limited VESA
bank-select mode support that NT4 and Win2K do not have...
Silent Hunter - Windows XP (SP1) Installation:
IMPORTANT! All of the following directions for the installation of
Silent Hunter and the required support files must be done as the
Windows XP (SP1) local User ID "Administrator". Let me repeat, all
the directions which follow must be done as the Windows XP (SP1) local User
ID "Administrator". Not some self created local User ID "Admin", or
some other local User ID with Administrator privileges. The one local User
ID put in place by Microsoft upon the installation of Window XP, the User ID
"Administrator". Those familiar with Windows XP (SP1) will not have a
problem logging in with that User ID, and will have a problem with the
length of these instructions. Those less familiar might respond that there
is no such ID displayed on the "Welcome" screen, and will need every
step of these instructions. Perform a "CTL-ALT-DEL-DEL" keystroke
sequence at the "Welcome" screen to bring up a more traditional
'Logon' Window where the local User ID "Administrator" and its
associated password may be entered.
To allow for the proper installation of Silent Hunter the correct
NTVDM environment must be configured to ensure a successful effort. The
installation DOS emulation environment (NTVDM) will not be the
same one used to actually execute the Silent Hunter program
executable. However, without this process the only other way to successfully
install Silent Hunter would be to install under a real copy of DOS in
a FAT16/FAT32 disk environment, and copy the resultant installed
files/structure to the WinXP NTFS file system. Since many individuals no
longer have easy access to DOS, a DOS FAT16/FAT32 partition, or a second PC,
the following installation method will avoid such measures being necessary.
STEP One: Create the Installation NTVDM:
These installation instructions require that all of the following steps
be performed from the "Administrator" User ID. After the proper
configuration, the execution of Silent Hunter may be done from
Limited User IDs, provided that proper security permissions are granted to
the application and support directories.
From the WinXP desktop, right-click the mouse and perform the "New >
Shortcut" action.
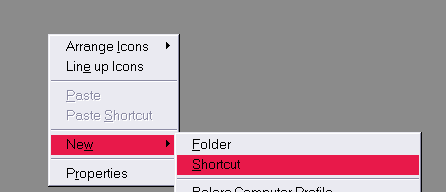
Assuming that Windows XP (SP1) is install on drive "C:" point the
shortcut at the file: "C:\Windows\System32\Command.com" which we
will use to create an NTVDM with the proper settings for a successful
installation of Silent Hunter. Click on the "Next>" button
to continue the shortcut creation process.

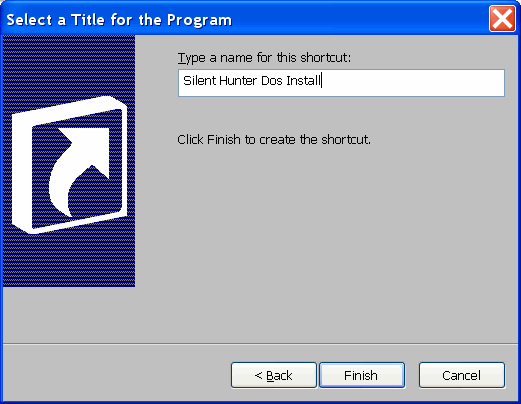
Title the shortcut "Silent Hunter Dos Install" and click the
"Finish" button to create the shortcut and place it on the WinXP
desktop.
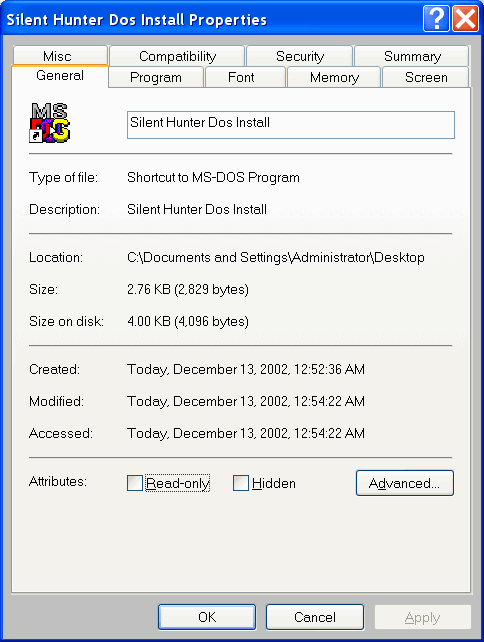
Now 'right-click' on the just created "Silent Hunter Dos Install"
shortcut icon to bring up the context menu, and choose "Properties".
Displayed will be a nine-tab window, with the 'General' tab being
displayed looking something like the one shown below.
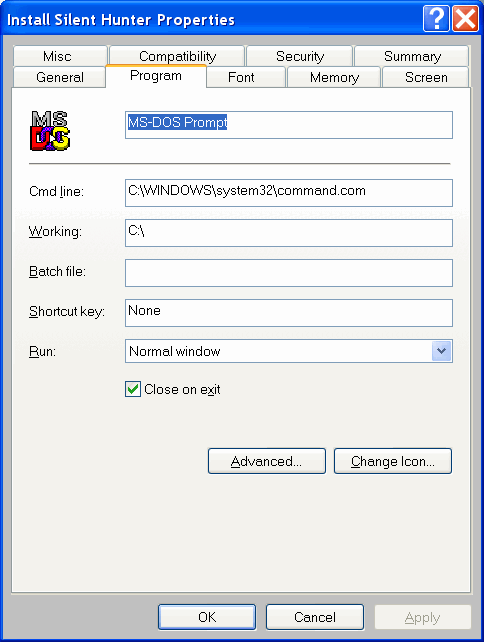
Next choose the 'Program' tab and change it so that it is
identical to the one shown below.
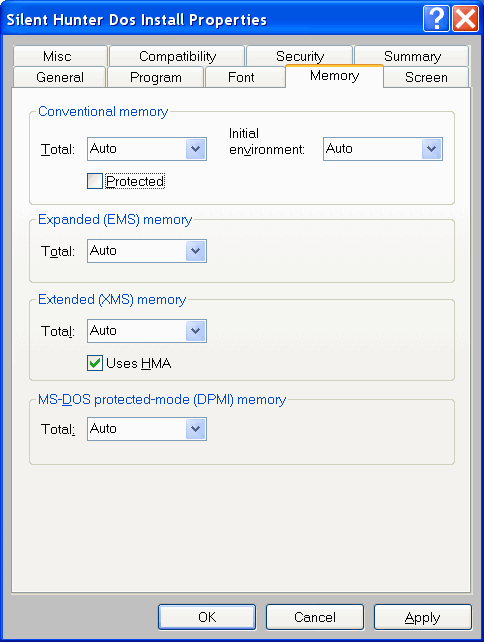
Next choose the 'Memory' tab and change it so that it is
identical to the one shown below.
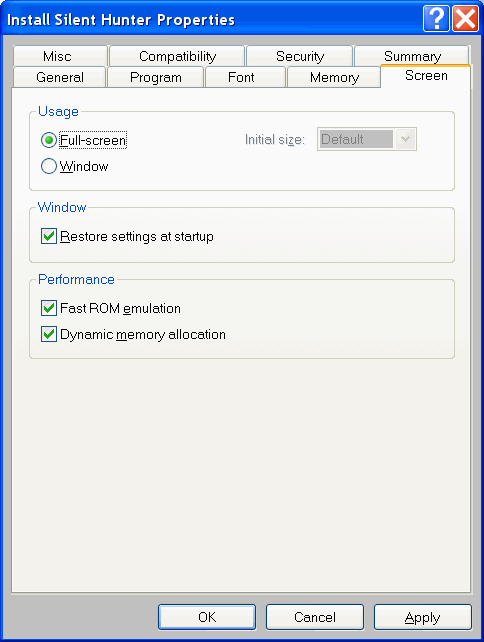
Next choose the 'Screen' tab and change it so that it is
identical to the one shown below.
Now click the "Apply" button, then the "OK" button. The
shortcut has now been properly configured to allow the successful
installation of Silent Hunter from the CD-ROM.
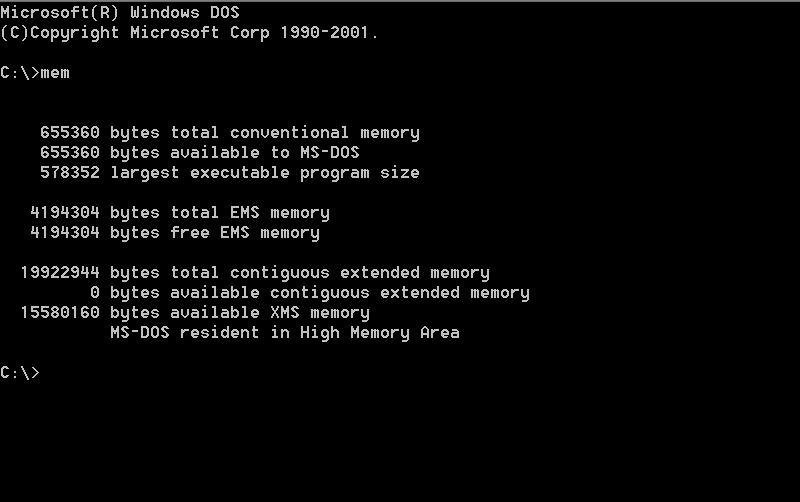
Now 'double-click' on the "Silent Hunter Dos Install" shortcut
icon to start a full-screen DOS NTVDM session that shall be used to
install Silent Hunter. Execute the "Mem.exe" program at the
DOS prompt and the memory information displayed will be similar to that
displayed on the screen shown below.
At this DOS prompt, create the sub-directory "x:\GAMES" where
drive "x:" is the target drive for game installation, as this
directory will be used as the parent directory to which Silent Hunter
will be installed. Failure to create this sub-directory will cause a
failure later during the installation process. The install program is
brain-damaged and will not create any sub-directory except for the
destination directory off the root of the install drive or a pre-existing
sub-directory on that drive.
Next, assuming that Windows XP is installed on your "C:" drive,
create a sub-directory "C:\UTILS". This sub-directory will be used
to contain all of the downloaded files listed in this document, and will
also be referenced as the location for various DOS TSRs that will be used
in the directions which follow. This sub-directory will be a permanent
addition to your WinXP system. Do not delete.
STEP Two: Install the Silent Hunter CD-ROM by using the
just created NTVDM Dos Prompt:
Place the Silent Hunter CD-ROM in the CD drive, and at the
"C:\>" prompt change the current drive to that of the CD drive. The next
action is to begin the Silent Hunter installation process with the
following typed in at the command-line prompt:
Install x:
(where 'x:' represents the target drive for the installation)
After typing in the above command and hitting 'Enter', the
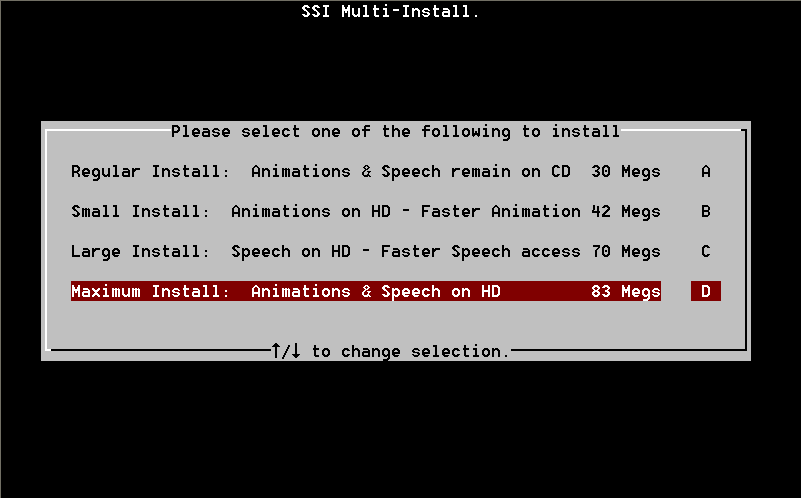
following Silent Hunter installation screen will appear; be sure to
choose the "Maximum Install" option. This will help to completely
eliminate the need for the CD-ROM when playing the game.
Now we arrive at the screen which was the reason for the memory
configuration documented above for the Silent Hunter Install NTVDM
shortcut. The column under the word 'SATISFIED' should have all
'YES' responses to the nine requirements. The DOS based installation
program would typically have a 'NO' response for the requirement
#2, Extended Memory under the default WinXP NTVDM. The DOS era
installation program is looking for 7,000 KB of Extended memory, but does
not use the BIOS supplied Int 15/AH=88h "GET EXTENDED MEMORY SIZE" API
function (which is unreliable with some BIOS) to determine the
amount of Extended memory which is defined as the memory above one
megabyte. The Silent Hunter version 1.0 (DPMI) program actually
needs a minimum of 7,000+ KB of Extended memory to function properly, and
around 15,000 KB for the update version 1.31 (DPMI) executable.
The Silent Hunter installation program takes a different
approach to determine the amount of Extended memory present, it inquires
of any XMS driver present the amount of XMS memory available.
XMS memory
is defined as Extended memory under the control of an XMS memory manager,
typically loaded in the mid-1990s as the DOS device driver "HiMem.Sys".
Windows XP provides an emulated XMS v2.77 memory manager as part of the
NTVDM services. The installation program then equates XMS memory reported
with the Extended memory present (limited to 16 MB) in the PC which
the DPMI executable requires. The DPMI host does not require an XMS
manager to function, it's just that the programmers who wrote the
"System Detection" portion of the installation program took an easy
way out to determine the amount of Extended memory present for use by the
Silent Hunter DPMI executable.
Note #1: There was a joystick attached to the WinXP PC used to test
this configuration document
Note #2: The maximum disk size recognized by the install program is 1
gigabyte (~1023MB)
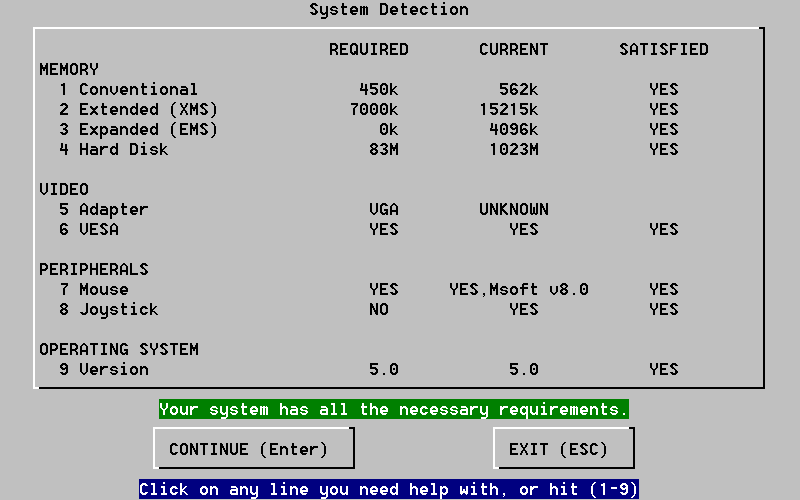
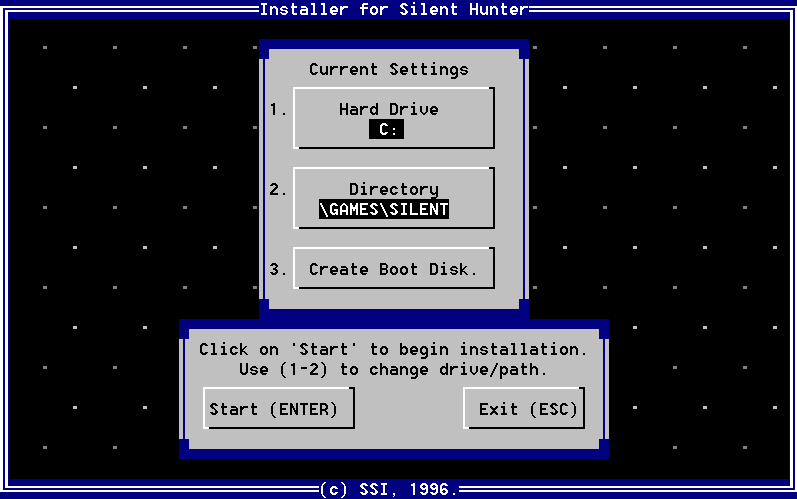
Since all system requirements are met, hit the "Continue" button
and arrive at the screen shown below. Enter the target 'Hard Drive' (on
this screen example I have chosen "C:") and make the 'Directory'
setting the same as show below. Click the "Start" button and the
installation process will begin.
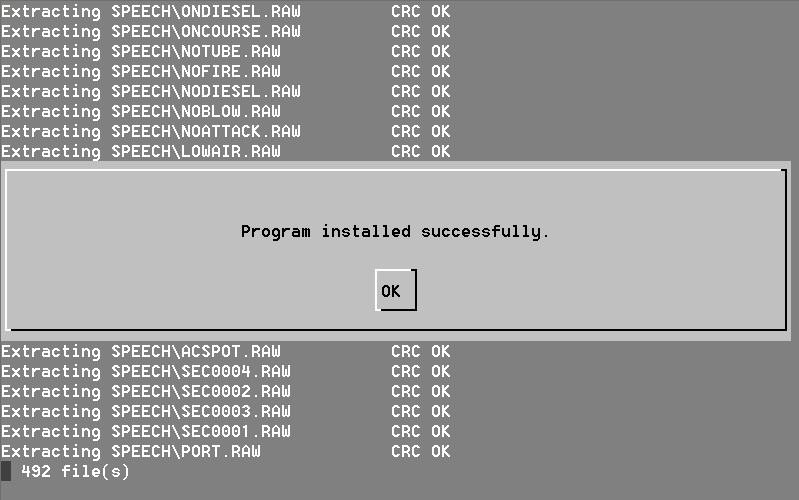
When the installation of the program and data files from the CD-ROM to
the WinXP PC hard disk is complete the following screen will be displayed.
Click the "OK" button to continue the installation and
configuration process.
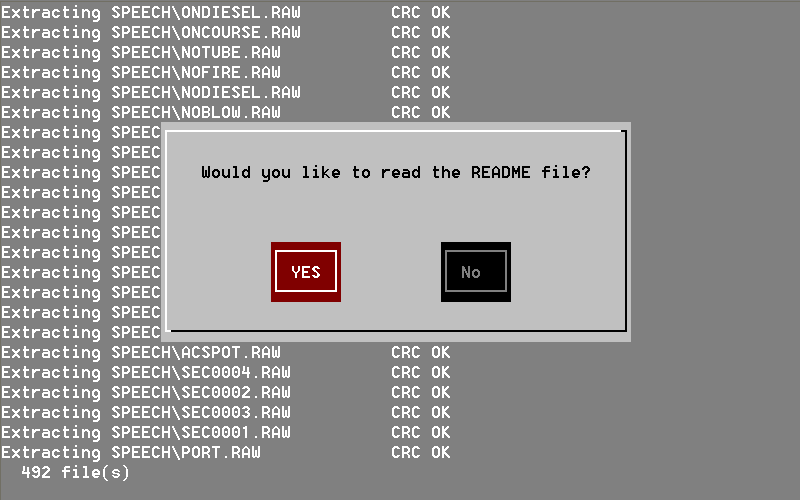
Next, click on "NO" to skip reading of the Readme file.
The installation process now continues with the configuration of the
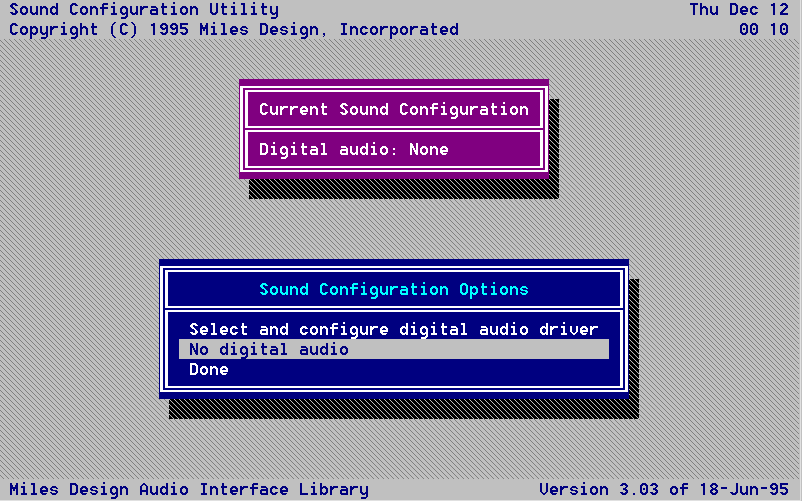
sound card. To allow the successful sound configuration, choose the "No
Digital Audio" option, and then the "Done" option to exit the
sound-card configuration routine. Don't worry, you will have sound when
this entire procedure is completed. The actual sound-card configuration
will be addressed later in this document.
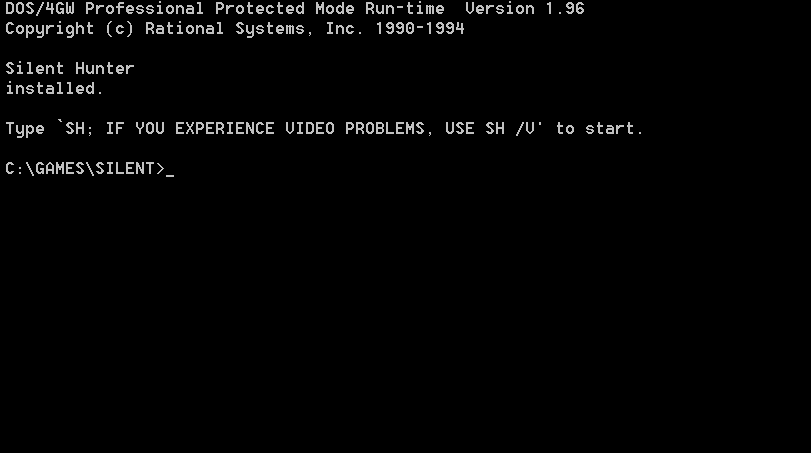
The Silent Hunter installation process will have completed
successfully when the following screen displayed below matches the end of
your installation procedure. Now change this DOS session from
'Full-Screen' to 'Windowed' by the use of the "ALT-HOME" keys. Keep
this DOS window available for use with some of the steps to follow.
End of the Silent Hunter CD-ROM portion of the installation
process.
Remove the Silent Hunter CD-ROM from the Windows XP CD drive. It
will not be needed again except to re-install the game at some future date.
It will not be required in order to execute Silent Hunter from now
on.
Silent Hunter - Update Process:
SubSoWesPac.org
has the following Silent Hunter update files located at its
Downloads page:
After the installation of the game from the Silent Hunter CD-ROM,
apply both of the above updates to bring the software to the last official
release version 1.31 of Silent Hunter. The Commanders Edition of
Silent Hunter should already be at the version 1.31 release level and
should not need to be updated. It is mandatory to perform this update to the
Silent Hunter version 1.31 before attempting to run under the Windows
XP DOS emulation (NTVDM). Only the last issued version 1.31 of the "SH.exe"
executable seem to eliminate all of the sound related problems which will
appear with previous versions of Silent Hunter operating under the
Windows XP DOS emulation (NTVDM).
First, download the above two Silent Hunter update ZIP
files to the "C:\UTILS" sub-directory previously created. Start
with the ~5.3 MB file "SH13.ZIP", unzip it with the unzip tool of
your choice to the sub-directory "C:\UTILS\SH13". You will end up
with two files, but we only care about the 5,592,910 byte file,
SHV13.EXE, which should now be executed. This self-extracting file
will now produce three files, of which we only care about the 5,572,991
byte file, SH13.EXE.
Second, copy the file SH13.EXE alone to the
"x:\GAMES\SILENT" game sub-directory.
Execute the file with the following command-line parameters to make
sure that the update is properly installed.
x:\GAMES\SILENT>SH13 -d -o
(The above command-line parameters are a lowercase letter "d" and
lowercase letter "o".)
This update will overwrite some files, add new files and create two
new sub-directories ".\ALT" and ".\CUSTOM" and update the
SH.EXE program executable to version 1.30 of Silent Hunter.
Third, unzip the 782 KB file "SH131.ZIP" with the unzip
tool of your choice to the sub-directory "C:\UTILS\SH131". You will
end up with two files, but we only care about the file SH131.EXE.
Execute this self-extracting file and you will end up with a single file,
a 1,646,723 byte SH.EXE. This file SH.EXE which should now
be copied to the "x:\GAMES\SILENT" sub-directory thereby
overwriting the existing program file SH.EXE, hence updating the
program executable to version 1.31 of Silent Hunter.
Silent Hunter - Eliminate the CD-ROM Requirement:
The "copy protection" used by Silent Hunter was to require
that the game CD-ROM be inserted into the CD drive for the game to function.
The copy protection 'check' was made by looking for the presence of the
17,028,772 byte file named "10.SMK" in the "\SH\BUD" sub-directory on
the game CD-ROM. The following method eliminates the need for the game
CD-ROM to be present in the CD drive when playing the game:
First, create a sub-directory named "\BUD" in the game
sub-directory on your WinXP hard drive. From our above example, in the
"x:\GAMES\SILENT" location we would now have "x:\GAMES\SILENT\BUD":
Second, now copy all of the "*.SMK" files in the
"\SH\BUD" sub-directory from the game CD-ROM to the above created
"x:\GAMES\SILENT\BUD" sub-directory on your WinXP hard drive. This
will require an additional 115 MB of hard disk space over and above the 83
MB required by the Silent Hunter Maximum Install.
Third, with NOTEPAD edit the file "ShPath.ini" located in
the "x:\GAMES\SILENT" sub-directory to look identical to the below
file configuration:
ShPath.ini file contents:
DATA   =DATA\
ART    =ART\
SFX    =SFX\
SPEECH =SPEECH\
CINES  =CINES\
SCEN   =SCEN\
BUD    =BUD\
SAVE   =SAVE\
You have now eliminated the need to have the game CD-ROM inserted into
your WinXP CD drive when playing Silent Hunter. This will make
execution under WinXP easier, and will not require that the WinXP DOS (NTVDM)
CD-ROM emulation be activated.
Silent Hunter - Sound Configuration Files
It does not matter what type of sound-card is actually installed in the
WinXP PC. The Silent Hunter executable will be dealing with an
emulated SoundBlaster-16, so follow the below directions precisely
and don't overthink the hardware situation.
Create and edit the Silent Hunter sound configuration files "Dig.Ini"
and "Mdi.Ini" in the "x:\GAMES\SILENT" sub-directory by using
NOTEPAD to configure both files to look exactly as the file contents listed
below:
This editing (or cut/paste from below) will result in the same
file contents as would selecting the "Creative Labs Sound Blaster 16 or
AWE32" choice from the SETSOUND.EXE configuration utility program with
the selection of IO address of 220h, IRQ 7, 8-bit DMA channel of 1, 16-bit
DMA channel of 5.
Dig.ini file contents:
;
;Miles Design Audio Interface Library V3.03 of 18-Jun-95
;

DEVICE      Creative Labs Sound Blaster 16 or AWE32
DRIVER      SB16.DIG
IO_ADDR     220h
IRQ         7
DMA_8_BIT   1
DMA_16_BIT  5
Mdi.ini file contents:
;
;Miles Design Audio Interface Library V3.03 of 18-Jun-95
;

DEVICE      Creative Labs Sound Blaster 16 or AWE32
DRIVER      SB16.MDI
IO_ADDR     220h
IRQ         7
DMA_8_BIT   1
DMA_16_BIT  5
Both of the files "Dig.Ini" and "Mdi.Ini" must exist as
configured above in the "x:\GAMES\SILENT" sub-directory for sound to
even function on a Windows XP system. Do not worry that the SB16.MDI
driver listed in the "Mdi.Ini" file does not exist.
Windows XP (SP1) - Applications to download:
Download the following files to the "C:\UTILS" sub-directory
previously created.
What functions the Applications perform:
1: NoLFB - contains "NoLFB.com" TSR (Terminate-Stay-Resident)
DOS program
"Here's the problem with VESA 2.0 running under Windows NT/2K/XP: The
video card BIOS says the linear framebuffer exists, but when DOS
applications try to set this video mode, the application exits with this
error message: "DPMI_mapPhysicalToLinear() failed!". Most people never see
this message because the screen is either black or jumbled at this point.
I don't know why the call fails, but I have a workaround:"
"NoLFB.zip (1351 bytes) A TSR that patches the VESA driver by fooling
DOS programs into thinking the VESA 2.0 linear framebuffer modes aren't
supported."
Source:
Ken Silverman's Build Engine Page VESA 2.0 patch for Windows
NT/2000/XP (09/21/2002).
2: MouseCTL - a TSR which enables greater control over mouse
movement and acceleration
@@MOUSECTL
MOUSECTL Michael J. Mefford
Adjusts mouse sensitivity
Purpose
Provides multiple sensitivity settings for achieving more precise and
smooth control of IBM and Microsoft mice.
Format
MOUSECTL [n ... n | filename | /U]
Remarks
MOUSECTL is a memory-resident utility that can be loaded either at the DOS
prompt or as part of an AUTOEXEC.BAT file. It can be used only with IBM or
Microsoft mouse drivers and must be loaded after either MOUSE.SYS or
MOUSE.COM. MOUSECTL can be deinstalled by entering the command with the /U
switch.
The optional n parameters consist of up to eight "multiplier" values
between 0 and 32767, which are used to modify the mouse sensitivity. The
default values are 5,6,10,15,22,30,50,70. Other values for n may be
entered using either a space or a comma delimiter. The n values are
entered into a look-up table from left to right; if less than 8 numbers
are entered those already in the table remain in force.
The range values represent the number of mickeys (1/200th-inch
increments) the mouse actually moves during its 25-millisecond reporting
period. The multiplier values (n) are divided by 10 and then multiplied by
the range value to determine the adjusted number of mickeys reported to
the application program. For example, an actual motion of 5 mickeys,
multiplied by 0.6 results in 3 mickeys being reported, slowing the mouse
movement to obtain more precise control for drawing. A movement of 30
mickeys in one 25-ms period will be multiplied by 5.0, so that 150 mickeys
will be reported, moving the cursor very rapidly for page scanning.
Note:
Because Microsoft Windows loads its own mouse driver, MOUSECTL cannot be
used with Windows utilities or with programs (such as Pagemaker) that
must, rather than may, be run under Windows.
3: VDMSound (v2.0.4) - provides excellent emulated SoundBlaster
audio support for WinXP NTVDMs
VDMSound is a program that overcomes what has probably been the most
exasperating limitation of DOS boxes since Windows NT -- sound support.
VDMSound is an open, plug-in oriented platform that emulates an MPU-401
interface (for outputting high-quality MIDI music), a SoundBlaster
compatible (SB16, SBPro 2, SB2, SBPro, etc.) implementation (for digital
sound effects and FM/AdLib music), as well as a standard game-port
interface (for playing games with joystick support). In development are
improvements to the existing joystick emulation, and possibly VESA
support.
Unlike all the Win9x SoundBlaster ISA 'legacy' drivers available from a
variety of PCI soundcard manufacturers, VDMSound is not a mere 'wrapper'
or 'bridge' to existing audio hardware. It is a self-contained, 100%
software emulation program that is completely independent of your audio
hardware type and settings. VDMSound works with any soundcard, and will
even work on computers that have no audio hardware at all (for instance,
instead of outputting sounds through your soundcard using the standard
Windows drivers, VDMSound can easily output them to disk).
Source: VDMSound
website, About Information
4: VDMSound Update 1 - provides updated code to VDMSound v2.0.4
What's new:
- SoundBlaster emulation now includes support for 4-bit ADPCM (fixes
"Populous 2", "Nightmare 3D", etc.)
- DirectSound module no longer crashes with an exception when sample rates
change frequently (fixes "Dune 2")
- VDMServices module now makes an undocumented system call to get around
the PUSHF/CLI/POPF problem (fixes "Doom", "Doom 2", "Duke 3D", "Heretic",
"Hexen", "Rise of the Triad", "Wacky Wheels", etc.).
!! This works under Windows XP only -- for NT4 and Windows 2000 use
Cli2Nop
- AdLib module now includes new and improved OPL2 synthesis code from
MAME's Jarek Burczynski (fixes "Gunship 2000", "The FM Sounds Editor",
"Adlib Tracker", etc.)
- Optional Disney SoundSource (and other parallel-port soundcards)
emulation, can be enabled by uncommenting the corresponding sections at
the end of VDMS.INI or, if using LaunchPad, by pasting the uncommented
sections into the "Custom Configuration" field under "Advanced
Properties", under "Troubleshooting" (fixes "Star Control II", "Another
World", "Ween the Profecy").
You need to register EmuPPDAC.dll first (type the following at the
command prompt: regsvr32 "%VDMSPath%\EmuPPDAC.dll").
Games that use parallel-port soundcards or the soundblaster direct-dac
mode rely on very high timer frequencies. Windows is unable to emulate
these frequencies properly, and you will most likely experience low
quality, slow sound (10 time slower than desired).
Source: VDMSound.2.0.4.update1.zip - Changes.txt file
5: VDMSound LaunchPad (v1.0.0.7) - WinXP GUI shell extensions for
VDMSound shortcuts
What does it do?
It extends the Windows shell in the following way:
- Adds notion of "VDMSound shortcuts" which behave like regular shortcuts
and can be fully customized like .pif files, but much better, since in the
"Properties" box you now have VDMSound emulation settings to play with as
well.
- "Run with VDMS" for .com/.bat/exe files with new behaviour; it lets
you automatically create VDMSound shortcuts in pretty much the same way
Windows lets you create .pif files from .exe/.com files.
Source: VDMSLaunchPad.v1.0.0.7.zip - Readme.txt file
6: VDMSound SpeedSet (v1.0.2) - TSR/DLL provides control over INT
08h interrupt rate in WinXP NTVDM
Behold! The new (and otherwise much improved) SPEEDSET. Now written in
assembly from scratch, SPEEDSET takes up a measely 1280 bytes of memory.
It also allows for infinitely fine granularity (well, at least 0,000015
granularity) for infinitely fine control over speed.
*******************
"The value you gove to SPEEDSET 1.0.1 is the number of "extra"
interrupts per millisecond. SPEEDSET then spreads them out, computing the
"ideal" interrupt rate, rounding it down to the closes millisecond period
(closest kHz value). So every period the DOS stub will generate a number
of INT8 (timer IRQs), which will vary up and down (+/- 1) as to achieve an
accurate overall "interrupts per millisecond" value."
Source: VOGONS
web site
Windows XP (SP1) - Installation of Applications downloaded
UnZip the downloaded files to the named sub-directories:
• Unzip all files in "NoLFB.ZIP" to "C:\UTILS\Nolfb"
• Unzip all files in "SpeedSet.v1.0.2.ZIP" to "C:\UTILS\Speedset.v1.0.2"
• Unzip all files in "VDMSLaunchPad.v1.0.0.7.ZIP" to "C:\UTILS\VDMSLaunchPad.v1.0.0.7"
• Unzip all files in "VDMSound.2.0.4.update1.ZIP" to "C:\UTILS\VDMSound.2.0.4.update1"
Copy the following files to the stated destination:
• Copy "C:\UTILS\NoLFB\NoLFB.com" to "C:\UTILS"
• Copy "C:\UTILS\Speedset\Speedset.exe" to "C:\UTILS"
• Copy "C:\UTILS\Speedset\Speedset.dll" to "C:\UTILS"
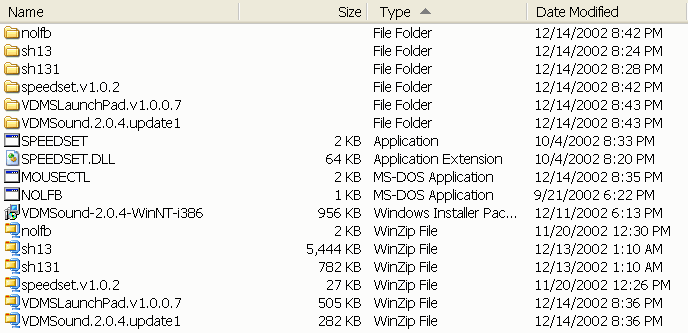
The contents of the "C:\UTILS" sub-directory should now look
something like that displayed below:
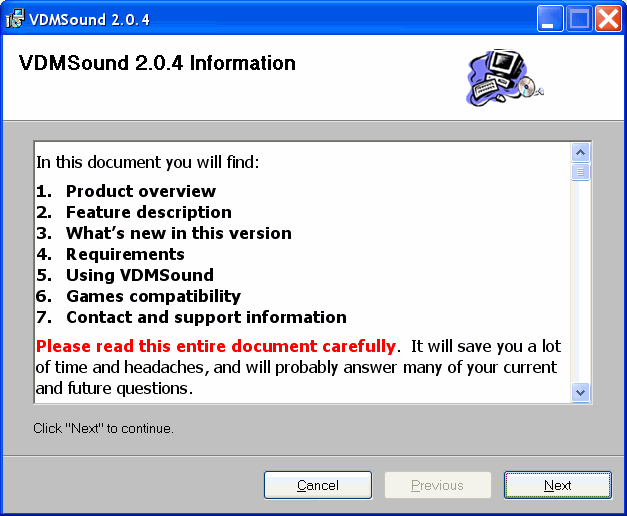
Install VDMSound version 2.0.4
'Double-click' on the file "VDMSound-2.0.4-WinNT-i386", which is
a Microsoft Windows Installer package located in the "C:\UTILS"
sub-directory to begin the VDMSound 2.0.4 Setup Wizard.
Click the "Next" button to continue.
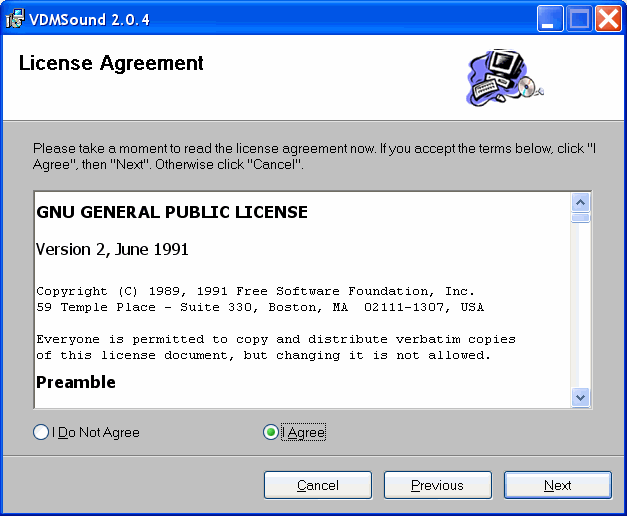
Agree to the License and click the "Next" button to continue.
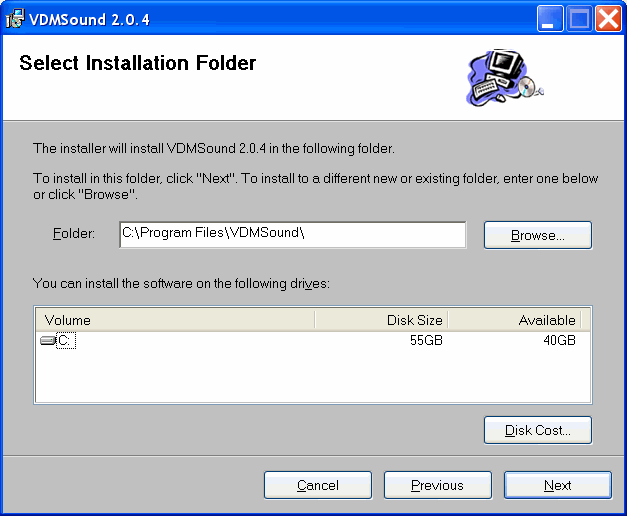
This example assumes that Windows XP (SP1) is installed on drive
"C:", and that the VDMSound application will be installed to above
listed sub-directory.
Looks like everything is OK, so click the "Next" button to
continue.
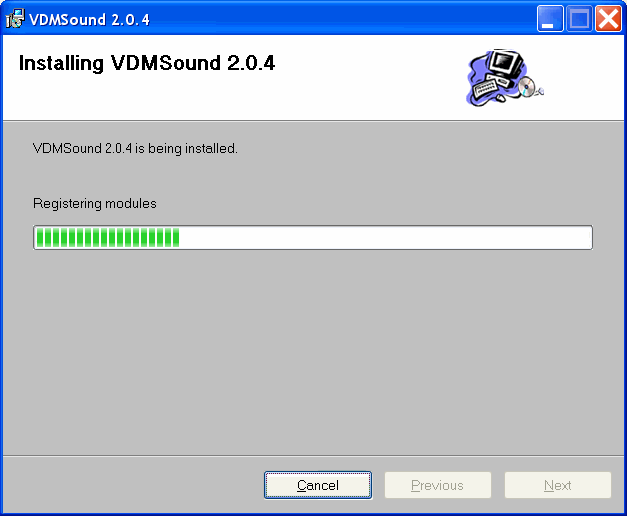
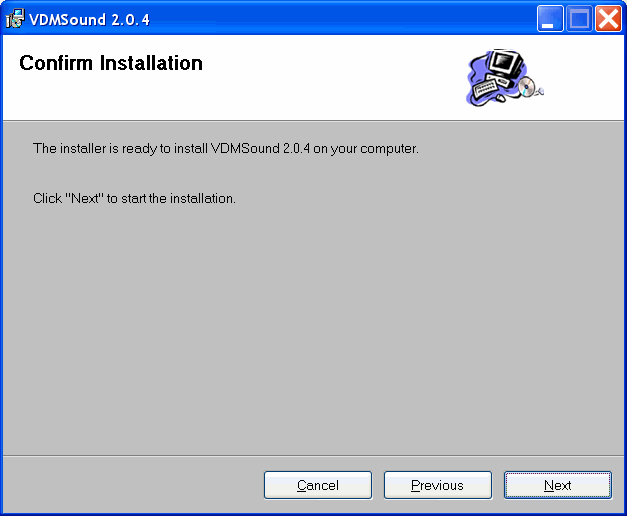
The installation commences...
Read it if you wish, click on the "Next" button when you are
ready to continue.
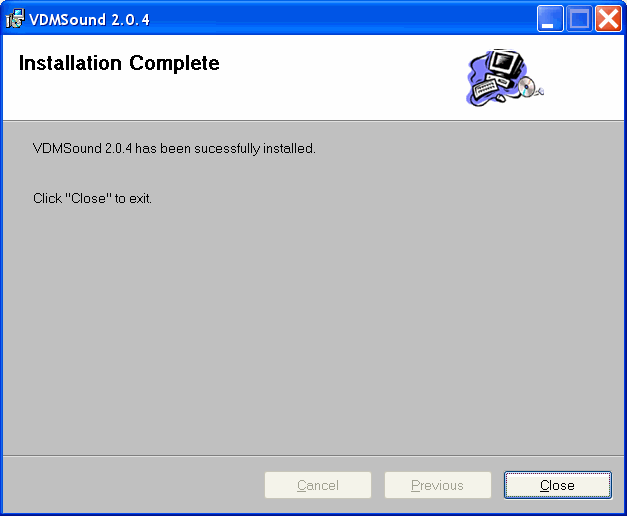
Looks as if it was a successful installation, click on the "Close"
button to finish.
Install the VDMSound version 2.0.4 Update1
• Copy the 19 files from the "C:\UTILS\VDMSound.2.0.4.update1"
sub-directory to the VDMSound sub-directory located at "C:\Program
Files\VDMSound". The 19 files thus copied will overwrite or add to the
files in the VDMSound sub-directory. This completes the VDMSound version
2.0.4 update1 process.
Install the VDMSound LaunchPad v1.0.0.7 Shell Extension
application
• Copy the two files "Install.bat" and "LaunchPad.dll"
from the "C:\UTILS\VDMSLaunchPad.v1.0.0.7" sub-directory to the
VDMSound program location "C:\Program Files\VDMSound".
• From the "C:\Program Files\VDMSound" sub-directory execute the
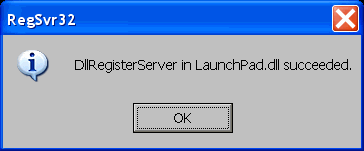
"Install.bat" file.
• If successful, the following message window will be displayed. Click
"OK" to continue.
Create and install a registry fix for VDMSound v2.0.4 update1
• Use NOTEPAD to create the file "HKCU_Software_Freeware_VDMSound_Fix.reg"
in the sub-directory "C:\UTILS". This file may be created by a
cut-and-paste of the six text lines delimited below:
REGEDIT4

[HKEY_CURRENT_USER\Software\Freeware\VDMSound]
"NextTip"=dword:00000000
"TipsFile"="C:\\Program Files\\VDMSound\\VDMSound.tips"
"ShowTips"=dword:00000000
• Save the file "HKCU_Software_Freeware_VDMSound_Fix.reg".
• Merge the Registry fix by 'double-clicking' the "HKCU_Software_Freeware_VDMSound_Fix"
in the Windows XP Explorer. This should result in the following two
message windows:

Yes we really, really do want to add this information to the
Registry. Click on the "Yes" button.
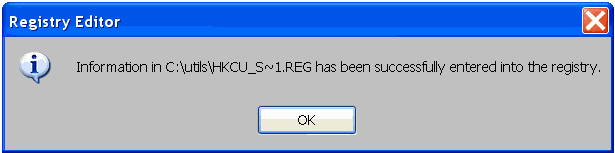
Fine, it's done. Click on "OK".
• This registry fix is for VDMSound v2.0.4 and Update 1 only. It must
be applied to each and every User ID on the Windows XP (SP1) PC. After the
completion of the process outlined in this document, be sure to logon to
each and every User ID and apply this registry fix before
attempting to execute VDMSound LaunchPad shortcuts (VLP files) for
this or any other DOS application. Silent Hunter will not properly
initialize and operate if you forget to apply this important VDMSound
registry 'bug' fix.
Windows XP (SP1) - Silent Hunter VDMSound Configuration
Now on to the configuration of VDMSound v2.0.4 (update1) via the
LaunchPad v1.0.0.7 Windows XP Shell Extension application. Use the Windows
Explorer and transit to the "x:\GAMES\SILENT" sub-directory. In the
following example, drive "C:" is our target drive, so all reference
will be to "C:\GAMES\SILENT". Look for the 'SH' application
and right-click the file name to bring up a context menu as is displayed
below:
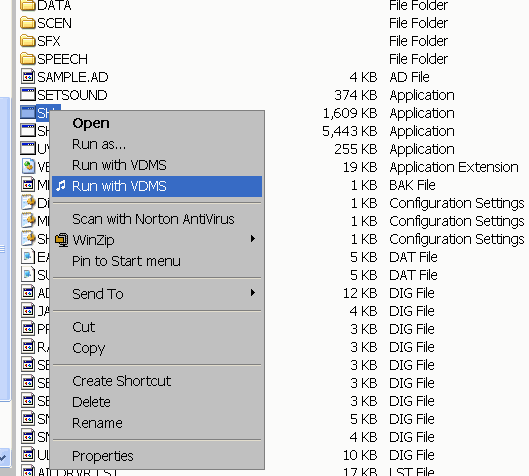
Select the same option as shown above, the "Run with VDMS" which
has the 'musical note' to its immediate left. This selection uses
the LaunchPad shell extension which we require. Do not select the other
'Run with VDMS' option.
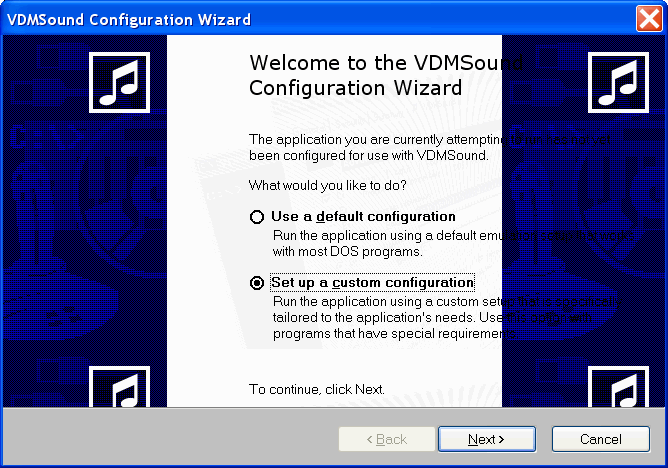
Now that the initial 'Welcome to the VDMSound Configuration Wizard'
window appears, select the 'Setup a custom configuration' selection
and click the "Next" button to continue.
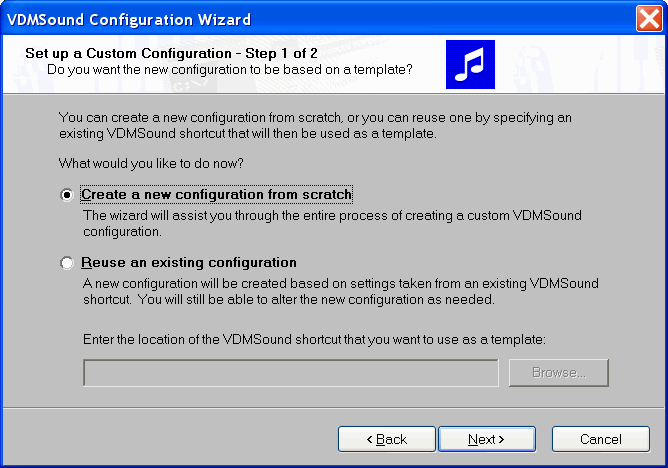
Now select the 'Create a new configuration from scratch' and
click the "Next" button to continue.
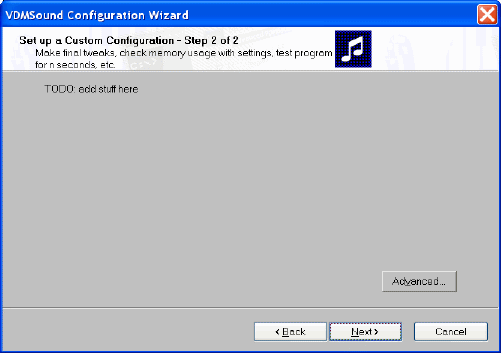
Now click on the "Advanced" button to configure the Silent
Hunter Advanced VDMSound Properties.
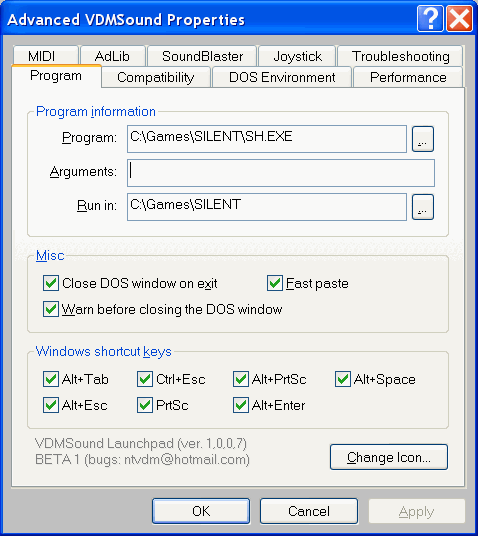
Configure the 'Program' tab to look identical to the one shown
above.
(Remember, in our example we use drive "C:"; use the proper drive for
your system.)
Do not 'click' the OK button until all nine 'tabs' have been
configured.
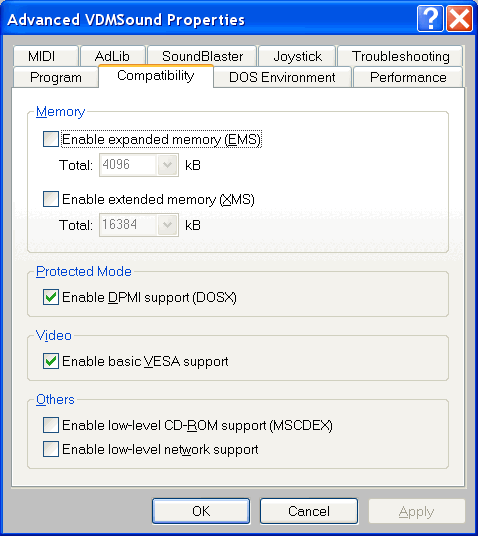
Configure the 'Compatibility' tab to look identical to the one
shown above.

Configure the 'DOS Environment' tab to look identical to the
one shown above. This tab is the heart of the non-sound related
Silent Hunter modifications needed to successfully execute the game.
The WinXP PC this procedure was tested on is completely described
towards the end of this document, but in brief it is a 2.4 GHz Pentium
IV processor. The only changes to the 'Autoexec.bat' section of
this tab are the TSR programs' command line parameters for the MouseCTL
settings or the Speedset settings. These items might need
adjustment if the target WinXP PC is considerably slower or faster than
a 2.4 GHz Pentium IV processor. Do not change any settings before
testing to see if this default configuration functions properly.
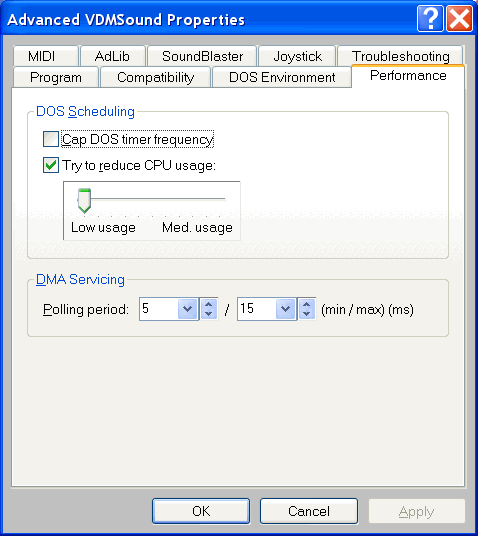
Configure the 'Performance' tab to look identical to the one
shown above. This will allow the NTVDM to get as many CPU resources as
it needs to keep the game action, audio and video smooth. The DMA
Polling setting might have to be adjusted from the (5/15) ratio
to some other ratio (say 5/10) if you have a slower WinXP system. Try
the default configuration listed above before attempting any changes.
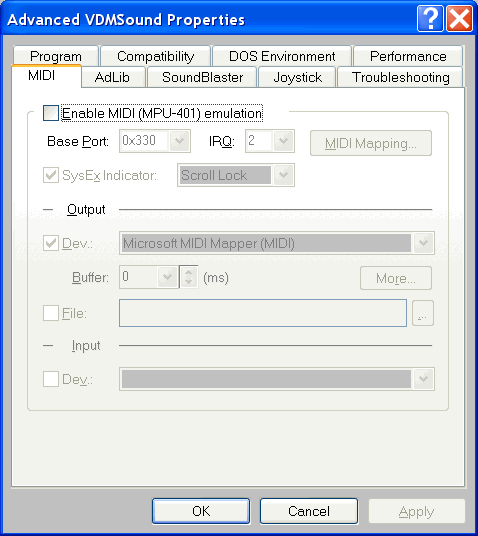
Configure the 'MIDI' tab to look identical to the one shown
above.
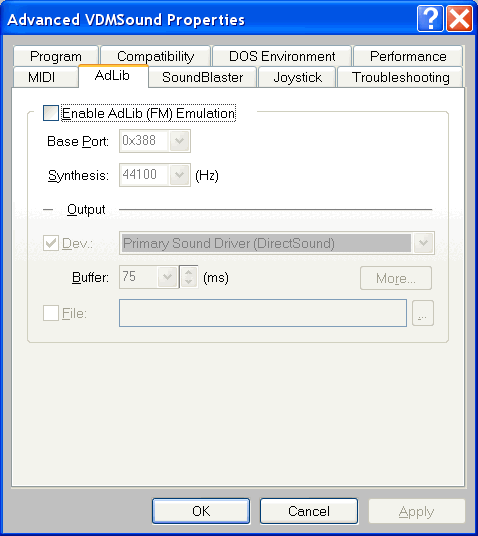
Configure the 'AdLib' tab to look identical to the one shown
above.
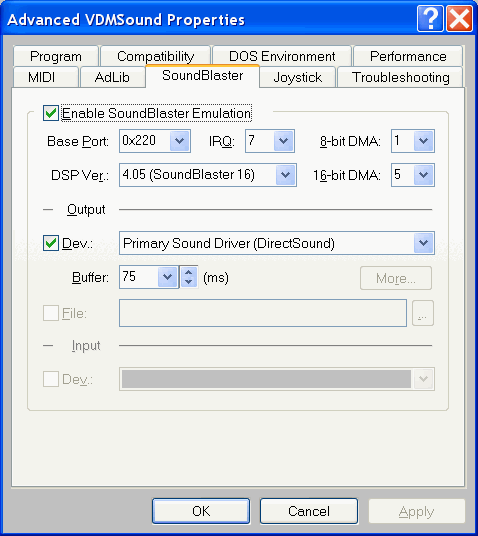
Configure the 'SoundBlaster' tab to look identical to the one
shown above.
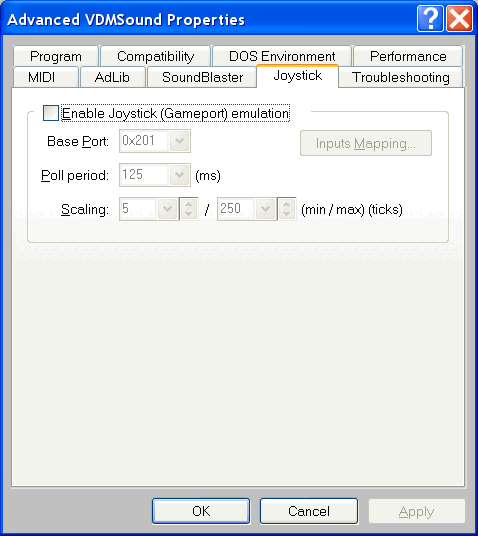
Configure the 'Joystick' tab to look identical to the one
shown above.
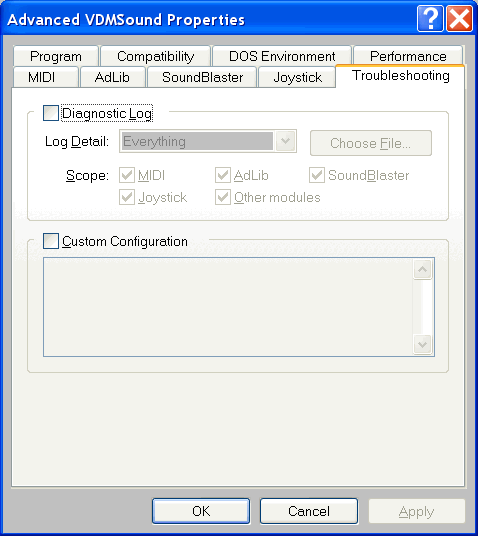
Configure the 'Troubleshooting' tab to look identical to the
one shown above.
This is the last 'tab' for the Advanced VDMSound Properties, so
first 'click' the Apply button, and then 'click' the OK
button to continue.
At this point we have successfully configured the VMDSound 'VLP'
shortcut information which is required to execute Silent Hunter.
Click the "Next" button to continue.
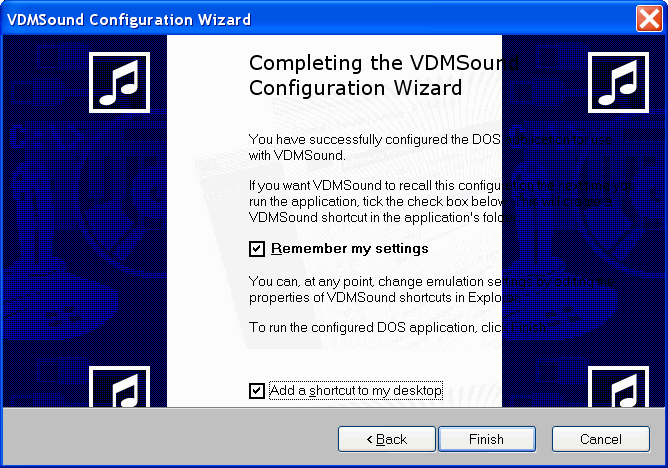
Now for the "Moment of Truth". Make sure that both check-boxes
are checked, as the "Remember My Settings" option will save the
settings so far configured in the file "SH.VLP" located in the
"x:\GAMES\SILENT" sub-directory. This file is the one pointed to by
the "Shortcut to SH" icon which will be placed on the Desktop by
checking the second check-box. If all the directions have been followed,
you should now 'click' on the "Finish" button to start Silent
Hunter for the first time on your Windows XP (SP1) system.
If the Silent Hunter opening credits do not immediately appear
in all of its Full-screen sound and glory, then you had problems. Most
likely you will see one of the two message boxes shown below, while you
'hear' but do not see Silent Hunter begining its startup procedure.
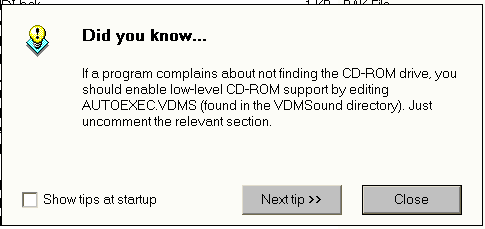
If this "Tip-of-the-day" message window is displayed instead
of the Silent Hunter opening video sequences, it indicates that
the VDMSound registry fix located in the "C:\UTILS" sub-directory with
the filename "HKCU_Software_Freeware_VDMSound_Fix.reg" was not
applied under the "Administrator" User ID. Apply the registry fix
now, and try to execute the "Shortcut to SH" desktop icon again.
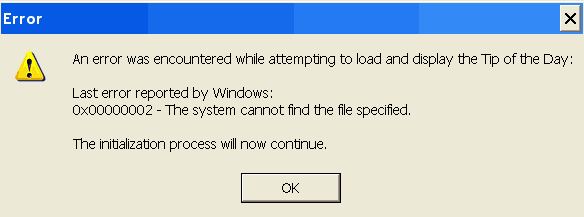
This error message will occur only when any other User ID
attempts to execute the "Shortcut to SH" desktop icon, without
the "HKCU_Software_Freeware_VDMSound_Fix.reg" being applied. Stop
immediately and apply the registry fix. Then attempt to execute
Silent Hunter again.
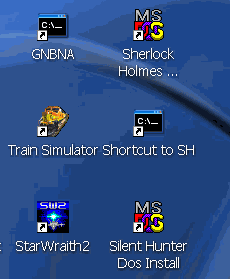
Consider deleting the "Silent Hunter Dos Install" shortcut as
you will no longer need it upon the successful installation and operation
of Silent Hunter. The "Shortcut to SH" points to the
VDMSound LaunchPad file "SH.VLP" located in the
"x:\GAMES\SILENT" sub-directory. This is the actual execution
mechanism.
Windows XP (SP1) - Limited User IDs and file/directory Permissions
Still to do with input...
Windows XP (SP1) - Silent Hunter VDMSound SH.VLP file contents
Below are the file contents of the "SH.VLP" file created by
VDMSound LaunchPad v1.0.0.7, and this file will be located in the
"x:\GAMES\SILENT" sub-directory in which Silent Hunter is installed.
[program]
workdir=C:\Games\SILENT
params=
executable=C:\Games\SILENT\SH.EXE
[winnt.dos]
config=FILES=60%000d%000aBUFFERS=25
autoexec=LH C:\UTILS\NoLFB.com%000d%000aLH C:\UTILS\MouseCTL.com 3,4,5,7,9,10,11,12%000d%000aLH C:\UTILS\Speedset.exe +1
[winnt.dosbox]
exitClose=yes
[winnt.memory]
useEMS=no
useXMS=no
[winnt.video]
useVESA=yes
[winnt.scheduling]
detectIdle=yes
idlePrio=0
[vdms.midi]
enabled=no
sysExLed=Scroll
[vdms.sb.fm]
enabled=no
[vdms.gameport]
enabled=no
System Description:
• Dell Dimension 4550
• Windows XP Professional (SP1)
• 2.4 GHz Pentium IV Intel Processor
• 256 MB DDR RAM
• 60 GB Maxtor hard drive
• 40x CD-RW drive
• nVidia GeForce4 MX440 video adapter
• Creative SoundBlaster Live! X-Gamer
• Creative 4-speaker Surround system
• Dell mouse, two button, one wheel
• Dell P992 19" Trinitron Monitor
• Dell Standard WinKeyboard
• Creative SB-Live drivers version 4.12.01.2008, dated 07/17/2002
• nVidia unified video drivers version 41.09, dated 12/03/2002
Credits:
Vlad Romascanu, creator of VDMSound, LaunchPad, Speedset, Mouseset,
Pitset
Ken Silverman, creator of NoLFB TSR
Bob Rodgers, for DOS games under XP information and MouseCTL.com
Matt Tammen, for first attempt to document running Silent Hunter
under WinXP with VDMSound
and the fine folks at :
VOGONS - Very
Old Games on New
Systems.
Other DOS games which can be made to operate successfully under
Windows XP (SP1):
Secret Weapons of the Luftwaffe, Lucas Arts
Great Naval Battles of the North Atlantic 1939-1943, SSI
The Seventh Guest, Trilobyte, Inc
Sherlock Holmes - Consulting Detective, ICOM Simulations
Silent Hunter on XP tips
Copyright © 2002 Don V. Wells, Jr. All rights reserved. |