|
THROUGH THIS LINK SUPPORTS SUBSIM, THANKS! |
The Web's #1 BBS for all submarine and naval simulations!
|
Click here to access the Helosim website |
The Web's #1 BBS for all submarine and naval simulations! |
|
|
 02-03-11, 01:03 PM
|
#1 |
|
Navy Seal
 Join Date: Jun 2008
Location: Land of windmills, tulips, wooden shoes and cheese. Lots of cheese.
Posts: 8,467
Downloads: 53
Uploads: 10
|
Right, just a quick checklist. I know there's a ton of 'm out there, but having one here can't hurt, right?
It's just my own way of doing it. Use this as a guide to find what works best for you. I've divided it into "sections" and a "flow": first section is providing basic electrical power and enabling communications (engines are noisy, so you can't just shout anymore). Then comes APU and engines start, and shutting down APU again. Then I close the canopy and start a flow to get everything else up and running. ------- Right, first things first: an A-10C needs electricity. Engines and APU are off, so that leaves batteries. Ground power is an option too, but I'm assuming ground services are not available. Enable the battery switch and switch the inverter to standby (up). At this point I prefer to uncage the SAI (standby attitude indicator) as well, lest I forget. It's gonna get noisy in a bit, so let's turn on the radios. Set both VHF radios to transmit/receive mode. Set UHF to "both"; this will let you transmit/recieve, as well as monitor the guard channel. ------- Properly prepared, we can launch the engines, though APU comes first. Enable the boost-pumps for all 4 tanks. If you have external tanks, be sure to enable those pumps as well. Start the APU and wait for it to stabilize, then enable the APU generator. Might as well turn on the engine generators as well, while we're there. Now start the engines. The A-10C goes through an automated start-up cycle, indicated by a flashing caution light in the top-left of the panel. To start, just move the throttles to idle (do note that this is done by a keystroke, rather than moving your controller throttle. Make sure it's at 0 before trying to start). Let the caution light extinguish (cycle finished) before starting the second engine. Finally, turn off APU generator and shut down the APU itself. ------- Navigation needs quite some time to align, so let's enable that first. Enable CDU and EGI. Turn the left dial to flight plan. So now it's noisy; lets close the canopy. Now it's not so noisy, but you cut off your supply of fresh air. This prompts a flow across the panels, starting close to the canopy switch: oxygen and climate control. Enable oxygen flow from the liquid oxygen supply. Continuing down along the far right of the right-console, you'll get to the bleed air, main air supply and temperature/pressure control switches. Enable all to pressurise the cockpit. This will keep you from blacking out due to hypoxia at high altitude, as well as keeping you nice and cozy. Continuing down you get to the lighting panel, which I'll skip here. Then, moving back up along the left side of the right console, you pass ILS, TACAN and CDU/EGI panels. Setting this up further is beyond the scope here. Next you get to the counter-measures panel. Set the dial to standby and enable all 4 switches. (remember to activate it from standby in flight) The flow then jumps to the left console, back to the radios (further set-up is mission dependant and again beyond the scope here) and then up. Hidden under the throttles are 2 switches; one for EAC, which we aren't ready for, and one for the radar-altimeter. Enable that one. Going down along the far-left of the left console, you'll wind up at the SAS panel. Enable both switches under yaw and pitch, 4 in total. Keep the T/O trim button pressed untill the indication light lights up. On it is to the front dash, lower-left, where you find the switches for CICU, JTRS and IFFCC. Set the first 2 from the left to enable, and set the third to the middle position. Press enter on the up front controller and IFFCC will run through a BIT, after which you can enter some parameters. When set, turn IFFCC on. The MFCDs should be up as well, so load the data from the cartridge (load all) and wait for it to load fully. You can enable the TGP to start the cooling cycle if you want, though I'd leave master arm and such off untill airborn. Now whe come back to EAC. For it to enable, the inertial navigation must be finished aligning. What you want to see is a flashing "INS NAV RDY" indication on the CDU. If it ain't flashing, give it some time. When you get that indication, set the CDU to nav mode and enable the EAC switch. You're ready to roll. Enable nose wheel-steering and anti-skid, taxi and hold short, set flaps for take-off and enable pitot heat. (easiest way to determine if you did it right is to look at the caution lights panel. If nothing is showing, you're good) (track going through the above. I enabled EGI&CDU soon after getting power from APU to save time on start-up. This is by no means wrong, but normally I use the time spent waiting on alignment to double-check and set up radios etc.)
__________________
 Contritium praecedit superbia. Last edited by Arclight; 02-03-11 at 03:13 PM. |

|

|
|
02-03-11, 04:39 PM
|
#2 |
|
Lucky Jack
 Join Date: Apr 2005
Location: Finland
Posts: 25,005
Downloads: 32
Uploads: 0


|
Thanks, Arc.
 Is there any procedures that one must do to get ordnance ready? Like Mavericks for example? I know how to lock and launch, but any pre-procedures one must do? |
|
|
|
|
02-03-11, 04:54 PM
|
#3 |
|
Navy Seal
Join Date: Jun 2008
Location: Land of windmills, tulips, wooden shoes and cheese. Lots of cheese.
Posts: 8,467
Downloads: 53
Uploads: 10
|
Turn them on, yes. You can get to a missile control page from the DSMS page and activate EO sensor there, or you can bring up the mav page and turn on EO there.
You can turn off auto-lasing for the laser-guided bombs in their profile settings, and you can turn on latch option on the TGP A-G settings page. I think it's better to do terminal lasing; only guide the bomb on it's last 8-10 seconds. Laser fires with nose wheel-steering button, but with auto-lase it will fire during entire flight automatically. The latch option means you don't have to keep the button pressed, but toggle it.
__________________
Contritium praecedit superbia. |
|
|
|
|
02-03-11, 04:56 PM
|
#4 |
|
Lucky Jack
Join Date: Apr 2005
Location: Finland
Posts: 25,005
Downloads: 32
Uploads: 0
|
Ah ok, thanks.

|
|
|
|
|
04-14-11, 05:49 AM
|
#5 |
|
Sparky
 Join Date: Aug 2005
Posts: 156
Downloads: 500
Uploads: 0
|
Any chance we can get a squadron going guys? We all seem to be on the same page, I'm in the UK.
P.S. Thanks Arclight, I've printed your info out, very handy. |
|
|
|
|
07-19-12, 10:21 PM
|
#6 |
|
Navy Seal
Join Date: Jun 2008
Location: Land of windmills, tulips, wooden shoes and cheese. Lots of cheese.
Posts: 8,467
Downloads: 53
Uploads: 10
|
Oh... little late.
Er, we have a squadron going, for over a year now; Thursdays are flight night. Problem is just that noone bothers showing up. Did a spot of flying today though, basically a Lolwaffle night. Perhaps more is in store. And since we might actually get somewhere with it now, I plan to expand on this thread as much as is needed. Starting with another start-up guide, since aparently the one above is too difficult to digest. Which means, pictures! It's quick and dirty, but it's really all you need to do. ----- Basic electrical power 1. battery on 2. inverter to standby 3. enable boost pumps 4. turn on APU 5. wait for APU to come to 100% RPM 6. turn on APU generator 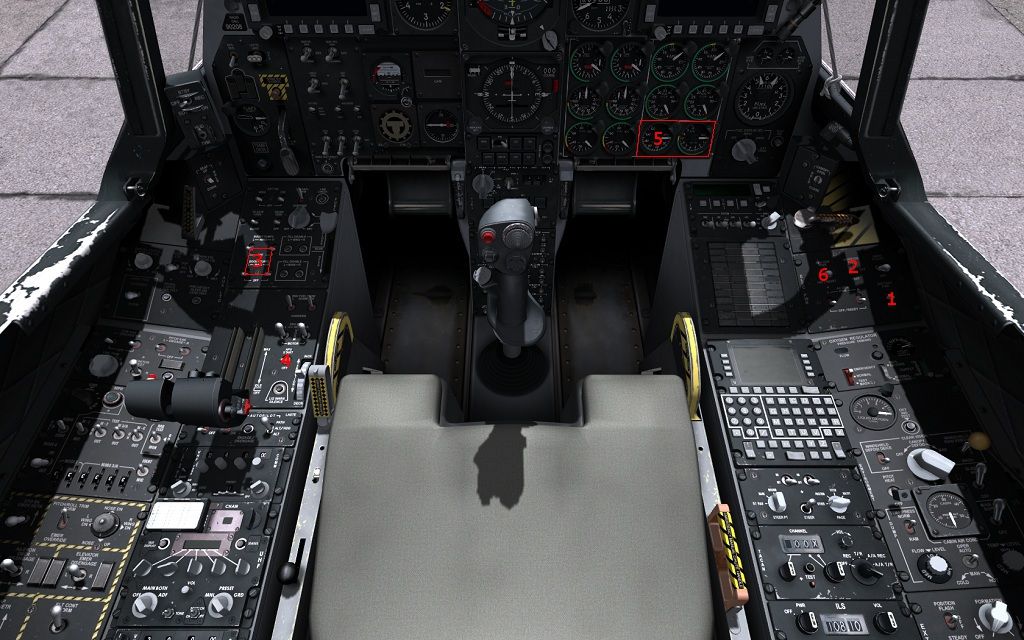 Avionics 1. turn on EGI and CDU 2. CMSP to standby, enable switches 3. arm ejection seat 4. turn on the radios (lower-right knob to TR for 2x VHF, lower-left knob to BOTH for UHF) 5. turn on radar altimeter 6. enable SAS channels 7. enable CICU, JTRS and IFFCC 8. enable anti-skid 9. uncage SAI 10. turn on MFDs 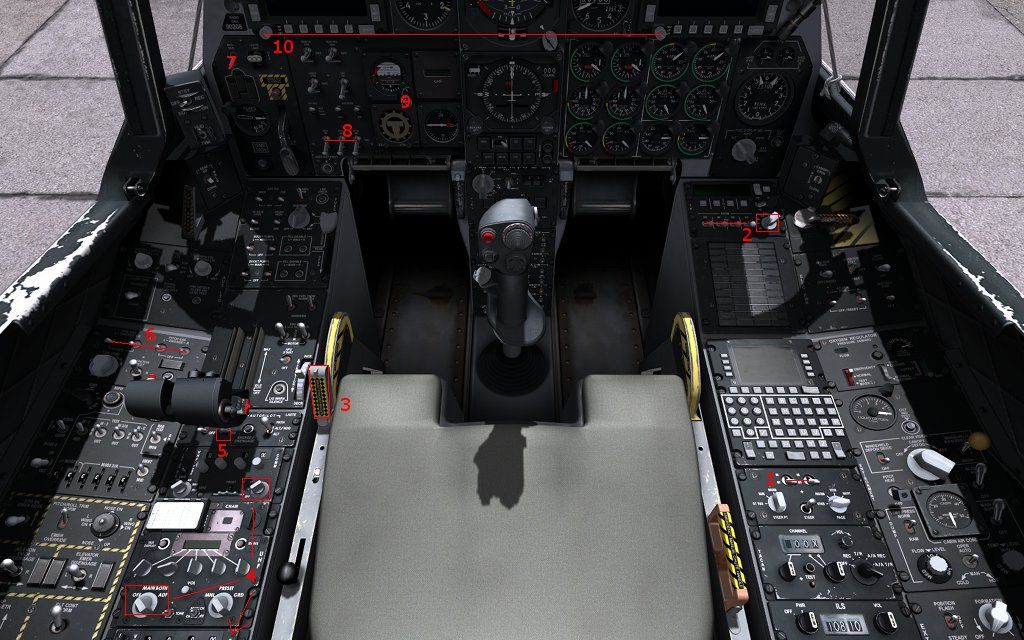 (yeah I kinda swapped 7 and 8...) Engine start It's an automated affair: move the throttle from its indent to IDLE position. If you have something like the Warthog controller you can physically do this, but for most you will either need to map a function to your controller or simply use the keyboard shortcuts: Right Alt + Home and Right Ctrl + Home. You start the engines one by one, waiting for the engine start cycle light on the caution panel (on its top-left) to extinguish in between. You can not start them both at the same time. Engine generators and APU shutdown 1. enable the engine generators - (master caution will sound and the APU generator light on the caution panel will flash) 2. disable APU generator - (master caution silences, light stops flashing) 3. disable APU Do not disable the APU generator before enabling the engine generators. The interupt in electrical power will screw up CDU alignment. It's fairly easy to fix if you're familiar with it, but it's something you'll want to avoid... I forget this all the time. INS alignment and EAC arming This is where most people become confused. When you power up the navigation systems, it starts a procedure to align them. This takes time, and is required to fully complete if you wish to arm the enhanced attitude control system. EAC provides for the stabilization feature of the gun (PAC) and autopilot. Neither will function without it. This is what you're looking for: 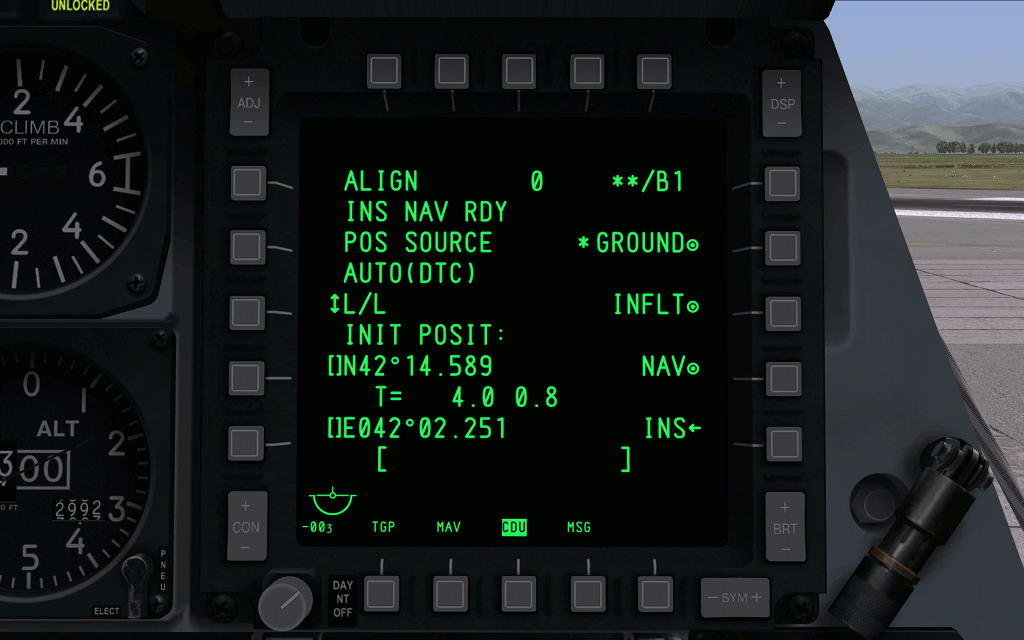 Note the flashing message at the top and the timer (T= 4.0). If the message is present but not flashing, you only have partial alignment, which is not enough for EAC. You can monitor the timer line to check progress; full alignment is at T= 4.0, confirmed by the flashing message at the top. When you have full alignment, press the button next to NAV to switch the system from alignment to navigation mode. Next, switch navigation to EGI: 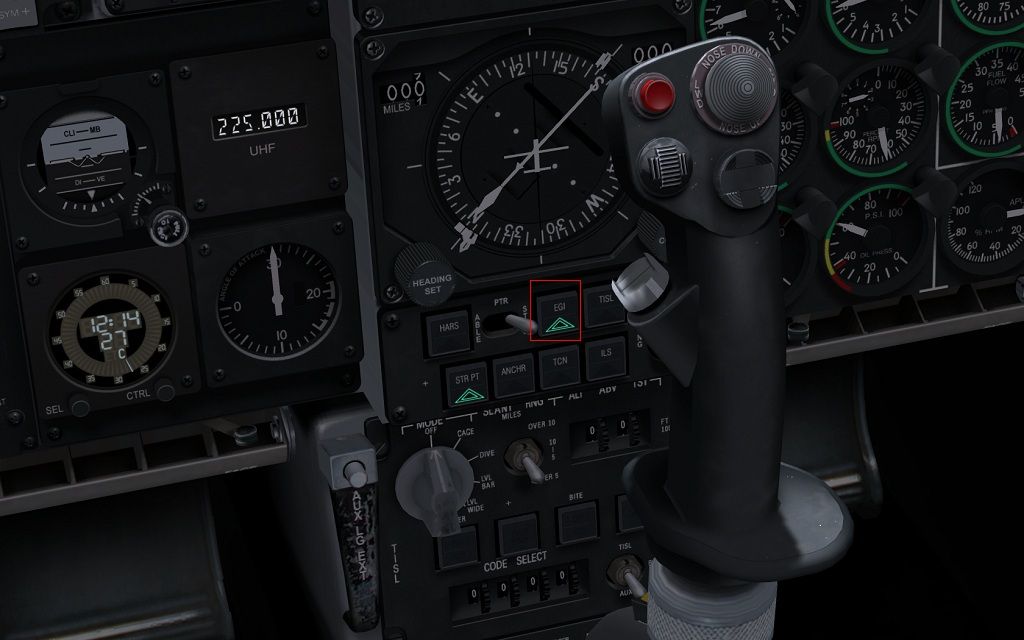 And then enable EAC: 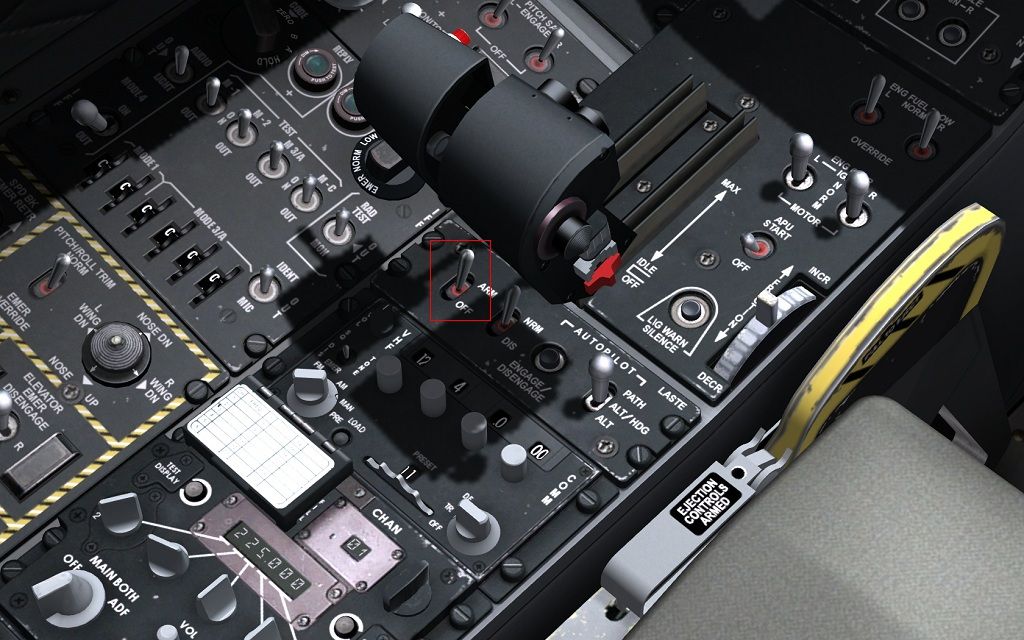 DTS upload Simples: hit LOAD ALL: 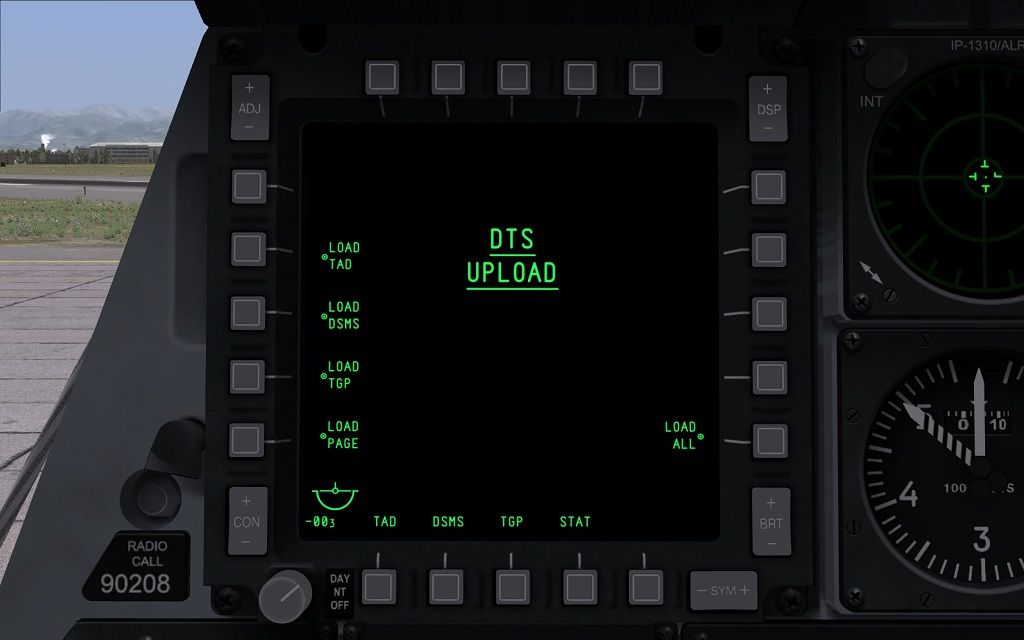 The display will change to indicate it is loading:  Note that the circles at the other functions disapeared while an asterisk apeared next to the selected function. It will change back to the first example once it is finished. Cutting corners You don't have to go through all this one by one; some things can be done simultaneously. For example, I start the left engine right after enabling the APU generator, power up all the electronics, load DTS after turning on the MFDs and then start the right engine. While the right engine starts and the INS aligns further, I go rumaging through DSMS to configure weapon profiles and settings and whatever else needs to be tinkered with. Point being, you don't have to wait on anything: by the time you're done setting things up INS will be aligned and the engines started. Final checks Enable nose wheel steering before taxiing. It's rather tricky without. Set flaps for take-off, and close the canopy, enable your air supply and pitot heat: 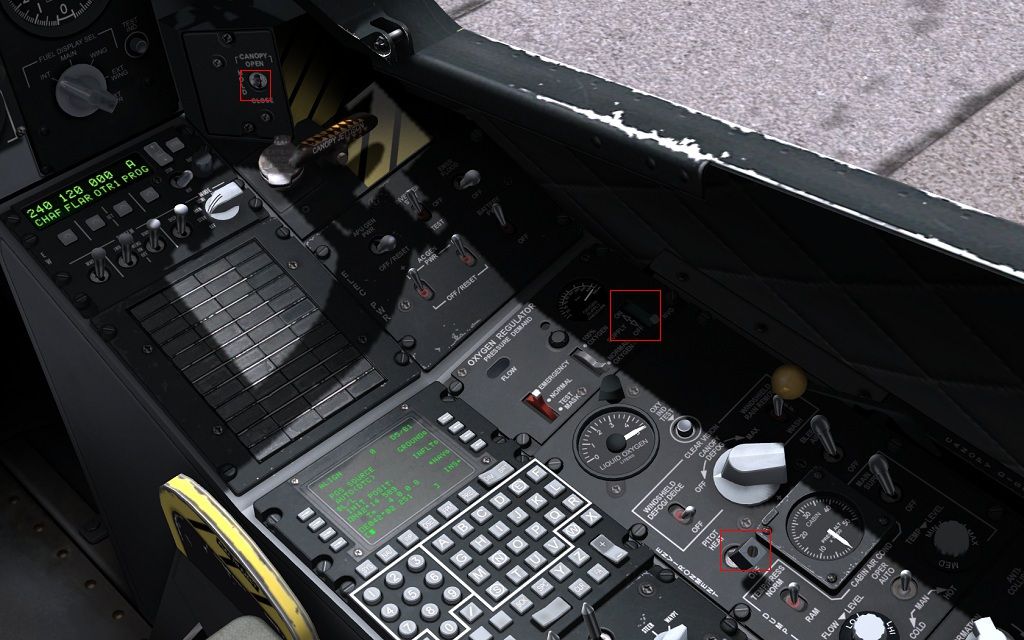 (set barometric pressure for the altimeter. It is given with take-off clearance, so you'll need to tune VHF AM to the airfield you're at) In flight Enable master arm, laser and TGP (you could include TGP in avionics). Set CMSP knob to desired mode. Have fun. Afterthoughts Set weapons to safe and CMSP to standby before landing. Disable pitot heat after landing. Set T/O trim before your next take-off.
__________________
Contritium praecedit superbia. |
|
|
|
|
07-24-12, 02:01 AM
|
#7 |
|
Navy Seal
Join Date: Jun 2008
Location: Land of windmills, tulips, wooden shoes and cheese. Lots of cheese.
Posts: 8,467
Downloads: 53
Uploads: 10
|
Not happy with the loadouts? Left Alt + ' =
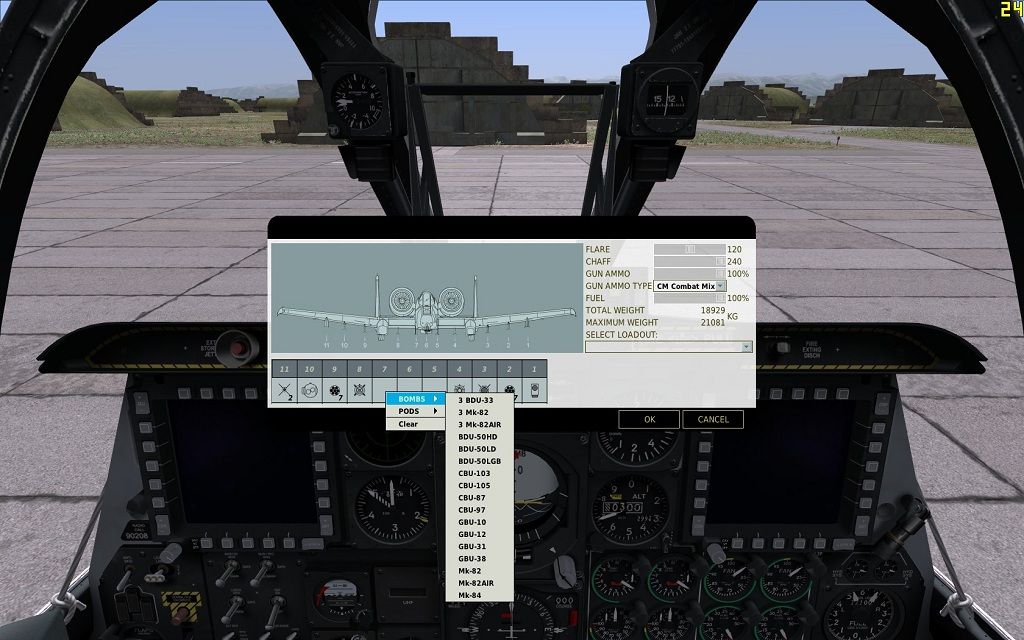 The "select loadout" drop-down lists all the configurations in the mission editor, including custom ones (for your role). Might be possible to create a few favourites for people in there so they are available for quick selection. Tested it for the A-10C, Ka-50 and Su-25T. Not sure for P-51, but it should work.
__________________
Contritium praecedit superbia. |
|
|
|
|
07-24-12, 02:38 AM
|
#8 |
|
Lucky Jack
Join Date: Apr 2005
Location: Finland
Posts: 25,005
Downloads: 32
Uploads: 0
|
Bah, wish I'd known that on Sunday.
 Tested and works with P-51D. 
|
|
|
|
|
07-24-12, 07:30 AM
|
#9 |
|
Navy Seal
Join Date: Jun 2008
Location: Land of windmills, tulips, wooden shoes and cheese. Lots of cheese.
Posts: 8,467
Downloads: 53
Uploads: 10
|
Bumped into it while searching for info on the warehouses. Suddenly realised I'd seen the screen before, just never checked if it was already implemented.

__________________
Contritium praecedit superbia. |
|
|
|
 |
|
|


 Hybrid Mode
