
|
|
SUBSIM: The Web's #1 resource for all submarine & naval simulations since 1997
|
SUBSIM: The Web's #1 resource for all submarine & naval simulations since 1997 |
|
|
 06-12-10, 06:17 AM
|
#1 |
|
Ocean Warrior
 Join Date: Jan 2008
Posts: 2,909
Downloads: 77
Uploads: 11
|
LATEST VERSION: v1.02 http://www.subsim.com/radioroom/down...o=file&id=1901
Here's a combined mod that adds in a 3D TDC, which is sort of interactive (within the limits of the game) and also a radar range unit, which can be used to measure the range of any target in the same way that the real unit that was on board the US Subs worked. 3D TDC: 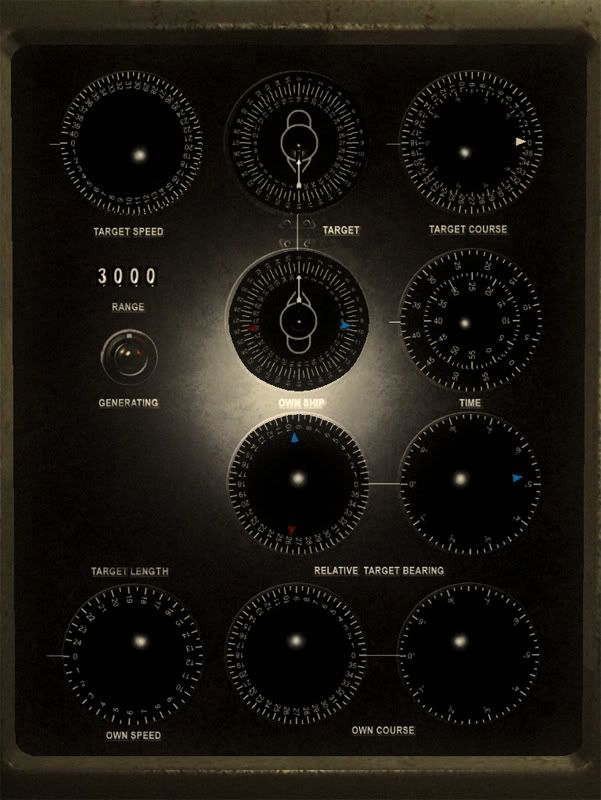 Range Unit with 'A' Scope: 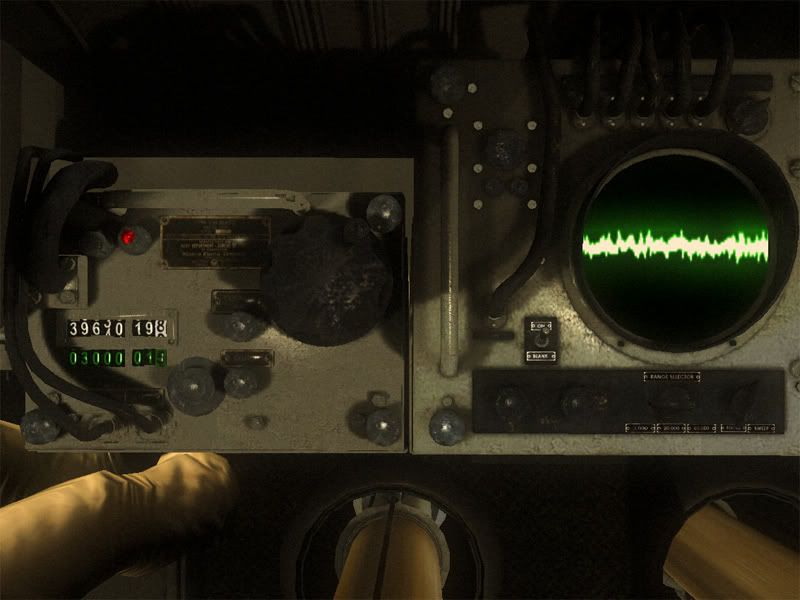 Here's how to use it. First, the radar range unit. The part that was missed off teh stock interior is the part that actually gives the measurement. The 'A' Scope is used to measure the timing of the signals and the range unit converts that to a range. The missing mode of the 'A' Scope was an 'expanded sweep' or 'precision sweep' mode, where the radar trace was expanded so that there was a 'window' 3,000 yards wide centred about the current range indicated on the range unit. So, if the range unit said '12,000' then the expanded sweep would show from 10,500 to 13,500. On this 'window' there was a step, which in my version is replaced by a little white triangle. The method of reading range is to get a roung idea of where the target is from the normal modes - 3k, 20k, or 40k and then switch to expanded mode and then fine tune the scope so that the target pip is directly over the 'step' (white triangle). 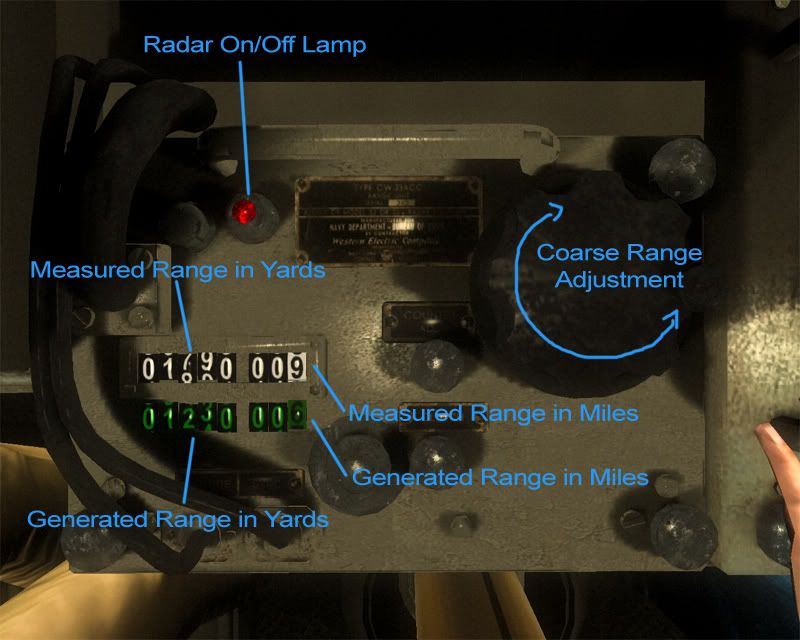 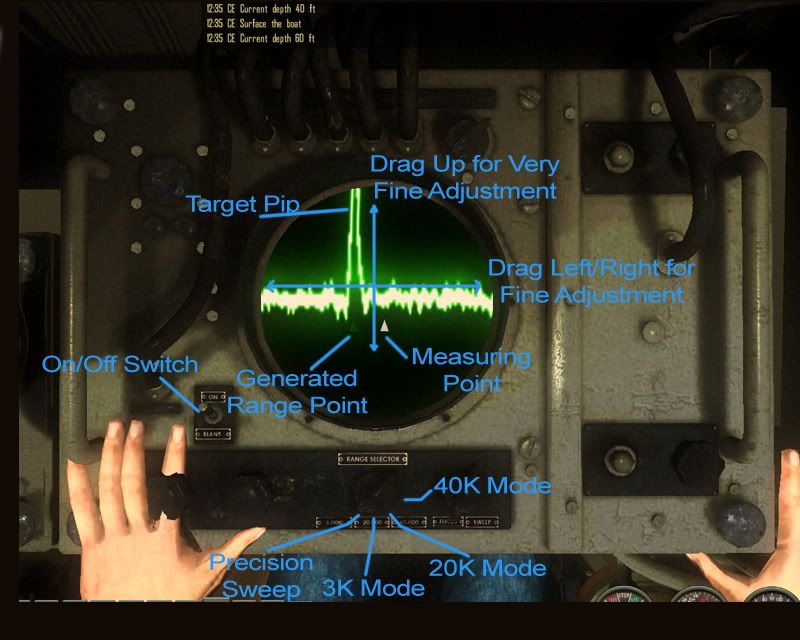 The white set of dials on the range unit is the range in yards (0 - 40,000 yards), with a further set of three dials that indicates the same range in miles (to make plotting easier and reduce errors - not historically correct, but is designed to reduce workload for the single player). The green set of dials are for the range that the TDC currently has. There is also a correspnding green step on the radar scope. This allows you to see easily ow the measured range compares to the generated range - not historically correct for a Mark 3 TDC, but it's again there to reduce workload on the player, as he is working alone during what can be a stressful and heavy work load when tracking and plotting alone. The range that is measured is put into the buffer used by the stadimeter, so to correctly measure the range, you will need to switch to the periscope or TDC and from the right hand slide out, choose the stadimeter before measuring the range. If you don't do that then you won't be able to send the range to the TDC and will have to measure it again. So, with the stadmiter selected, the range value you measure will be loaded into the stadimeter buffer, then all you need to do is switch back to the periscope or TDC view and 'send' the range to the TDC. This sounds a bit fiddly and in practice it isn't as long as you remember to set the TDC input to the stadimeter, measure the range and then take a bearing and send the range with the bearing. The radar train bearing indicator now also has a digital display, again ahistorical, but is designed to reduce workload and errors on a single player. In reality you can get a better idea of the bearing from the original indicator, but in game it's not so easy as the camera is fixed and the resolution is much lower and it's just not as easy to get a good look at the bearing, especially if you are switching back and forth. 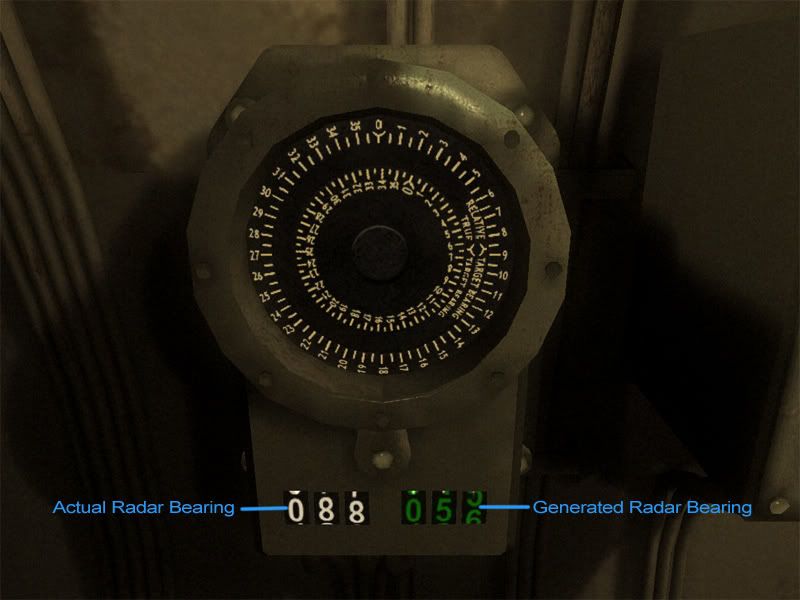 There is now also a green set of dials that indicates the generated bearing from the TDC - allowing you to quickly rotate to the right point and find the target in a hurry. You can't send the radar bearing to the TDC, what you have to do is to move the periscope to the measured bearing. The radar is slightly buggy in that the radar cone will pick up targets only to one side of where the radar is pointing, instead of both sides, so you may find that the target disappears at the exact bearing that the target is at. Annoying, but that's a problem with the game's sensors. A rememdy will be coming later. Now onto the 3D TDC. The actual TDC was a very complicated device and it's sad to see that it's functions have been somewhat mutilated and the device made harder to use by incorrect modelling - e.g. changing the bearing does not change the range or Angle on the Bow, making last minute bearing adjustments very difficult and unnecessarily increasing the workload on the player. The dials will be explained in two halves, top and bottom. Some of the dials are grouped together and designed to be read in pairs, with one dial being a low speed and one dial being a high speed one. The first half (apologies for the resolution, but it's necessary to show it clearly and explain the readings): 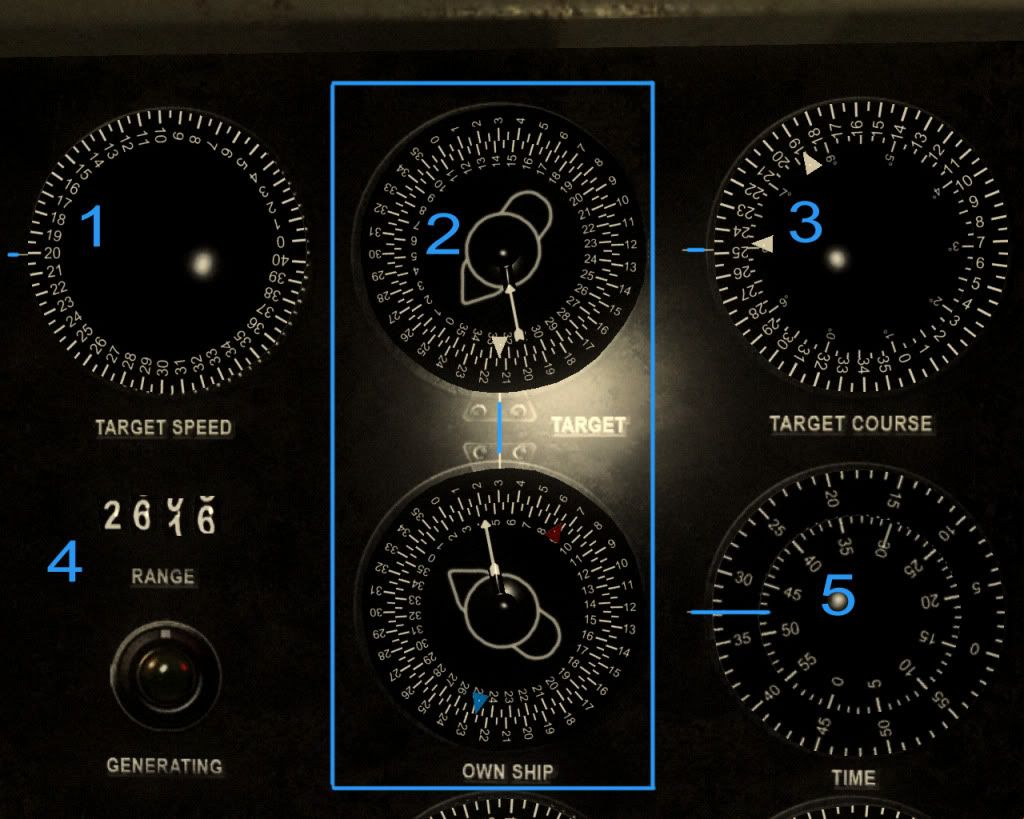 Dial 1. Target Speed Does what it says on the tin. Will display the target's speed that is currently set in the TDC. Read where the blue line is indicating. Thie dial shows shows a target speed of 20 knots. Dial Pair of Pairs 2. Own Ship and Target Ship These are a complicated set of dials to read, but have much information. Upper dial, Target Ship, represents the target that the TDC is tracking. Target dial is read from the bottom for most readings, where the blue line is. Data shown is: Outer ring, true bearing from the target to the submarine. approx 212 degrees Inner ring, Angle on the Bow (currntly incorrect graphics) Alignment of inner ring's zero and outer ring - Target's course (approx 248 degrees). Arrow indicator - Torpedo track angle. The white triangle pointer is draggable abd can be used to change the AoBB setting, as long as the AOB dial has been selected from the TDC input dial on the periscope screen first, then the AoB can be input and sent to the TDC. Drag the pointer around in a circle. Lower Dial, Own Ship, represents the position of the submarine. Outer ring, true bearing to target - approx 30 degrees. Inner ring, relative bearing to target - approx 53 degrees. Arrow indicator - torpedo gyro angle Red pointer - radar bearing (when using radar it can be switched off after a bearing is taken, so that it does not auto sweep). Blue pointer - Sonar indicator (useful when ordering sonar man to track a traget as you can compare the blue pointer to the relative bearing). Not draggable. Dial 3 Pair. Target True Course high and low speed. The outer dial is the 'low speed' indicator and rotates once evert 360 degrees and the inner 'high speed' dial rotates 36 times per 360 degrees, thus giving one rotation per ten degrees. Read the dial as the outer number being the first two digits of the course, with the inner dial providing the third digit, so if the outer dial shows between 13 and 14 and the inner dial 7, the target's course is 137 (True). The value indicated in the screenshot is 248 degrees. Two sets of pointers - high and low speed target course change indicators. Clickable: Make coarse adjustments to the course by dragging the AoB indicator (whilst looking at the target course indicators). Then make fine adjustments with by dragging up and down, then make very fine adjustment by dragging left to right over the dial. As with the AoB setter, make sure you select the AoB input from the periscope or TDC screen before you enter the new course, or you will have to set it again! This ability to input a course is very useful, if you are updating a bearing, as the poor implimentation in the game does not update the AoB when you put in a new bearing, so it is necessary to input a new course after each bearing change you make. Using this dial, it's very easy to do, as long as you remember to do it! Dial set 4. Range to Target. Indicates range to target in yards. Will only display up to 8,000 yards in the TDC mark 3 - a mark 4 version will be coming along soon, but 8,000 yards should allow you to track most things without trouble. The mark 4 went up to 40,000 yards. Read the range as displayed, the range shown is 2606 - the third dial is half way between 0 and 1, so zero is taken). Dial 5. Time. This should show the time since the problem was started, but this isn't possible in the game. I did have it linked to the stopwatch originally, but unfortunately the stop watch only goes up to 30 minutes and the resets, so instead I have shown it linked to real time, so that you can at least make radar measurements and record them as the time past the hour and have something to compare it to. Clicking on teh Time dial will bring up the stopwatch, which will be used later for the Dead Reckoning Tracer (to come). The lower half: 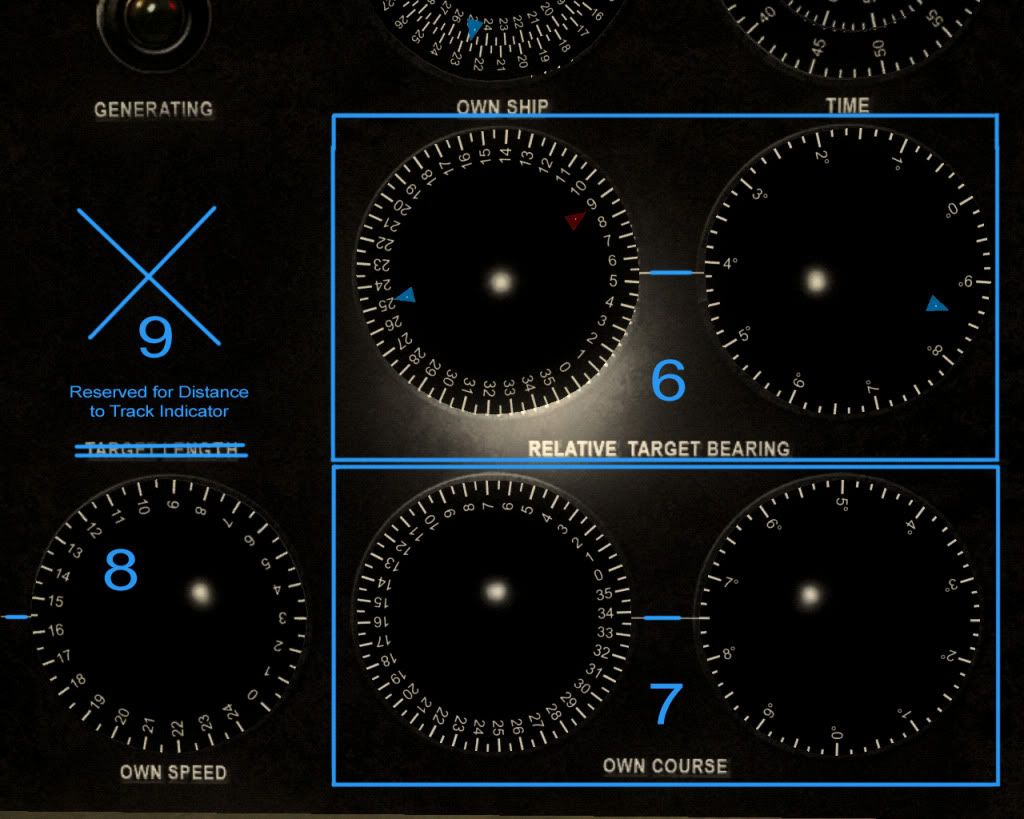 Dial Pair 6. Relative Target Bearing. NOTE: On the real TDC there would be another set of smaller dials that would indicate the relative sound bearing, but as sound in SH4 travels at the speed of light, there is no need for this and also the SBC (Sound Bearing Converter) is also not modelled in the game for the same reason. The left hand dial is the high speed dial showing the first two digits of the relative bearing (as generated by the TDC) and the right hand high speed dial is the last digit. The relative bearing shown is 54 degrees and 10 seconds. The blue arrow represents the sonar bearing and can be used to see if the bearing rate is correct when you order your sonar man to track the target - if the blue pointers follow the relative bearing, then your solution is correct (or at least not definately wrong). The red arrow is the radar bearing, which can be used when you obtain a radar bearing and switch the set off, which will freeze the radar bearing, otherwise it will just continue to whizz round on it's own. I'm going to refine the radar pointer, as there are problems with the radar sensor's bearing measurements, as mentioned earlier. Dial Pair 7. Own Course. This shows your own sub's course, with the now familiar low speed and high speed arrangement. The left low speed dial is the first two digits and the right hand high speed dial is the last digit. The value shown as the current sub's course is 337 degrees and 30 seconds (337.5 degrees). It's very accurate! Clickable: You can order a course change by clicking on the low speed dial. Dial 8. Own Speed. This is your own speed in knots as measured by your pit log. Clickbale: You can click on it to order your sub to any speed (within your speed range). This is useful if you want to parallel a traget and match speed. Blank 9. Reserved of Distance to Track indicator. Some TDCs (mid mark 3s) had a range to track indicator that showed you how far from your target's track (line drawn though the target's course) you were. This can be quite usefull to see how far you are from the intercept point you are and whether you will cross over the target's track before the target gets there (e.g. you will have crossed and will be shooting from the sterns - or possibly you will be too close to fire). It's not in at the moment and historically it would have gone where the target course indicator is. The place where it is now would have been the Target Length input and output matcher for the SBC, but as sound travels at the speed of light, there is no need for an SBC, which converts the measured sonar bearing and takes into account the delay of the sound wavs and the range and the course of the taregt and generates the actual bearing of the target from the sonar bearing - fancy stuff that we don't need. So, to use it effectively:
Hitman came up with the idea of using the two readings to get a calculated solution easily, to reduce the tracking workload. It's much more accurate with radar ranges and optical bearings than using the stadimeter. Also, you can use the radar now to calibrate the stadimeter. As the range you measure at the radar is sent through the stadimeter, you can measure the radar range, then take an immediate stadimeter measurement and then adjust the target height dial, so that the the indicator is in the same place as it was when you measured the radar range and there you have just set the target height. You can use that method to measure from any part of the ship you want too, which really helps when you are making submerged approaches. You can order your sonarman to track the target and then observe the bearing on the TDC blue indicators and then compare them to the generate solution. Thanks to skwas, without whom, I'd never have even attempted this mod and thanks everyone who helped test this mod or providied resources: Wilcke, epower, Bubblehead1980, LukeFF, mav87th, virtualplender, Gino, vickers03, 399knov and Rockin' Robbins. And a massively huge thanks goes to Hitman, who probably wrote more text than I did in the discussions on the project. This project has taken a very long time to create and as such, I can't properly explain it all in just one post. It's got a lot of functionality and I've only scratched the surface of what you can do with it, so now it's time to dive in and get used to it. There are loads of things left to discuss, like how to measure the bearing of a target using radar only, how to distinguish between targets close together and track the right one, how to adjust your solution according to measurements you take (e.g. what the errors in range or bearing mean). Yeah, just loads of stuff. Planned is a Dead Reckoning table that you will be able to use to show the tactical situation and also to take two radar/optical readings and then from that graphical work out the course and speed of the target (thanks to tater for that idea). At the moment, it's only in the Balao and Gato class for stock, but I have been offered help in porting it to the other interiors and probably what will happen is it will be integretaed with the newer shinier interiors anyway. So here it is: http://www.subsim.com/radioroom/down...o=file&id=1901 There are faults with it and it can be (and will be) improved, but if I waited until it was perfect, it would never have been released.
__________________
-------------------------------- This space left intentionally blank. Last edited by Nisgeis; 07-31-10 at 12:50 PM. |

|

|
|
06-12-10, 06:27 AM
|
#2 |
|
Ocean Warrior
Join Date: Jan 2008
Posts: 2,909
Downloads: 77
Uploads: 11
|
Reserved.
__________________
-------------------------------- This space left intentionally blank. |
|
|
|
|
06-12-10, 06:28 AM
|
#3 |
|
Ocean Warrior
Join Date: Jan 2008
Posts: 2,909
Downloads: 77
Uploads: 11
|
Reserved Too.
__________________
-------------------------------- This space left intentionally blank. |
|
|
|
|
06-12-10, 07:02 AM
|
#4 |
|
SUBSIM Newsman

 Join Date: May 2008
Location: Close to sea
Posts: 24,211
Downloads: 548
Uploads: 0
|
Great work!
(Edited for content...No need to quote the first post.)
Is this practicable to SH3?
__________________
Nothing in life is to be feard,it is only to be understood. Marie Curie 
Last edited by Donner; 06-12-10 at 04:39 PM. |
|
|
|
|
06-12-10, 07:39 AM
|
#5 |
|
Ocean Warrior
Join Date: Apr 2005
Location: Carmel, Indiana
Posts: 3,250
Downloads: 320
Uploads: 11
|
WOW!
  Thanks, I'll give it a go today! 
__________________
Irish1958 
|
|
|
|
|
06-12-10, 08:36 AM
|
#6 |
|
Sink'em All

Join Date: Mar 2001
Location: Naperville, IL
Posts: 2,150
Downloads: 305
Uploads: 1


|
Am going to give this a try tonight after I get home from work. Fantastic job, Nisgeis.
 
__________________
Head Deep and Keep'em Astern" - LtCDR Samuel D Dealy SHIV Guide | Imperial Japanese Navy | US Submarines |
|
|
|
|
06-12-10, 10:26 AM
|
#7 | |
|
Ocean Warrior
Join Date: Jan 2008
Posts: 2,909
Downloads: 77
Uploads: 11
|
Quote:
__________________
-------------------------------- This space left intentionally blank. |
|
|
|
|
|
06-12-10, 10:34 AM
|
#8 |
|
Navy Seal
 Join Date: Apr 2009
Location: Florida USA
Posts: 6,922
Downloads: 550
Uploads: 42

|
wow is all i can say, can't wait for the version that works with TMO, great work guys
SH 4 will live for a long time because of you guys and others.
|
|
|
|
|
06-12-10, 12:10 PM
|
#9 |
|
Stowaway
Posts: n/a
Downloads:
Uploads:
|
Most cool mod for running a Gato around the Pacific. Very cool work Nisgeis - but you know that i mean that already mate!!
  Above Me and Nisgeis at his improved PPI scope... |
|
|
|
06-12-10, 01:50 PM
|
#10 |
|
Pacific Sub Expert
 Join Date: Aug 2006
Location: Las Vegas, Nevada
Posts: 148
Downloads: 55
Uploads: 0
|
Very nicely done!
Groetjes,
__________________
Gino |
|
|
|
|
07-17-10, 01:51 AM
|
#11 |
|
Ocean Warrior
Join Date: Sep 2008
Location: Notify command we have entered the Grass Sea
Posts: 2,822
Downloads: 813
Uploads: 0
|
as near as I can tell, the Radar Range Mod conflicts with the East Aob mod. If I activate the Easy Aob mod before or after activating the Radar Range mod, I get the following:
I cannot see the triangle on the Radar screen. I cannot see the 3d TDC The stop watch and tools revert to full size in TMO 2.0. The stop watch appears on the left side of the screen rather than the right side. I fiddled with the order the mods were activated and this is what I came up with. Maybe someone has a fix, such as jaminadrid (JTex???). |
|
|
|
|
07-17-10, 12:16 PM
|
#12 | ||
|
Ocean Warrior
Join Date: Jan 2008
Posts: 2,909
Downloads: 77
Uploads: 11
|
Quote:
Quote:
__________________
-------------------------------- This space left intentionally blank. Last edited by Nisgeis; 07-17-10 at 12:37 PM. |
||
|
|
|
|
07-17-10, 01:48 PM
|
#13 |
|
Watch
 Join Date: Nov 2009
Posts: 26
Downloads: 39
Uploads: 0
|
Okay, I installed U-Boat missions and got it working. I don't see the triangles on the A scope and I'm not quite sure what I'm doing when I'm dragging the mouse cursor over the A scope.
Might there be something wrong with the mod, files missing, or am I doing something wrong? Is there some step I need to take to see the triangles on the a scope? |
|
|
|
|
07-17-10, 02:10 PM
|
#14 |
|
Sea Lord
 
Join Date: Sep 1998
Posts: 1,846
Downloads: 156
Uploads: 5
|
It's probably a question of understanding how it all works. Be paitient, a tutorial is coming.
JCC |
|
|
|
|
07-17-10, 02:14 PM
|
#15 |
|
Watch
Join Date: Nov 2009
Posts: 26
Downloads: 39
Uploads: 0
|
Good, I'm looking forward to one. This mods got a lot of potential, but it could use a good step by step explenation. I hope to seen one soon, I'm itching for a good night surface attack: radar only!
|
|
|
|
 |
|
|


 Hybrid Mode
