
|
|
SUBSIM: The Web's #1 resource for all submarine & naval simulations since 1997
|
SUBSIM: The Web's #1 resource for all submarine & naval simulations since 1997 |
 03-02-22, 11:39 PM
|
#1 |
|
ET2/SS
Join Date: Oct 2017
Posts: 2,501
Downloads: 58
Uploads: 0

|
So, this just arrived.
  A 1970 Chevy K5 Blazer 4X4 by ACME in metallic blue with white (removeable) top in 1/18th scale. Available in the US from https://www.diecastmodelswholesale.com/ Use the promo code NEXT for a 10% discount at check out. OK, enough of the spam.  I'm only posting where I bought it because I've used them in past with very good results, you also don't have to deal with any bidding wars on EBay and I'm pretty sure you can buy it cheaper direct vs at Amazon. I paid out a total of $154.90 (I don't always use the promo code discount and there is $9 flat rate shipping) on Feb. 23rd and my box showed up today (Mar 2nd) via Fedex. I'm only posting where I bought it because I've used them in past with very good results, you also don't have to deal with any bidding wars on EBay and I'm pretty sure you can buy it cheaper direct vs at Amazon. I paid out a total of $154.90 (I don't always use the promo code discount and there is $9 flat rate shipping) on Feb. 23rd and my box showed up today (Mar 2nd) via Fedex.Unboxing is very straight forward, there are no screws holding the model down, however the hard top is packaged in the top of the styrofoam container under a paper and tape cover. Remove the top carefully and set it to the side. Opening the styrofoam cover is easy, just cut the tape on one side and open it up. The main part of the Blazer is covered in tissue paper and has two black plastic blocks at the sides of the bottom to hold it tight for shipping. Gently remove the model at this point then remove the small foam blocks in the interior. Before you attach the hard top, take a minute to check out what you just bought.  OK, this is where the obsessive/compulsive part of the review starts. In general, this is a slightly pricey die-cast but it looks GREAT. If you only want something to park on the shelf, snap on the hard top and you're done. If small details tend to bug you, read on.  The doors and tailgate open smoothly and paint is very good. Note that there isn't a clear coat over the met. blue, an accurate detail for this truck. Open the hood carefully and you'll note a very satisfying slight "push" from the hood hinge springs.  BE CAREFUL with the hood. The two hinges are pretty accurate to the real article and also very delicate. If you feel any binding while opening or closing the hood, stop and re-access what you're doing. It also might be an idea to apply some light machine oil or Vaseline to the parts of the hinges that pivot then clean off the excess. The engine looks good, in some ways it looks too good and we'll deal with this in depth later. You may notice a black vinyl hose above the air cleaner at the back of the engine bay. Either leave it alone or carefully cram it under the air cleaner. The hose is very soft and bends easily. OK, on to the interior. 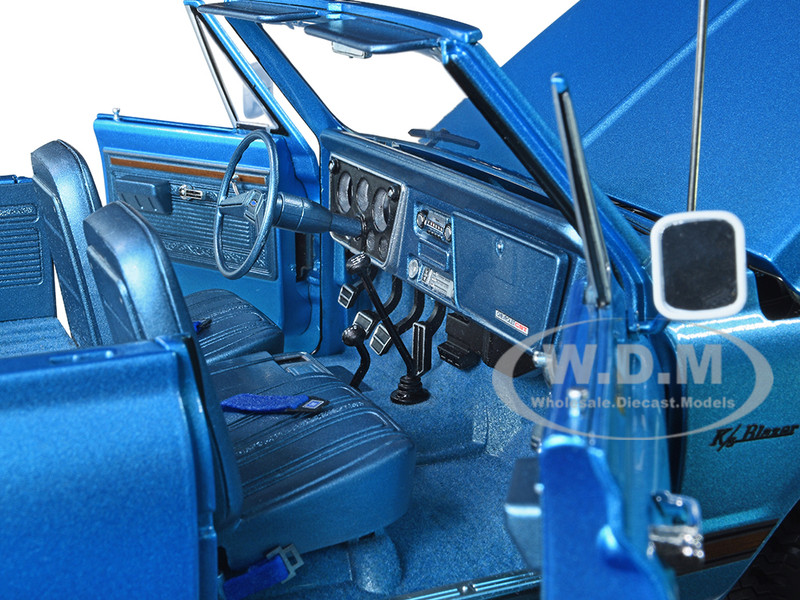 I'm pretty sure these are photos of a prototype of the model, mine is slightly different. Mainly, the steering wheel and column on my model is done in body color vs gloss black. Which version is right? Well, both. Keep in mind this a 1970 Blazer, these trucks didn't go to the golf club and the fancy restaurants. Its somewhere between sporty and utility. Its also a 1970 model, this was kind of in-between when GM shifted from bare bones to everything plastic. BTW, the steering wheel does not turn with the front wheels. This is a bit of a gimmick in the 1/18th scale die-cast world and I'm not losing sleep because it doesn't function. This Blazer, as delivered, has a manual five speed, floor shifter, and transfer case shifter (manual locking hubs). The two floor shifters have very fine number and pattern markings. The entire floor is flocked in powder blue and looks "about right". My only real gripe is the belt material for the seat belts, it just looks too course and I may paint the belts with clear (gloss or matt) varnish to give them a more polyester look.  The passenger seat folds forward smartly for access to the rear bench and its your only "easter egg" on this model. The passenger seat folds forward smartly for access to the rear bench and its your only "easter egg" on this model.So, let's get that roof on and check out the body and running gear. 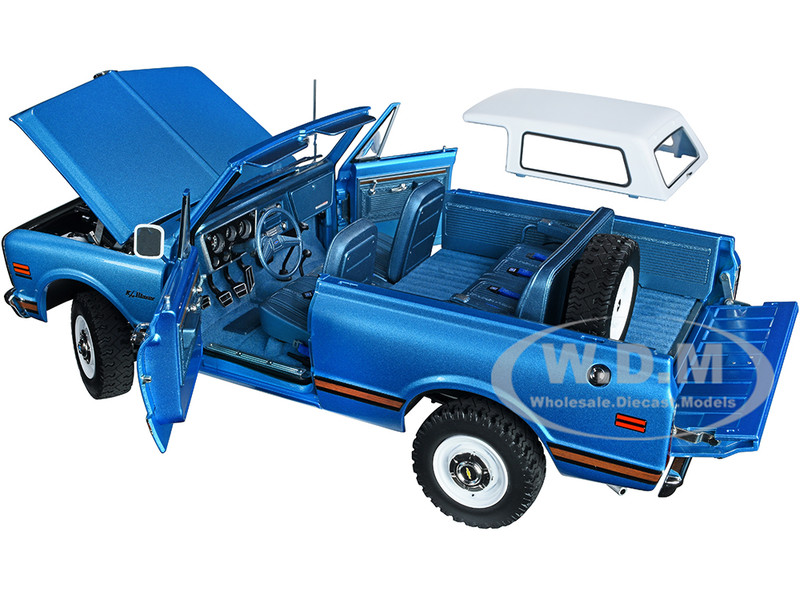 The roof is best set in place by lining up the front to the windshield while gently setting the sides into place. Note that the front of the roof "clips" into the windshield slightly. Once the alignment looks good, carefully press down using your thumbs above side windows. Check the gap between the roof and body, a little gap is fine and is actually correct as long as that gap is even front to back and mostly matches the other side. Just take your time, the roof winds up being a rather snug fit and it will stay in place with no problems. By now you'll notice that the rear hatch is molded in place and does not open.  I understand why ACME did it this way but, sheesh, there are other ways to skin that cat. At this price point, they could have sold this thing with the roof already attached and with an opening hatch. I understand why ACME did it this way but, sheesh, there are other ways to skin that cat. At this price point, they could have sold this thing with the roof already attached and with an opening hatch.Oh well, this is what I call "the 95% solution" in 1/18th scale die-cast. The manufacturers will get a given subject 95% right and then call it a day. Yeah, it would have been a little more complicated and it would take a little more time to make it the right way..which is why they didn't do it.  Anyway.. There are two things you can fix on the roof that just don't look "right". The hinges for the (non opening) hatch and the drip rail should be chrome or silver. This is a quick fix with a little paint or a Molotow chrome pen. The other problem is the gap between the (non opening) hatch and the rest of the roof. I haven't done this yet, but I'm guessing either Tamiya black or dark gray accent liner applied to the gap will give it a better look. The chassis is molded smartly in black in the standard "no it isn't" plastic that is common to die-cast models. It isn't styrene, it isn't vinyl, but it is tough to break. A little detail painting here can go a long way, or you can just skip it and call it fine. I'm pondering what color to paint the shock absorbers and the drive shaft universals are defiantly getting hit with some "dark metallic" or iron paint. The body details all look right (recall, this is a 1970 model) and the paint is superb. The shade of met. blue screams "GM" so ACME got it right. Headlight lenses and buckets are pretty much perfect. The front turn signals are..correct? I had to do a google image search and, yeah, ACME got it right but I might add some amber bulbs. The tail lights and back-up lights are close to perfect but I definitely want to hit the red lenses with some Tamiya clear red to darken them slightly and the back-up lights need something. Maybe some clear gloss mixed with a tiny bit of white or just clear gloss that gets stippled slightly before it fully cures? The mirrors are painted in body color and white. I was kinda hoping for chrome but they look fine. BTW, if the mirrors look a little wonky, that isn't a problem. The bow tie emblem on the hood is painted dark blue. I was hoping for yellow or clear blue but it looks fine. Wheels and tires-now I can gripe a little more. These are small issues but the wheels are factory steelies with dog dish chrome hub caps. The chrome and painted details on the hub caps look perfect but the wheels need some work. Maybe some panel liner just to give them some depth? Tire valves are included. The tires themselves have a great tread pattern, think Gates or Uniroyal off road tread, but NO side wall detail. I mean, c'mon.. At least some small letters for inflation pressures..something? The front wheels feature locking hubs painted blue. Call me a purist, but I want to paint them yellow because everyone knows you HAVE to have Warn Locking Hubs installed. Nothing else will do. So, this model was a little pricey. Was it worth it? Yeah, I don't feel like I got burned. If anything, if I had to sum it up, its just too clean. Some basic weathering can add depth but this is a BLAZER. Its supposed to look like it gets beaten with a chain, even in the dealer's showroom. Last edited by ET2SN; 04-24-22 at 11:11 AM. |

|

|
|
03-03-22, 08:46 AM
|
#2 |
|
Fleet Admiral
  Join Date: Sep 2003
Location: Denmark
Posts: 17,814
Downloads: 37
Uploads: 0

|
A real beauty she is indeed. I myself have just finished building two 1/16 scale car models.
1) Porsche 356 Cabriolet - 1:16 (Revell) 2) Pontiac Firebird 1979.(MPC) I build them strait up and down-no paint. I could have painted the Porsche the colour scheme was available, but there weren't any colour scheme for the Pontiac-So it's all white. Diecast in all it's honour, I prefer bigger models to build. Markus
__________________
 My little lovely female cat |

|
|
|
03-03-22, 08:56 AM
|
#3 |
|
Chief of the Boat

Join Date: Feb 2006
Location: 250 metres below the surface
Posts: 180,867
Downloads: 63
Uploads: 13


|
Very nice ET2SN
A week or so ago I was looking at this but never pulled the trigger. https://www.amazon.co.uk/dp/B08R15Z7...A3P5ROKL5A1OLE
__________________
Wise men speak because they have something to say; Fools because they have to say something.
Oh my God, not again!!  GWX3.0 Download Page - Donation/instant access to GWX (Help SubSim) |
|
|
|
 |
| Tags |
| model |
| Thread Tools | |
| Display Modes | |
|
|


 Linear Mode

