|
THROUGH THIS LINK SUPPORTS SUBSIM, THANKS! |
The Web's #1 BBS for all submarine and naval simulations!
|
Click here to access the Helosim website |
The Web's #1 BBS for all submarine and naval simulations! |
|
|
 05-25-10, 04:01 PM
|
#1 |
|
Ace of the Deep
 Join Date: Dec 2003
Posts: 1,006
Downloads: 5
Uploads: 0
|
Kamov Ka-50 quick start up procedure.
[Wall Panel] Batteries 1&2 ON [Left Panel] Rotor Brake OFF K-041 ON [Right Front Panel] ABRIS ON [Wall Panel] Fuel Pumps FWD & AFT ON, external pumps as required if carrying wingtanks. Fuel QTY ON INTCOM ON VHF-2 ON Standby S A I ON Fire Supressing System OPER [Rear Panel] Power plant, hydraulics, EKRAN self test systems OPER INU HEAT ON INU ON [Left Front Panel] Press MASTER CAUTION push-light twice (2x) to initiate EKRAN self-test ENGINE START UP ------------------ [Wall Panel] APU fuel shutoff valve OPEN [Left Panel] Start ( Button: Home ) After "START VLV" light extinguished and APU running Set engine selector to LH (Button: e) [Wall Panel] Left engine fuel shutoff valve OPEN Left engine Electronic Engine Governor (EEG) ON [Left Panel] Start Engine at 2000 RPM or more then Left engine fuel cut off OPEN After engine is running and START VLV light is extinguished, set engine selector to RH. Repeat for right engine. AFTER ENGINE STARTUP ------------------------ Throttle to Auto (Button: 2x Pageup) [Left Panel] Shut down APU ( Button: END ) [Wall Panel] When APU completely shut down then: APU fuel shutoff valve CLOSED Generators ON IFF ON NAV systems power ON VHF-1 ON DL ON VHF TLK ON SA-TLF ON Ejecting System Power ( 3 switches ! ) ON Weapons control systems ON NAV master mode OPER NAV Datalink power ON Datalink Mastermode set to desired mode ID set to your ID ( 4 aircraft in one flight 1, 2, 3, 4) Each pilot with unique number! Autopilot channels ON [Rear Panel] UV-26 ON L-140 ON [Wall Panel], [Overhead Panel] Lights as required [Overhead Panel] Rotor anti ice as required. Engine anti ice/ or Dust protection as required. Pitot heat as required. Wall Panel   Left Panel  Rear Panel 
Last edited by Lionclaw; 05-26-10 at 10:33 AM. Reason: Redone checklist |

|

|
|
05-25-10, 04:30 PM
|
#2 |
|
Lucky Jack
 Join Date: Apr 2005
Location: Finland
Posts: 25,004
Downloads: 32
Uploads: 0


|
I think we could use this thread for all kinds of stuff about DCS. Useful hotkeys, tutorials etc.
 While watching a track you can speed/slow/reset the time with LCtrl+Z/LAlt+Z/LShift+Z We had talk about the helo repair/respawn today, the key is RCtrl+RShift+TAB |
|
|
|
|
05-25-10, 04:35 PM
|
#3 |
|
Rear Admiral
 Join Date: Jul 2008
Location: SPACE!!!!
Posts: 10,142
Downloads: 85
Uploads: 0
|
well, one I had plenty of experience with today would be
Lwin + Home, for auto start.
__________________
Task Force industries "Taking control of the world, one mind at a time" |
|
|
|
|
05-26-10, 06:32 AM
|
#4 |
|
Navy Seal
 Join Date: Jun 2008
Location: Land of windmills, tulips, wooden shoes and cheese. Lots of cheese.
Posts: 8,467
Downloads: 53
Uploads: 10
|
Checklist is good, but all the panning around between the panels is confusing. To simplify, you can go front, right, rear;
Turn on batteries and/or ground power. First basic step. Front: (left) K-041 (right) Abris Right: Comms (all radio switches except last one) Fuel gage Fire suppression Standby SAI Rear: INU power and heat Ekran self test Then back to front to push the blinking light, and continue with APU/engine start. * and something missing is closing the APU valve after shutting it down and powering NAV system (both wall panel).
__________________
 Contritium praecedit superbia. |
|
|
|
|
05-26-10, 06:51 AM
|
#5 |
|
Lucky Jack
Join Date: Jul 2002
Posts: 25,976
Downloads: 61
Uploads: 20


|
Be sure to find the button for rotor ejection and tape something over it...you don't want to make the same mistake I have on EECH...
|
|
|
|
|
05-26-10, 07:28 AM
|
#6 |
|
Navy Seal
Join Date: Jun 2008
Location: Land of windmills, tulips, wooden shoes and cheese. Lots of cheese.
Posts: 8,467
Downloads: 53
Uploads: 10
|
Separate system I'd like to touch on. It's part of the start procedure, but requires proper setup, instead of just turning it on:
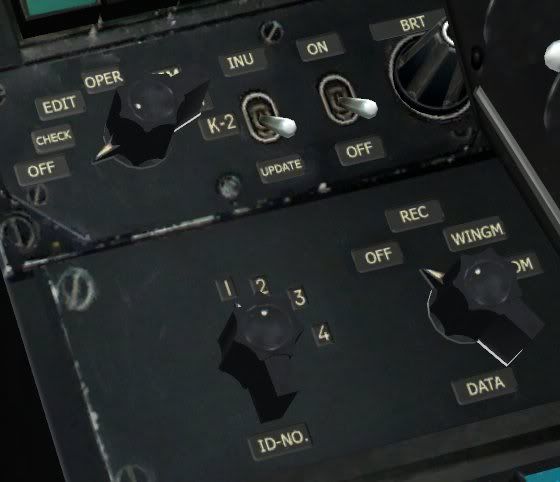 The main benefit from setting this is getting numbered icons on the Abris display, showing you the position of flight members. First power the system by setting the 2nd switch on the top to "ON", and make sure "Data link radio equipment" and "Data link VHF radio equipment" radio switches are on. Is all part of normal start-up, so shouldn't have to worry about it. I'd suggest the first chopper in the selection screen sets his "ID-NO" to 1, second chopper in screen sets to 2, etc. There's only 4 numbers, so chopper 5 sets to 1 again. Grouping is controlled by the radio-frequency of VHF2, which you can set on the left panel. "DATA" knob controls send/receive mode. Set to "COM" for flightlead (#1) or "WINGMAN" for other flightmembers (#2-4).
__________________
Contritium praecedit superbia. Last edited by Arclight; 06-09-10 at 06:25 AM. |
|
|
|
|
05-26-10, 07:47 AM
|
#7 |
|
Seasoned Skipper
 Join Date: Jun 2009
Location: In your ocean, sinking your ships
Posts: 721
Downloads: 96
Uploads: 0
|
I easily forgot about the next step when I try to manual start myself.

__________________
[SIGPIC][/SIGPIC] |
|
|
|
|
05-26-10, 09:15 AM
|
#8 |
|
Navy Seal
Join Date: Jun 2008
Location: Land of windmills, tulips, wooden shoes and cheese. Lots of cheese.
Posts: 8,467
Downloads: 53
Uploads: 10
|
In the manual, they give you these checklists for each and every possible procedure; firing gun from static mount, firing gun while tracking, firing gun from static with ranging, etc.
Imho a better way is to learn the different functions of the system, and mix and match what you need on the fly. I think knowing the system makes it easier to use it, as compared to remembering 15 different checklists. Basic thing is to enable "master arm", nothing will work without it. To bring up targeting reticle for gun or rockets (static fire), simply select the hardpoint (rockets) or enable cannon. Note that the cannon overrides other weapons: you can switch to cannon with any other other weapon selected, but you'll need to disable it again before you can fire anything else. The problem here is you're "firing from the hip": the reticle is only accurate for a particular range, so you'll need to eyeball the actual range and estimate proper leed/elevation. Need experience (or some spare ammo) to get this right. A slightly more advanced method is to include ranging; the only extra tool you need for this is the laser, and set the Shkval mode to "GS" (switch next to laser) . Enable the laser, maneuver to place the reticle on the target and push the "lock target" button. A countdown of a few seconds will appear in the HUD, after which the reticle will jump. It now displays a proper impact point for the selected weapon, based on the range that you entered. Grants you much better accuracy and takes out the guesswork from "firing from the hip", though you should still leed moving targets. Note though that if you're moving at high speed, the range will have shortened in those few seconds. 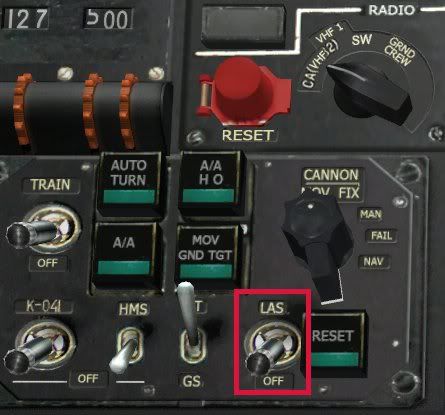 You'll get the highest degree of accuracy with auto-tracking. It is also the most complex. Works for the cannon and Vikhrs. In addition to the laser, you need to operate the Shkval. First, press the "uncage" button. The display comes alive and a reticle pops up on the HUD to indicate where it's pointing. Now pan it over your target and press the lock button. The bracket should start to jitter a bit, indicating the system is actively analyzing and tracking. If you have the laser active, a range will display at the bottom as well (if not, activate laser and press "target lock" again. You might realise now that the "lock" button doubles as rangefinder button). If you have the cannon active, you'll notice a large bracket displaying in the HUD. It indicates the maximum area the gun can traverse. Make sure the target is within this limit before opening fire. With Vikhrs selected, a reticle will display on the HUD, which will drop down to the same elevation as the target; the launcher is automatically depressed to line up the shot, but it can't swing side to side, so you'll need to turn the helicopter to line up the reticle with the Shkval reticle before firing. In all modes, you'll notice the "firing authorised" indicator in the HUD and Shkval display; it looks like a "C". Without this, weapons will not fire. Firing is authorised when conditions are met; target is not too close, not too far and within launch window. You can override this by flipping a switch, allowing you to fire a weapon whenever you wish (American style). 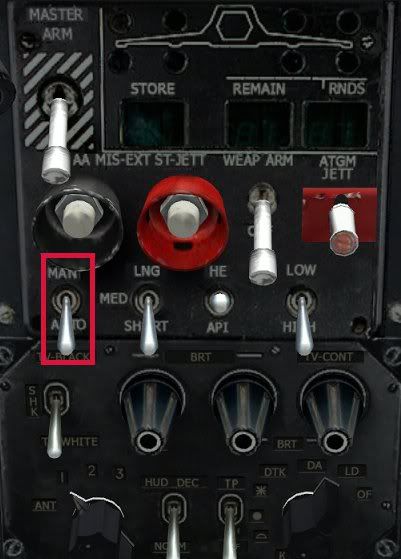 Set to "MAN". There are also 4 modes you can use to improve targeting and make your life a little easier. 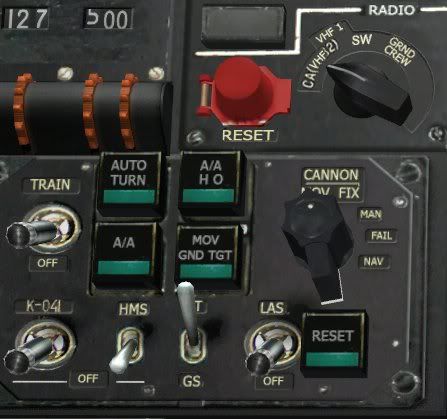 "AUTO TURN" makes the helo turn to where the Shkval is pointing, basically lining up shots with Vikhr automatically, though you might need a little rudder input to counter wind. "MOV GND TGT" should be enabled when targeting moving vehicles. As far as I know, it only tells the cannon to lead the target, though it might have some impact on Vikhr too. "A/A" should be used against airtargets. It sets a proximity fuse on the Vikhr, increasing the odds of damaging a target when the missile misses direct impact. "A/A H O" is basically the same as the previous, but the fuse is set to go off earlier. This should be used for airtargets that are coming at you. Some other things to note on this panel: the radio selector knob should be set to "GRND CREW" if you wish to refuel or rearm. You can just open the cockpit door and shout when the engines/APU are not running, but otherwise you'll have to use the radio (make sure it's on, too). The "HMS" switch controls the helmet mounted sight. Flip it, and a reticle flips down in sight. You can turn your head to look around and line up targets. When lined up, press the "uncage" button, and the Shkval will uncage and automatically slew to wherever you were looking. Can be used to quickly line up targets, especially with "AUTO TURN" engaged (beats the painfully slow panning in most cases). The "AT" / "GS" toggle is used to control the Shkval mode. "AT" means auto-tracking, which is the default mode. "GS" means gunsight, and it activates, slews and locks the display to the reticle displayed in the HUD. You can use it to get a close up view of what you're engaging with rockets or cannon, but imho it doesn't offer an improvement in accuracy over the reticle in the HUD, and the field of view is so narrow that it is rather cumbersome to target with. Good for ID-ing targets though, but if you're close enough to deploy cannon or rockets effectively, you probably made up your mind about whether or not it should be killed. Note that it must be set to "GS" to use rangefinding when firing without auto-tracking (locking the Shkval on target). There's a function called "targeting mode reset". It's used to reset the weapons system, caging the Shkval, disabling any selected modes and deselecting hardpoints. It returns the HUD to default mode, which is much better when you're moving about (if the HUD does not return to normal after using this, you have the cannon active; as stated before, cannon overrides anything else, including the reset command). Default mapping is backspace.
__________________
Contritium praecedit superbia. Last edited by Arclight; 05-27-10 at 08:02 AM. |
|
|
|
|
05-26-10, 07:17 AM
|
#9 |
|
Lucky Jack
Join Date: Apr 2005
Location: Finland
Posts: 25,004
Downloads: 32
Uploads: 0
|
Replacing an existing Ka50 skin using JSGME
Right, this is the easiest way for adding own skins to the game. First of all, install JSGME to the Ka-50 root folder just as you would do it in Silent Hunter, remember to run it once to get the MODS folder. 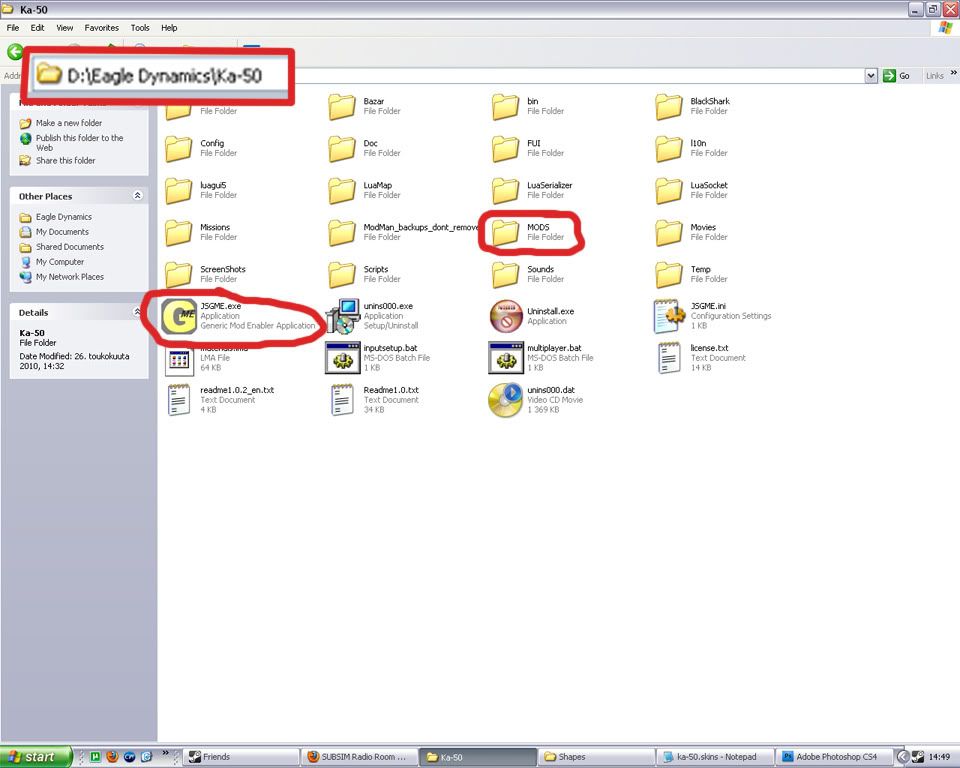 Next, you have to decide which skin to replace, so go to ka-50/scripts/database/helicopters and open the ka50.lua with your favorite text editor. The skins are listed at the top of the file. Let's say you want to replace the New Year 2009 skin, what you need to do is remember the number in the end of the line, 23 in this case. 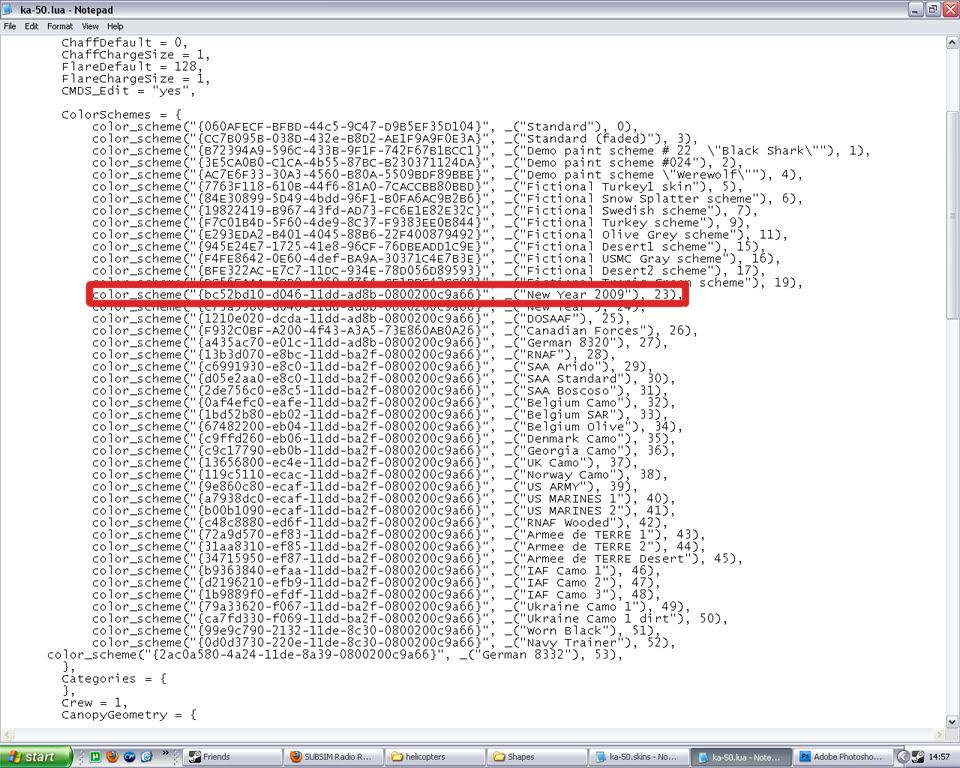 Now, with knowing which skin to replace, you must go to Ka-50/Bazar/World/Shapes and open the Ka50.skins file with your favorite text editor. Inside you'll see sections of code that leads to different .BMP files. In the beginning of each section, you see a value number 0, 0.1, 0.2 etc. Ok, you propably guess what to do next, yup; scroll down until you find value of 2.3 which is for the New Year 2009 skin. 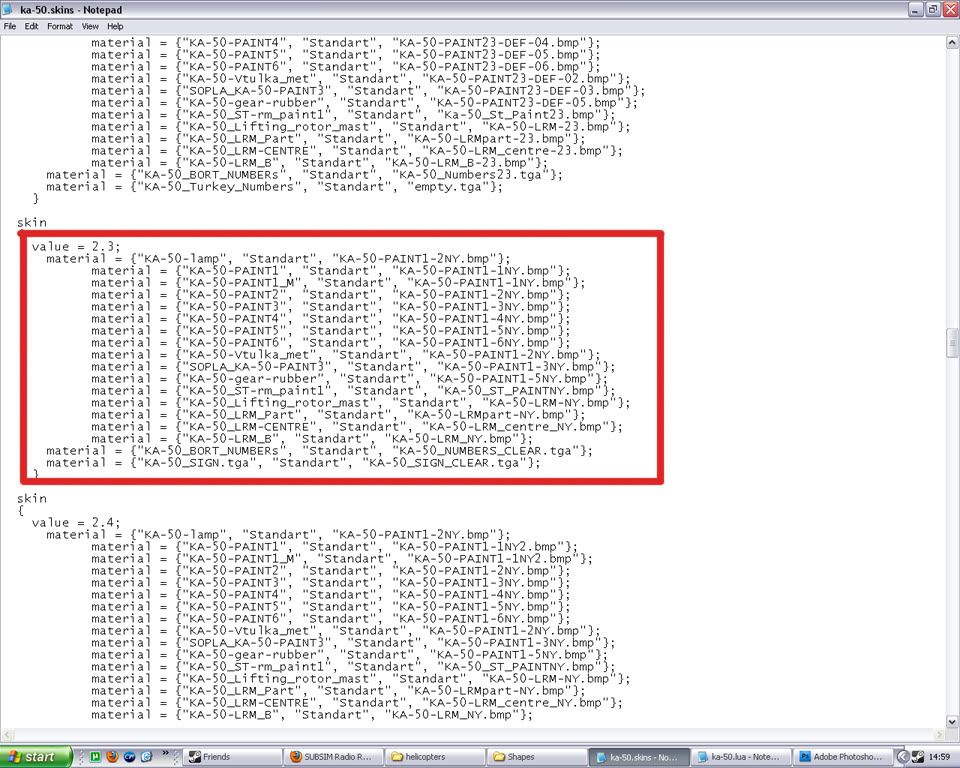 Now, all you must do is rename your custom skin files to resemble these. For example, one of my custom skin files is called: KA-50-Dowly-PAINT1-DEF-01.bmp I would rename it to: KA-50-PAINT1-1NY.bmp KA-50-Dowly-PAINT1-DEF-02.bmp to KA-50-PAINT1-2NY.bmp and so on. After renaming all your files copy your skin files to MODS/nameofyourskinmod/bazar/temptextures If you've done everything correctly, you have now replaced the New Year 2009 skin with your own awesome skin. Notes: - If you are using the official template, you might be missing few files, I think paint 3 is one, but I think that's for some small parts. Using this method of installing skins, every skin file the game doesn't find from Temptextures, is loaded from the .cdds files. - I haven't tried to replace the skin I mentioned, only the standard skin, but I don't see why this wouldn't work. - Damn, that Jim Carrey movie was right, only now I realised I picked skin number 23. 
|
|
|
|
|
05-27-10, 07:59 AM
|
#10 |
|
Navy Seal
Join Date: Jun 2008
Location: Land of windmills, tulips, wooden shoes and cheese. Lots of cheese.
Posts: 8,467
Downloads: 53
Uploads: 10
|
Right, made a mistake in the weapons section; to use rangefinding without auto-tracking, you need to set Skvahl to "GS" mode. Will edit that.
__________________
Contritium praecedit superbia. |
|
|
|
|
05-27-10, 08:35 AM
|
#11 |
|
Navy Seal
Join Date: Jun 2008
Location: Land of windmills, tulips, wooden shoes and cheese. Lots of cheese.
Posts: 8,467
Downloads: 53
Uploads: 10
|
Every now and then, you'll have to deal with an engine that won't start. Whether it is because of damage or user error, there's 1 procedure you can try to get it back in order again.
It's called cranking the engine, and is used to purge excess fuel from an engine. Basically, you turn the engine without supplying more fuel, driving out what fuel is present already. Technically, you should engage the rotor brake, but since we don't have to deal with braindead groundcrew wandering too close to our helo, I don't think it's nescesary. What you do is use the normal start-up procedure with the start-up mode selector set to "crank" (switch next to engine selector, has 3 modes for: "engine start", "crank" and "false start"; up, middle and down position respectively), except turning on EEG isn't nescesary because you're not trying to fire up the engine, and you leave out the last part of opening the cutoff valve when the engine spools up to 20% (denying fuel to engine). What you'll see is the start-valve light come on as normal, and the engine spools up to above 20% as normal (if it doesn't, you've got bigger problems). Again, don't open the cutoff valve at this point, just wait untill the light turns off and the engine spools down. Then set the mode selector back to "engine start" and start as normal. 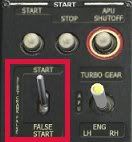
__________________
Contritium praecedit superbia. |
|
|
|
|
05-27-10, 09:04 AM
|
#12 |
|
Navy Seal
Join Date: Jun 2008
Location: Land of windmills, tulips, wooden shoes and cheese. Lots of cheese.
Posts: 8,467
Downloads: 53
Uploads: 10
|
The PVI-800 is your navigation computer; the big panel on your lower-right front, with the numbered buttons.
It has a lot of functionality packed into it, including the ability to send points (coordinates, basically) over the datalink to other flightmembers, but I'll just touch on some basic functions here. 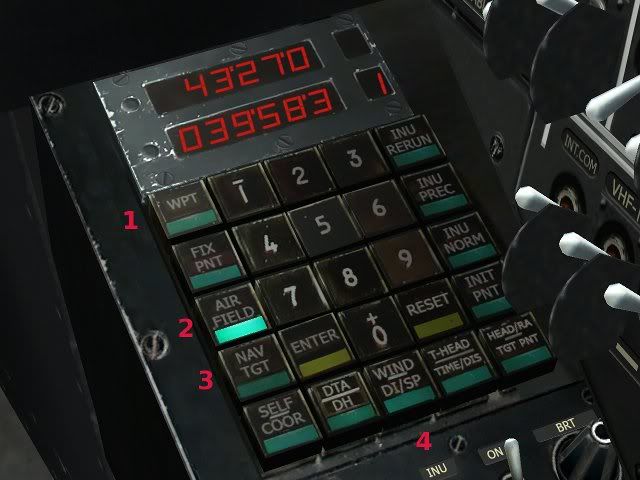 1. waypoint mode: If you look at the Abris in flight (and you set it to map), you'll notice the lines and waypoints forming a flight route. The autopilot isn't tied to the Abris, so apart from visual guidance on it's display and in the HUD, it doesn't help you get there. But those waypoints are also stored in the PVI. If you press the "WPT" button (marked 1 above) and press a number, the corresponding waypoint is brought up and made active. Note that the first waypoint for PVI is not the airfield, but the actual first waypoint in the route. 2. airfield: The position of the base/FARP you take off from is stored in the PVI as well. You can bring it up by pressing the "AIRFIELD" button, and then "1". 3. point mode: In the editor, you can set targetpoints, typically placed at enemy positions. These points are entered in the PVI as well, and can be brought up by pressing the "NAV TGT" button and then a number. You should notice a numbered box popping up on the Abris display (given that it is visible, depending on scale setting). 4. wind Nice and simple: press this button, and the top bar will display wind direction, and the bottom bar displays wind speed in m/s. To set the PVI back to neutral and get the standard HUD back, just push the lit mode-button. It will turn off and no more data is supplied from the PVI untill you activate it again. So, what good is all this? Well, for one, the HUD displays some more info: an indicator will pop up on the heading strip to indicate direction to your selected point, and on the bottom of the HUD you'll notice a range-indication. This is handy when combined with the point mode; given that a point is properly set to indicate enemy position, you can read out a range estimate from you to likely threats. Knowing a Strela SAM can reach out to about 5 km, and your Vikhrs to 7km (about 8km with the authorisation override), you can position yourself in striking range without flying into threat range. Note that it kinda depends on how the mission is set up, but it's still a good tool to use to determine if your current firing position is likely to result in a smouldering wreck at some point. Secondly, it allows you to engage the autopilot, and have it fly for you. And that's what I'll touch on next.
__________________
Contritium praecedit superbia. |
|
|
|
|
05-27-10, 11:19 AM
|
#13 |
|
Navy Seal
Join Date: Jun 2008
Location: Land of windmills, tulips, wooden shoes and cheese. Lots of cheese.
Posts: 8,467
Downloads: 53
Uploads: 10
|
Because the autopilot and trimmer are closely tied together, a bit on the trimmer and how the 2 relate first.
A trimmer sets control-surfaces to a user specified setting. For example, if you trim the rudder in a direction, it will stay like that until you change it. In the real KA-50, the trimmer "locks" the controls in place, and the same thing should happen if you have a force-feedback joystick. In the game, without force-feedback stick, it will remember your input, and use it as the new center-position for your controls. Note that there's an option in the options menu that lets you change the behavior. Normally, as soon as the trimmer is released, any input at that moment is added to the new center-position, so if you have the stick pushed forward when releasing the trimmer, the nose will suddenly dip further until you center the controls. The alternative method disables input until you center the controls, preventing the dip. But you might be turning the helo with trimmer down and accidentally release it for a moment; controls don't respond because you need to center first before making new inputs. Something to watch for, decide for yourself which method suits you best. To use the trimmer, press and hold it down, then maneuver the chopper to your new course and attitude, and release the trimmer. The autopilot will use whatever control-authority it has (about 15-20% from max input) to hold current pitch, bank and heading. That means that if you trim the helo flying North and then try to change direction without trimmer, you first have to override that 15-20% input the AP will use to counter you, and you'll end up fighting (quite literally) the helo. And even if you manage to steer your new course, the AP will happily steer you back to the previous one as soon as you ease up on the controls. Besides the 3 hold-channels, the AP has some other modes and functions, 2 of which can be seen near the 3 primary ones: 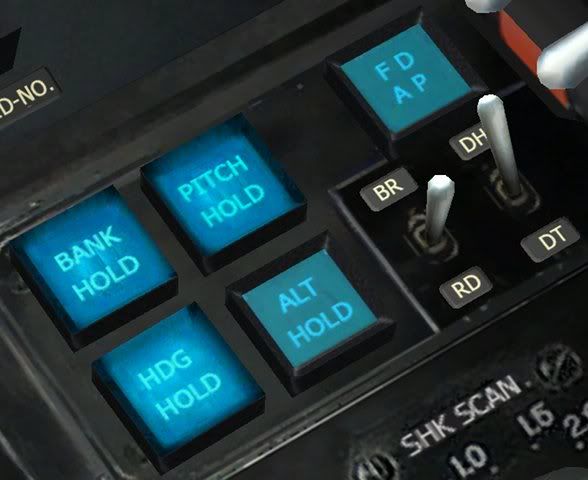 "ALT HOLD" engages the AP altitude hold channel. As with the other channels, it has only limited control, so if, say, 30% more collective is required to hold altitude, the AP will not be able to do so and you will lose altitude. So the best way to use this, and the other channels, is trim the helo to what you want it to hold. In this case, manually get your vertical speed to (near) 0 before engaging it. That way the AP has sufficient authority to make the necessary adjustments. Note that any change in attitude requires re-trimming (preferably, have the trimmer held down when making these changes, as stated before). Note also that this particular channel has an extra control interacting with it: the "collective brake". In the real KA-50, this needs to be pulled before you can make changes to the collective, to avoid dropping out of the sky after accidentally bumping it. It also has an "assign altitude" function, which is modeled in the game, and functions much like the trimmer. Let's say you're in a hover, hover-mode and altitude-hold both engaged. To change altitude, press and hold the brake, increase or decrease the collective, level off at desired altitude (near 0 vert. speed) and release the brake. The new altitude will be sent to the AP and it will hold there (basically the brake acts as the trimmer for the altitude channel). (alternatively, turn off alt hold, change altitude, level off and re-engage) The first switch below the "FD AP" button is related as well: "BR" (up) tells it to use barometric pressure altitude, which is basically your altitude above sea-level. "RD" (down) tells it to use the radar-altimeter, which always gives you height above ground. The middle position sets this to auto (see just below). The radar-altimeter functions to 300m above ground-level, after which it no longer gives a reading. If you have the altitude-hold channel active and set to radar-alti, the channel will essentially fail to function correctly because it is not receiving any altitude information. To get around this, leave the switch in the default auto position: radar will be used below 300m, and it will switch to baro-alti above that. You may have realized that you can use the radar-altimeter and altitude-hold to get the helo to follow terrain automatically, but please remember that the AP has only limited input. It really can't manage with quick changes in height above ground, especially at speed. Be careful. The "FD AP" turns on flight-director mode. You will see a change in the HUD, with 2 small horizontal bars popping up either side of the attitude indicator. It represents the currently trimmed pitch and bank. It's function is this: in flight-director mode, the 3 main channels get different behavior. They no longer hold, but dampen, and in the case of heading-hold it is no longer functional at all. What it allows is a fair degree of free control without trimming for every little change. You can still use the trimmer to minimize the needed input, but the AP will not actively fight you when you try to deviate from it. On the flip-side, you now have to make corrections regularly to counter small changes in pitch and bank. Personally I prefer this when going into combat; I don't have to worry about constantly holding down the trimmer to maneuver. Note that since hold-behavior is changed to dampen, hover-hold will not work as well either. Told you this thing was complex, didn't I?  Route-mode: Route-mode works in combination with the PVI. It automatically flies the helo to the waypoint or targetpoint you brought up on it's display, while holding desired speed. You can set whether you want to simply fly towards the waypoint (heading), or fly the exact line between 2 waypoints, or between a waypoint and a targetpoint (track). You control this with the 2nd switch below the "FD AP" button. "DH" (up; desired heading) position tells it to just steer the heading, "DT" (down; desired track) position tells it to follow the exact track. Note that the AP will try to maintain your desired speed: if you want to cruise at 180kph, accelerate/decelerate to that speed, trim the helo to maintain that speed and engage route-mode. Changes can be made with the mode active by holding the trimmer, changing speed, leveling off to maintain that speed and releasing again (again, the AP has limited input available, so if the speed is different than desired, the helo is probably not trimmed close enough to the desired attitude. Also realize that any change in collective affects attitude as well; yes, more trimming). Combine this with altitude hold for a nice, hands-off, perfectly level flight. Hover-mode: In hover mode, the AP tries to hold the helo at the same position and height, so as a result of enabling this, altitude-hold channel is automatically engaged as well. To use this properly, trim the helo for a hover first; reduce speed to near 0 and trim so it almost hovers on its own. Engage hover-mode and it will make the necessary adjustments to hold the helo in place without any further input. It has a minimum altitude, which I think is 15m (more like 10m or 5m, but try to keep a margin for safety). Do NOT engage this mode below that altitude. Please don't try to land by descending from this hover; it will disengage at some point before touching the ground, leading to a failed landing if you're not prepared to deal with the suddenly needed corrections. In the HUD, you'll see a small circle pop up, with a small square in the middle. Imagine looking at the helo from the outside, from above. The small square is the point on the ground you want to hover above, and the circle represents the rotordisk. If you drift forward, you'll see the square drifting down in the HUD (to the rear of the helo in this imaginative top-down view). The AP will always try to steer back to this point, centering the square in the circle (getting the center of the rotordisc exactly above the desired point). If the deviation becomes to big, the AP will pick a new point directly below the helo (you'll see a new square pop up in the HUD, centered to the circle, if the previous one drifts off to far). If the helo has trouble staying on the spot, keep the trimmer pressed and refine your manual hover, then release to give the AP another shot at it. Vertical descent: It's an automated way of descending while in hover-hold mode. Press and hold the key to make a smooth descent at up to 2m/s. Once released, new altitude is sent to AP and it will hold that. It's useful because it has a limited rate of descent, avoiding any vortex accidents. Should it not descent, or barely, you probably have the collective "trimmed" to high, so the AP can not give enough input to make the descent. Think that's it... god, I hope that's it.
__________________
Contritium praecedit superbia. Last edited by Arclight; 05-27-10 at 11:38 AM. |
|
|
|
|
05-27-10, 11:54 AM
|
#14 |
|
Navy Seal
Join Date: Jun 2008
Location: Land of windmills, tulips, wooden shoes and cheese. Lots of cheese.
Posts: 8,467
Downloads: 53
Uploads: 10
|
On the auxiliary panel, rear-right, you'll find this bad boy:
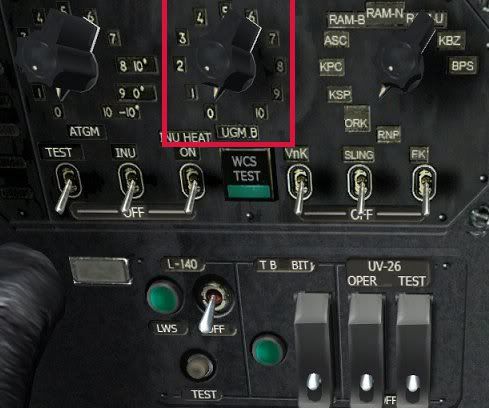 It's the ballistics data settings selector. It has different modes that you need to set, depending on which type of unguided weapon you are using. If you're only carrying 1 type of rocket or gunpod, and it is mounted at the start of the mission (the helo "spawns" with it), it should be in the right postion. If you change load-out during the mission though, or have different weapons on the inner and outer hardpoint (S-8 + gunpods, for example) it will need to be set manually: 0 - S-8 KOM / OM 1 - S-8 TsM 2 - S-13 3 - 4 - S-8 OFP2 5 - UPK-23 6 - 7 - FAB 250 8 - FAB 500 9 - KGMU AO 10 - KGMU AT Failing to set it correctly will result in the targeting reticle not displaying in the correct place on the HUD.
__________________
Contritium praecedit superbia. Last edited by Arclight; 05-29-10 at 02:09 PM. |
|
|
|
|
06-01-10, 07:39 AM
|
#15 | |
|
Lucky Jack
Join Date: Apr 2005
Location: Finland
Posts: 25,004
Downloads: 32
Uploads: 0
|
Nifty Ka-50 Cockpit trainer from the Warhawk squadron:
http://war-hawks.net/Training/mod/re...iew.php?id=122 If it asks to register, click to login as quest. Quote:
|
|
|
|
|
 |
|
|


 Hybrid Mode
