
|
|
SUBSIM: The Web's #1 resource for all submarine & naval simulations since 1997
|
SUBSIM: The Web's #1 resource for all submarine & naval simulations since 1997 |
 02-01-06, 01:10 AM
|
#1 |
|
Captain
 Join Date: Jan 2006
Location: Ensenada, B.C., Mexico
Posts: 504
Downloads: 0
Uploads: 0
|
<Edit: PDF version here - Gizzmoe>
First of all, let me start by saying that I didn't reinvent the wheel or claim that I did. All of what you will find here can be found on other posts (and only one of them was done by me) To learn more, go here: http://www.paulwasserman.net/SHIII/ http://www.communitymanuals.com/shii...itle=Main_Page This is just an attempt to show you how to apply all that wonderfull knowledge in a step by step illustrated fashion, playing a SHIII game modded with RUB and on 100% realism (only unchecked realism box is the one that relates to the nav-map updating contacts automatically, but that still gives you 100% realism on the newer RUB) Having said that... Lets roll  !! !!Step 1: Most of the times you'll get help from other german units by virtue of contact reports that you'll receive from the BdU... and you're in luck, 'cause you just got one now 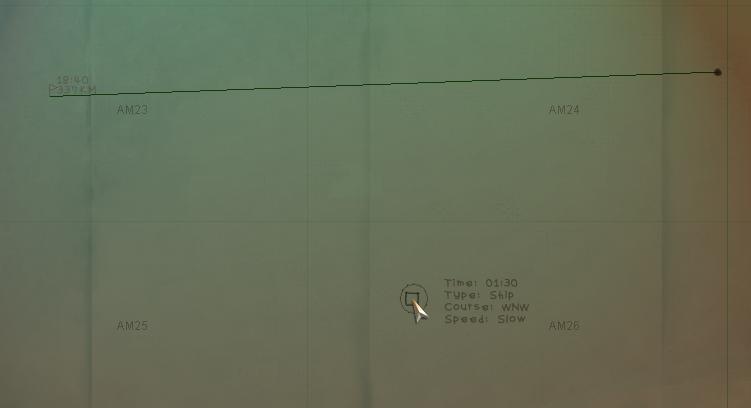 You take notice of the ship's speed and heading: Slow, going towards West by Northwest. You keep your cool and don't head straight for the contact. As a graduate from officer school in the Kriegsmarine, you know that any bilge rat that heads straight for the target will find it long gone by the time he gets there. You know that instead, you need to calculate an intercept course. You know that the answer can be very easily calculated with the law of the sines, but you don't carry the necesary trigonometric tables on board a U-boat to do that (So that would be cheating). Notice on image 1 that you have allready ventured a guess as to what the intercept course will be, and have allready started heading towards it. It won't be very accurate of course, but at least you won't head in a completely wrong direction while you work out a graphical solution to the intercept problem Step 2: You take out the protractor and click on your U-boat and the on the contact to make the first leg. For the secon leg, make it so that it goes from the contact off into it's reported direction. In our case it was reported as West by North West, which is 292.5 degrees from north (click on the ? icon in the nav-map window to have these type of aids show) 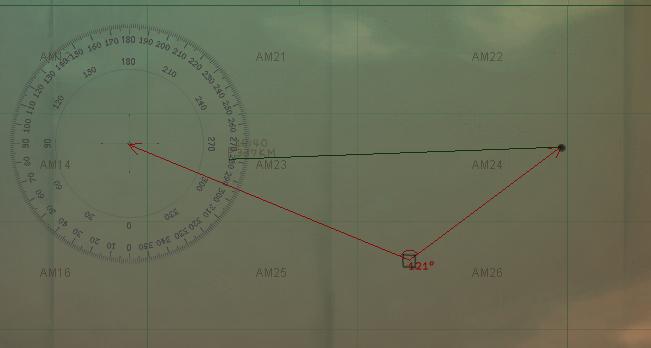 Step 3: Now you take out the ruler and measure from the contact's location of into the direction of it's course. You measure a distance that is representative of his speed. In this case, he was reported as slow, which you know means about 6 knots (medium is 9). In this case the image shows a distance of 60 kms on the ruler which works well. Other options would have been 6 kms, or 0.6 kms or whatever number that readily reminds you of 6 knots. 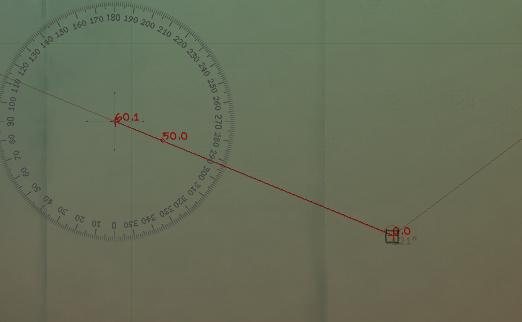 Step 4: Now it's decision time: at what speed should you travel to intercept the contact a) moving away from you b) and very far away from you to start with c) your in English controled waters all of which means that you'll have to move decisevely... so 16 knots it is. So you draw a circle, centered at the end of the ruler measurement you did in step 3, with a radius of 160 mks... why 160 mks? because in step three you chose to represent each knot by 10 mks, remember? (If in step three you'de had measured 6 kms for the 6 knots you would now be drawing a circle radius of 16 kms for 16 knots, and so on). Let's look at your circle 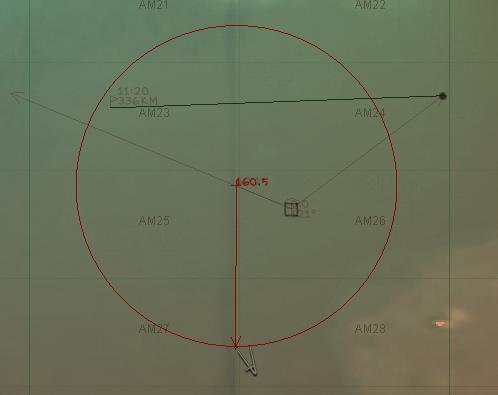 Achtung herr Kaleun!!: Take special notice of were the circle cuts the line formed from your u-boat to the contact. Step 5: Now the magical part. You take another protractor (second one) and click on the center of the circle you just made on step four, then you click on the spot the special spot noted at the end of step four (where the circle cuts the line that goes from your u-boat to the contact) to make the first leg of the protractor. For the second leg of the protractor, make it sow that it heads directly towards the contact. Your Nav-Map now looks like this  Take special notice of the angle that has been formed (in this example, 19 degrees) Congratulations, you now know how to succesfully intercept the contact: you should lead it by 19 degrees in order to intercept it. Step 6: This is just an auxiliary step that aids you in measuring those 19 degrees by which you need to "lead" the target. You take another protractor tool (third one) and click on the contact (you might have to fiddle around with all of the overlaping protractors), then click on the U-boat. You now have the first leg. For the secon leg, just make it so that it reads 19 degrees while cutting the contact's reported course. Your nav map now looks like this: 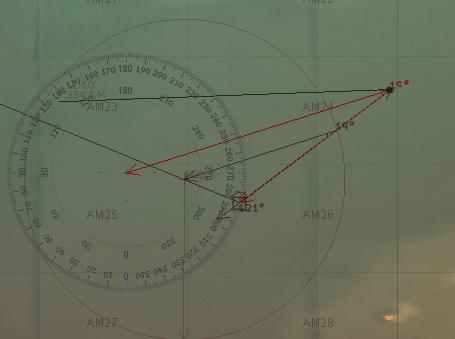 Step 7: This last leg of the protractor tool you drew on step six is the exact course you need to take, so you move your navigation way point to match it. To make it even better, you take care to place the nav point precisely at the point where your new course and the contact's course both intesect. Your nav map now looks like this: 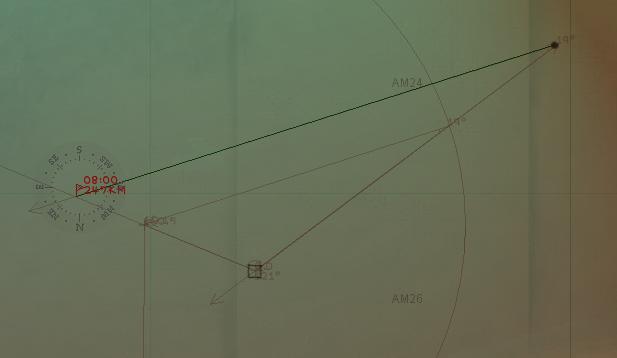 Notice that the way point says that interception will occur in 8 hours at a point that is 247kms from your current position  !!! You can't help but feel silly for all those times before you knew how to do this and all those ships that used to vanish without a trace :hmm: !!! You can't help but feel silly for all those times before you knew how to do this and all those ships that used to vanish without a trace :hmm: Step 8: Before going of to sleep (you are playing this in 1xTC real time aren't you  ?!?!) you realize that both you and the contact will arrive at the interception point at the same time. ?!?!) you realize that both you and the contact will arrive at the interception point at the same time. 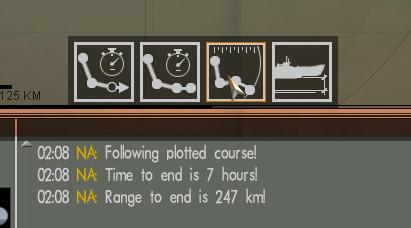 Good, we'll now arrive with plenty of time to spare (continued on separate post) |

|

|
|
02-01-06, 01:12 AM
|
#2 |
|
Blade Master
 Join Date: Jan 2002
Posts: 1,388
Downloads: 0
Uploads: 0
|
When is it coming out in paper back? :rotfl:
|
|
|
|
|
02-01-06, 02:19 AM
|
#3 |
|
Captain
Join Date: Jan 2006
Location: Ensenada, B.C., Mexico
Posts: 504
Downloads: 0
Uploads: 0
|
Step 9:
You wake up feeling rested and refreshed and realize that your allmost at the intercept point. Of course you dont expect the ship to be there just waiting in your scope's sight, because: a) the exacteness of your drawings determines the precision of the outcome b) the ships heading that was provided to you was quite vage (no degrees, just a compass heading) c) YOU CHOSE TO ARRIVE EARLY, remember? So you decide to do a quick sonar search. Periscope depth! Engines Ahead Slow! Let's listen... Aha! You got him now  !!! !!!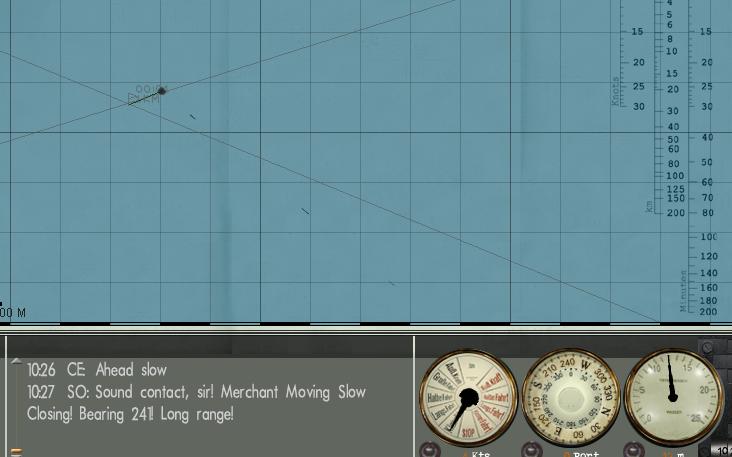 Step 10: Let's take a look at what you've got... Surface the boat!! (relax, he's too far to see you) heading 241, eh? Nope can't see him... he's still too far away. Let's wait for him 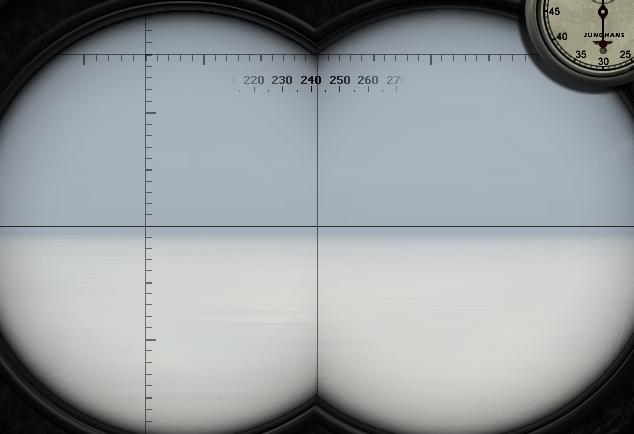 Naah, let's not. press the = key and head straight for him... A silly move for sure but we just want to get a little bit closer... let's just sail for 5 kilometers and then do a sonar search again. Step 11: 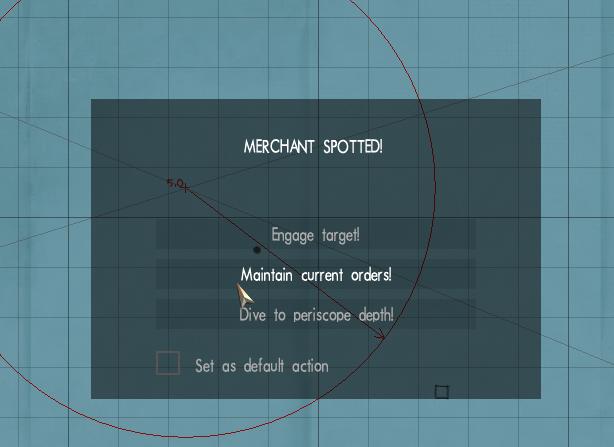 Aaahh, so there he is... you found him pretty quick . Now keep your cool and maintain current orders. Theres no need to rush an engagement or to dive like a frightened rabbit down a hole :|\ Step 12: Now let's set up your torpedoe run. Start the stop watch and immediatly mark the contact's position on the nav map (for a fully manual mode, take a look at Wazoo's "plot while you move" method) 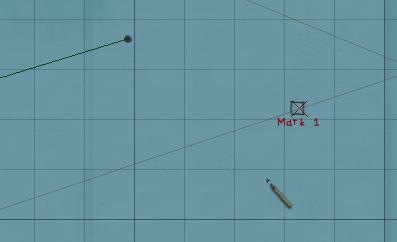 when the stop watch reaches 3 minutes 15 seconds, mark the contact's position again. Technically that is all that you'll need to determine the ships exact heading and speed, but will take another reading in another 3 minutes and 15 seconds just to make sure Step 13: By now the contact is starting to get a little bit too close, so you decide to dive and plot a course that paralels the contact's course, so that you keep ahead of him. You now wait for the stop watch to reach the 6 minute and 30 seconds mark (3:15 twice) 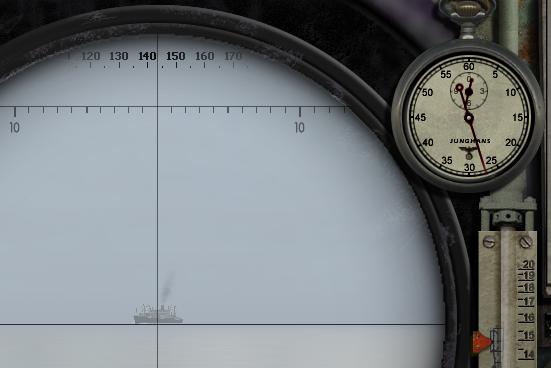 almost time for the third mark Step 14: TIME! mark the contact's position on the nav map. It should now look like this 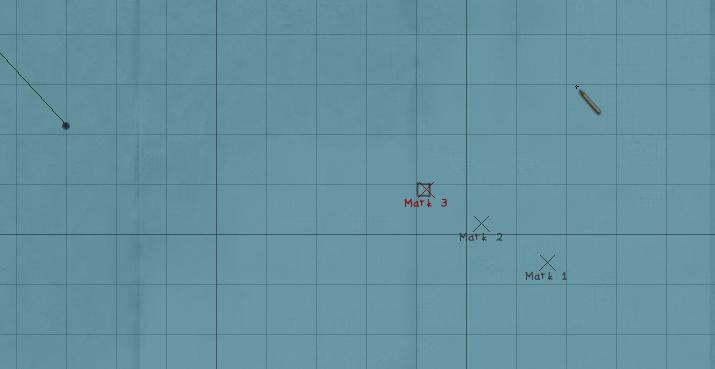 Step 15: Let's measure the marks on the nav map. In two 3:15 segments the contact traveled 1.4 kms. Which means that on average it travels .7 kms every 3 minutes and 15 seconds. The 3:15 rule says that the contact is traveling at a speed of 7 knots 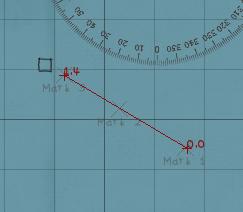 7 knots Step 16: Now the contact is officially a target so lets set him up for a trip to the deep. Take the ruler you just used and stretch it so that it projects the target course. This is also called it's "track". Using a navigation waypoint make a course for your ship that cuts across the target's track at a 90 degree angle. Aid yourself with a protractor for best results. This is of course very easy to do becuase you very wisely chose to arrive before he did . Your nav map should now look like this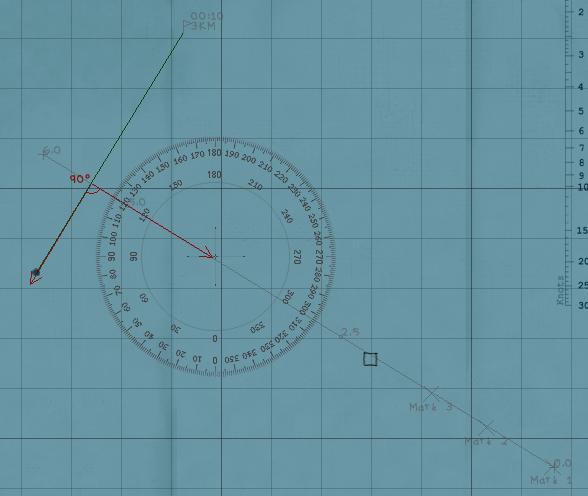 Step 17: You star feeling very confident about the situation and so decide to use the stern tube for the kill (you got to use them sometime, so why not now ) So that means that you'll have to cross to the other side of the target's track. Set the nav point 0.5 kms on the other side of the track. Asist yourself with a ruler if needed. When your almost in position, the navmap should look like this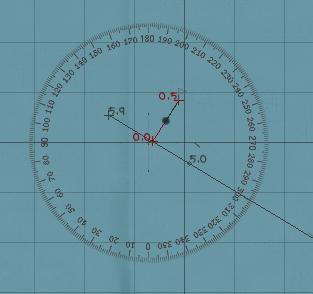 Step 18: Because you have set up your shot so beautifuly, there's no need to calculate the dreaded AoB (not hard to do, but why do it if it can be avoided?) Just raise your periscope, and point it at the 180 degree mark (that's where the aft torpedo will be coming out from :P ) and declare to the notepad with ferverent faith and utmost confidence: "when the target reaches this point, AoB whill be 90 degrees on the starboard side"  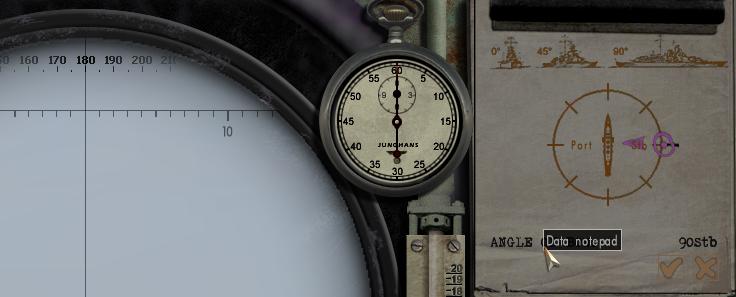 Step 19: Now that the notepad has inputed that information into the targeting computer, swivle the periscope back to the target and AoB will be constantly and correctly updated on the targeting computer By the way, since whe're allready looking at the target, take this chance to ID him.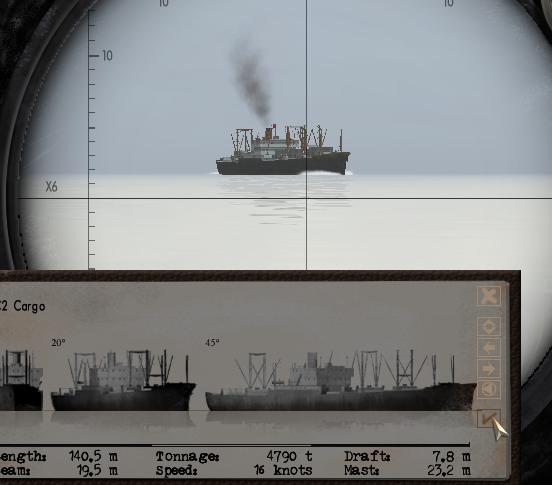 Step 20: You allready know the target's speed (7 knots) but let's double check it. Lower the periscope. Head to the hydrophone and listen to the target. 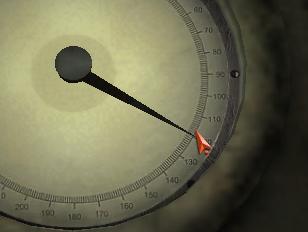 CHUG-chug-chug-chug CHUG-chug-chug-chug CHUG-chug-chug-chug... his four bladed propelar turns 28 times per minute. For a C2 that kind of engine effort translates into 7 knots ... speed confirmed (if this was way over your head don't worry, there's an excellent academy mission download for training yourself in the use of the sonar, done by Grayrider and Captain Nautilus I beleive)Step 21: Input all the data into the targeting computer (F6) screen. First, press the "manual" button to the green position so that you can play with the dials. Let's start on the bottom from left to right. Leave the first one alone. Set range one to 500 meters (our "distance to track" on the nav map). Leave the Angle of Bow one alone, it is allready correct (remember the notepad?). Set the speed dial to 7 knots. Now for the torpedoe itself: Choose tube 5. Set the torpedoe's pistol for impact detonation and the torpedoe's depth for 3.5 meters (I just like that depth for no particular reason) your targeting computer should look like this 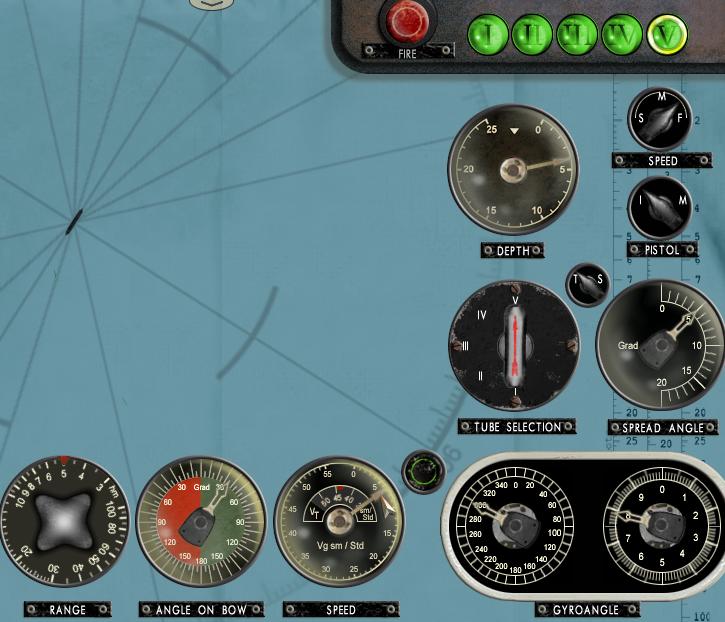 Step 22: To avoid exposing your periscope too much, follow the target with it will it's still lowered... whaaa  ?!?! Yes. Have the sonar man call out to you the target's relative bearing continualy and turn the periscope acordingly (allthough to dark to see in the picture, you can actually read the numbers on top of the scope to know which way it points, if not, just raise it a bit so that some light washes in). Observe the gyro angle while you do this, it will update automaticaly. In the example picture, the targets bearing is 137, the scope points toward that direction, and the gyroangle reads 318. ?!?! Yes. Have the sonar man call out to you the target's relative bearing continualy and turn the periscope acordingly (allthough to dark to see in the picture, you can actually read the numbers on top of the scope to know which way it points, if not, just raise it a bit so that some light washes in). Observe the gyro angle while you do this, it will update automaticaly. In the example picture, the targets bearing is 137, the scope points toward that direction, and the gyroangle reads 318.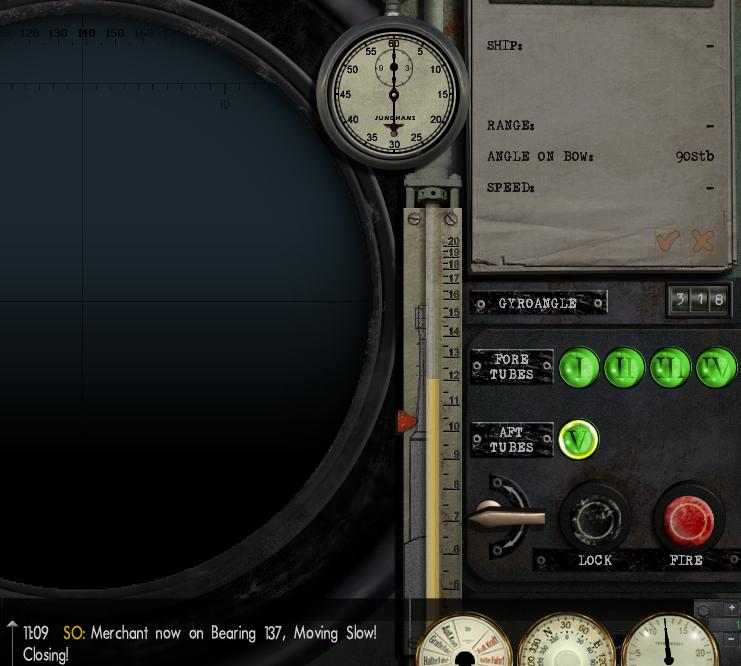 You want the gyro angle to read somewhere between 350 and 10 degrees when you fire so get ready to raise the scope when it nears those values Step 23: Now that the scope is up, don't lock in on the target, instead point it ahead of the ship so that the gyro angle reads 000. Leave it there and wait for the ship to appear. Open the tube (VERY IMPORTANT!!!). Get your finger ready on the trigger button. Wait untill the juciest part of the ship reaches your crosshair to ensure a one shot kill I like the engine room exactly below the smoke stack, but there are other (better) places. Look!! it's almost in sight 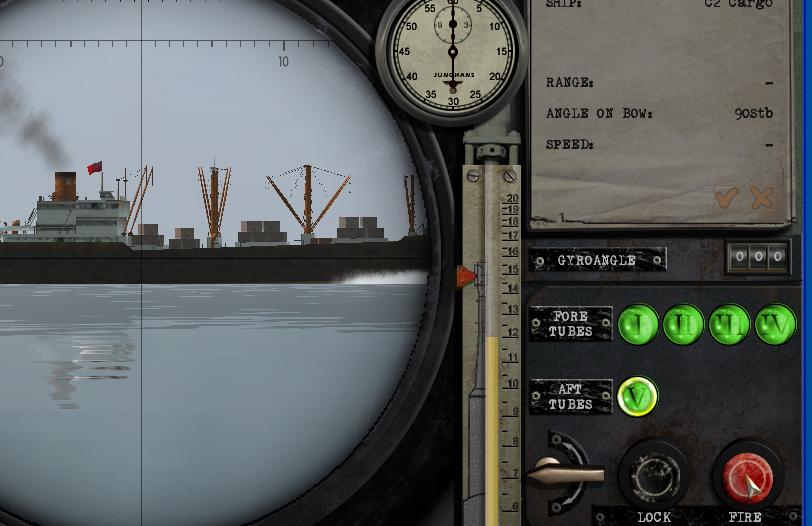 FIRE 5 !!!Step 24: Go to flank speed and turn hard to the left so that you come around and present your forward tubes in case the ship doesn't die in one shot. Lock the scope on the target if you want so that you don't loose sight of it. Observe your shot while you turn... Torpedoe Impact 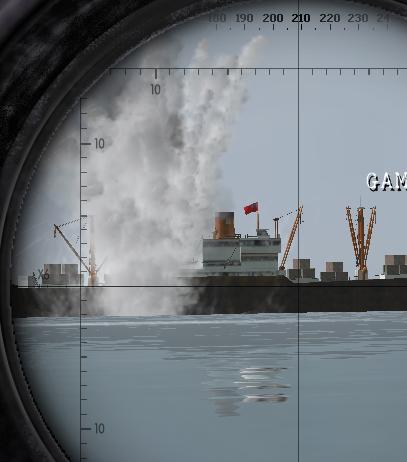 Whait!!! what's this  ?!?!?! I wanted you to hit below the smoke stack, what happened ?!?!?! I wanted you to hit below the smoke stack, what happened Noooooo, the range was wrong it was set to 500 meters because that was the distance from the last nav point to the target's track, but the ship didn't stop there, even with it's engines stoped it managed to drift to 700 meters before coming to a complete stop (verified with the nav map on a later ocasion) and people say that range doesn't matter  Step 25: Becuase the torp had to travel farther than expected, it arrived late to the target, missing our intended spot. No use in crying, we're turning the ship around precisely because of this posibility and will finish it off with a forward firing tube... whait ... what's this?!?! the target has stoped, it's engines aren't functioning anymore.... Yaaaay  happy days indeed, that's why I allways suggest you go for the engine area (not the propelers, the engine boiler room) happy days indeed, that's why I allways suggest you go for the engine area (not the propelers, the engine boiler room) Ok... SURFACE THE SHIP... This will be a one torp kill after all... MAN THE DECK GUN!!! 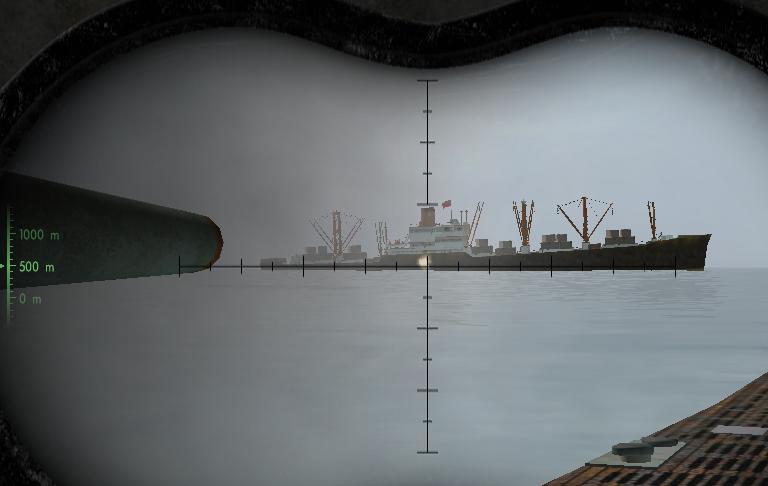 The end: Well, your down to 53 HE shells but you got it done. Good bye Tommy... it's down to David Jone's locker with you 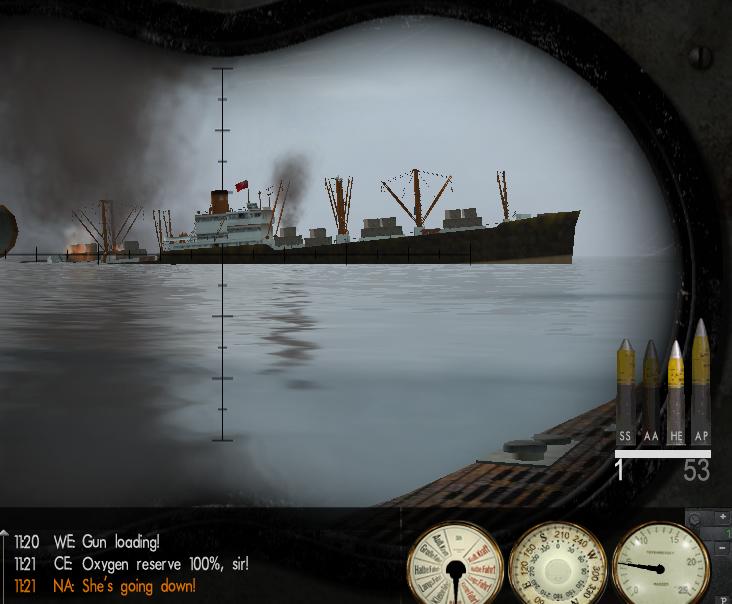
|
|
|
|
|
02-01-06, 10:24 AM
|
#4 |
|
Swabbie
 Join Date: Feb 2006
Location: Somewhere...,
Posts: 12
Downloads: 0
Uploads: 0
|
Excellent, just excellent..., especially for me not understanding the details of setting interception and searching everywhere for a good explanation.
I'm new to this game, got it just a couple of weeks ago and just started my career (after mercilessly going through the Navel Academy over and over again), and this explanation is going to really afford me new avenues of sinking ships. I'm curious though, you're target on the example is going west by north west, how did you come up with 292.5 degrees from north? Is that part of the nav-map window aids after clicking on the, "?" icon? ...., that could just be a newbie question since I didn't get a manuel with my copy of the game (just the PDF on the CD). |
|
|
|
|
02-01-06, 11:16 AM
|
#5 | |
|
Commander
 Join Date: Dec 2001
Location: Großbritannien
Posts: 452
Downloads: 48
Uploads: 0
|
God that was a great read!
Thanks for the hard work putting that together, it was really helpful!!
__________________
Quote:

|
|
|
|
|
|
02-01-06, 11:28 AM
|
#6 |
|
Ace of the Deep
 Join Date: Jul 2005
Location: Suffolk, Virginia
Posts: 1,027
Downloads: 0
Uploads: 0
|
Awesome post.
|
|
|
|
|
02-01-06, 05:58 PM
|
#7 | |
|
Captain
Join Date: Jan 2006
Location: Ensenada, B.C., Mexico
Posts: 504
Downloads: 0
Uploads: 0
|
Quote:
http://www.communitymanuals.com/shii...tle=Navigation And yes, when you press the ? icon on the nav map an aid will show up to help you draw those angles with more precision. Some people get confused and think that the aid is upside down (i.e. it has 180 on the top for South and 0 on the bottom for North) but it's perfect just the way it is because when you want to draw something that's going to a certain direction, the line that you drag BEHIND you is what will actually cross the map aid. |
|
|
|
|
|
02-01-06, 08:49 PM
|
#8 | |
|
Samurai Navy
 Join Date: May 2005
Posts: 588
Downloads: 0
Uploads: 0
|
Quote:

|
|
|
|
|
|
02-02-06, 08:35 AM
|
#9 | ||
|
Swabbie
Join Date: Feb 2006
Location: Somewhere...,
Posts: 12
Downloads: 0
Uploads: 0
|
Quote:
Thanks again |
||
|
|
|
|
02-02-06, 09:58 AM
|
#10 | |
|
Lucky Jack
 Join Date: Jan 2006
Location: Down Town UK
Posts: 27,695
Downloads: 89
Uploads: 48


|
Quote:

|
|
|
|
|
|
02-03-06, 04:41 AM
|
#11 |
|
Nub
 Join Date: Jan 2006
Location: submerged and silent
Posts: 3
Downloads: 0
Uploads: 0
|
Thanks.. great guide!!
Tried it out last night and i managed to intercept my merchnt superbly. I was one hour ahead with plenty of time to go over my torpedosettings. ...And totally missed I discoverd that my sub had drifted almost 600 m due to the wind or waves or whatever... Going for a new try tonight.. hopefully my 2-year old daughter falls asleep early 
|
|
|
|
|
02-03-06, 09:28 AM
|
#12 |
|
Swabbie
Join Date: Feb 2006
Location: Somewhere...,
Posts: 12
Downloads: 0
Uploads: 0
|
Well, I get interception, kind of makes me want to slam my head into a wall every time I think back how I missed the previous contacts
Anyway, I've been trying to get my torpedo solutions going better, I can do it easily on Automatic targeting, but the game just doesn't feel like a sim when I do it, so I'm trying to learn everything doing it manually. I can determine the range and the 90 on a target as well as its course and where to intersect it, giving myself plenty of time to line up and set my fish. But I'm not quite clear on the 3:15 rule, even though during the initial sightings and plotting, I mark the map on the contact every 3:15 as forcing the habit. I do four 3:15 apart and measure, and, from what I read, the measurement determines the knots of the target. BUT, every time I think I got the speed and set up an interception I'm off ALWAYS (not in firing, but positioning). And I know that the contact hasn't spotted and increased its speed somewhere because my stealth meter is stating that I'm still good while I'm on course to my designated waypoint. Now, what I've been doing is measuring the speed of the contact by listening on the hydrophone and counting the sounds on the screws (thanks to the tutorial I downloaded on Subsim excellent Mod by the way), but I would like to understand where I'm going wrong in the 3:15 rule because that seems to be an easier way to get a contact's speed at this range, and thats how I plot the contacts course direction anyway. Anyone know where I'm going wrong here? |
|
|
|
|
02-03-06, 11:21 AM
|
#13 |
|
Stowaway
Posts: n/a
Downloads:
Uploads:
|
You must determine the targets actual position as accurately as you can for both plots, i.e. one at 0mins and 1 at 3:15mins.
Then you use the ruler to measure the distance between these two plots and what ever the ruler says the measurement is then thats the speed of the target in knots. (I would reccomend making a few more plots just to make sure though as accuracy increases when the target is nearer to you). As for the plots, what I do is ask the Watch Officer for the range and bearing to the target. Then I immediately start the stop watch and mark my U-Boats position on the nav map. I then draw a circle with center point on my U-Boats position and radius equal to the range of the target. Next I calculate the bearing of the target relative to North and where that bearing line intersects the circle is where the target was when I started the stop watch. I repeat the whole procedure when the stop watch reaches 3:15. Et voila, the distance between the two plots is the targets speed. Now, things get a little tricky when you're submerged and thus using the periscope as its harder to determine the range of the target, especially in a storm. Still, you should be able to make a decent enough estimate. That said, if you managed to calculate the speed of the target before you submerge then have confidence in your plots. If he hasn't spotted you then the chances are he'll be where you expect him to be. One last thing, once you're in firing position, immediately mark the position of your U-Boat. This way you'll be able to judge how far you're drifting. Again, practice makes perfect etc. Cheers,..... |
|
|
|
02-03-06, 03:44 PM
|
#14 |
|
Swabbie
Join Date: Feb 2006
Location: Somewhere...,
Posts: 12
Downloads: 0
Uploads: 0
|
Sounds like a plan. Thanks a bunch.
|
|
|
|
|
02-03-06, 06:10 PM
|
#15 |
|
Captain
Join Date: Jan 2006
Location: Ensenada, B.C., Mexico
Posts: 504
Downloads: 0
Uploads: 0
|
Uber Gruber is right, the most reliable way to plot a target's position whithout auto map updates is through the watch officer... Even then you'll get errors up to +/-49.5 meters (since he only uses multiples of a 100 to call of ranges)
I rarely use the stadimiter if at all this days, since I've found that it only works well when your extremely close to the target (less that a 1000 meters)... but by then I allready have all the info I need on the cotact's track so why bother? The stadimeter method is so horrible that even with practice you can easily get it wrong by a kilometer or more if you are, lets say, 6 kilometers away from the target... at those distances you can surface without fear of being detected (at least early in the war) and ask the watch officer for range info instead. Again, to learn more just follow the links to Wazoo's material and to the Wiki manual. Another good source of info is the Avon Lady's FAQ, but I don't recall right now if it touches this subject. |
|
|
|
 |
| Thread Tools | |
| Display Modes | |
|
|


 Linear Mode

