Well, I made a sketch about the manual engagement method I use all the time,
so heres the:
Engagement Problem:
(And how to implement it through the realistic Conning Tower Attack mod)
A rough sketch, I break it down below step by step:
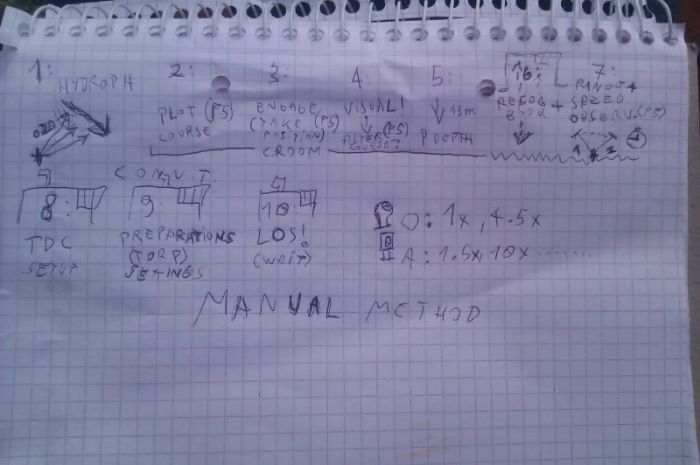
List of Manual Targetting tasks by time order:
(Control Room as area is
green, Conn. Tower as area is
red)
1.: You get a sound bearing on Hydrophone. Either by your officer, or just yourself.
--a.: First observation of direction, and rough accessment of sound strength.
--b.: Second observation of direction, and rough accessment of sound strength.
--c.: Third observation of direction, and rough accessment of sound strength.
By the change of sound strength, you can roughly determine that the target is closing,
constant, or moving away, and you can put this together with the direction change, to:
2.: Plot the rough course of the target on the
Nav. Map (F5) by tools.
3.: Engage. Plot your course to intersect the target's course, on
the nav map (F5) trying to get
ahead, and your endpoint roughly 90degree to target's course.
Start engines, and preferrably on the surface, on full speed, go...
Arrive there, wait.
IF you did everything right, and target doesnt altered course, then suddenly... :
4.: VISUAL! Either you, or your officer reveals a ship on the horizon.
You examine the target through
Observation Periscope (O) or by the tower binoculars,
and determine by its bearing, and rough range, that you need to alter your
course/position, or not.
5.: Dive to periscope depth, and correct your observations.
6.: or
6.: Either by
Observation Periscope (O) or by
Attack periscope (F3) you identify the target.
Make another fast approximation that you are on
the right angle, and range, or not. Alter if needed.
7.: or 7.:Make your two, or more observations,
---a.:by the help of the Recognition Book(mark the target's ID) and notepad
(Use the "range" function to shoot the highest point, hence acquire the range) and by the given degree
the target is compared to you,
you make your first observation, and
---b.: -instantly- start the Stopwatch.
---c.: Hastily switch to
Nav. Map (F5) and put down the line in the given direction
from your boat, til the given range.
---d.: wait either 3 minutes 15 seconds, or no matter how mutch AND use the nomograph, and
---e.: Make another observation, and plot a line towards the given degree,
by a given range, and read the speed of the target.
---f.: repeat, if time let you.
---g.: Read AOB by the course of the target, and your position.
8.: Set up the TDC: push manual button, set the range of the target, set its speed,
set the AOB. Push manual button again, to continue the automatic feed of the
direction by Periscope.
9.: Set up the Torpedo(es) via the dials: Either Impact, or Magnetic, desired depth,
and speed. Open the corresponding doors.
10.: Point the
Attack Periscope (F3) to the exact spot you want your torpedo
go on the target, and... LOS! Fire the eel.
Wait. Pray.
_________________________________________________
Thats it.
So, heres the problem:
As you can all see, til step
5 everything is done in the Control Room.
But:
6, and
7, can either requires
Observation, or
Attack periscope... As the
magnification (4.5x) of the Observation Scope may not be enough...
But you still HEAVILY need to use your
Nav. Map in these steps, (As theres no MAP TOOLS
for the Attack Map..)
Which is only downstairs in the
Control Room.
As for steps
8, 9, 10, if you done everything right, you can happily climb into the
Conning Tower, as everything is given for you there, to finish the job.
This steps, 6 and 7 is mixed up in the Manual Method for the moment, and need further consideration.
The solution is:
I.--- Either by Doing everything of
6,7 via the
Observation Scope (given that the
magnification is enough) and staying in the control room until step
8, but then you
spend very little time in the conn. tower...
II.--- Or by linking even the nav. Map to the Conn. Tower, and doing step
6,7 there also,
or by duplicating the area somehow, so there will be a Nav. Map for all two areas.
(one's mimicking a true attack map).
__________________________________________________ ___
This is the dilemma, and these two solutions came into my mind.
So, do any of you have a clue about how to duplicate the Nav.map in Commands_en.cfg ?
I really appreciate the help.
One is for (f5) of course, in the Control room, the other is for another key, or without key,
and only accessible via the clickable map there, in the Conn. Tower.
__________________________________________________ ___
So here I am standing now

Open for discussion.
+ + +