 08-09-13, 10:33 AM
|
#6
|
Sailor man 
Join Date: Mar 2011
Posts: 47
Downloads: 27
Uploads: 0
|

Step #4: Mark Current U-Boat position on Navigation Map
Since we are doing this without hitting the pause key, your U-boat position needs to be marked with the Marker tool to insure accurate plotting of the target.
Quickly Hit F5 to get to the Navigation Map and select the Marker tool. Move the Marker tool over your U-boat and left click to enter a Mark. This is more accurate the slower you are going.
 Step #5: Convert the Bearing to Target into Bearing to Target from North
As your U-boat is moving away from your observation point (the one you marked in Step #4), it is not possible to use Jase's Bearing mod that displays bearings for your U-boat. This is because there is currently no mod available that keeps the orientation of the U-boat's bearings at a marked point on the map. Thus, we need a workaround to do this without pausing and then marking from the U-boats frozen position.
To do this, we need to convert the Target Bearing into the Target Bearing from North. Put another way, if the U-Boat was traveling EXACTLY due North, what would the Target Bearing from the U-boat be?
Luckily, this is quite simple because you have your U-boats current course heading which we took in Step #1. To convert Target Bearing from your U-Boat to Target Bearing from North, just add your course from Step #1 to the target bearing you took in Step #3.
In this example, the target is bearing 310 and the U-Boats course is 44.
310 + 44 = 354 deg target bearing from North.
TIP: If your answer is greater than 360, just subtract 360 from the sum to get the Target Bearing from North.
Step #6: Draw a Bearing Line to the Target
Select the ruler tool, and extend a line from the position you marked as your observation point in Step #4 through the bottom of the compass that appears at the tip of the ruler. The key point here is to extend the line not only the distance you recorded as the range to the target, but also at the Target Bearing to North which you calculated above.
Simply have the line pass through the compass on the end of the ruler at the Target Bearing to North value. In the example below, notice how the line goes through 354 degrees on the compass outer ring.
Step #5: Convert the Bearing to Target into Bearing to Target from North
As your U-boat is moving away from your observation point (the one you marked in Step #4), it is not possible to use Jase's Bearing mod that displays bearings for your U-boat. This is because there is currently no mod available that keeps the orientation of the U-boat's bearings at a marked point on the map. Thus, we need a workaround to do this without pausing and then marking from the U-boats frozen position.
To do this, we need to convert the Target Bearing into the Target Bearing from North. Put another way, if the U-Boat was traveling EXACTLY due North, what would the Target Bearing from the U-boat be?
Luckily, this is quite simple because you have your U-boats current course heading which we took in Step #1. To convert Target Bearing from your U-Boat to Target Bearing from North, just add your course from Step #1 to the target bearing you took in Step #3.
In this example, the target is bearing 310 and the U-Boats course is 44.
310 + 44 = 354 deg target bearing from North.
TIP: If your answer is greater than 360, just subtract 360 from the sum to get the Target Bearing from North.
Step #6: Draw a Bearing Line to the Target
Select the ruler tool, and extend a line from the position you marked as your observation point in Step #4 through the bottom of the compass that appears at the tip of the ruler. The key point here is to extend the line not only the distance you recorded as the range to the target, but also at the Target Bearing to North which you calculated above.
Simply have the line pass through the compass on the end of the ruler at the Target Bearing to North value. In the example below, notice how the line goes through 354 degrees on the compass outer ring.
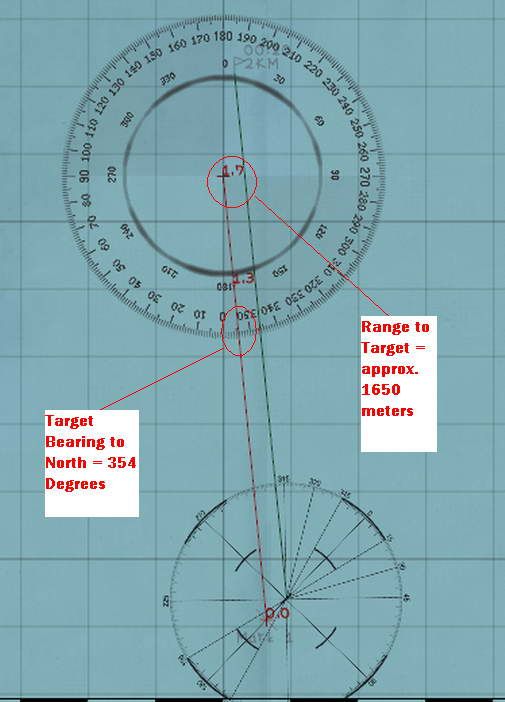
Setting the correct range requires a bit of estimating because when a number on the ruler changes, lets say from 1.6km as you extend the ruler to 1.7km, you must subtract 50 meters. Thus 1.7km is NOT 1700m when it changes from 1.6km, but is actually 1650m. An annoying little issue that I hope is
fixed in a future patch.
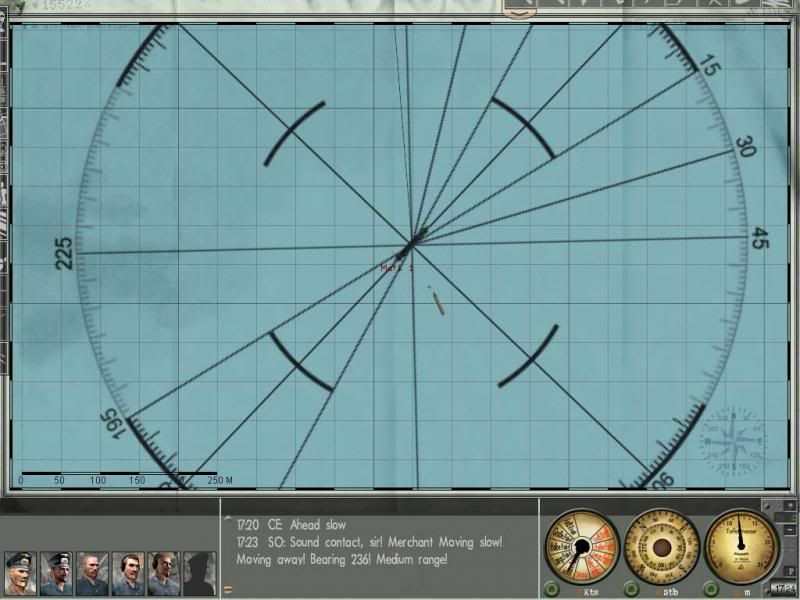
Step #7: Wait 3 Minutes and 15 Seconds Then Make Next Observation
Go back into your scope view (either periscope or UZO) and await the 3 minute 15 second point on the stop watch. With about 30 seconds left, raise your periscope (you DID lower it to maintain stealth, right??) and take another range reading. I usually do a couple as I approach the 3 minute mark to test my accuracy.
 When the stopwatch hits 3 minutes and 15 seconds, lower the scope and go back to the Navigation map and
repeat Steps #4, #5, & #6 above.
When the stopwatch hits 3 minutes and 15 seconds, lower the scope and go back to the Navigation map and
repeat Steps #4, #5, & #6 above.
|

|

|