 08-09-13, 10:26 AM
|
#5
|
Sailor man 
Join Date: Mar 2011
Posts: 47
Downloads: 27
Uploads: 0
|

Section II - Manual Charting While Moving
The Goal: Determine the heading and speed of the target.
Depending on the situation, you might find it advantageous to make your observations and do your manual charting while your U-Boat is in motion. Often this is done to keep the range of the target ships at a reasonable distance as the farther away they get, the smaller they get, and the harder
it is to get accurate range information.
The downside is, as discussed below, you need to make more calculations compared to the Dead Stop method of plotting. It is, overall, a more complex way of plotting and recommended after you have mastered Dead Stop plotting.
Step #1: Locating the Target and Setting a Roughly Parallel Course
When a ship is sighted, center it in the scope/UZO and press L to lock the target. Make a visual observation of the contacts course relative to yours and click on the compass to set a course roughly parallel to your target.
*IMPORTANT* - As highlighted in the picture below, note your new course as called out by your Chief Engineer. This will be VERY important shortly.
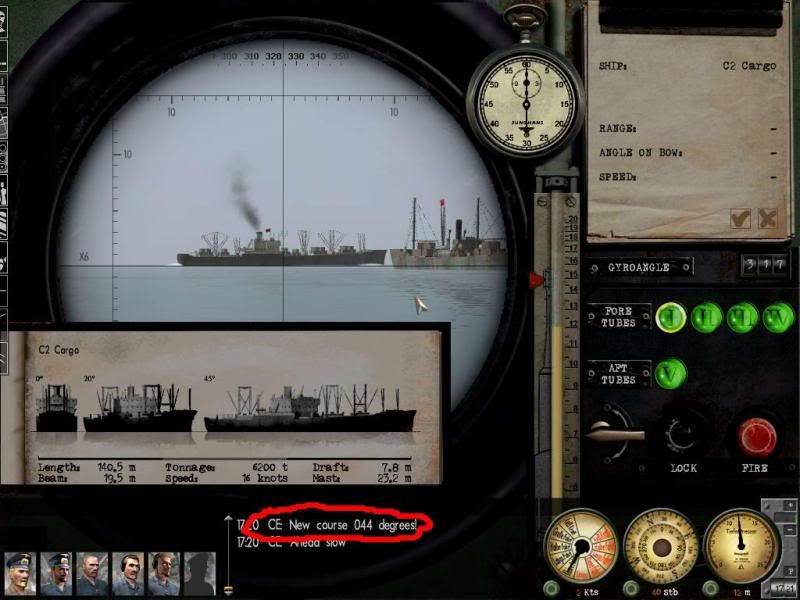 Do your best to get your bow heading in a direction that is ahead of the contact and will close distance over time. Perfection aint important here; just head in the correct general direction by not letting the contact bearing get too far behind your beam.
Step #2: Get Your U-Boat Ready
Zoom Map
While you are turning towards your new course, go to the Navigation map and zoom all the way in to your U-boat. This will make accurate markings in real-time simpler.
ID contact with recognition guide
Bring up your Ship Registry and look for your contact. Once found, make sure to check the box so the mast height is entered on the notepad as in the picture below.
Do your best to get your bow heading in a direction that is ahead of the contact and will close distance over time. Perfection aint important here; just head in the correct general direction by not letting the contact bearing get too far behind your beam.
Step #2: Get Your U-Boat Ready
Zoom Map
While you are turning towards your new course, go to the Navigation map and zoom all the way in to your U-boat. This will make accurate markings in real-time simpler.
ID contact with recognition guide
Bring up your Ship Registry and look for your contact. Once found, make sure to check the box so the mast height is entered on the notepad as in the picture below.
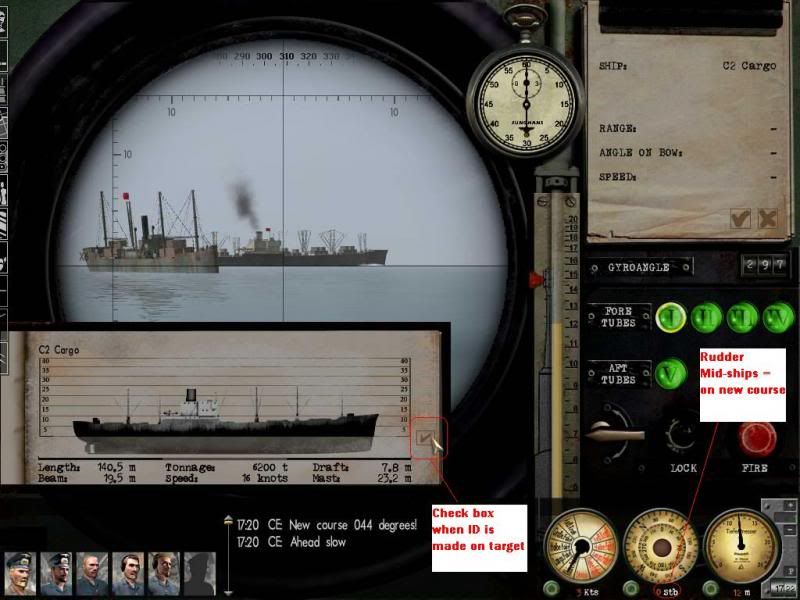 Get to New Course
Confirm that you are now on your new course set in Step #1 above. Youll know when the rudder gauge shows zero turn as in picture above.
DO NOT PROCEED TO STEP #3 UNTIL YOU ARE ON YOUR NEW COURSE!
Set Ahead Slow
By slowing down, not only do you help your stealth, you make real-time mapping a tad easier. As you get better, try upping the speed if you so desire.
Step #3: Make First Observation Point
It is a truism that the more observation points you mark on the map in manual charting/TDC mode, the better. For this method, you can, in a pinch, get by with only two observation points. However, I try to make three or four to increase the accuracy. However many points you decide to make, the technique is the same for each.
Get Range to Target
Place the horizontal line of your scope on the waterline of the target. Next, click on Range in the Notepad. This will switch you to the Stadimeter which you then place at the top of the highest mast of the ship. Click the left mouse button when the line has been placed on the highest mast. The range to target will then appear in the Notepad.
Get to New Course
Confirm that you are now on your new course set in Step #1 above. Youll know when the rudder gauge shows zero turn as in picture above.
DO NOT PROCEED TO STEP #3 UNTIL YOU ARE ON YOUR NEW COURSE!
Set Ahead Slow
By slowing down, not only do you help your stealth, you make real-time mapping a tad easier. As you get better, try upping the speed if you so desire.
Step #3: Make First Observation Point
It is a truism that the more observation points you mark on the map in manual charting/TDC mode, the better. For this method, you can, in a pinch, get by with only two observation points. However, I try to make three or four to increase the accuracy. However many points you decide to make, the technique is the same for each.
Get Range to Target
Place the horizontal line of your scope on the waterline of the target. Next, click on Range in the Notepad. This will switch you to the Stadimeter which you then place at the top of the highest mast of the ship. Click the left mouse button when the line has been placed on the highest mast. The range to target will then appear in the Notepad.
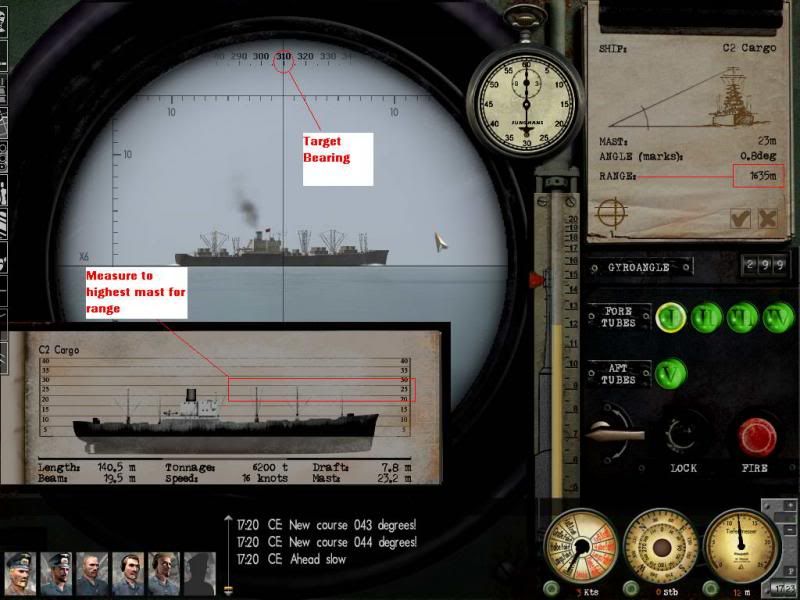 NOTE: The highest mast can be determined in the Ship Registry by looking at the target page that has only one ship on it.
Get Bearing to Target
Look at the number that appears in your scope right over the center of the target. This is the Bearing to Target in relation to your ship. In the above example, the Target Bearing is 310 degrees from the bow of the U-Boat and the range is 1635 meters.
Start Stopwatch for First Observation
Click on the stopwatch to begin what will be a three minute time period.
TIP: It is good practice to lower your periscope with CTRL-PageDown once an observation is made to decrease the probability of being spotted.
YOU NOW HAVE 3 MINUTES TO COMPLETE A PLOT OF THE TARGETS POSITION
NOTE: The highest mast can be determined in the Ship Registry by looking at the target page that has only one ship on it.
Get Bearing to Target
Look at the number that appears in your scope right over the center of the target. This is the Bearing to Target in relation to your ship. In the above example, the Target Bearing is 310 degrees from the bow of the U-Boat and the range is 1635 meters.
Start Stopwatch for First Observation
Click on the stopwatch to begin what will be a three minute time period.
TIP: It is good practice to lower your periscope with CTRL-PageDown once an observation is made to decrease the probability of being spotted.
YOU NOW HAVE 3 MINUTES TO COMPLETE A PLOT OF THE TARGETS POSITION
Last edited by Svonne; 08-25-13 at 01:45 AM.
|

|

|