
Hi NiceSub,
glad you sent me a PM to read your post. I probably would have missed your question regarding the "High Realism Tutorial" found
HERE.
The 145 degree bearing I refer to in the tutorial is the estimated heading of the target. I explain how I came up with that heading by using the AoB Calculator. As I state, it's a rough estimate, which will become much more accurate as you draw out the plot on the map. By turning the calculator to the relative bearing (found along the outer most dial of the calculator) and having it face you; and reading the compass heading off the black arrow of the center AoB dial, you can attain the targets heading. You simply turn the center AoB dial to match the angle you see through the scope view to the relative bearing the target is on (in the tutorial the target is on a 60 degree relative bearing). As I point out it's an rough estimate that will get you started in making your first plot on the navigation map. I recommend to use a clearer AoB Calculator than the one I originally made by down loading the one found
HERE made by reaper7.
To follow the tutorial I recommend you use the Practice Test Mission found
HERE. It's the same ship as described in the tutorial, which will give you the same readings as outlined. Just follow along and work at your own pace.
It's been a while since I looked at the games "Sub School" mission. When I ran it, one glaring problem is the length of time the game gives you to do a manual targeting solution. The Mogami Cruiser is just 40 degrees off your bow steaming at such a high rate that you won't get a chance to check for its speed until it's well out of range. Don't use the games test mission, it's an effort in futility (unless you go-in knowing the cruiser's speed is
over 20 knots, hint, hint).
To come up with a target heading
without using the Calculator the Position Keeper will do very nicely. The German side
needs the Calculator, no Position Keeper for them. From experience, when I first looked at the Mogami I guessed right off that the AoB was 90 degrees Starboard. Too much profile showing to be anything else. Using the Attack Data Tool (top right tool), click the center bottom button to have the AoB dial appear and move the dial to match what you see in the scope. Placing 90 degree Starboard onto the mark at the bottom of the dial.
Click the red "Send" button to have the PK/TDC register the 90 degree Starboard bearing.
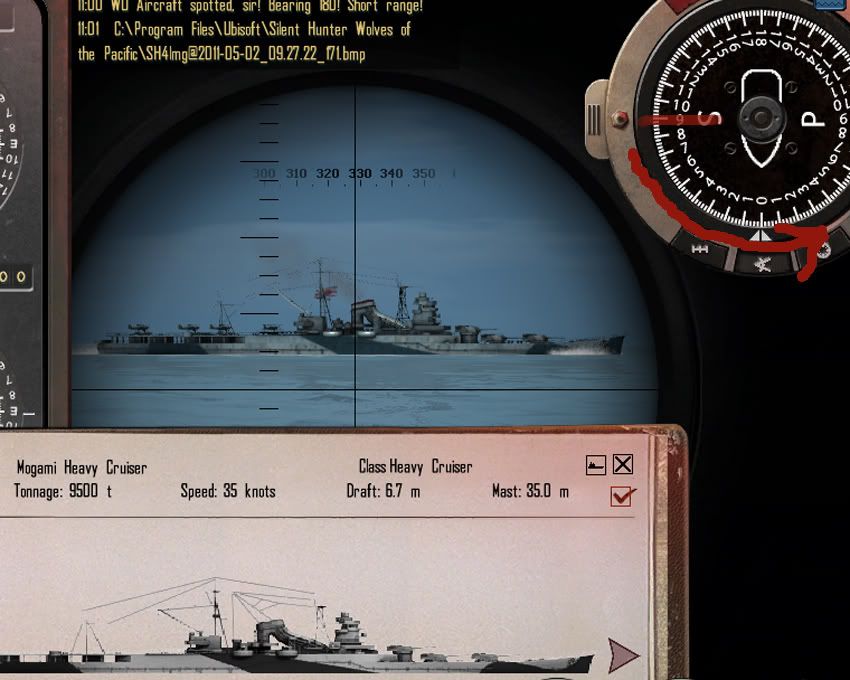
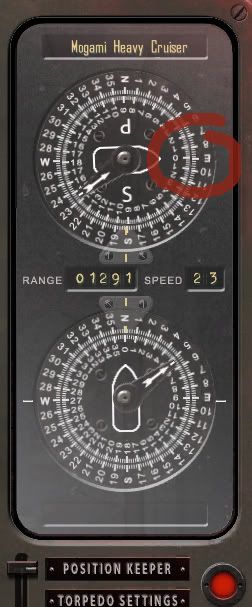
Take a look at the top "target ship" dial of the Position Keeper. The ship icons bow (zero degrees) is pointing at its true north heading. In this case, the Mogami's heading is 90 degrees to true north or simply East as the outer dial shows. The yellow marker of the top dial represents the subs position in relationship to the target. The white arrows represents the torpedo track as the firing solution stands now, at the time the picture was taken.
It's important to note that your accuracy in both processes is determined by how you "estimate" the targets Angle on Bow. If your off the mark, so will be the targets estimated heading.
To eliminate
some of the guess work, I've corrected the optical view to allow for the use of the Telemeter divisions (the hash marks found on the periscope lens) to measure range and AoB angles to give you a more accurate result. The mod is called "Optical Targeting Correction" found
HERE. I would hold off on using it just yet, before you get a good foundation for target plotting and manually finding range. One step at a time.