|
THROUGH THIS LINK SUPPORTS SUBSIM, THANKS! |
The Web's #1 BBS for all submarine and naval simulations!
|
Click here to access the Helosim website |
The Web's #1 BBS for all submarine and naval simulations! |
 10-16-08, 06:57 AM
|
#1 |
|
Lucky Jack
 Join Date: Apr 2005
Location: Finland
Posts: 25,005
Downloads: 32
Uploads: 0


|
This is my 256th project/thingy I start and more than likely will never get around to finish, buuut you never know. :p
Anyhow, I wanted to share you some of the tricks I've learned during the years of skinning different planes. Skinning Italian 109E: 1. Reference Obviously, not needed if you plan to make a fictional skin. But if you're planning on making a historical skin, Wings Palette is the place to go. Tons of colored profile pictures of airplanes all the way from WWI to modern era. Just a word of caution, tho. Profile pics are usually scanned from old books and the colors are atleast on half the cases wrong/faded. Some pics mention the color codes used and you can go to Simmer's Paint Shop to see color charts for different countries. 2. Applying the paint Naturally, you want to use layers if possible. Giving every major color of the camouflage it's own layer speeds up the skinning alot. Extremely useful when you are doing something messy (Dirt, weathering, mottling) that tends to spread to the parts you dont want to. Say, you added dirt to your uppersurfaces, just to notice later on that there's dirt on the bottomsurface areas. Make selection of the bottomsurface layer, select the dirt layer and delete.  The background painting is the easy stuff, so nothing more on that. The background painting is the easy stuff, so nothing more on that.Righto, I need to get some pics for the next parts, which gonna be the fun parts. Details, details, details. Last edited by Dowly; 10-17-08 at 08:22 AM. |

|

|
|
10-16-08, 08:25 AM
|
#2 |
|
Lucky Jack
Join Date: Apr 2005
Location: Finland
Posts: 25,005
Downloads: 32
Uploads: 0
|
3. Details
Before I tell how I do few things to spice up the skin, I warn you; the less you use the blur filters the better! It's easy way to soften something, but it lacks the randomness, thus making it look kinda unrealistic. 3.1 Paint Chipping Very easy to do, but is time consuming. 1. Take the pencil tool (no, hard brush wont do!), with size of 1 pixel 2. Pick a color that looks like metal shining thru the paint, lightgrey with a hint of blue is what I use. 3. Paint randomly chipping along the panel lines, heavier chipping on moving/used parts like flaps, ailerons, hatches etc. 4. Lower the opacity to 5-20% Without paint chipping  Paint Chipping added 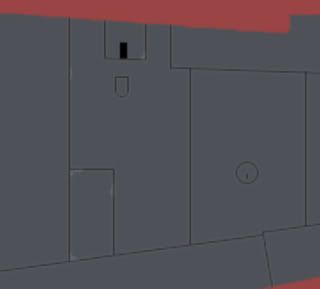 3.2 Dirt Now, you gonna use the 2 most useful tools for dirt, mottling, weathering etc. The maple leaf brush with scattering set up to 700-900% and the smudge tool, using the three strawed grass brush and strenght of 70%. 1. Pick the color you want to use for the dirt, I normally go with the solid black, but I imagine brown will work too. 2. With your maple leaf brush, paint over the parts you want to add dirt to, dont overdo it, just some areas. 3. Take your smudge tool and go crazy, smudge and smear the paint all over to look like someone took a greasy rag and played a prank on you. 4. Lower the opacity so it looks good. Without dirt 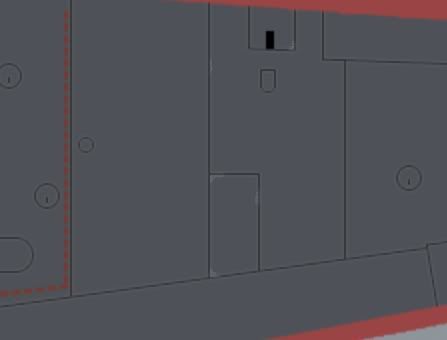 Dirtyyy  3.3 Weathering Look the instructions for the dirt, I do it the same way but just on small areas. 3.4 Optional texturing To give more 'life' to the skin, duplicate the paint layer, noise ~5-10% and blur it few times. Then just lower the opacity to 10-20%, gets rid of the plain look of the paint. Another good way is to use a pic of metal, preferably with scratches etc. and just paste it over your skin and lower the opacity. No texture Noise texture with 20% opacity 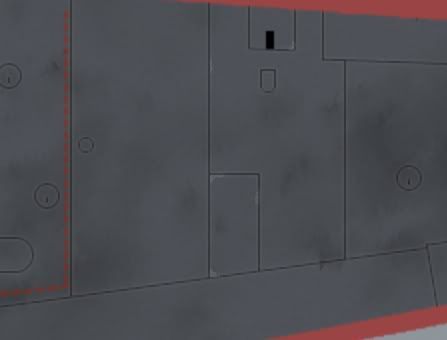 Scratched metal texture with 25% opacity  4.Panel lines Very easy to make them look "sufficient", but can also be time consuming, depends how you make them. 4.1 Panel Lines from Void.bmp Some of the IL2's void files are clean, so you can take the lines from them easily. Go to the Simmer's Paint Shop and download the remove white tool for Photoshop. Then just use it and it removes all the white. 4.2 Panel Lines by hand Some void files have weathering and dirt in them, so you cant necessarely get clean panel lines by using the remove white tool. In that case, the only way is to make a new layer and just simply paint the panel lines 'again' to the new layer. Remember to use 100% hard brush or the pencil tool to get nice crisp lines. 4.3 Shading Now that you have your black ugly panel lines, it's time to smooth them in to the skin. Again, very easy to do and pretty nice effect. 1. Go to your black panel lines layer and select all 2. Nudge the layer up and down (CTRL+up/down). This because if you just CTRL+click to the layer, the selection isnt usually perfect. 3. Make new layer and invert the selection 4. Fill the selection with white, feather by 1 pixel and hit delete. 5. Move the new layer below the black line layer and tone down both's opacities. Ookie, I think that's it. Cant remember anymore atm. I'll upload a vid sometime today where I make a skin from paint to finish, so you get a look how I do it. Last edited by Dowly; 10-17-08 at 07:12 AM. |
|
|
|
|
10-16-08, 08:40 AM
|
#3 |
|
Navy Seal
 Join Date: Sep 2001
Posts: 5,330
Downloads: 5
Uploads: 0
|
So in the vid are you going to use subtitles or sign language since we never hear you speak even with the mic...:rotfl:
__________________
|
|
|
|
|
10-16-08, 08:51 AM
|
#4 | |
|
Navy Seal
Join Date: Jul 2007
Location: Stavka
Posts: 8,211
Downloads: 13
Uploads: 0
|
Quote:
__________________
Current Eastern Front status: Probable Victory |
|
|
|
|
|
10-16-08, 09:09 AM
|
#5 | |
|
Lucky Jack
Join Date: Apr 2005
Location: Finland
Posts: 25,005
Downloads: 32
Uploads: 0
|
Quote:
|
|
|
|
|
|
10-16-08, 12:00 PM
|
#6 |
|
Fleet Admiral
 
Join Date: Jul 2003
Location: Patroling the Slot.
Posts: 17,925
Downloads: 90
Uploads: 0
|
Okay, when i saw the thread title, I thought you were talking about this:
 Taxidermy:rotfl:
__________________
 
|
|
|
|
|
10-16-08, 03:33 PM
|
#7 | |
|
Ace of the Deep
 Join Date: Apr 2007
Posts: 1,267
Downloads: 0
Uploads: 0
|
Quote:
quite sure some,including myself will find this helpful.
__________________
 |
|
|
|
|
|
10-17-08, 01:11 AM
|
#8 | |
|
Stowaway
Posts: n/a
Downloads:
Uploads:
|
Quote:
That poor bastard! :rotfl: |
|
|
|
|
10-17-08, 07:13 AM
|
#9 |
|
Lucky Jack
Join Date: Apr 2005
Location: Finland
Posts: 25,005
Downloads: 32
Uploads: 0
|
Panel line tips added to the second post.
|
|
|
|
|
10-17-08, 08:23 AM
|
#10 |
|
Lucky Jack
Join Date: Apr 2005
Location: Finland
Posts: 25,005
Downloads: 32
Uploads: 0
|
And the video to the first post, crappy quality as usual, but there's really nothing new to see that I didnt describe on the tips. All the painting you see me doing by hand is the maple leaf brush followed by the three strawed grass smudge brush.
Hope you learned something new.
|
|
|
|
|
10-17-08, 10:43 PM
|
#11 | ||
|
Weps
 Join Date: Jan 2006
Location: Buenos Aires, Argentina
Posts: 369
Downloads: 0
Uploads: 0
|
Quote:
* you can use multiply or the two under it, i don't know their names in english. (my Photoshop is in spanish)
__________________
Quote:
|
||
|
|
|
|
10-25-08, 05:57 PM
|
#12 | |
|
Weps
Join Date: Jan 2006
Location: Buenos Aires, Argentina
Posts: 369
Downloads: 0
Uploads: 0
|
what happens when a "bump post" meets an infomercial?
you get this: I tried Ferret's Skinning and ABS tips & tuts and this is how my BF-109 F-2 looks now: (keep in mind that it's not finished, the cone and the air intake hasn't been painted, the camo needs some corrections and such, plus, the rivets were made using the void with "multiply" blending option) http://img517.imageshack.us/my.php?i...emoskintc6.jpg
__________________
Quote:
Last edited by kenijaru; 10-26-08 at 08:19 AM. |
|
|
|
|
|
01-22-09, 12:09 PM
|
#13 |
|
Lucky Jack
Join Date: Apr 2005
Location: Finland
Posts: 25,005
Downloads: 32
Uploads: 0
|
Quick video on how to make shadows, in this case, to the flaps, be sure to watch in HD to actually make out anything:
|
|
|
|
|
01-22-09, 01:56 PM
|
#14 |
|
Admiral
 Join Date: Aug 2007
Location: Suomi, sauna, puukko, perkele
Posts: 2,346
Downloads: 39
Uploads: 0
|
A small tip Dowly
Add this: Code:
&fmt=18 |
|
|
|
|
01-22-09, 02:26 PM
|
#15 | |
|
Lucky Jack
Join Date: Apr 2005
Location: Finland
Posts: 25,005
Downloads: 32
Uploads: 0
|
Quote:
Adding the &fmt=18 makes the video show up in HQ and at the same time, disables the "watch in HD"-button. So, in the end you end up with worse quality than you actually could watch it in. :p |
|
|
|
|
 |
|
|


 Linear Mode

