
|
|
SUBSIM: The Web's #1 resource for all submarine & naval simulations since 1997
|
SUBSIM: The Web's #1 resource for all submarine & naval simulations since 1997 |
 08-11-18, 09:44 AM
|
#1 |
|
Swabbie
 Join Date: Mar 2006
Location: Saskatoon, Saskatchewan, Canada
Posts: 11
Downloads: 49
Uploads: 0
|
I have just come back to SH after a while away, and I dimly remembered that it was possible to get target tracks exclusively via hydrophone while still moving. After looking around a bit, I finally rediscovered kuikueg's 4 bearing method document, and Makman99's video of how to pull it off in SH3. But unfortunately neither really gives a super easy set of instructions on how to do it in game, and kuikueg's geometry makes my brain hurt. So I set out to break it down Barney-style. Have a look, and tell me what you think.
Kuikueg's 4-bearing method for a moving Sub. I am using MoBo as a plotting tool here, because it is easier to switch and do screen snips between it and this document. Note that due to not having a zoom feature, Mobo is not as precise as is possible in game at full zoom. Therefore it is possible that my answers at the end in terms of target heading and speed are not quite as accurate as would be achieved by carefully plotting in-game. My objective here is to show the steps, I am sure you will be entirely accurate and get good results. Also note that throughout the process I tell you to labels points thisly and thusly, but it totally doesn't matter, and you don't have to label a damn thing if you don't want to! 1. Take 3 bearings at regular time intervals. Changes in own bearing/speed/position are completely immaterial, but the intervals must be as precise as possible. 2. Scribe a random line that crosses all three bearing lines. Label intersections on b1 at (a), b2 at (b), and b3 at (c). 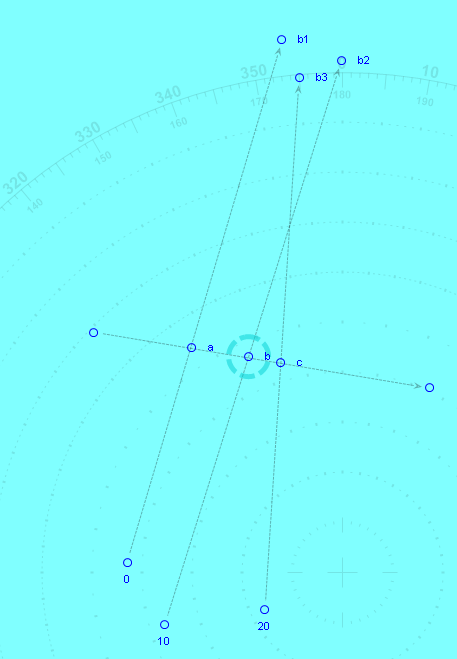 3. Draw a circle centred on (b) with radius endpoint at (a). Label the point on the line at the opposite side of circle from (a),as (d). 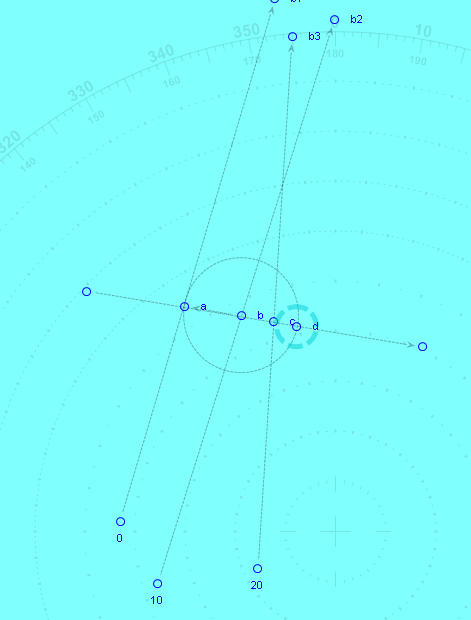 4. Draw a line parallel (easiest using the compass and dragging it) to b1, and place it so that it intersects with (d). Find the point this line intersects with b3, and label it (e). 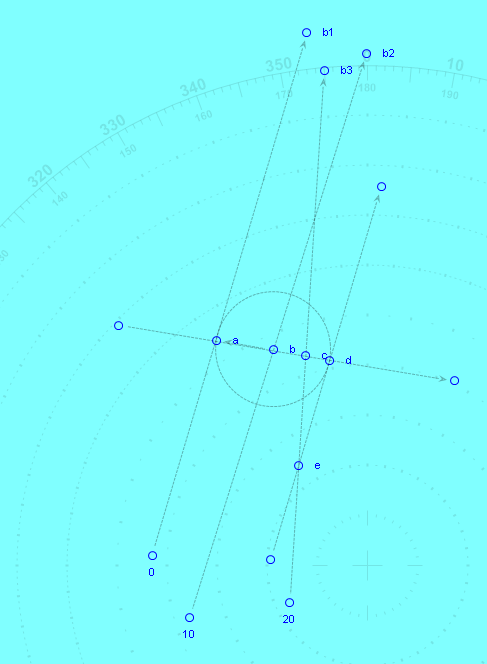 5. Draw a line through (b)-(e), then draw a circle centred on (e) with radius endpoint at (b). Label the opposite side of the circle on line (b)-(e) as (R1). (R1) is your first “red line” point. 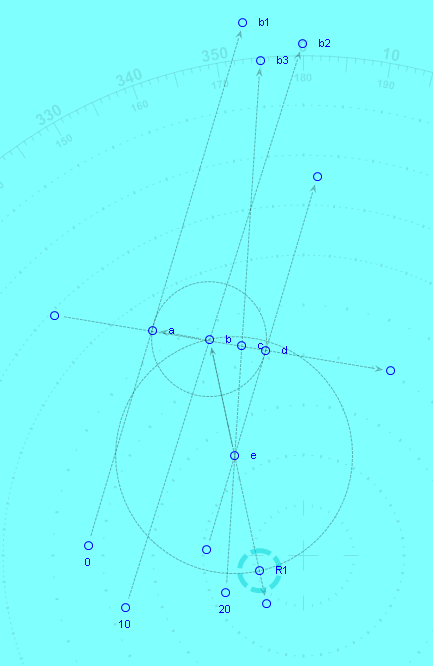 6. Repeat steps 1-4, but with a different random line thorough b1, b2, and b3. Label the resultant point R2. 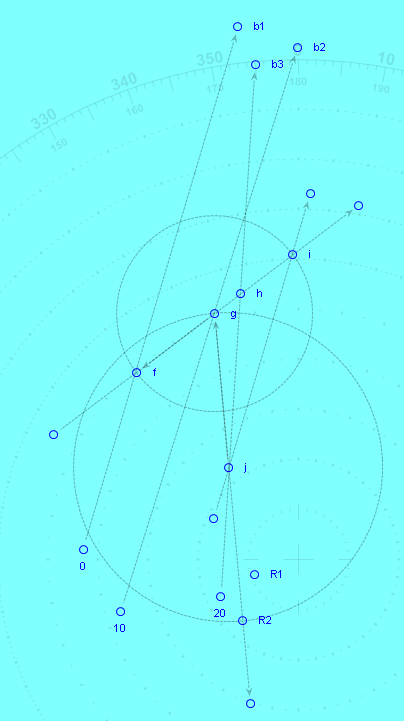 7. Draw a line from R2 extending through R1. Then take another bearing at the regular interval, b4. It is helpful here to ensure that your own bearing changes between the b3 and b4 measurements if you have been previously travelling at a consistent speed/bearing; this will aid in the triangulation of the target position. Find the intersection with the “red line” extending through R1-R2, and mark it (A). This is the exact current position of the target. 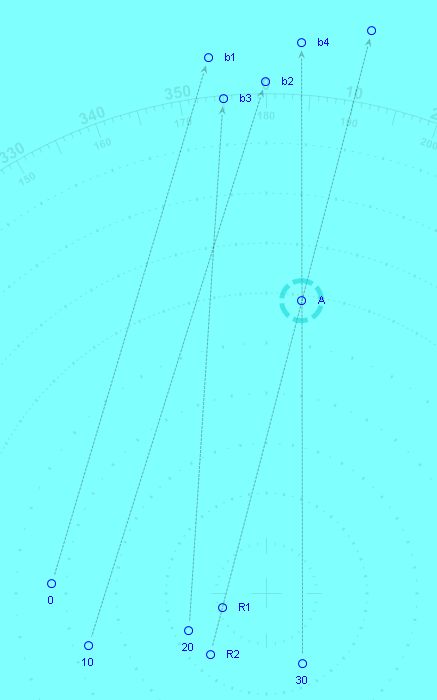 8. In order to find target course, draw a random line from (A) that intersects b3 anywhere along its path. Label the intersection of this line and b3 as (k). Draw a circle radius (k)-(A), and mark the spot on the line at the opposite end of the circle as (l). 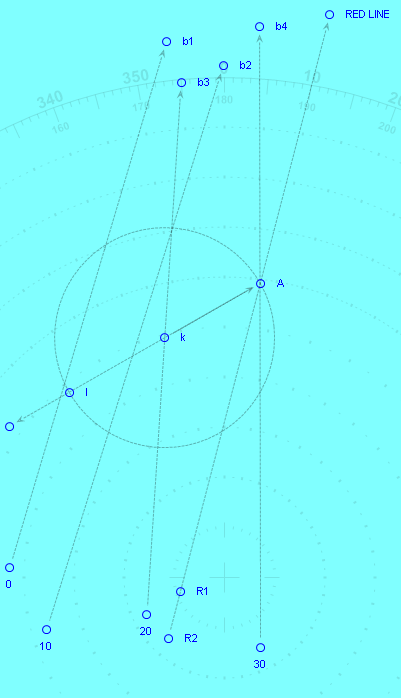 9. Similar to step 3, above, draw a line parallel to b3, passing through (l). Find the point at which this line passes through the b2 line, and label it (m). 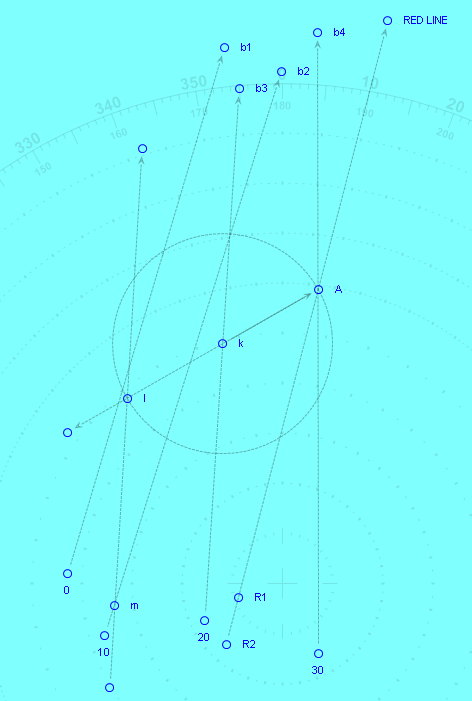 10. Draw a line from (m) through (A). This line indicates the exact course of the target, from which can be gained speed and AoB. 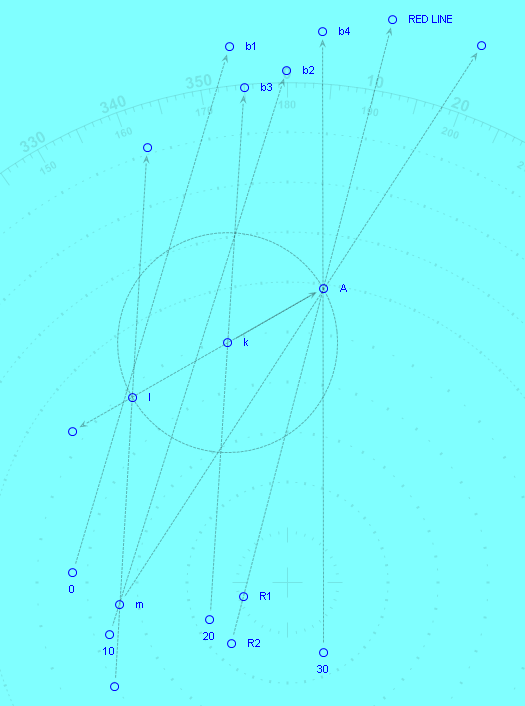 11. After a bit of tidying up, we can plot and measure the intersection points with the b1-b4 bearing lines, and use our speed tables to get the target speed, and use our compass to get the bearing. In this case, using the MoBo application gets us a target heading of approx 33 degrees true, approx 3800m between b3 and b4 intervals, which with a 10 min bearing interval gives us a speed of approx. 11.3 knots. Definitely enough to get you close. 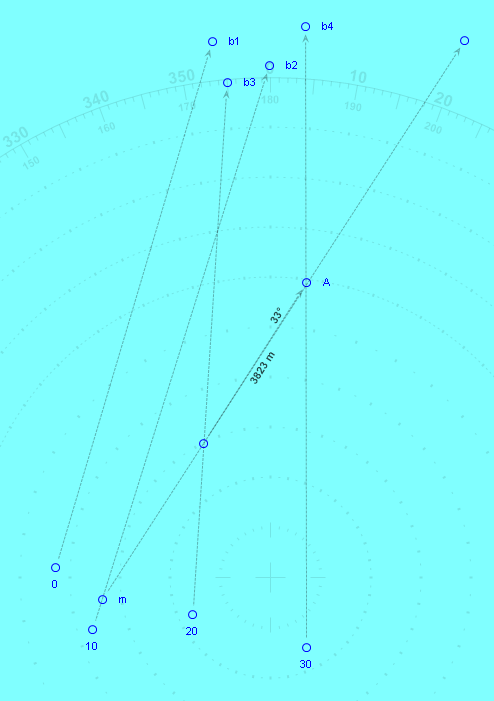 12. Note that for this exercise I picked totally random start points and bearings, and used the MoBo to plot. In real life for this solution with the sub actually at the “0” mark, the b1 bearing would have been a back bearing of that indicated, as the target would have passed by the sub on its way to (m) between the b1 and b2 bearings. This would have changed how steps 1-6 looked, but, amazingly, would not have changed line through R1-R2, or the outcome, at all. Therefore, it is perfectly ok at any point to extend the bearing lines infinitely, and draw your random intersection lines at any point along the infinite bearing lines, so long as the relevant intersection points are generated. Hope this is helpful, and let me know if you spot any errors!
__________________
Cede Nullis |

|

|
|
08-11-18, 04:19 PM
|
#2 |
|
Sea Lord
 Join Date: Apr 2008
Location: Germany, Italy
Posts: 1,703
Downloads: 107
Uploads: 4
|
You say you have difficulties in following some tutorials, that's right, there are many of them, videos and written ones too. I'm not sure about your post intentions, but if you are looking for other ones, then:
There is a good written tutorial by jerm138 here on Subsim.com http://ricojansen.nl/downloads/Sonar_Tracking.pdf The words '4-bearing' don't appear in this tutorial, but it's about it anyway I think because your sub will be moving in the last step in order to 'triangulate' the target's position. It's definitly a hydrophone tracking method. Also there are the Stoianm video series about the 4-bearing method (4 videos; part1-part4). The method is indeed so simple, and that's why when comparing it to the tutorials mentioned, then looking at your pictures above seem to me a totally different method...but everyone should use his own style of course. Thanks to share! Last edited by XenonSurf; 08-11-18 at 04:57 PM. |
|
|
|
|
08-11-18, 06:44 PM
|
#3 |
|
Swabbie
Join Date: Mar 2006
Location: Saskatoon, Saskatchewan, Canada
Posts: 11
Downloads: 49
Uploads: 0
|
Part of the issue with jerm138's excellent tutorial is that while it discusses the theory of the 4 bearing method from a continually moving sub being essentially the same as for a stationary sub, there is not a lot of detail about how to actually do it. Stoianm's videos, and the others I have found, only really deal with how to do the stationary 4-bearing method. And I know I used to routinely get target info while moving!
Basically I did this up to give myself a reference while playing, and I thought I'd put it up here so that others more knowledgeable than I could pick it apart, basically, and if not, then someone could use it!
__________________
Cede Nullis |
|
|
|
|
08-11-18, 07:38 PM
|
#4 |
|
Sea Lord
Join Date: Apr 2008
Location: Germany, Italy
Posts: 1,703
Downloads: 107
Uploads: 4
|
There are surely geometry methods only to be used if your sub is moving, but these must be - necessarily - more complex, time-intensive and prone to errors than the simple method when your sub is NOT moving. Also by moving you just may get further away from your target, surely not to your advantage... That is likely the reason why so many tutorials consider 3-bearings when standing still and the last 4th bearing after you have moved to triangulate your solution exactly.
Personally, I'm never using a complete hydrophone method, it's just easier to combine it with periscope handling for the final approach and final course to take in order for my torps to hit 90°. When seeing target with periscope, I'm calculating the final bearing to target for the moment to fire at 0-10 angle off. Now, yes, you can do a pure hydrophone solution like shown in the videos, but he... Did a real skipper do this? I highly doubt: Torpedos were not a thing to waste and danger to be detected (for nothing but a miss) by escorts is too high with such a method - your early torpedos don't run deep but near the surface with a bubble trail, if deep you won't know immediately if you are detected or not -, a bad risk-reward situation IMO. When at periscope depth I won't lose the option to make a surface escape if escorts are heading in the wrong direction, that's also an important factor, for that I need to use the scope, so why using a pure hydro approach? you have to forsee what happens AFTER you fire and hit the target (or do not hit)... Then, how do you identify the target with a pure hydrophone method ?? But of course: as an isolated own problem, it's good to know what would be the perfect hydro approach, Wissen ist Macht... Last edited by XenonSurf; 08-11-18 at 08:30 PM. |
|
|
|
 |
|
|


 Linear Mode

