Ocean Warrior 
Join Date: Dec 2007
Location: Between test depth and periscope depth
Posts: 3,021
Downloads: 175
Uploads: 16
|
 Part 3: Adding an AA Gun Mount
The third part of this tutorial will focus on adding AA guns to our boat. Since this is very similar to adding deck guns to our boat I'll be quote the first part of this tutorial frequently and making appropriate changes. Again the Ohio has been choosen for this tutorial. For the AA guns we will be working with the Conning Tower files which can be found under the Objects folder.
Quote:
Now what we want to do is open up the .dat file using S3D. Open up the main node for our unit. Now right click that node and highlight "Append New Child Chunk", then select Nodes and then Node. This should insert a new Node at the end of the other nodes. Just like the previous step select this node, right click and highlight "Append New Child Chunk", then add a Label. So your new node with its label should look like this:
XXX:Node- <New Label>XXX:<New Label>
XXX= the number for those entries.
Now we want to name our new node. To do this select our label sub-entry. On the right side you should get a text box that you can type in. Currently <New Label> is in that box. Enter "slot_A01_NSS_Tambor_Tower_01" into that box. Remember how we added the new node to the unit in the beginning? Now we have to do that again in the node you just created. This time enter "cfg#A01_NSS_Tambor_Tower_01" into the our new <New Label> box. Let's break this down so you understand what you are entering.
cfg#A01_NSS_Tambor_Tower_01
A= Anti Aircraft
Variants of this are:
M=Main Armament
S= Secondary Armament
01=Mount Number
NSS_Tambor_Tower_01=Unit Name
Armed with that knowledge you can now change the label to suit your needs. Should look like this:
Playable Unit
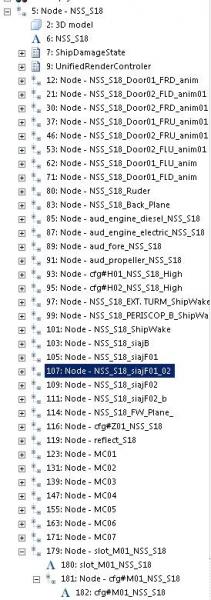
Now we want to position the node where we want our gun at. Select the first node we created and use this menu to position it.

A red dot in the model preview represents where you node is at at that moment. Once you get your node positioned where you want save it. That's it for the .dat file.
Next is the sim file so go ahead and open that up. First thing you want to do here is right click and "Append New Chunk," select the Controllers then the Controller option. Select this new entry and a text box will show up on the right. Enter obj_Turret in that field. Now right click on our new entry and select "Append New Child Chunk", Properties, SH4, SHSim, obj_Turret. So we should now have the following:
XXX: obj_TurretXXX: obj_Turret
Now select the sub-entry and a menu appears on the right. What we are interested in in this menu is Traverse and Elevation. Under each are the tree things we are primarily interested in; min, max, and speed. For traverse min is how far left the mount can rotate, and max is how far right. Speed is the speed the mount rotates in º/sec. The same settings for Elevation should be self explanatory. That does it for the sim file!
Next we open the units UPC file found in the UPCData/UPCUnitsData folder. Our first stop here is the compartments listing. We want to add a new compartment to our unit. For Ohio I added this compartment:
Quote:
[UnitPart 1.Compartment 2]
CompartmentType= 2
StatusActive= No
ID= OhioConnAA
NameDisplayable= AA Guns
Type=NULL
FunctionalType= FlakRoom
MechanicalCoef= 0.2
ElectricsCoef= 0
GunsCoef= 0.5 ;0..1
WatchmanCoef= 0.5
WatchStandingCoef= 0.048
MaintenanceCoef= 0.0144
RepairsCoef= 0.072
ReloadingweaponCoef= 0.072
SleepCoef= -0.12
LeadersSlots=0
CrewMembersSlots= 0
EffciencyDenominator=1
EffciencyDenominatorBS=1
Hitpoints=200
CrewExposure=0.3
EquipmentsExposure=0.1
WeaponsExposure=0.1
ExternalDamageZoneTypeID3D= 44
DamageDescription1= NULL, 0, 0.2, 0, 1, 1, Minor damage, 0, 0, NULL, 0, 0.2, 0.2
DamageDescription2= NULL, 0.2, 0.6, 0, 1, 1, Medium damage, 0, 0, NULL, 0, 0.2, 0.5
DamageDescription3= NULL, 0.6, 1, 0, 1, 1, Heavy damage, 0, 0, NULL, 0, 0.2, 1
|
I added this as the last compartment. Something to make sure you change is the compartment number. If the previous compartment is compartment 7 obviously name this new one compartment 8. The next thing we need to add now is crew slots for our new compartment.You will want to add this at the end of all the other crew member slots in the file just before the equipment and weapons slots start. Again this is what I added for Ohio:
Quote:
; ******** FLAK *********
[UnitPart 1.Compartment 2.CrewMemberSlot 1]
ID=CrewMemberSlot_FlakC1
NameDisplayable= AA Gun Crew
Type= Crewman
WatchIndex= 0
IDLinkCrewMember= NR
WatchCrewMemberSlot3D= WM1@slot_A01
BattleStationsCrewMemberSlot3D= WM1@slot_A01
WatchAccessoriesForAdding3DObjects= NULL
WatchAccessoriesForSubtracting3DObjects= NULL
BattleAccessoriesForAdding3DObjects= NULL
BattleAccessoriesForSubtracting3DObjects= NULL
|
Make sure the compartment number for your crew slots matches the compartment number you entered earlier. Next step is adding the weapon slots slots. Just like the crew slots add this after all the other equipment and weapons slots but before the Upgrade Slots.
Quote:
;------------------------------------------------------------
; FLAK GUNS
;------------------------------------------------------------
[UnitPart 1.Compartment 2.WeaponSlot 1]
ID= CTBackAA
NameDisplayable= AA Mount
Type=NULL
AcceptedTypes= NULL
UserCustomizable=No
IDLinkBunker= GunsAmmoBunker
IDLinkWeaponIntervalDefault1= NULL, NULL, NULL, NULL
ExternalNodeName3D= A01
ExternalObjectName3D= NULL
ExternalDamageZoneTypeID3D= -1
|
Now we add an entry under UpgradePackSlot.
Quote:
;************************************************* ***********
;
; UpgradePackSlot
;
;************************************************* ***********
[UnitPart 1.UpgradePackSlot 1]
ID= UpgAAGun
NameDisplayable= Anti-Aircraft Gun
Type=NULL
AcceptedTypes=USLightAA
UserCustomizable=Yes
IDLinkUpgradePackSlots= CTBackAA
IDLinkUpgradePackSlotsIntervalDefault1= NULL, NULL, Upack20mmSingle
|
One last thing to enter to make our new mount work in-game and that's under FunctionalSubsystem. Like before this goes at the end of that section.
Quote:
[UserPlayerUnit 1.FunctionalSubsystem 25]
ID= CrewFlak
NameDisplayable= AA Gun Crew
FunctionalType= CrewMembersGrouping
IDLinkFunctionalSubsystemSlots= CrewMemberSlot_FlakC1, 0
|
Note that the colored entries must match each other, yellow for yellow, red for red, etc. This gives you the basics you need to add a AA gun mount to a playable unit.
|
If you want to change the default weapon, say you wanted a quad 40mm, the steps are exactly the same as they are in part 2 of the tutorial. Also, if you want to add more than one mount you need to repeat the steps of this tutorial for each mount.
__________________

USS Kentucky SSBN 737 (G)
Comms Div 2003-2006
Qualified 19 November 03
Yes I was really on a submarine.
Last edited by ETR3(SS); 02-26-10 at 08:45 PM.
Reason: posted part 3
|