Slightly OT for Jim's thread but last month I treated myself to a new whip.

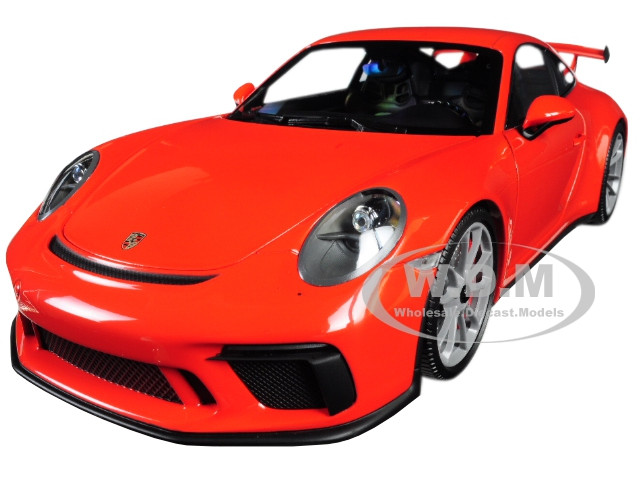
Its a 1/18th scale 2017 Porsche 911 GT3 in Lava Orange, or as I call it Jagermeister Orange from AutoArt.

Note that this example is made from diecast and not resin. If its supposed to open and close, it mostly does. Mine arrived with some small hassles (its from AutoArt) which I was able to deal with. The door for the gas cap had way too much paint which required some careful re-scribing, polishing, and buffing. I also added some detail to the door by thinning down some dark brown paint and flowing it into the gas door panel lines. The wheels were sold as "silver" but are actually more like a primer gray (this would be correct for a real car equipped with ceramic brake pads but I don't like ceramic brakes).
Having a choice for the wheels turned into a bit of a headache (chrome, chrome and gold, gun metal, steel, what???) and after a couple of days I settled on painting the wheels in steel with a slightly brite-er aluminium inner cap while keeping the black hub. Its subtle and it looks good.

The AutoArt diecast (probably the same for Minichamps) came with a Rube Goldberg-esque spring and plunger to open the boot in front. This was quickly dealt with after removing all of the screws and separating the floor pan from the body. The plunger went back into the box and now I can just slide a toothpick or small plastic dowel into the plunger's hole if I want to open the boot. BTW, door and panel lines on this 'cast are VERY tight and look correct for this scale.
Where the engine cover meets the rear panels, it can look slightly "gappy" but this is correct for the real car.
Since I already had everything un-assembled, I did some quick paint work in the engine compartment.
Since opening the engine cover will only show you the factory installed "shelf", detail painting is limited to the bottom of the car. I left the actual engine alone and painted the exhaust in "titanium gold" followed up with dark brown panel liner. The exhaust tips were painted "NATO Black" to give a slightly "run in" look.
Do some checking on YT and you'll find vids of the real car, factory exhaust, and "tuner" exhausts to give you ideas. With the engine deck cover, you could go crazy with some carbon fiber decals but note this model is a GT3 and not a GT3R or RS. Black plastic is what the factory uses.
Going crazy on the brake rotors and calipers is not a waste of time. A little effort in this area pays off due to the wheel design. I kept the calipers red and used a pin vise to drill into the holes in the rotors slightly, just enough to expose the black plastic of the part. The rotors now look more convincing without having to invest a lot of time.
The interior is mostly good as it is. Note again that this is a model of a GT3 and NOT a GT3R. If too much of everything looks about right, go for the GT3R model, instead. Steering wheel alignment is about as close as it gets with the wheels straight. One thing that's missing on the GT3 are lap and shoulder belts, not a deal breaker but I found an e-tail-er in Italy who sells shoulder belts, decals, and photo etch for 1/18th scale.

Maybe black belts or red Sabelt belts are in the future along with a "CH" nationality logo for the rear deck and a printed licence plate and vanity frame?

Oh, if anyone's interested, I can post a tutorial on how to make modern licence plates in scale using a printer, photo-grade paper, clear shipping tape, and a basic graphics program.

About the paint, I really like this color and the photo makes it look too orange. The real color is slightly more pastel, kind of like somewhere between bright orange and "cremesickle" orange. Whatever it is, it just looks right on a 911.
Let's see.. The only other complaint was the rear wing, which pinged off while I was unscrewing the model from its shipping foam. No big deal, really. I wanted to polish and wax ( I actually use a high gloss detailing spray on my die cast cars unless the paint is screwy) the painted surfaces anyway. So, after getting the painted surfaces done, I cleaned off the old glue residue and used some small drops of "clear parts glue" (acrylic) to re-attach the wing.
I've found that acrylic glue works better than CA or epoxy. Its better to have the glue joint fail before the end plates or detail parts break off and acrylic glue is strong enough to survive 99% of handling accidents.