Because the autopilot and trimmer are closely tied together, a bit on the trimmer and how the 2 relate first.
A trimmer sets control-surfaces to a user specified setting. For example, if you trim the rudder in a direction, it will stay like that until you change it. In the real KA-50, the trimmer "locks" the controls in place, and the same thing should happen if you have a force-feedback joystick. In the game, without force-feedback stick, it will remember your input, and use it as the new center-position for your controls.
Note that there's an option in the options menu that lets you change the behavior. Normally, as soon as the trimmer is released, any input at that moment is added to the new center-position, so if you have the stick pushed forward when releasing the trimmer, the nose will suddenly dip further until you center the controls.
The alternative method disables input until you center the controls, preventing the dip. But you might be turning the helo with trimmer down and accidentally release it for a moment; controls don't respond because you need to center first before making new inputs. Something to watch for, decide for yourself which method suits you best.
To use the trimmer,
press and hold it down, then maneuver the chopper to your new course and attitude, and release the trimmer. The autopilot will use whatever control-authority it has (about 15-20% from max input) to
hold current pitch, bank and
heading. That means that if you trim the helo flying North and then try to change direction without trimmer, you first have to override that 15-20% input the AP will use to counter you, and you'll end up fighting (quite literally) the helo. And even if you manage to steer your new course, the AP will happily steer you back to the previous one as soon as you ease up on the controls.
Besides the 3 hold-channels, the AP has some other modes and functions, 2 of which can be seen near the 3 primary ones:
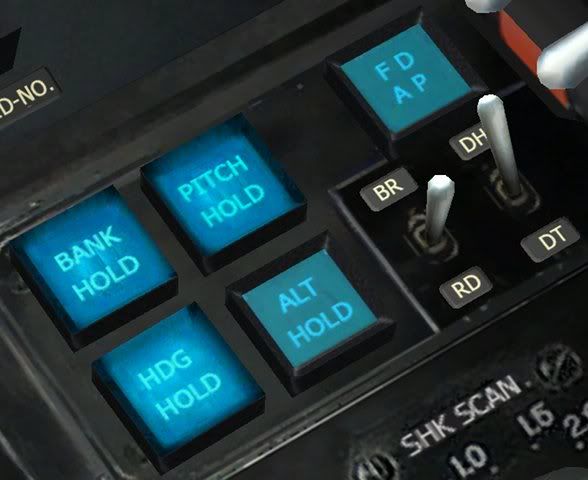
"ALT HOLD" engages the AP altitude hold channel. As with the other channels, it has only limited control, so if, say, 30% more collective is required to hold altitude, the AP will not be able to do so and you will lose altitude. So the best way to use this, and the other channels, is trim the helo to what you want it to hold. In this case, manually get your vertical speed to (near) 0 before engaging it. That way the AP has sufficient authority to make the necessary adjustments.
Note that any change in attitude requires re-trimming (preferably, have the trimmer held down when making these changes, as stated before).
Note also that this particular channel has an extra control interacting with it: the "collective brake". In the real KA-50, this needs to be pulled before you can make changes to the collective, to avoid dropping out of the sky after accidentally bumping it. It also has an "assign altitude" function, which is modeled in the game, and functions much like the trimmer.
Let's say you're in a hover, hover-mode and altitude-hold both engaged. To change altitude, press and hold the brake, increase or decrease the collective, level off at desired altitude (near 0 vert. speed) and release the brake. The new altitude will be sent to the AP and it will hold there (basically the brake acts as the trimmer for the altitude channel).
(alternatively, turn off alt hold, change altitude, level off and re-engage)
The first switch below the "FD AP" button is related as well: "BR" (up) tells it to use barometric pressure altitude, which is basically your altitude above sea-level. "RD" (down) tells it to use the radar-altimeter, which always gives you height above ground. The middle position sets this to auto (see just below).
The radar-altimeter functions to 300m above ground-level, after which it no longer gives a reading. If you have the altitude-hold channel active and set to radar-alti, the channel will essentially fail to function correctly because it is not receiving any altitude information. To get around this, leave the switch in the default auto position: radar will be used below 300m, and it will switch to baro-alti above that.
You may have realized that you can use the radar-altimeter and altitude-hold to get the helo to follow terrain automatically, but
please remember that the AP has only limited input. It really can't manage with quick changes in height above ground, especially at speed. Be careful.
The "FD AP" turns on flight-director mode. You will see a change in the HUD, with 2 small horizontal bars popping up either side of the attitude indicator. It represents the currently trimmed pitch and bank.
It's function is this: in flight-director mode, the 3 main channels get different behavior. They no longer
hold, but
dampen, and in the case of heading-hold it is no longer functional at all. What it allows is a fair degree of free control without trimming for every little change. You can still use the trimmer to minimize the needed input, but the AP will not actively fight you when you try to deviate from it. On the flip-side, you now have to make corrections regularly to counter small changes in pitch and bank.
Personally I prefer this when going into combat; I don't have to worry about constantly holding down the trimmer to maneuver.
Note that since hold-behavior is changed to dampen, hover-hold will not work as well either.
Told you this thing was complex, didn't I?

Route-mode:
Route-mode works in combination with the PVI. It automatically flies the helo to the waypoint or targetpoint you brought up on it's display, while holding desired speed.
You can set whether you want to simply fly towards the waypoint (heading), or fly the exact line between 2 waypoints, or between a waypoint and a targetpoint (track). You control this with the 2nd switch below the "FD AP" button. "DH" (up;
desired
heading) position tells it to just steer the heading, "DT" (down;
desired
track) position tells it to follow the exact track.
Note that the AP will try to maintain your desired speed: if you want to cruise at 180kph, accelerate/decelerate to that speed, trim the helo to maintain that speed and engage route-mode. Changes can be made with the mode active by holding the trimmer, changing speed, leveling off to maintain that speed and releasing again (again, the AP has limited input available, so if the speed is different than desired, the helo is probably not trimmed close enough to the desired attitude. Also realize that any change in collective affects attitude as well; yes, more trimming).
Combine this with altitude hold for a nice, hands-off, perfectly level flight.
Hover-mode:
In hover mode, the AP tries to hold the helo at the same position and height, so as a result of enabling this,
altitude-hold channel is automatically engaged as well. To use this properly, trim the helo for a hover first; reduce speed to near 0 and trim so it almost hovers on its own. Engage hover-mode and it will make the necessary adjustments to hold the helo in place without any further input.
It has a minimum altitude, which I think is 15m (more like 10m or 5m, but try to keep a margin for safety). Do
NOT engage this mode below that altitude. Please don't try to land by descending from this hover; it will disengage at some point before touching the ground, leading to a failed landing if you're not prepared to deal with the suddenly needed corrections.
In the HUD, you'll see a small circle pop up, with a small square in the middle. Imagine looking at the helo from the outside, from above. The small square is the point on the ground you want to hover above, and the circle represents the rotordisk. If you drift forward, you'll see the square drifting down in the HUD (to the rear of the helo in this imaginative top-down view). The AP will always try to steer back to this point, centering the square in the circle (getting the center of the rotordisc exactly above the desired point). If the deviation becomes to big, the AP will pick a new point directly below the helo (you'll see a new square pop up in the HUD, centered to the circle, if the previous one drifts off to far).
If the helo has trouble staying on the spot, keep the trimmer pressed and refine your manual hover, then release to give the AP another shot at it.
Vertical descent:
It's an automated way of descending while in hover-hold mode. Press and hold the key to make a smooth descent at up to 2m/s. Once released, new altitude is sent to AP and it will hold that. It's useful because it has a limited rate of descent, avoiding any vortex accidents.
Should it not descent, or barely, you probably have the collective "trimmed" to high, so the AP can not give enough input to make the descent.
Think that's it... god, I
hope that's it.
